
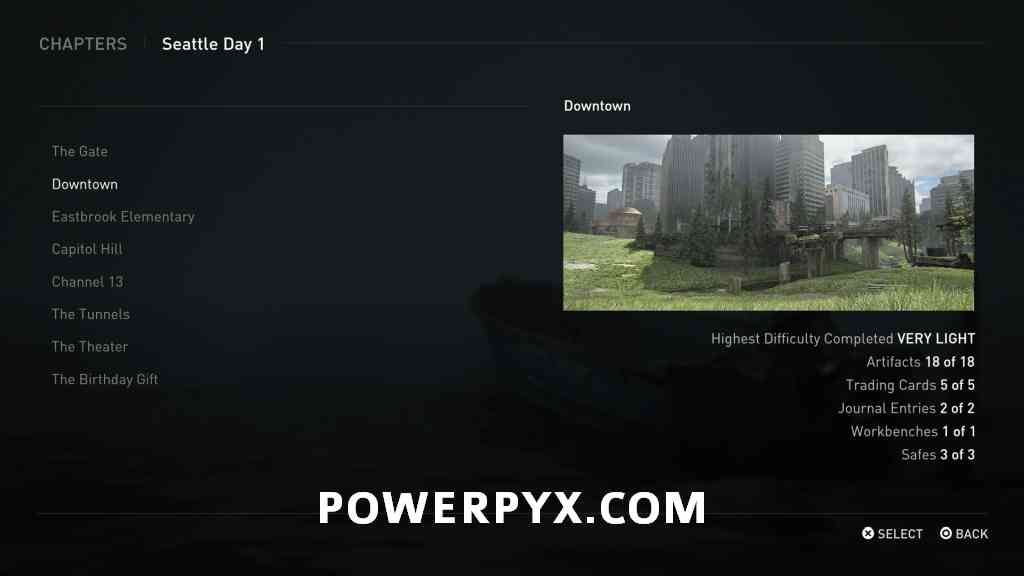
Chapter 9: Downtown (Seattle Day 1) contains 33 Collectible Locations in The Last of Us 2 (TLOU2). This walkthrough will guide you to all collectibles in Downtown Chapter in chronological order. Everything that’s needed for trophies and 100% completion is included: Artifacts, Journal Entries, Trading Cards, Coins, Safes, Training Manuals, Workbenches, Weapons, Supplements (Player Upgrades), Parts (Weapon Upgrades).
If you forget a Collectible you can still get it via Chapter Select, so nothing is missable.
- Artifacts: 18
- Trading Cards: 5
- Journal Entries: 2
- Workbenches: 1
- Safes: 3
- Training Manuals: 1
- Weapons: 2
- Gun Holsters: 1
Video Guide

Artifact #1: FEDRA Census Document
After spotting Serevena Hotel you will automatically dismount the horse. On the left is a small guard post, in its drawer is the document.
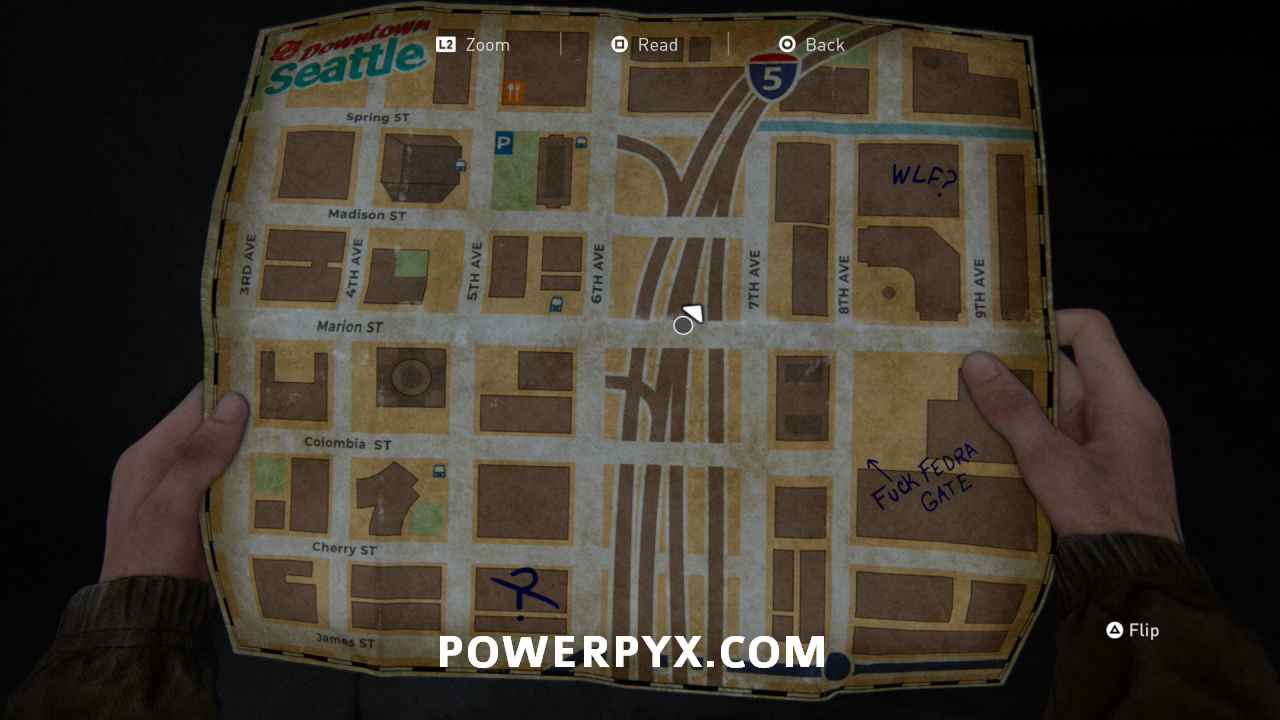
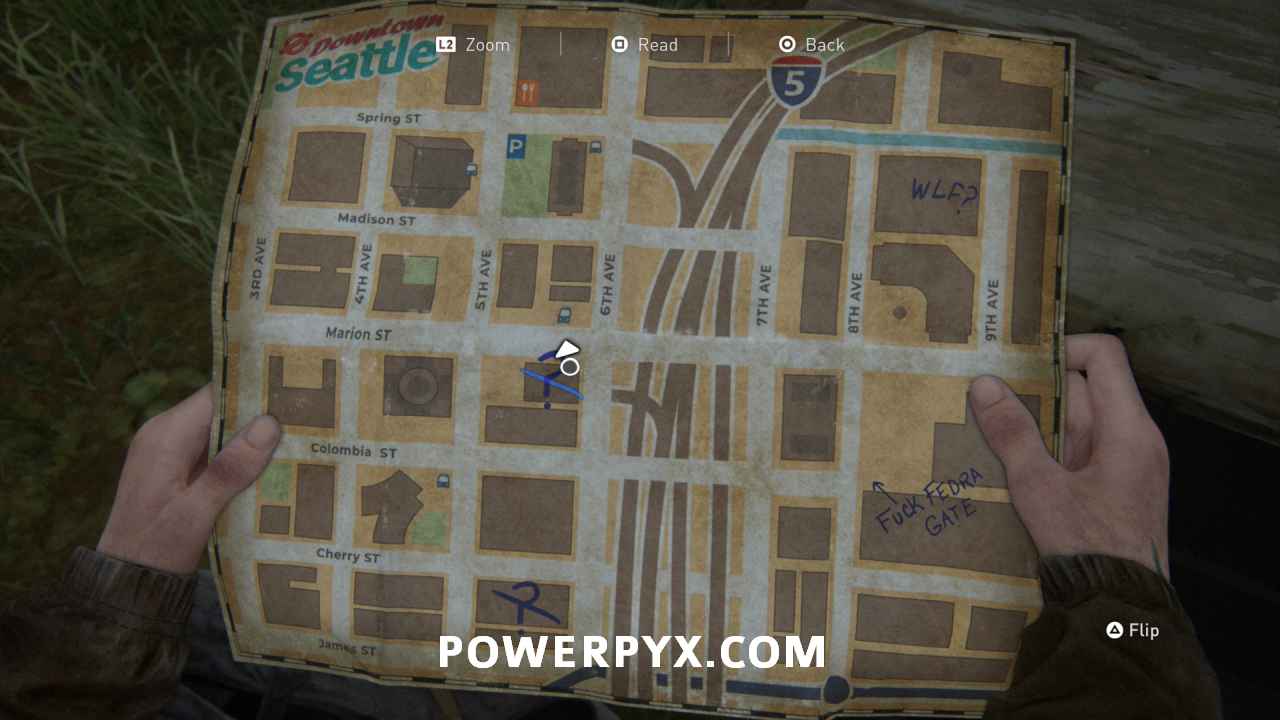
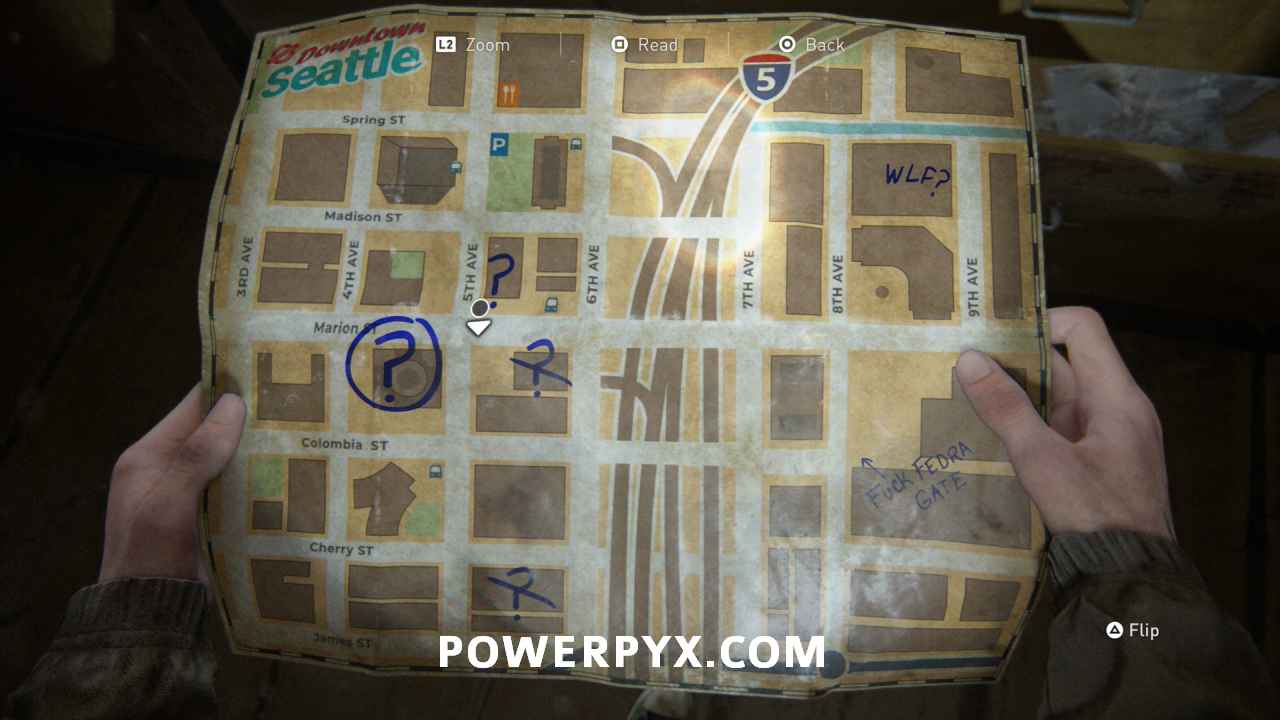
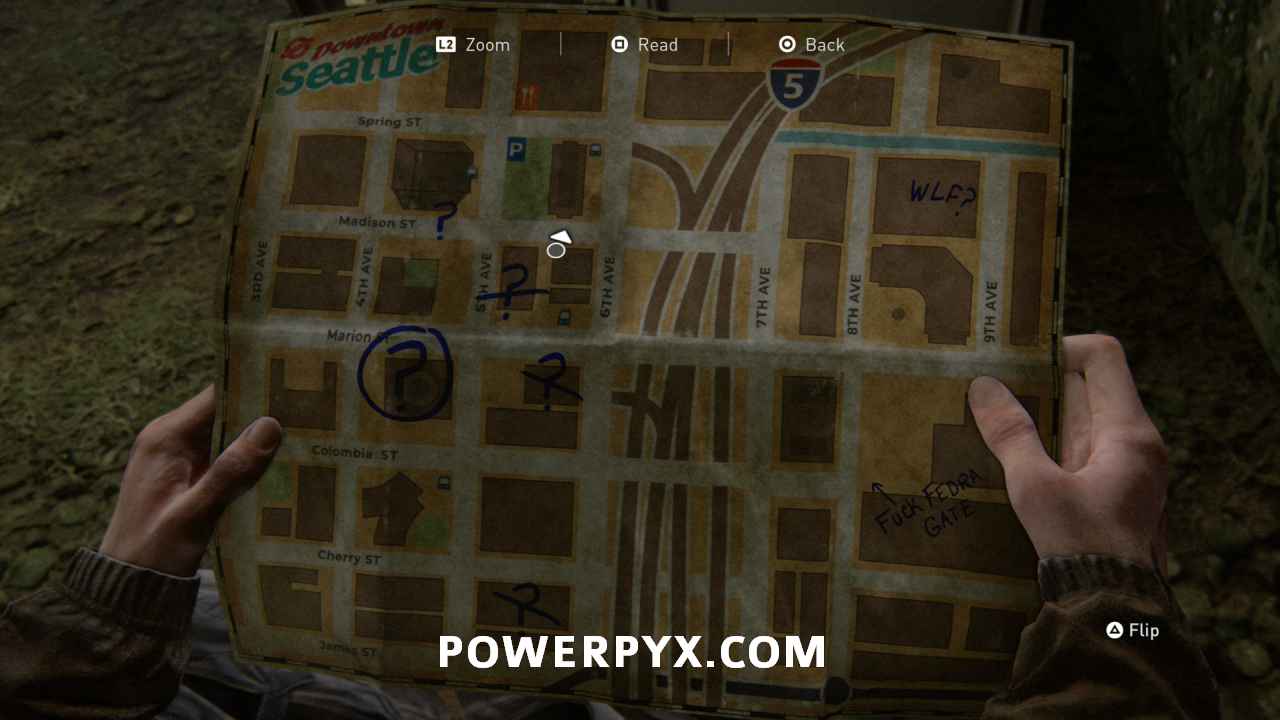
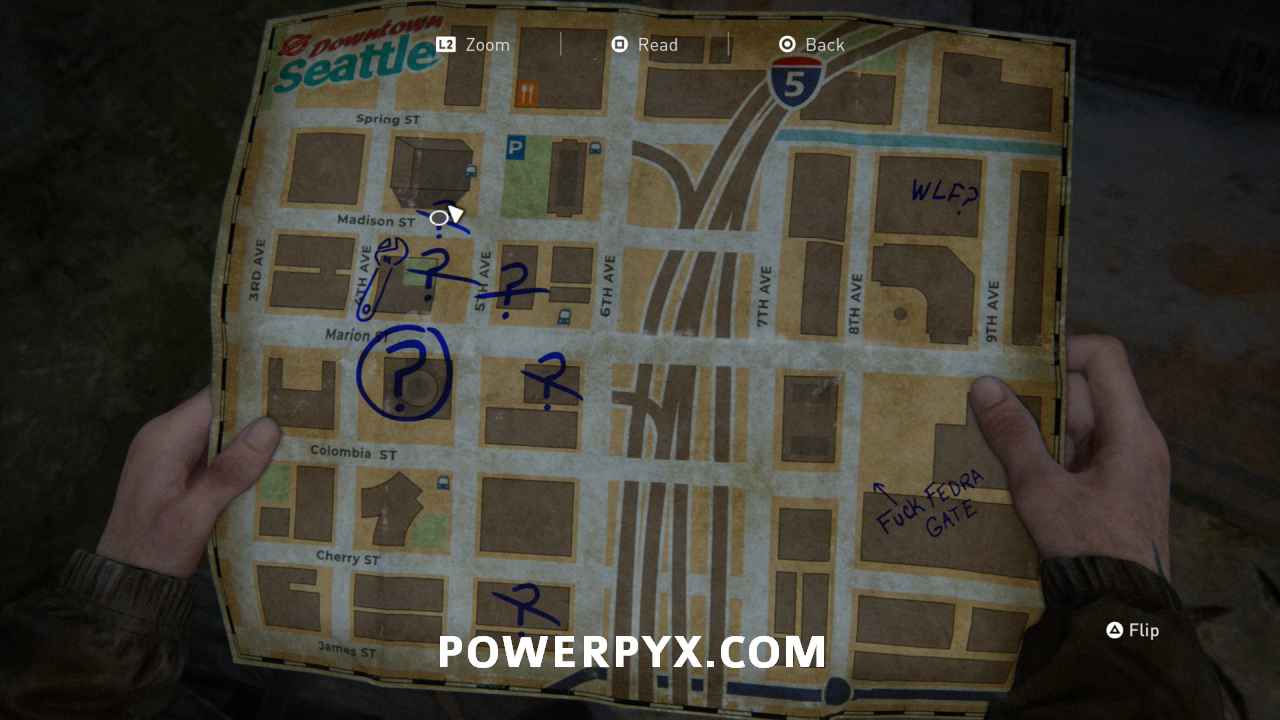
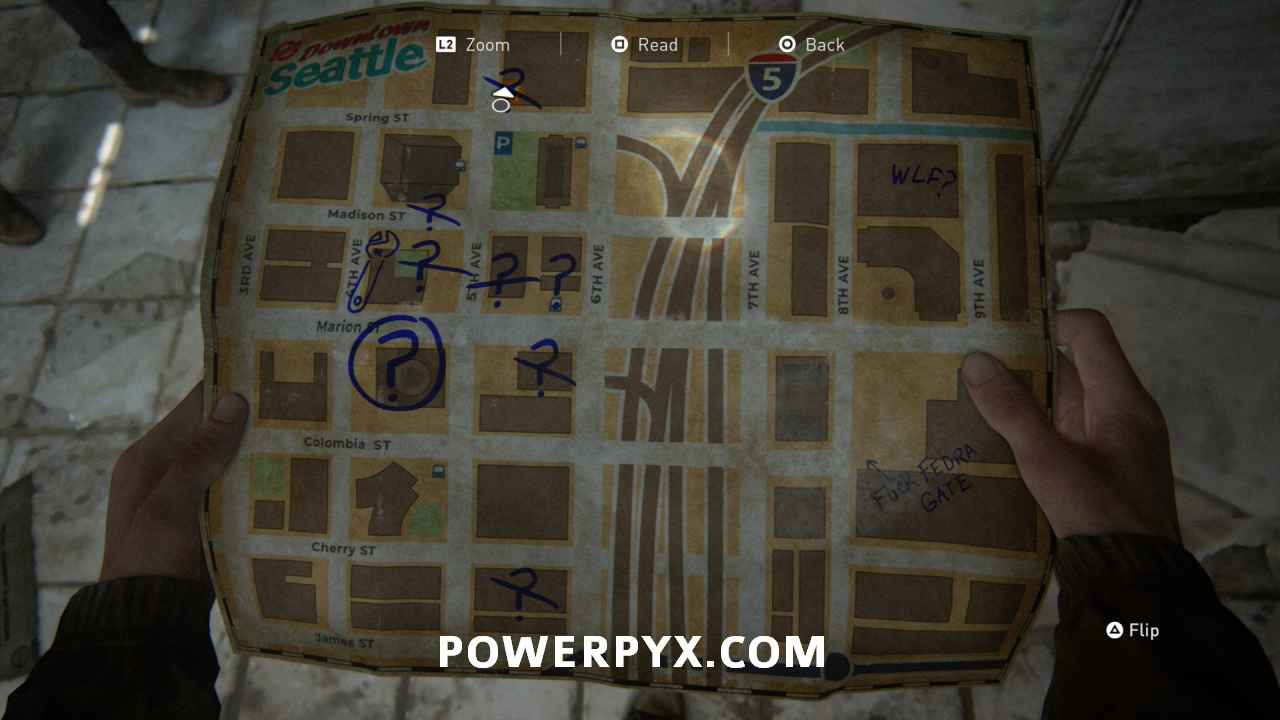
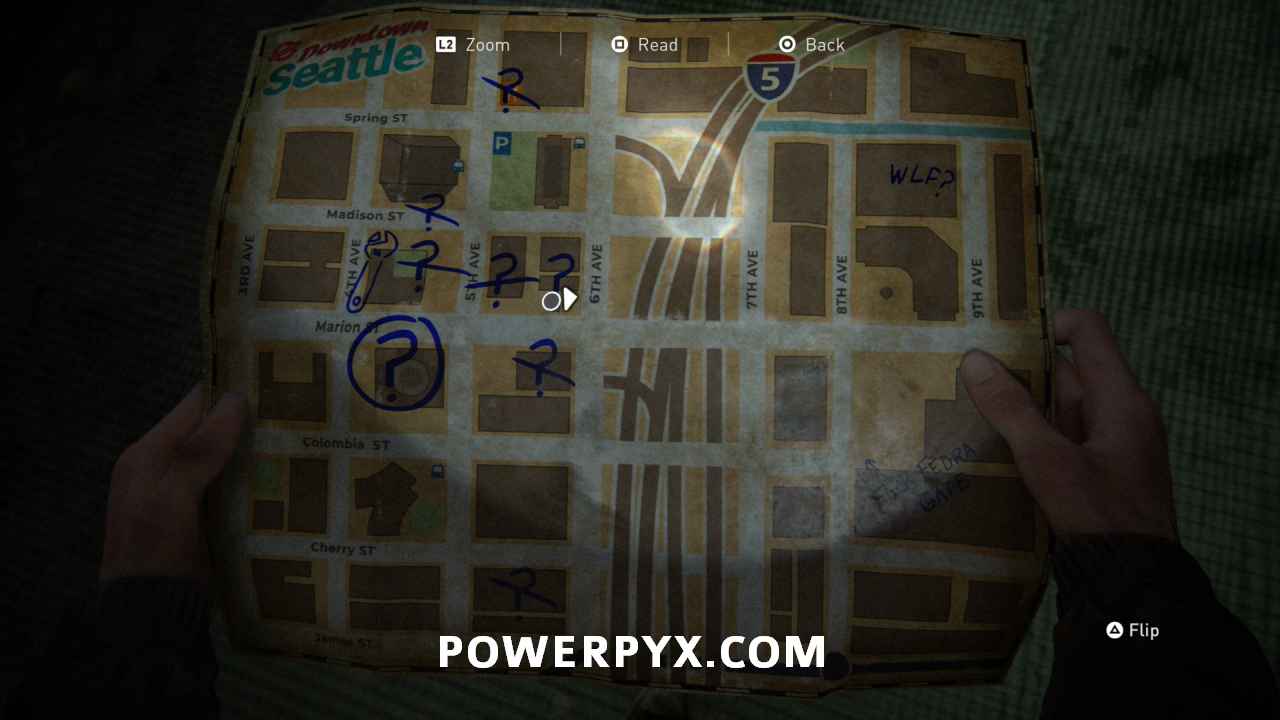
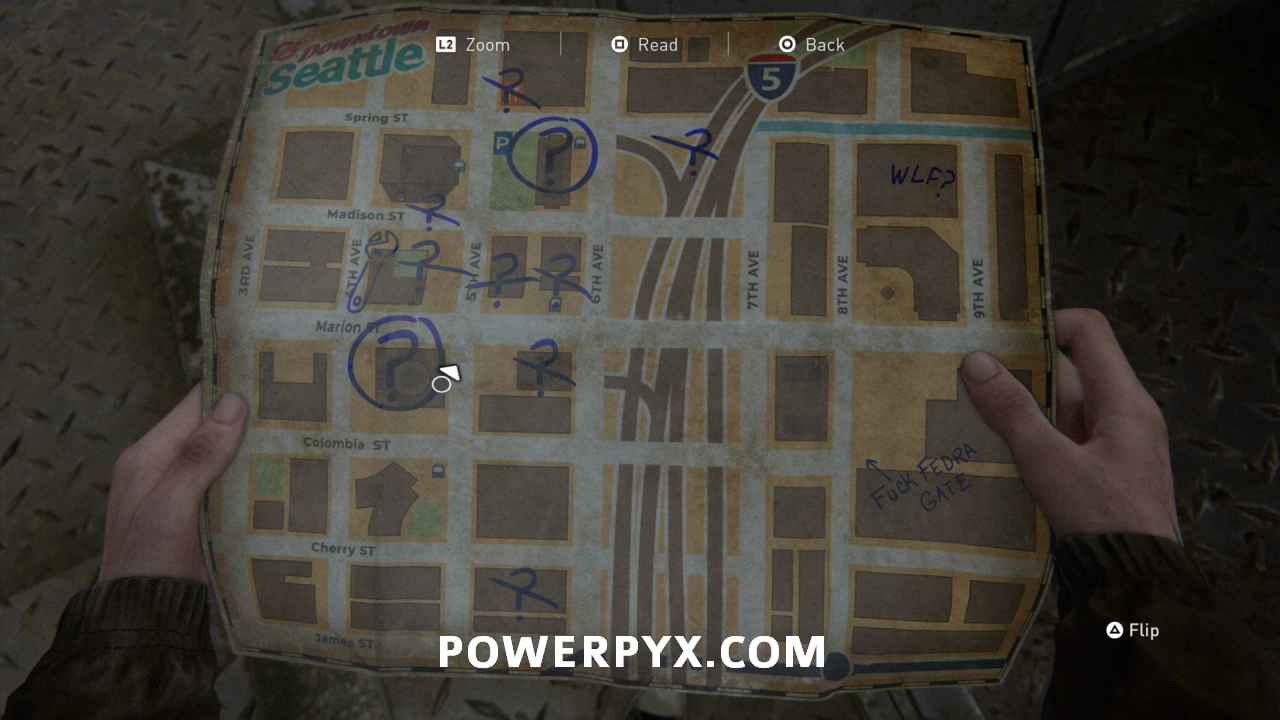
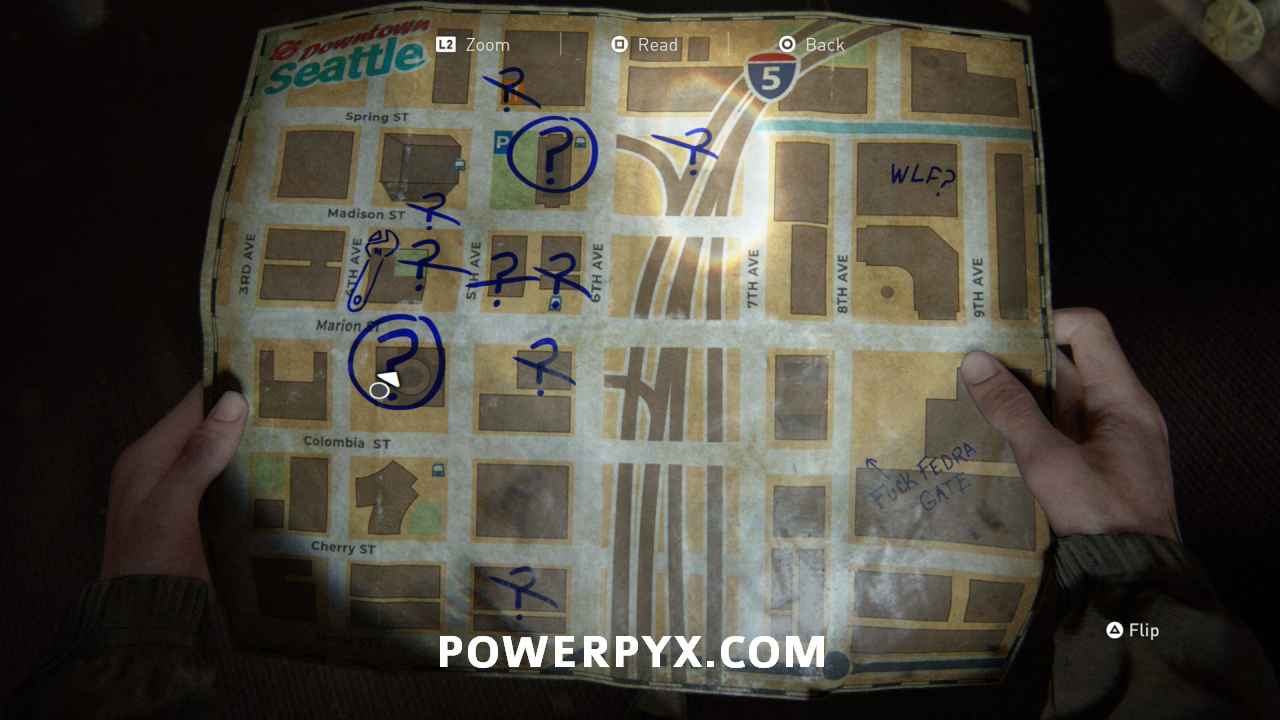
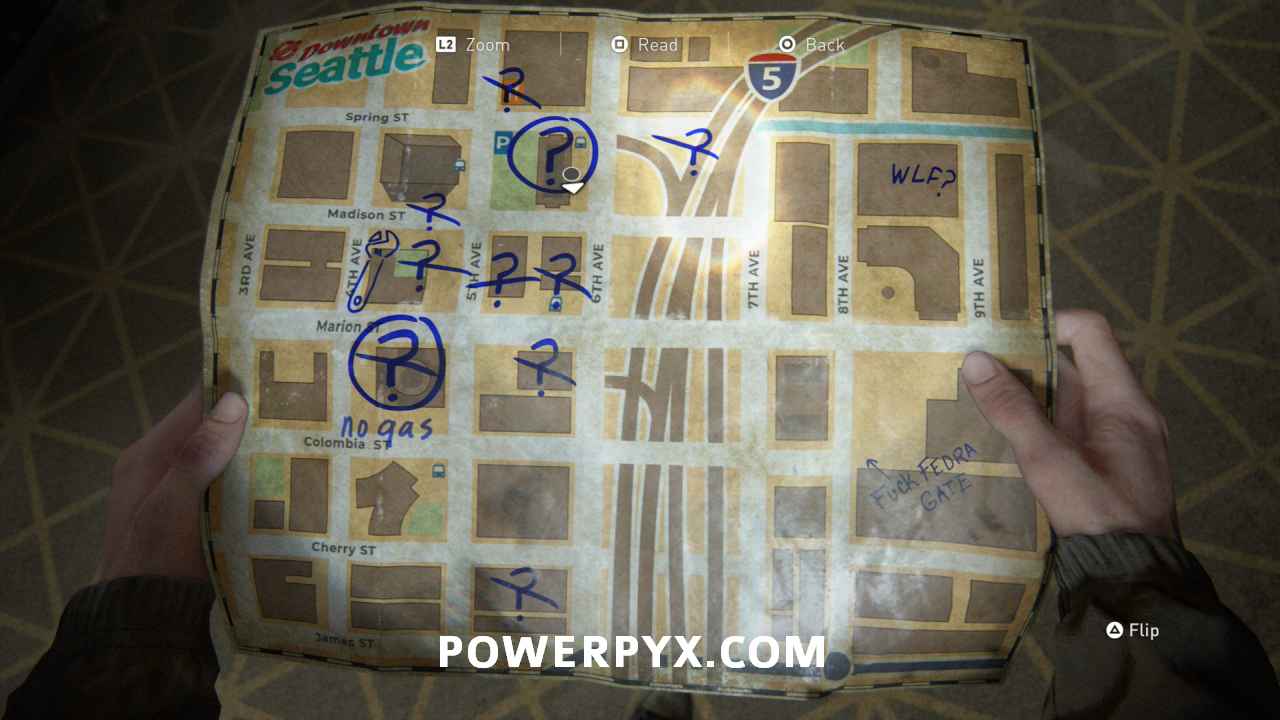
*The next area of the chapter is a big open world section. Use your map by pressing Touchpad  to find your way around. We’ll start left of the broken highway roads on the map, in the bottom row of buildings (southernmost row on map). From there we’ll work our way up north.
Artifact #2: Bank Heist Plans
Rightmost building between James ST & Cherry ST (Westlake Bank). Enter the building and after defeating the Infected and Clickers inside, check the dark side room for a note inside a satchel. It reveals the vault code 60-23-06.

Safe (60-23-06)
Open the bank vault, next to the last artifact. Code is 60-23-06.
Weapon: Shotgun
Inside the bank vault.
Artifact #3: Bank Robber Letter
Inside the bank vault, on table.
Artifact #4: Antique Ring
Inside the bank vault, in a drawer in right-side corner. Also unlocks the  trophy “So Great and Small”.
Artifact #5: Cache Hunter Note
Exit the bank building. From its exit, look north to see a canopy. There is a note (on map it’s the brown square north of bank building).

Artifact #6: Letter from Isaac
One block to the left from the last location (the middle block between Cherry ST & Colombia ST). A military tank is parked there, left of it is a corpse with a collectable document.

Training Manual #1: Crafting Training Manual
Head north to the broken highway bridge between 6th Ave & 7th Ave. There’s a firetruck on the bridge. Climb the parked military truck next to the bridge, from its roof you can jump to the firetruck. Pick up the fire hose  and throw it down the bridge
  +
+  to a highway segment with a rolled over truck. Climb down the hose
  and swing off it to the rolled over truck, in it is the first training manual in the game. These unlock new skill trees for you on which you can spend Supplements (press Touchpad to open your backpack and
  scroll to the skill trees). Alternatively, this can also spawn in the basement of the Courthouse if you go there first.
Note: If you have the Pre-Order DLC that gives you a bonus Manual, it won’t spawn here. If you pre-ordered the game digitally or bought it physical and redeemed the pre-order bonus, check your backpack (Touchpad). A Training Manual should already be in there. This won’t affect trophies or anything, it simply means you got the Manual automatically and can skip it here. Players who have the Pre-Order Bonus will instead find a 2nd Manual spawn in the hotel at the end of the chapter (upstairs bedroom), which won’t be there for other players (it will be mentioned here in the guide when we get to it).
Supplements x10 + Parts x16
In same vehicle as Training Manual.
Trading Card #1: Doctor Uckmann
Third block from the left between Colombia ST & Marion ST (Ruins). Found at the top of the ruins together with 18 Supplements and 7 Upgrade Parts. Walk upstairs, smash window straight ahead, step on balcony behind window, jump to next balcony on right, go further upstairs to reach the top.
Supplements x18 + Parts x7
Exact same location as above.
Trading Card #2: Das Wort
Building between 5th Ave & 6th Ave (Valiant Music Shop). Check the drawer behind cash register.
Parts x13
Same building as above (Valiant Music Shop), smash the glass cabinets upstairs.
Artifact #7: WLF Community Supply Chest Note
3rd Block from the left on Madison ST, there are some stairs you can go up to find a note by a corpse (north of Valiant Music Shop, south of Court House).
Supplements x1
Same as above, in crate next to artifact.
Artifact #8: Street Drawing
At the intersection between 5th Ave & Madison ST (street left of Valiant Music Shop). There’s a security checkpoint, climb up the ladder, find note in the drawer of one of the guard posts.

Journal Entry #1
Immediately after picking up the last artifact note, in the exact same guard post, a Journal prompt will show up (looking south towards the dome).
Workbench #1
2nd Block from left between Marion ST & Madison ST, in a military tent.

Parts x16
Same as above (on shelf next to workbench).
Safe (04-51)
2nd Block from left between Marion ST & Madison ST. While on Madison ST, there’s a gate you can push through, it’s actually the left (west) end of Madison ST where the road ends. There you find a safe (Code = 04-51). Also contains 17 Parts, 20 Supplements and Trading Card: Flo.
Trading Card #3: Flo
In the above safe.
Parts x17
In the above safe.
Supplements x20
In the above safe.
Artifact #9: WLF Safe House Supply Note
In northernmost building (Ruston Coffee Shop), north of Spring ST (2nd block from the left on map, top row). Smash the windows to enter the shop. A note is on the counter.
Trading Card #4: Big Blue
Same as above (Ruston Coffee), in drawer behind counter.
Artifact #10: Pet Store Key
Same as above (Ruston Coffee), in the restroom. Beware an Infected will attack when entering the restroom.
Parts x12 + Supplements x12
Same as above (scattered inside Ruston Coffee shop).
Parts x7
There are 7 Parts in the little guard house next to Ruston Coffee shop (outside).
Artifact #11: Join WLF Note
3rd Block from the left between Marion ST & Madison ST, building east of Valiant Music Store (Barkos Pet Store). Use the previously collected Artifact “Pet Store Key” to open the door in the back of the building. There’s a note on the printer. You also find 18 Supplements, 8 Parts, the Stun Bomb, and Gun Holster here (adds additional inventory slot to carry more firearms).
Supplements x18
Same as above (Barkos Pet Store).
Upgrade: Gun Holster
Same as above (Barkos Pet Store).
Weapon: Stun Bomb
Same as above (Barkos Pet Store).
Parts x8
Same as above (Barkos Pet Store).
Artifact #12: Note to Informant
Between 6th Ave & 7th Ave head to the very north where the water / river is coming from (little waterfall). There’s a truck parked in front of the waterfall, Ellie will mark it on her map as a location. Open the back of the truck to find a document and 12 Parts.

Parts x12
Same as above (in truck at waterfall).
Artifact #13: Emergency Protocols Memo
2nd Block from left between Colombia ST & Marion ST (Dome). Head to the Dome, one of the main objectives in the mission. Enter through the fence, then immediately turn right to climb up a ladder. On top are 2 guard posts, in the drawer of one is a document.
Parts x10
From the last collectible, continue into the dome (synagogue). There are 10 parts scattered around the ground floor inside the synagogue.
Parts x11
Still inside the dome (synagogue), after climbing up to the upper floor (before using rope to swing).
Artifact #14: Rabbi Sauders’ Letter
Inside the dome (synagogue). On upper floor, after using a rope to swing to a balcony (mandatory story part), check the rabbi’s office on the right, read the document from his desk.
Journal Entry #2
Same as above. After reading the previous document “Rabbi Sauders’ Letter”, Ellie will automatically add an entry to her Journal (no need to interact with anything else, just pick up the document).
Supplements x8
Same as above, on same desk as the letter.
Supplements x11
3rd Block from the left, between Madison ST & Spring ST (Courthouse). Climb up the ladder in the south of the Courthouse and enter through the window. There’s a Clicker walking in the same room where you enter. In the next room straight ahead (behind the Clicker) you find 11 Supplements on a table to the left.
Artifact #15: Plea to a Friend
Still in the same Courthouse. After fighting through the room with Clickers and Infected, you’ll head to the downstairs area of the Courthouse. At the end of the dark hallway under a “FEDRA” sign are corpses with a document collectible.
Artifact #16: Lt. Torres’ Final Memorandum
Directly left from the last artifact, smash in the window to the side office. Inside you find 3 collectibles (2 Artifacts, 1 Safe). Take the machete from the police corpse to make it drop an artifact.
Artifact #17: List of Known WLF Agitators
Same as above, interact with cabinet left of police corpse to find a document.
Safe (86-07-22)
Same as above, safe is where you smashed the office window. Code = 86-07-22 (shows the code on office whiteboard).
Parts x7 + Supplements x19
Inside the safe.
Parts x3
Same office, on floor.
Parts x8
Before you rappel down the elevator rope, turn around for 8 Parts in the dark corridor (same corridor where corpses with artifact were).
Parts x7
Once you got the fuel, backtrack to “FUCK FEDRA GATE”, use fuel to turn on power and go through the gate (Code = 5345). Advance to Serevena hotel where it says “WLF?” on your map. 7 Parts are on ground floor, in a drawer.
Parts x11
Same place as the last parts, ground floor of Serevena Hotel (Concierge room). Warning: all the remaining Collectibles in this Chapter are easily missable if you progress to the next cutscene by opening the last door upstairs on the right. It’s recommended to make a Manual Save now, so you can reload it just in case.
Supplements x18
Still in Serevena Hotel, upper floor, 1st bedroom, in bathroom sink.
(Training Manual: Stealth)
(Serevena Hotel, upper floor, on bedroom dresser there’s a potential Training Manual spawn. Many players have reported seeing it there but it wasn’t there for me. It’s believed to require the Pre-Order DLC which unlocks an extra Training Manual. In the video guide I will pick it up in Chapter 11. Just like other Training Manuals it has multiple spawns and there are more than you need. So don’t worry if you missed it or don’t get it to spawn here, we’ll grab it in Chapter 11).
Artifact #18: WLF Recruiter Journal
Still in Serevena Hotel, upper floor, 2nd bedroom, drawer under TV.

Trading Card #5: Know It All
From the artifact turn around and loot the nightstand in bedroom. This is the last collectible in Downtown Seattle, the biggest chapter in TLOU2.
That’s 100% of the collectibles you can find in Chapter 9: Downtown in The Last of Us Part II.
For more Collectible Guides, check out the complete The Last of Us 2 Collectibles Guide.
JL says
Theres 7 parts just outside the cafe (its in a drawer on the guardbooth).
JL says
There are also 11 supplements in the room north of the courtroom in the Courthouse.
Nick says
Confirmed both of these. Thanks for the extra help
PowerPyx says
These have been updated now, thanks guys!
Michael says
In the hotel toward the end of the chapter. Right when you go upstairs and get the supplements in the bathroom there is also a Stealth Training Manual in the bedroom on the dresser
PowerPyx says
Thanks for reporting, I added a note that it can also spawn there. For me it spawned in Chapter 11 (in the video it will be shown in Chapter 11).
Did you get the Training Manual Pre-Order DLC by any chance? That would explain the additional spawn. I think it has something to do with the pre-order bonus. I hadn’t installed the pre-order bonus and didn’t find a Manual in the hotel.
If anyone else finds it and could confirm whether pre-order bonus was installed, that’d be great!
Edit: I also checked with some others who don’t have the Pre-Order DLC installed and none of them got it to spawn in the hotel. Pretty sure it requires the pre-order bonus to spawn.
Michael says
Yeah I did have the pre-order bonus installed! Sorry for the late response
Icy says
I found the stealth training manual at the hotel floor, in the bedroom desk.
PowerPyx says
Wasn’t there in my game
I picked it up in Chapter 11.
Did you get the Training Manual Pre-Order Bonus? That would explain the additional spawn. I think it’s from the pre-order bonus.
Icy says
Yea i did preorder so it might be related to that! Thanks for the guides as usual, great job
Scott Graham says
I missed know it all card do I have too replay whole chapter too get it ?
PowerPyx says
No. There’s no need to reach a checkpoint or finish the chapter afterward.
You can load a previous save near the collectible or use Chapter Select. When you picked it up, quit to main menu or load your most recent save. It will have updated the collectible in chapter select tracker.
D says
It seems that way. I dont have a save nearby, and downtown just starts downtown from the beginning. Lol it’s the only thing I’m missing in that chapter too.
Alexbeav says
I replayed the chapter and I got the small gun holster at Barkos instead of the long one -.-
BksterCorp says
I have the pre-ordered standard edition and I had the long gun holster.
Chan says
I also had the pre-order & I found the manual last night in the hotel
cory says
stealth training manual 1st bedroom on desk with coffee pot looking into room 2
cory says
sry for duplicate post didn’t sere about manual til after I posted n yes preorder so ur probably right just trying to help out
LBoerner says
Wow, I went into the room with the tortured dudes before picking up the final collectibles and it won’t let me go back for no apparent reason. Thanks Naughty Dog!
Bompbomm says
Same, was working my way up and figured I’d be able to go back out. Dumpster was moved too
Dragontechnique says
Yea same shit happened to me… No way back inside hotel.
Goldfire says
Yep, same here. Wasn’t very impressed about that one. Have to do it all over again…
Tash says
Yep. This was a dumb one for sure.
Iwalleh says
There are 7 mechanical parts outside in the guard post outside of Rouston coffee. There are also 11 supplements on the desk during the first clicker fight in the courthouse
PowerPyx says
These are in the guide now, thanks!
Tachanka says
I’ve done this chapter over 3 times from start to finish but it still shows 17/18 artefacts
Gabe says
Did you ever get this resolved? I just played through the chapter again, got EVERY artifact, and it still shows 17/18. Any ideas??
Thanks!
Tachanka says
I lost all my collectible progress from the game. Only 2 were left and now the game shows 0 across all chapters.
MadLads says
I can’t get journal entry #1
I grabbed the Artifact and didn’t get the entry, I came back after seeing it here but couldn’t get it.
Jp says
Same !! I read the note 10 times and Ellie will not write anything in her journal.
Groucho says
For me the Crafting Manual isn’t in the truck, it’s also not already in my inventory, so… I can’t collect everything? Lol.
Toby says
I can’t find the holster, I think I have them both already. Where else can the holsters spawn?(short and long)