
Ashina Depths is the 7th area in Sekiro Shadows Die Twice. This walkthrough will guide you through the Ashina Depths region.
Checkpoints (idols):
- Ashina Depths
- Poison Pool
- Hidden Forest
- Mibu Village
- Water Mill
- Wedding Cave Door
How to Get to Ashina Depths region
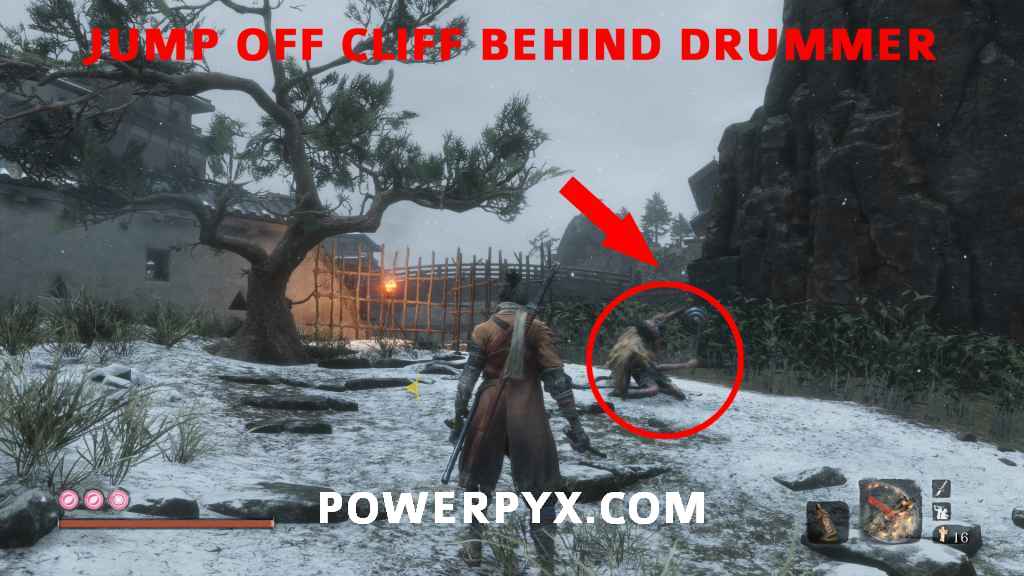
From the Ashina Reservoir idol in Ashina Castle, head to the enemy fort to your left (where two big hammer guys are walking around). There’s a drummer in the back. Walk to the cliff behind him and look to your right. There you can grapple on to a ledge and find a hole in the ground that leads to an old well. Inside the well you must defeat the Lone Shadow Longswordman miniboss. Then you can swim through the well and reach the Abandoned Dungeon’s Bottomless Hole idol.

There’s also a headless miniboss to be found here but you can ignore him for now. Instead, follow the path after the idol and you come to a praying woman. Talk to her and she will tell you to leap yourself off the cliff. This is exactly what you must do – jump down the pitch-black abyss in front of the woman and as you fall, use your grappling hook to jump to some cliffs. It’s a long fall so just spam  /
/  as you fall to grapple. After you land at the bottom, follow the cliffside to your left until you reach the Ashina Depths idol.


Ashina Depths – Poison Pool
Right after the Ashina Depths idol you come to a room filled with poisonous water and some big monk statues. The Snake Eyes Shirahagi miniboss is here. He’s standing in the top right corner of the area. You can use the grappling hook to fly from tree to tree and land on a statue left of him, then sneak up from behind for a backstab. A white mist wall will block the path, the only way to make it go away is to defeat this miniboss. You can lure him into the tunnel where the mist wall is so that you’re out of reach from the other enemies.

After defeating him, grab the Poison Pool idol on the left side of the room (same room where the miniboss fight was, in the corner). With the boss defeated, the mist wall behind him will have disappeared and we can head through that passage now.
Ashina Depths – Hidden Forest
From the Poison Pool area, simply follow the linear path through the cave behind the miniboss and you’ll reach the Hidden Forest idol.
In case you’ve already beaten the “Guardian Ape” main boss in Sunken Valley then you will meet an ape double-boss here. If you followed the walkthrough in order and went to Ashina Depths first (as intended) these bosses won’t be here but will spawn in later after you finished Sunken Valley.
Ashina Depths – Mibu Village
From the Hidden Forest idol, walk across the tree branches in front of you. There are some chickens here attacking you. Below the trees there’s also one of the “headless” minibosses but you don’t want to mess with that guy right now, keep him for another time. Instead, just walk across the tree branches until you come to a foggy area with some apparition-like soldiers. You’ll hear someone playing flute in a temple here.
On the left side of the foggy area you can grapple on to a tree branch. The best point of reference is where you find 3 item pickups all sitting in the same spot close together under a tree. When you see those, look up and you can grapple the tree branch above.

Up there you reach the next miniboss Tokujiro the Glutton (the below video also shows the path leading there). He’s guarded by some monkeys. Take them out first, then backtrack until the boss loses sight of you. Then return and grapple on to the tree branch on the right to get behind him for an easy stealth takedown. He’s the same boss as Juzou the Drunkard was in Hirata Estate, exact same moveset.
After he is defeated, jump up the little hill in the miniboss area, where one of the monkey snipers was shooting you from. Walk up to the cliff and look to the right. There you’ll see a tree branch you can grapple on to, which is where you must go.

There are two more tree branches after that. Then you come to a tall tree that lets you jump on the roof of the temple where the flute music is coming from. There’s a hole in the temple rooftop that you can go through.


Then you can drop down to the Mist Noble miniboss (the video also shows the way to it). Defeating it will clear out the fog of the area. It will also create a hole on the ground floor of the temple. Exit that hole and head straight ahead, jump down some trees and you’ll come to the Mibu Village idol.
Ashina Depths – Water Mill
After the Mibu Village idol you’ll have to go through a village filled with midget enemies. This is actually a fantastic XP & money farming spot. They die in one Whirlwind Slash Combat Art and it kills an entire group at once. As you advance through the village, there’s a big tree with white leaves at the end of the village. It’s the only tree with leaves in the area and there’s a big mob of enemies gathered there. Under this tree you find a Gourd Seed. Go past the bell-wielding enemy and you’ll reach the Water Mill idol.
Right behind this idol you can see a woman playing an instrument. After you walk past her she will turn hostile and attack, that’s the O’rin of the Water miniboss fight.
Ashina Depths – Wedding Cave Door
After O’rin of the Water follow the path across a bridge and you’ll soon reach the Corrupted Monk main boss. He’s quite powerful but has only 1 health bar and has the same moveset throughout the fight. A fairly easy way to defeat him is with the Mortal Draw combat art because it does unblockable damage. You get it automatically after talking to the Divine Child at the end of Senpou Temple, Mt. Kongo region (after beating the Folding Screen Monkeys main boss).
Just keep your distance and let the boss miss all his consecutive attacks. After he finishes (misses) a combo, he’s unable to move and vulnerable for a short moment – enough time to go in and use the Mortal Draw combat art. Quickly get away from him, let him miss his next move, use mortal draw, and repeat. You can either dodge away from him or run by holding  /
/  to build up distance quickly.
After the Corrupted Monk is defeated, go in the cave behind him to grab the item there. This fulfills one of the two item requests for Kuro. Now we need to head to the Sunken Valley to get the flower that Kuro requested.
This concludes the “Ashina Depths” area.
Next up: Sunken Valley
For all other areas check out the full Sekiro Shadows Die Twice Walkthrough.
ED1CT says
Just wanted to say, there is a prayer bead right before the corrupted monk. In the house with all the villagers and bell giant in front, you can go beneath the house and use the shinobi door there to enter. If you exit the broken wall on the side, and then turn around, there will be a grapple point to to the second floor with an altar with the bead on it.
Dc says
There’s also a chest under the water by white tree that gives you a prayer bead. I got swimming skill after defeating corrupted monk.
Decarvalho30 says
Where i can find that tree?
Luay says
For O’rin, you can actually stealth back stab her once. If you go behind her and crouch then you throw a ceramic shard at her; You will have a short window where you can back stab her.
Nobody says
I did this and it actually worked. You jest have to crouch a little to the right of her or you’ll miss. Probably wouldn’t have beat her otherwise
Meta says
Also just did this, worked like a charm. She was destroying me before.
Ulas Cinol says
Works like a charm, and also for her 2nd health you can use “loaded umbrella – magnet” which deflects her attacks sooo easily and exhautsts her in seconds to give you a chance to finish her with shinobi execution
alex says
You dont get mortal draw from the merchant, you get it when you get the sword through the main story
PowerPyx says
Hey, you are totally right. I thought it was from the merchant at first, but it’s indeed from the Divine Child in Senpou Temple (story-related). I updated this, thanks for pointing this out.
Sexiro says
My mortal draw uses 3 spirit emblems ?
Team Venture says
It takes 3 emblems but when I was fighting corrupted monk I was able to use it far after I had depleted my emblems. I don’t understand, I couldn’t use firecrackers, but I could use Mortal Draw?
Ian D Barrie says
You can use it without emblems, same with all combat arts that require emblems, but they’ll be weaker, iirc.
Psraessi says
There Is also a Prayer bead on top of a monk statue mese the poison pool Idol, you Hey on top by hanging in a cealing on the left in the tunnel that gets accessibile After you’ve defeated Snake Eyes Shirahagi miniboss.
VampireHorde says
On my playthrough against the Corrupted Monk, she actually resurrected six times in a row! Each time I defeated her, I never got the “Shinobi Execution” screen and she would just keep fighting again.
A few ppl have encountered this glitch and it can easily be solved by quitting and realizing your save (thank god). I seriously thought this was how the boss battle really was!