
Saints Row (2022 Reboot) has 265 Discovery Locations. Finding all Discoveries Collectibles is needed for 100% district completion to unlock the All Mine trophy and achievement. Finding them also unlocks the Tourist trophy and achievement for completing the Photo Scavenger Hunt.
There are 9 types of Discoveries, all of them are needed for the district completion:
 Weather Station (counts automatically upon discovery) – interact with tower that catapults you in the air and opens the wingsuit
 Rooftop Access (counts automatically upon discovery) – use the door at the street level to use the elevator to the rooftop
 Pallet Pickup – collect pallets, there are always 3-4 together in the same location
 Photo Hunt – take a photo of an object
 Fast Travel Photo – take a photo of a monument to unlock fast travel to it
 Hidden History – find 5 history boards in the yellow search area
 Dumpster Diving – interact with a golden glowing dumpster
 Lost Wheels – interact with the windmills, only available in the desert areas
 Shooting Gallery – shoot the 15 targets, only available in the desert areas
For the All Mine trophy/achievement only the 15 inner-city districts are required, the ones that contain threats. The deserts (Badlands North/South & Rojas North/South) and Lake Sabastian in the middle of the city are not needed for it. In those areas you only need to get the Photo Hunts for the Tourist trophy.
None of the Discoveries are missable. You can still find all of them after the story. They are already available at the start of the game when reaching the open world and can be done at any time. The Discovery Icons get marked on the map when you go near them. Flying over them with a helicopter or VTOL (unlocked after story) unlocks the icons too if you are close enough to the ground. For the pallets you need to be very close within 5-10 meters to get the icons to show up. Pallets always spawn in pairs of 3-4 in one spot. For all other icons you can be further away within a 10-30 meter radius to get them marked on the map.
It is highly recommended you collect them in one go to not get confused what you have and haven’t found. It’s best to finish the story first without touching any Discoveries. After the story you will have the VTOL plane at your HQ to fly around the map quickly. Then collect them district by district. When you have all in one district you move on to the next district. On the map you can scroll over a district to see how many there are. If you already collect a few here and there it could get hard to keep track where you already went. That’s because the icons disappear from the map when you collect them, except for Weather Stations and Rooftop Access. If you prefer you can also collect them early on, everything is available after the Prologue when reaching the open world. Of course if you already grab some during the story you can still get everything else later and won’t miss out on anything, this is just a recommendation to make it easier for you to keep track.
Also keep in mind that Weather Stations and Rooftop Access automatically count upon discovery towards the district completion. You don’t need to interact with these two types. Simply going within a 30-50 meter radius of them is enough to reveal the icon and have them count towards the map counter. This is why you may see the counter say “1/13” in a district even though you haven’t interacted with anything. In that case you’d have 1 Weather Station or 1 Rooftop Access icon already on that district’s map.
On the world map you can filter by “Discoveries” to see just these icons specifically. The “Fast Travel Photos” can show under “All” instead of “Discoveries” but this is also pointed out in the guide below in each district that has one. Just keep this in mind as it can make it a bit confusing when you count up the icons in the “Discoveries” map view, you’re probably missing the Fast Travel Photo under “All”. If you are 1 short in a district also recheck the Pallet Pickups, remember there are always 3-4 at the same location close together.
There’s a known bug that some icons disappear from the map if you have too many on the map at the same time. This doesn’t void the 100% district completion and they can still be collected. The pallet icons may not show up again on the map if they bug out but they can still be collected. Other icon types will respawn on the map if you go near them.
For other Completion Items refer to:
- Saints Row 100% Completion Guide
- 265 Discoveries Guide
- 75 Threats Guide
- 41 Side Hustles Guide
- 35 Stores Guide
- 15 Ventures Guide
- 115 Main Collectibles
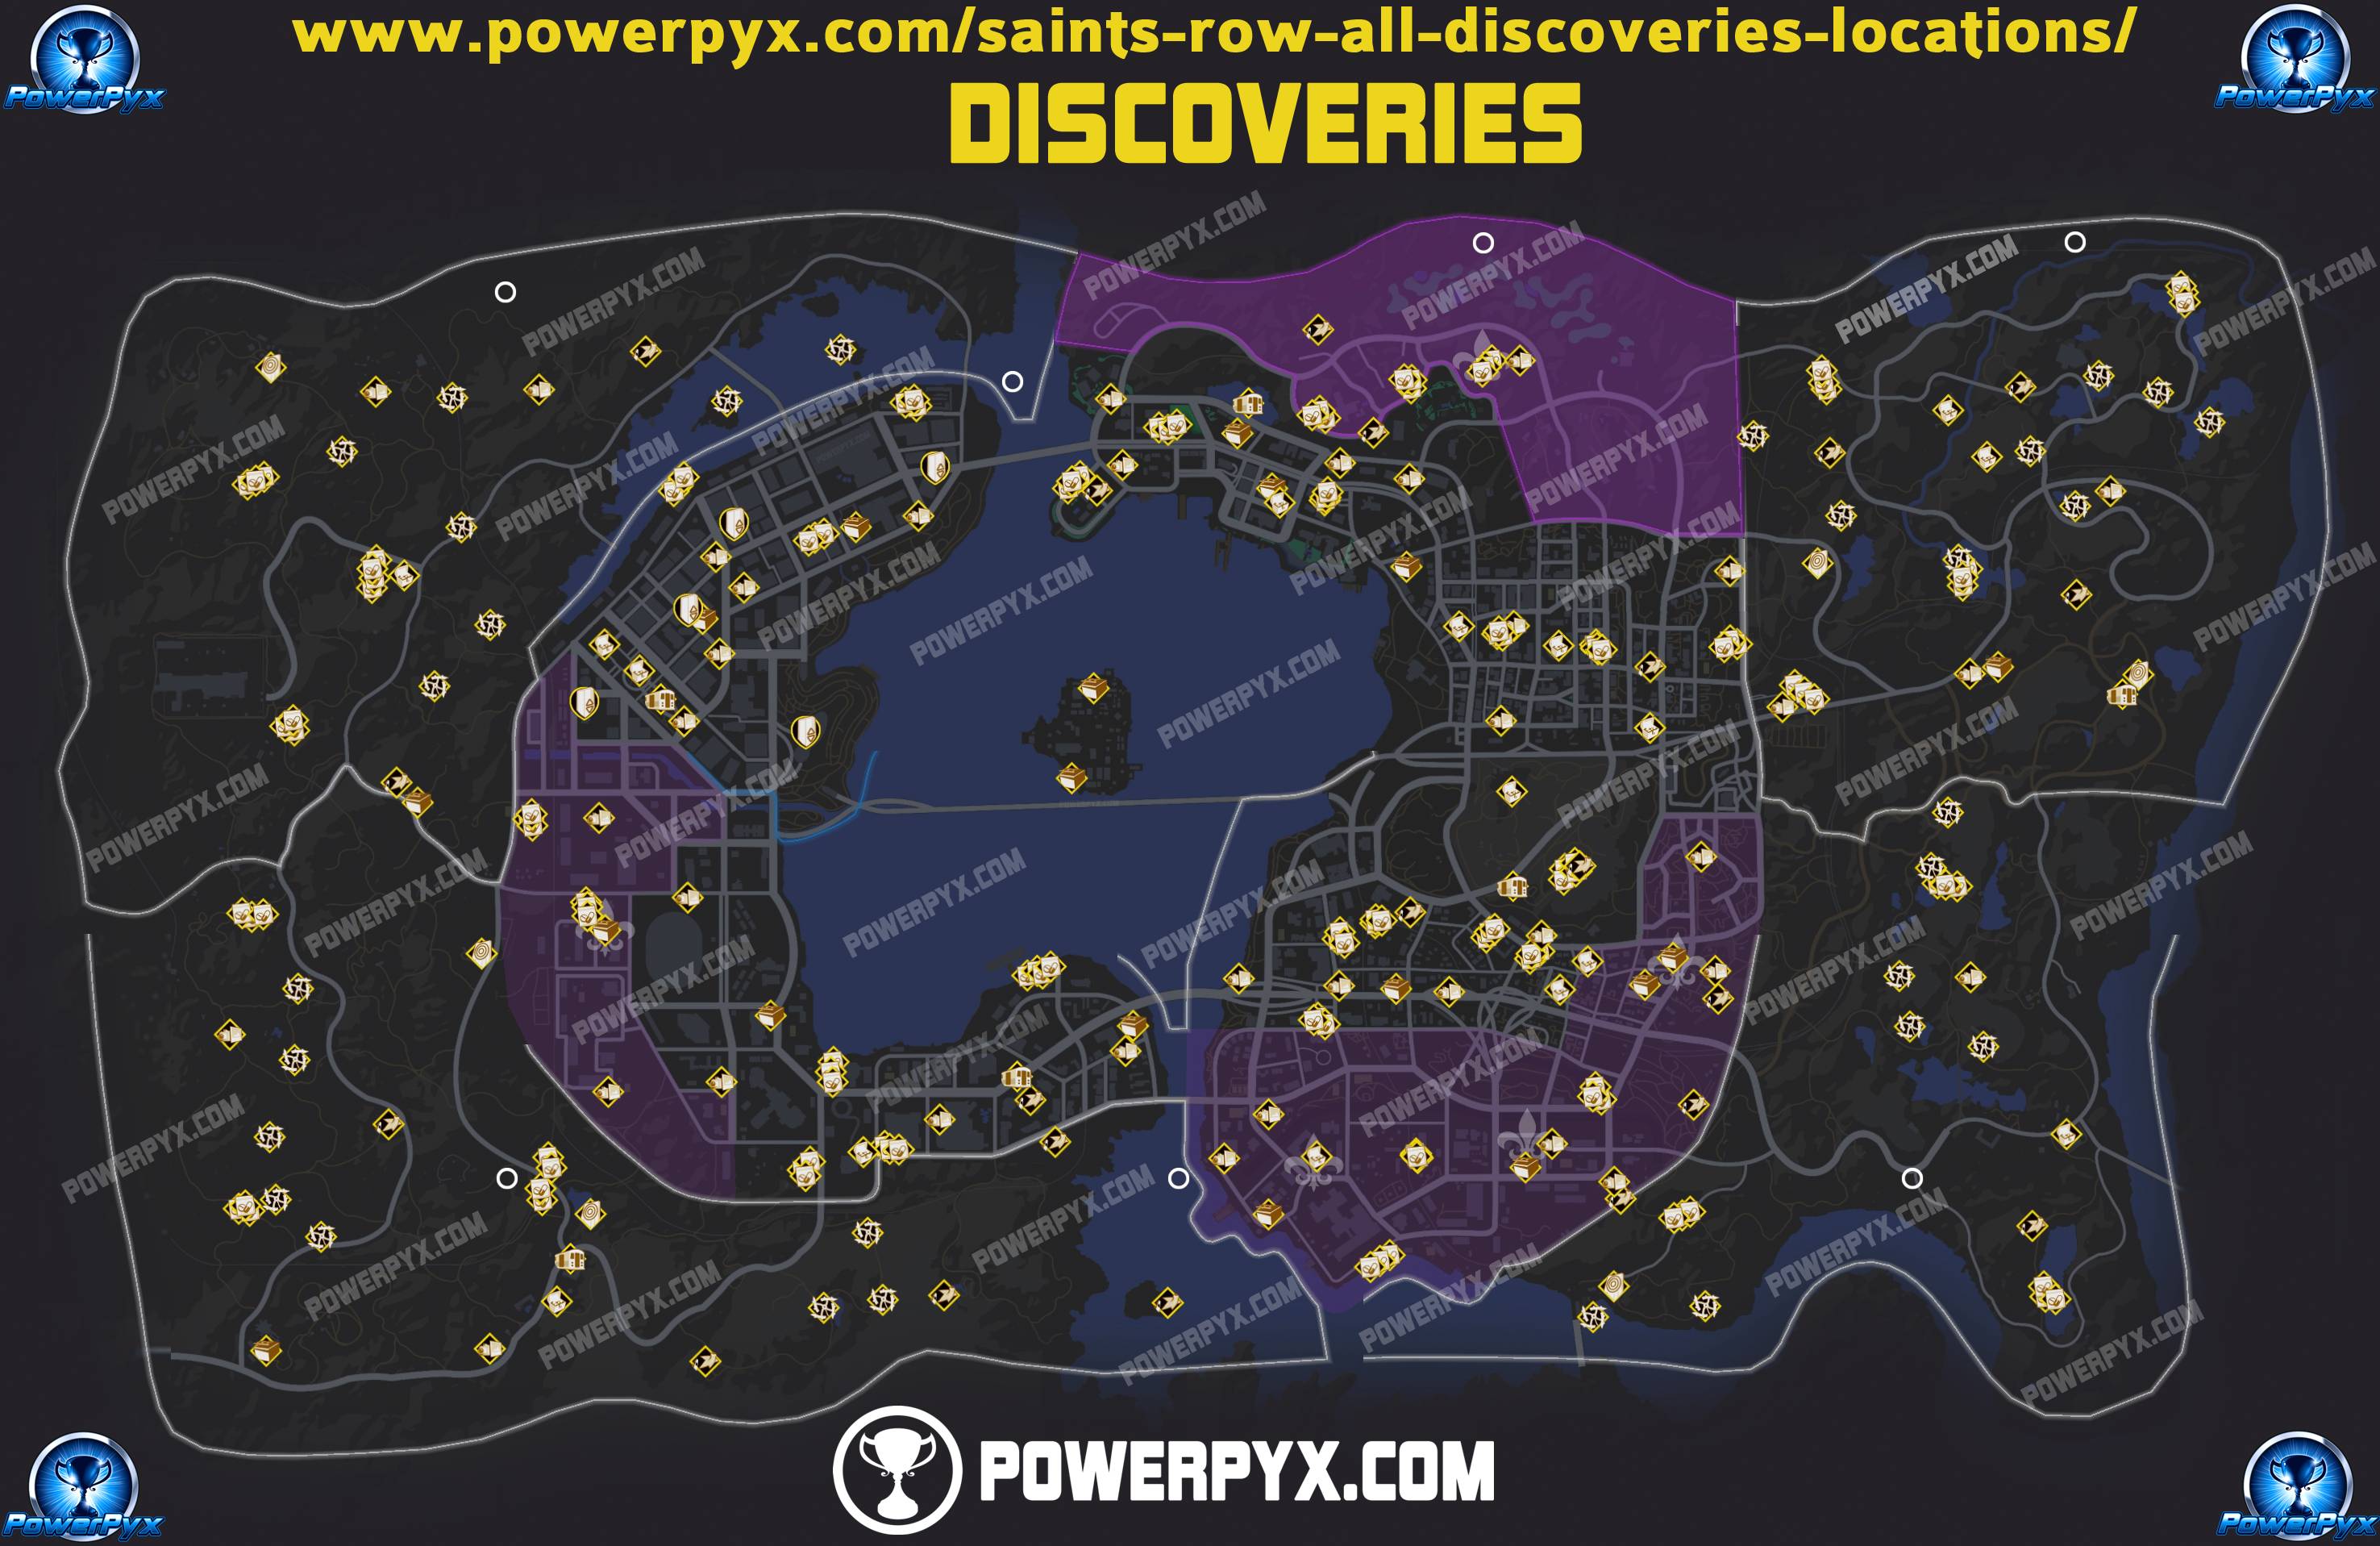
All Discoveries Map
Below is a map showing all Discoveries in the game. Remember that Pallets spawn in groups of 3 or 4, these are often very close together on the map and show as 1 icon. Below are also zoomed-in maps of each individual district that show them more clearly at closer zoom level.
*Click map image to enlarge*

Mercado

- Pallet Pickups: 9
- Photo Hunts: 2
- Dumpster Diving: 1
- Weather Stations: 1
- Total: 13
Smelterville West
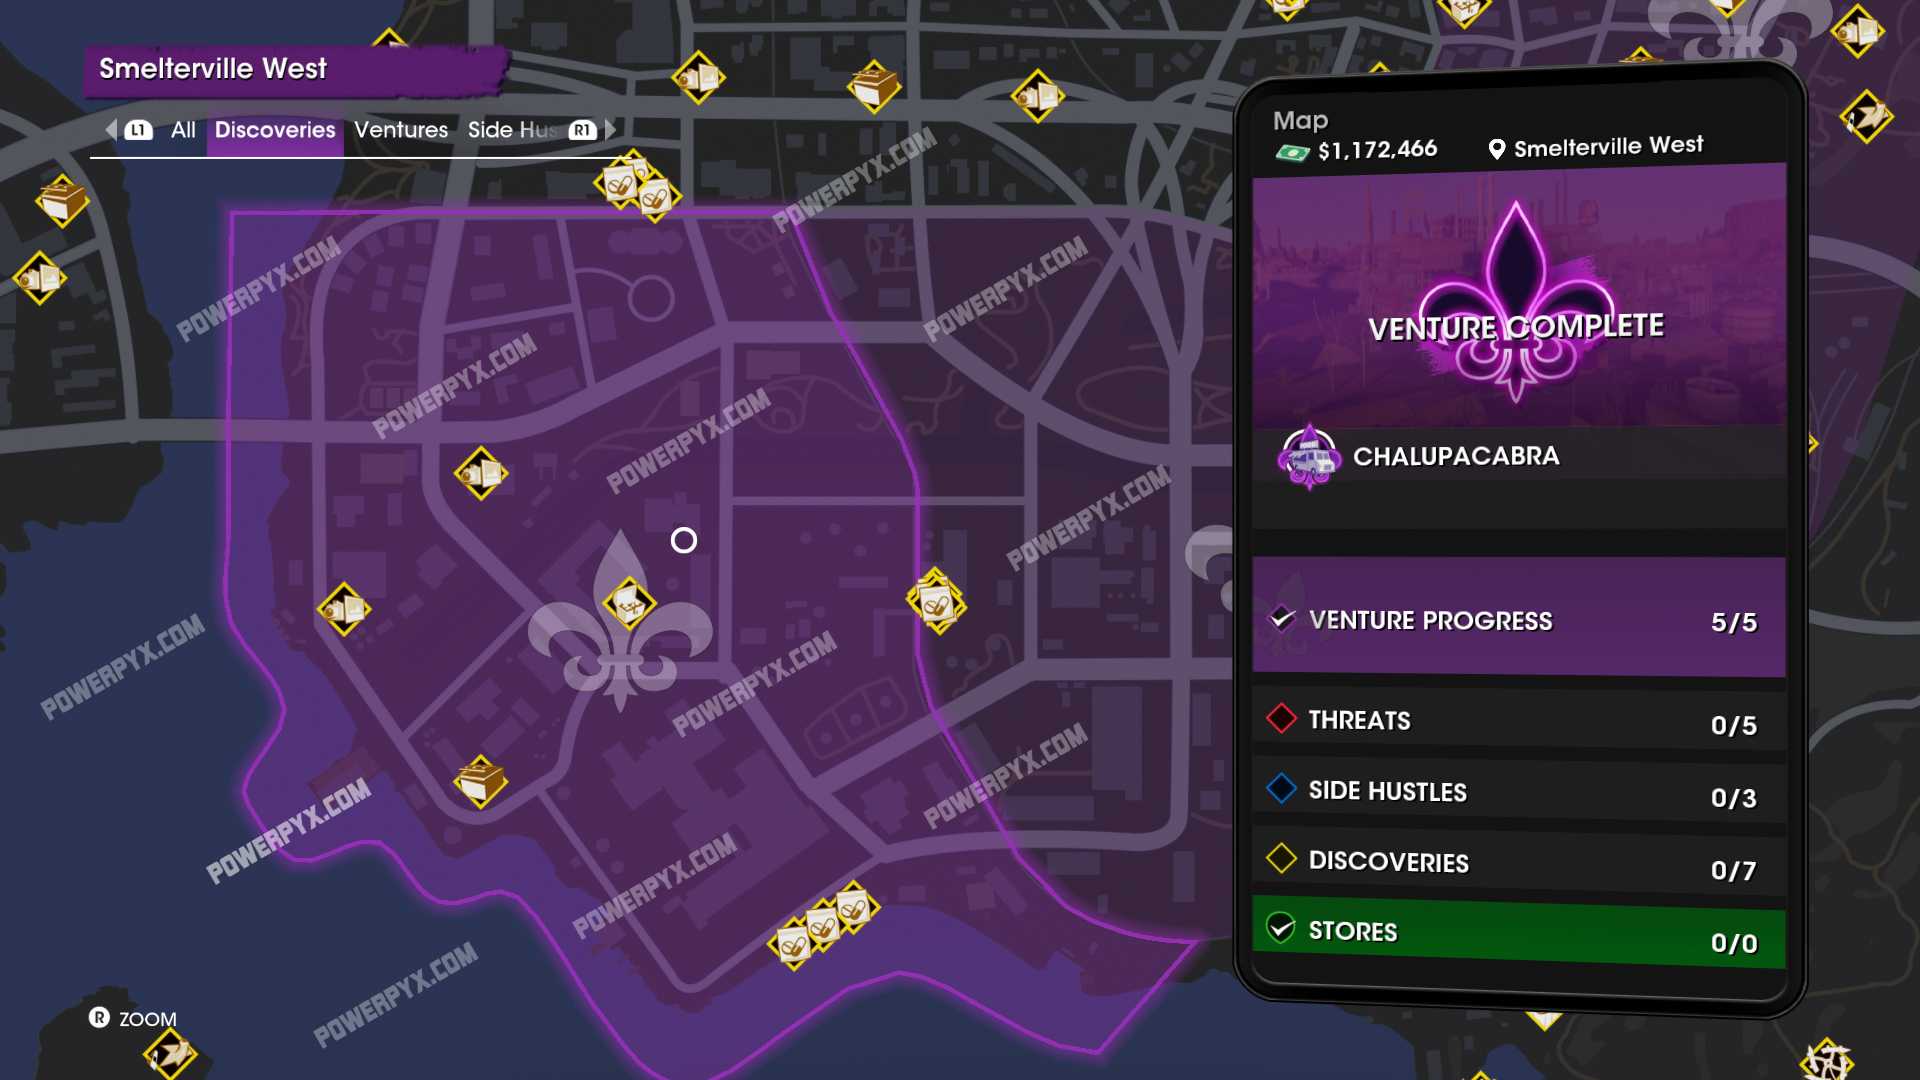
- Pallet Pickups: 3
- Photo Hunts: 2
- Hidden Histories: 1
- Dumpster Diving: 1
- Total: 7
Smelterville East

- Pallet Pickups: 7
- Photo Hunts: 2
- Dumpster Diving: 1
- Weather Stations: 2
- Total: 12
West Providencia
Note: The “Fast Travel Photo (train icon) might only show on the “All” filter and not the “Discoveries” Filter for some players.

- Pallet Pickups: 10
- Photo Hunts: 2
- Hidden Histories: 2
- Weather Stations: 1
- Fast Travel Photo: 1
- Total: 16
East Providencia
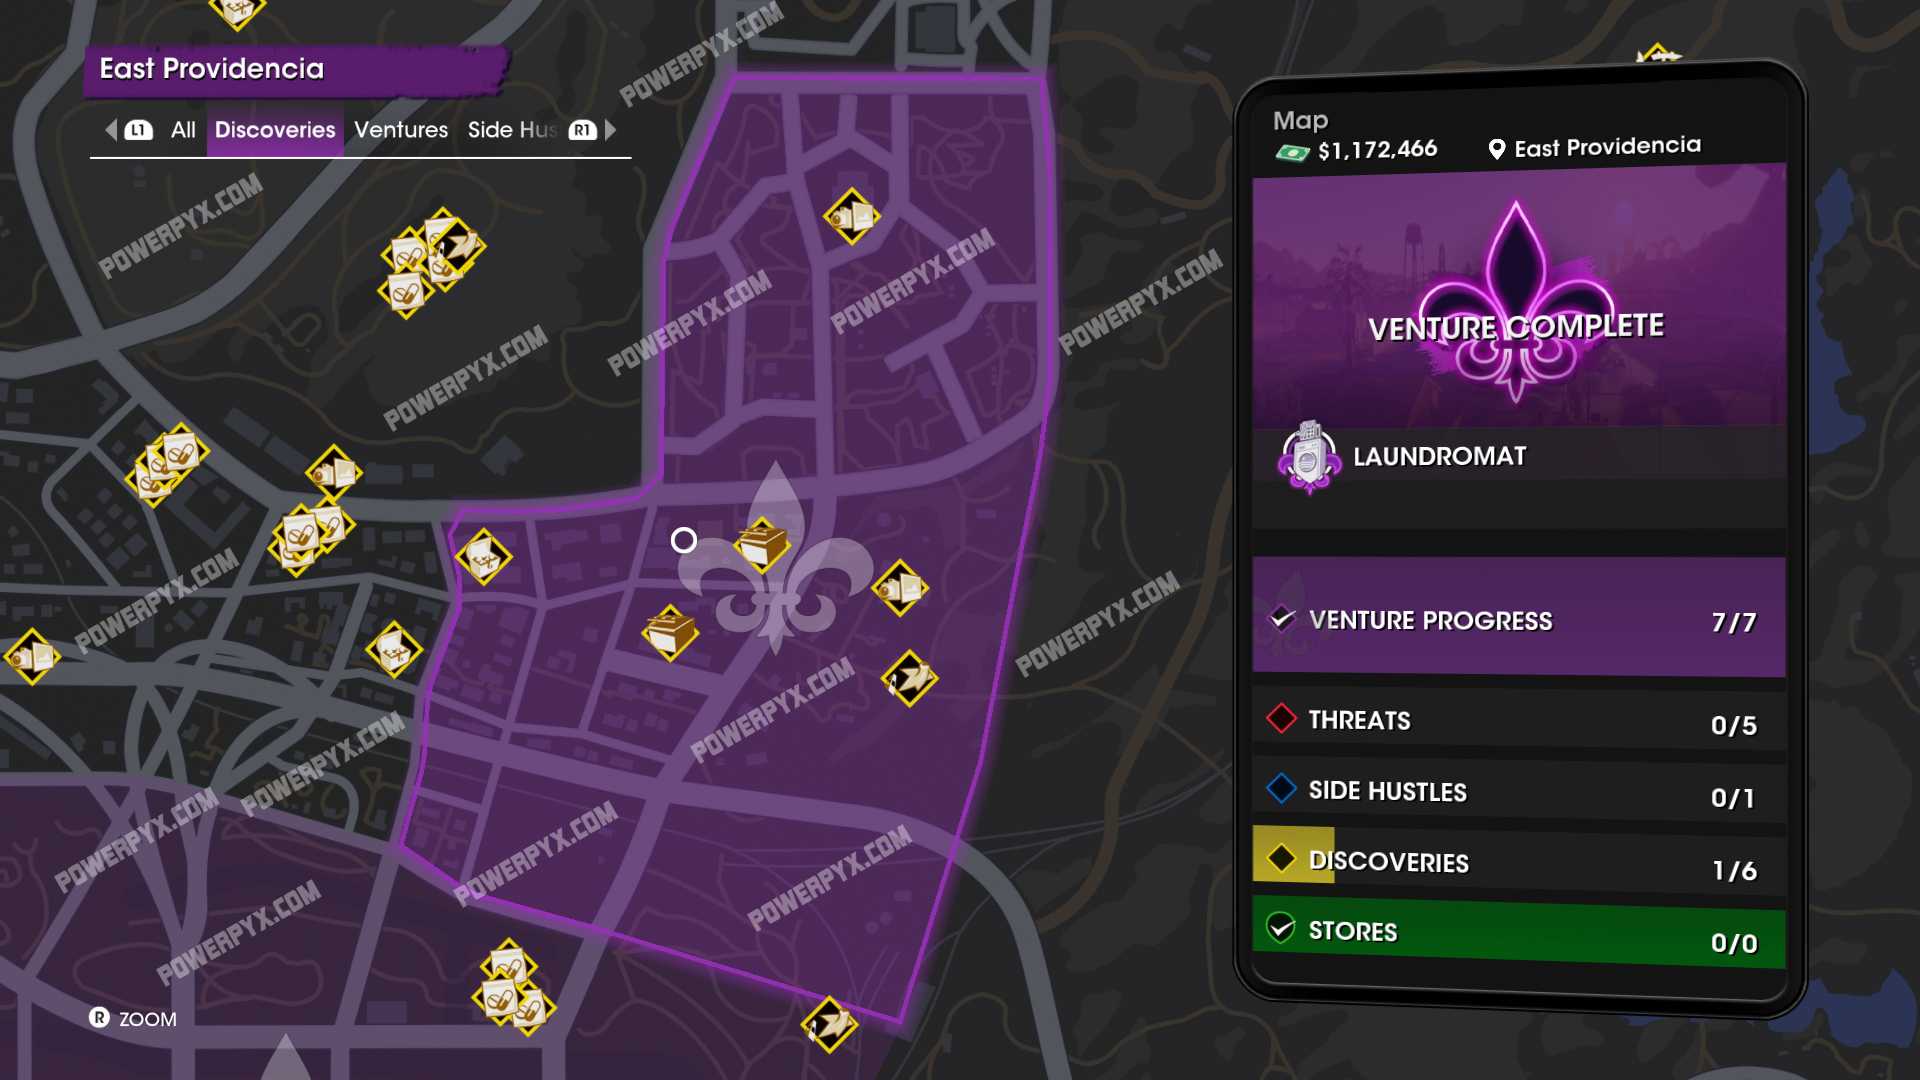
- Photo Hunts: 2
- Hidden Histories: 1
- Dumpster Diving: 2
- Weather Stations: 1
- Total: 6
Rojas Desert South
–> Not needed for “All Mine” trophy (100% in all 15 inner-city districts), only the ones containing threats count towards the trophy


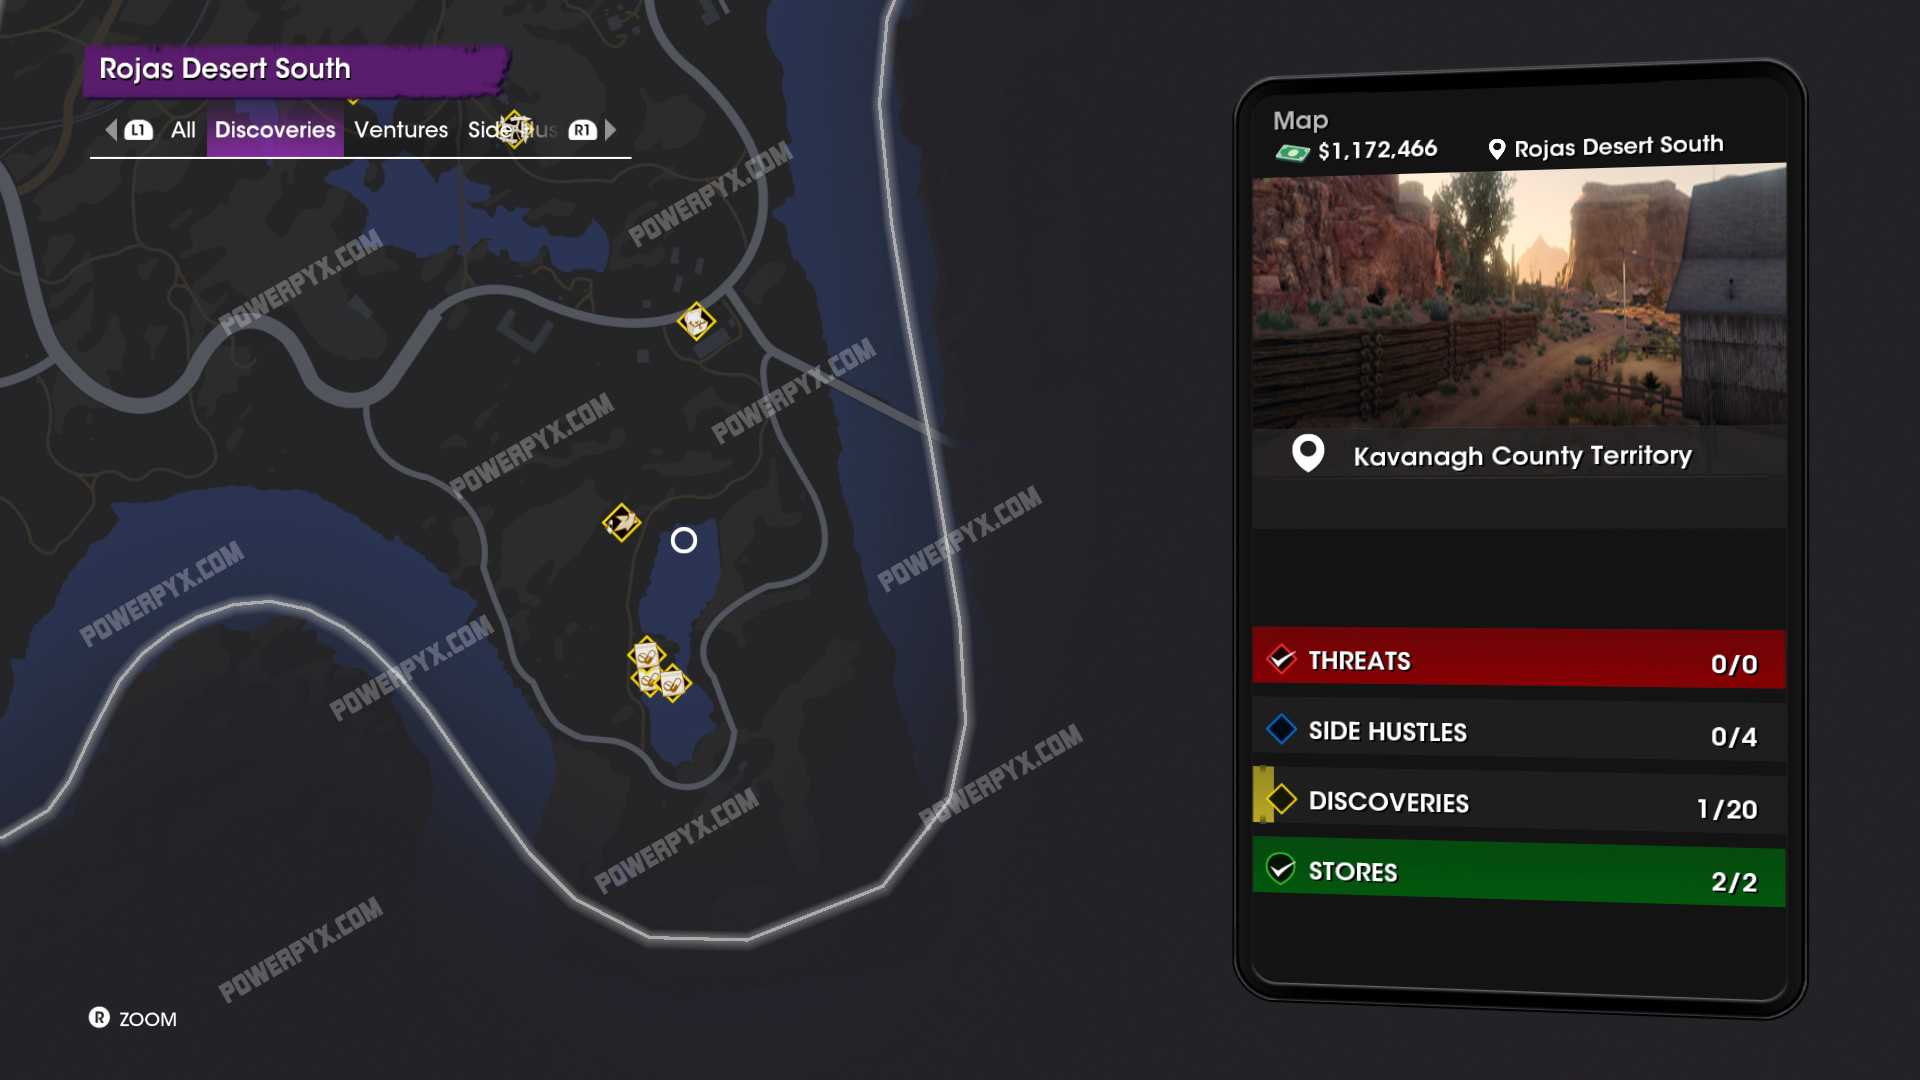
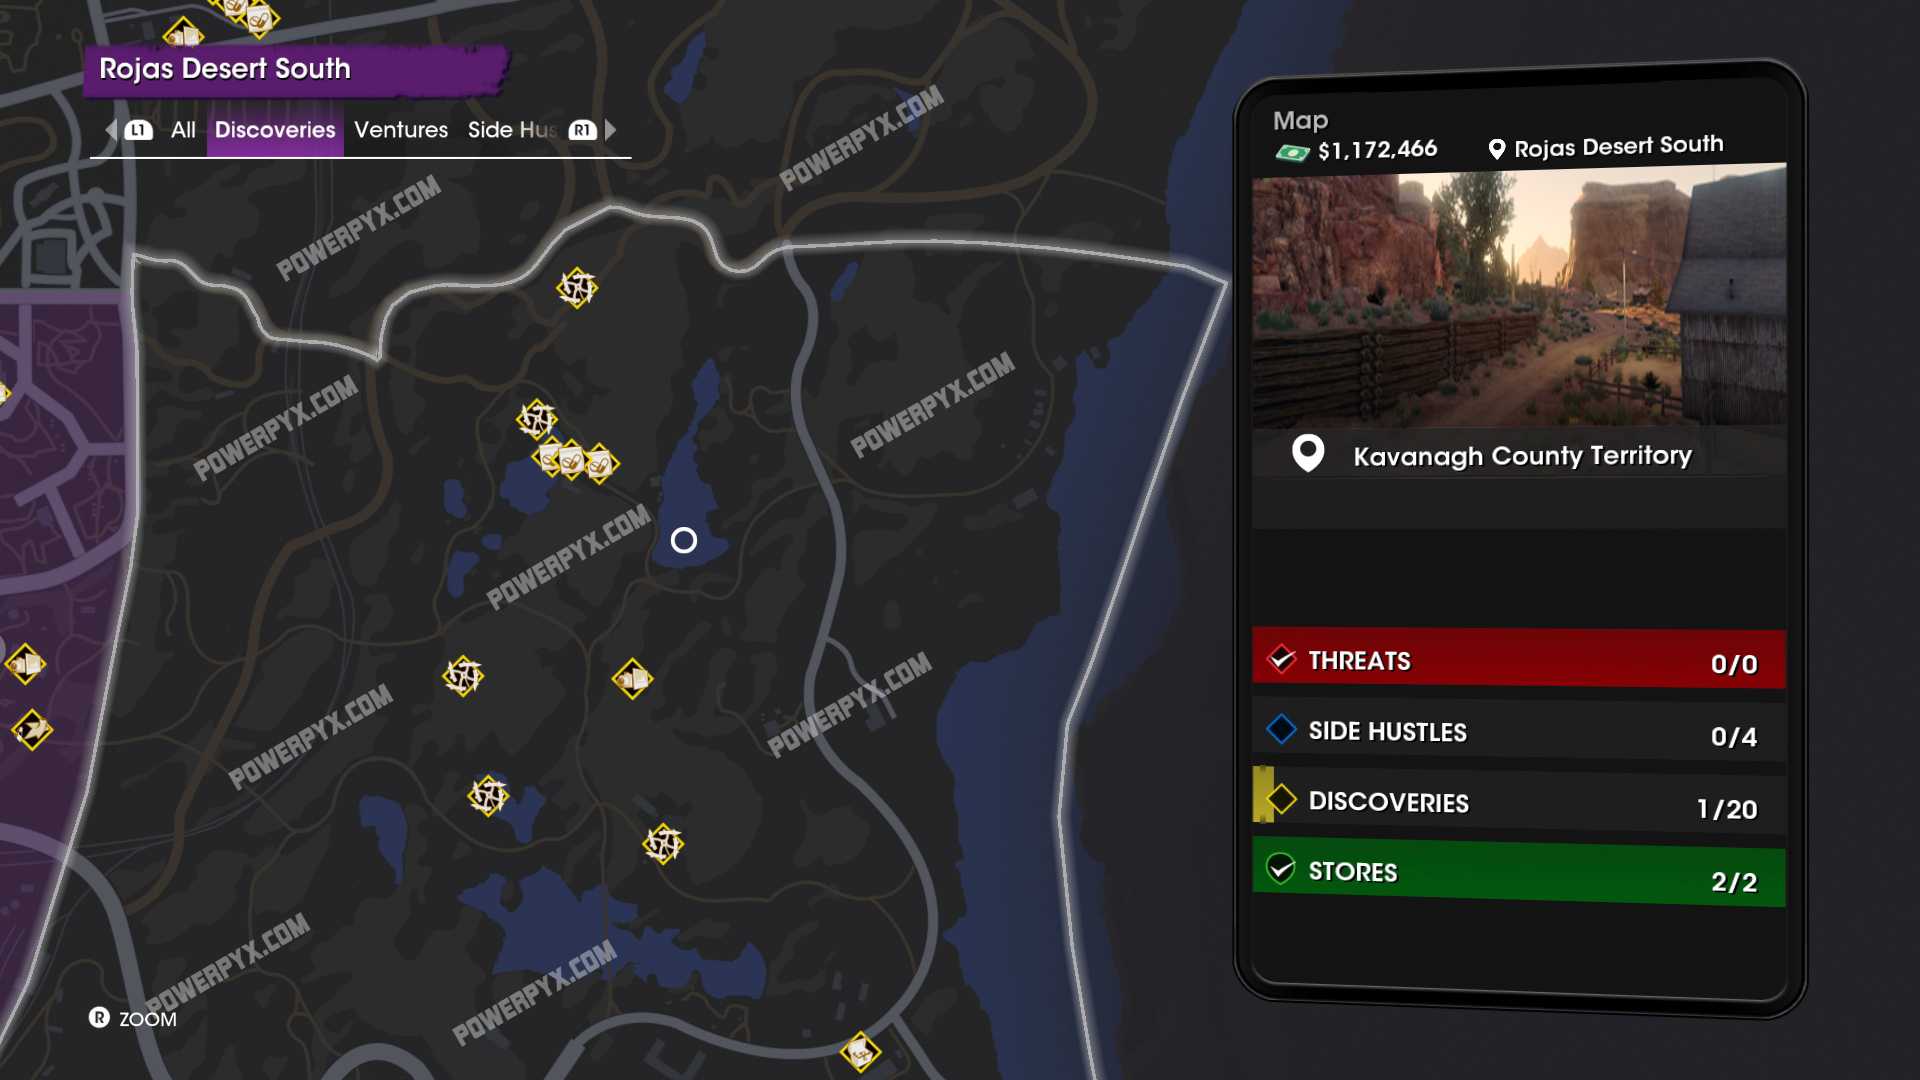
- Pallet Pickups: 9
- Photo Hunts: 1
- Hidden Histories: 1
- Weather Stations: 1
- Shooting Galleries: 1
- Lost Wheels: 7
- Total: 20
Rojas Desert North
–> Not needed for “All Mine” trophy (100% in all 15 inner-city districts), only the ones containing threats count towards the trophy
Note: The “Fast Travel Photo (train icon) might only show on the “All” filter and not the “Discoveries” Filter for some players.


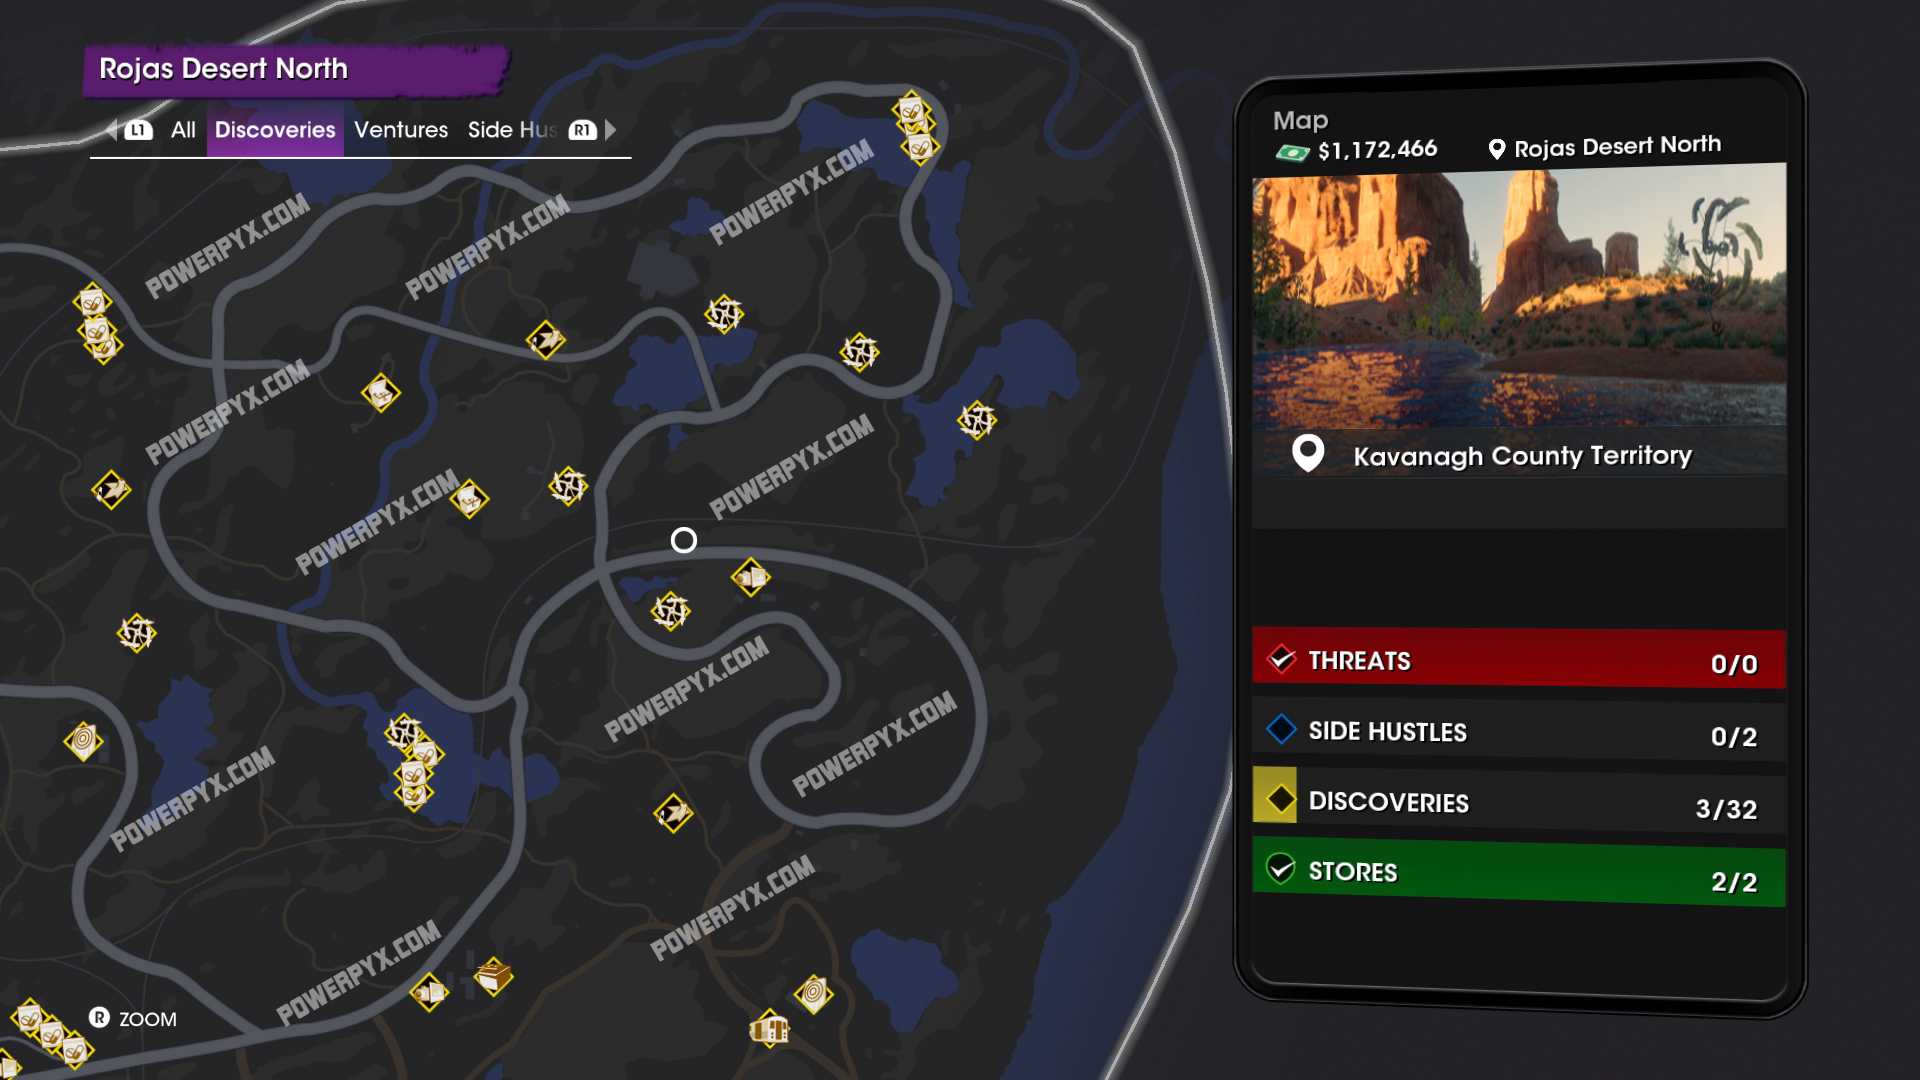
- Pallet Pickups: 12
- Photo Hunts: 3
- Hidden Histories: 2
- Dumpster Diving: 1
- Weather Stations: 3
- Fast Travel Photo: 1
- Shooting Galleries: 2
- Lost Wheels: 8
- Total: 32
Old Town East

- Pallet Pickups: 6
- Photo Hunts: 1
- Hidden Histories: 1
- Dumpster Diving: 1
- Weather Stations: 1
- Total: 10
Old Town West

- Pallet Pickups: 3
- Photo Hunts: 2
- Hidden Histories: 2
- Dumpster Diving: 1
- Total: 8
Old Town Shoreline
NO COLLECTIBLES IN THIS DISTRICT!
Monte Vista

- Pallet Pickups: 9
- Photo Hunts: 1
- Weather Stations: 1
- Total: 11
Marina East

- Pallet Pickups: 3
- Photo Hunts: 2
- Weather Stations: 1
- Total: 6
Marina West
Note: The “Fast Travel Photo (train icon) might only show on the “All” filter and not the “Discoveries” Filter for some players.

- Pallet Pickups: 6
- Photo Hunts: 2
- Hidden Histories: 1
- Dumpster Diving: 2
- Weather Stations: 1
- Fast Travel Photo: 1
- Total: 13
Lakeshore North

- Pallet Pickups: 6
- Photo Hunts: 2
- Dumpster Diving: 1
- Rooftop Access: 2
- Total: 11
Lakeshore South
Note: The “Fast Travel Photo (train icon) might only show on the “All” filter and not the “Discoveries” Filter for some players.

- Pallet Pickups: 3
- Photo Hunts: 3
- Hidden Histories: 2
- Dumpster Diving: 1
- Fast Travel Photo: 1
- Rooftop Access: 3
- Total: 13
West Flats
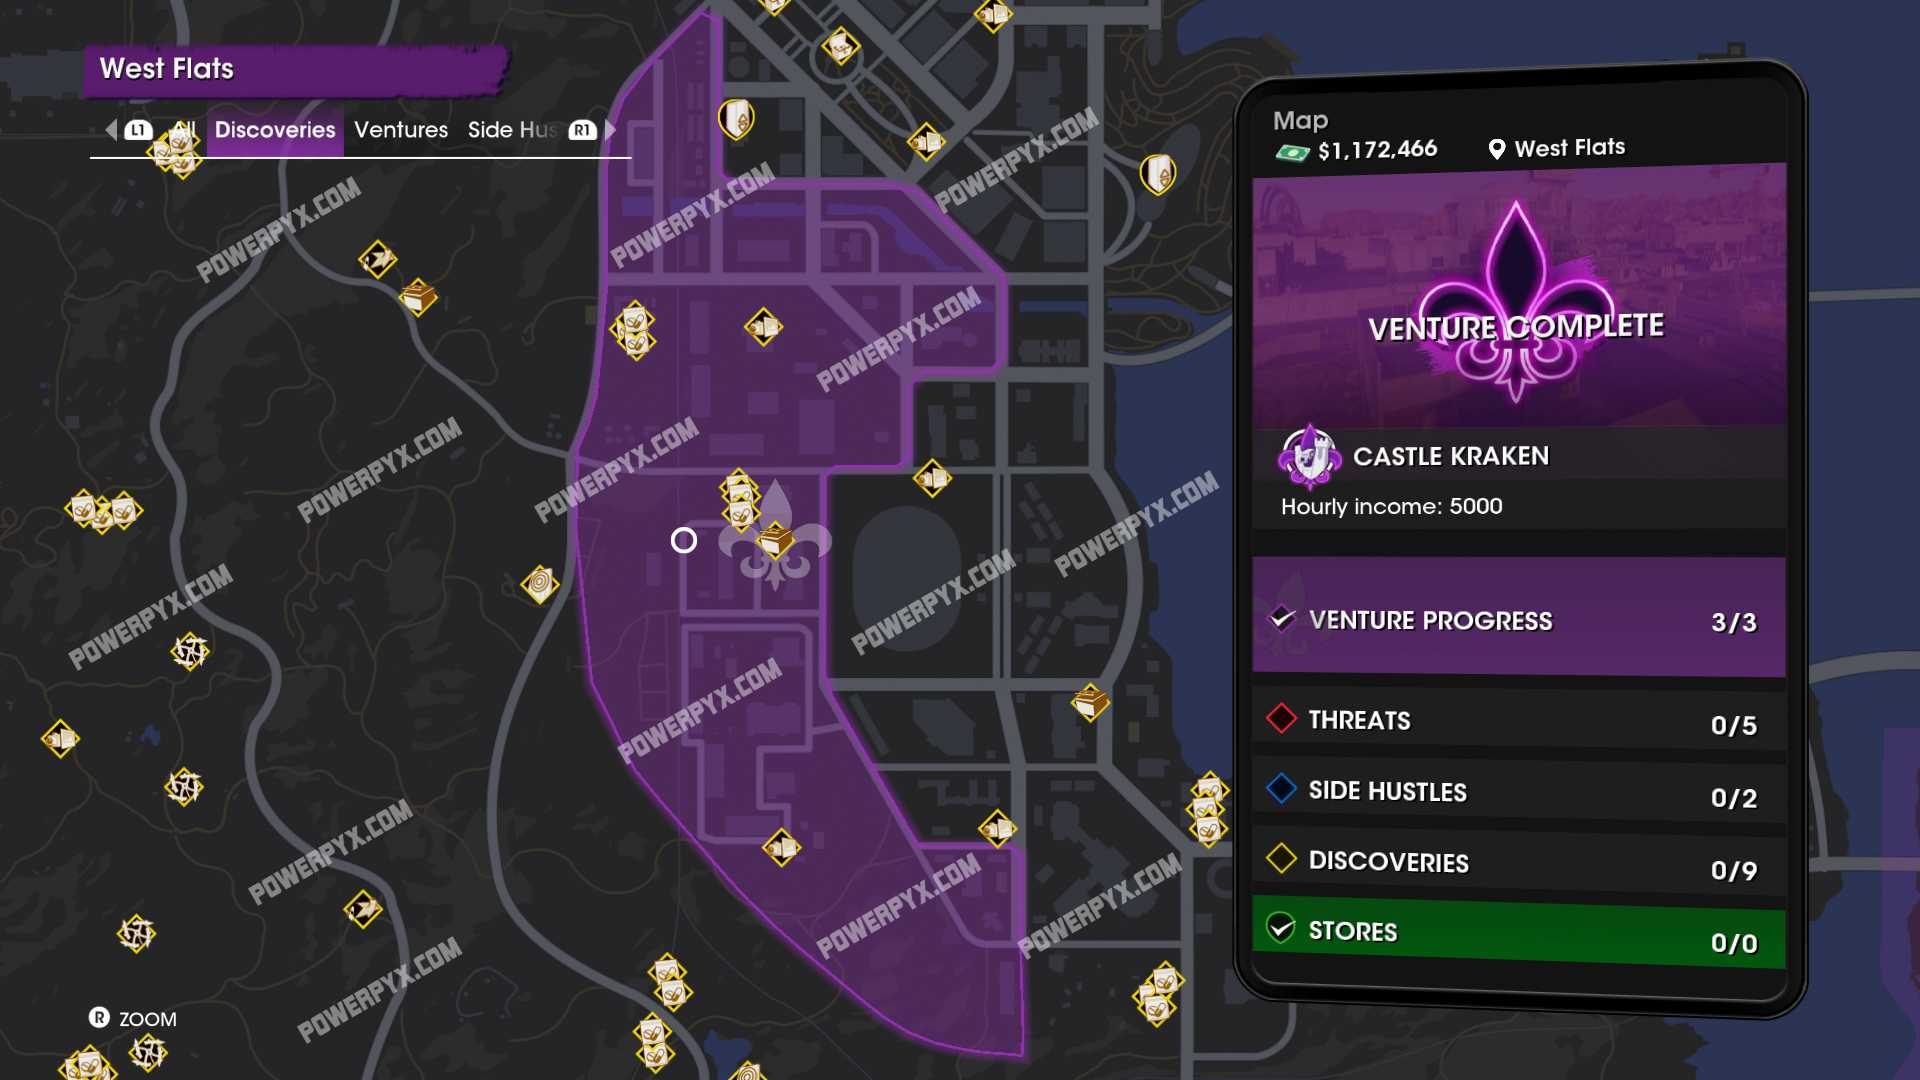
- Pallet Pickups: 6
- Photo Hunts: 2
- Dumpster Diving: 1
- Total: 9
East Flats

- Pallet Pickups: 3
- Photo Hunts: 2
- Dumpster Diving: 1
- Total: 6
El Dorado
Note: The “Fast Travel Photo (train icon) might only show on the “All” filter and not the “Discoveries” Filter for some players.

- Pallet Pickups: 10
- Photo Hunts: 2
- Hidden Histories: 1
- Dumpster Diving: 1
- Weather Stations: 1
- Fast Travel Photo: 1
- Total: 16
Lake Sabastian
–> Not needed for “All Mine” trophy (100% in all 15 inner-city districts), only the ones containing threats count towards the trophy
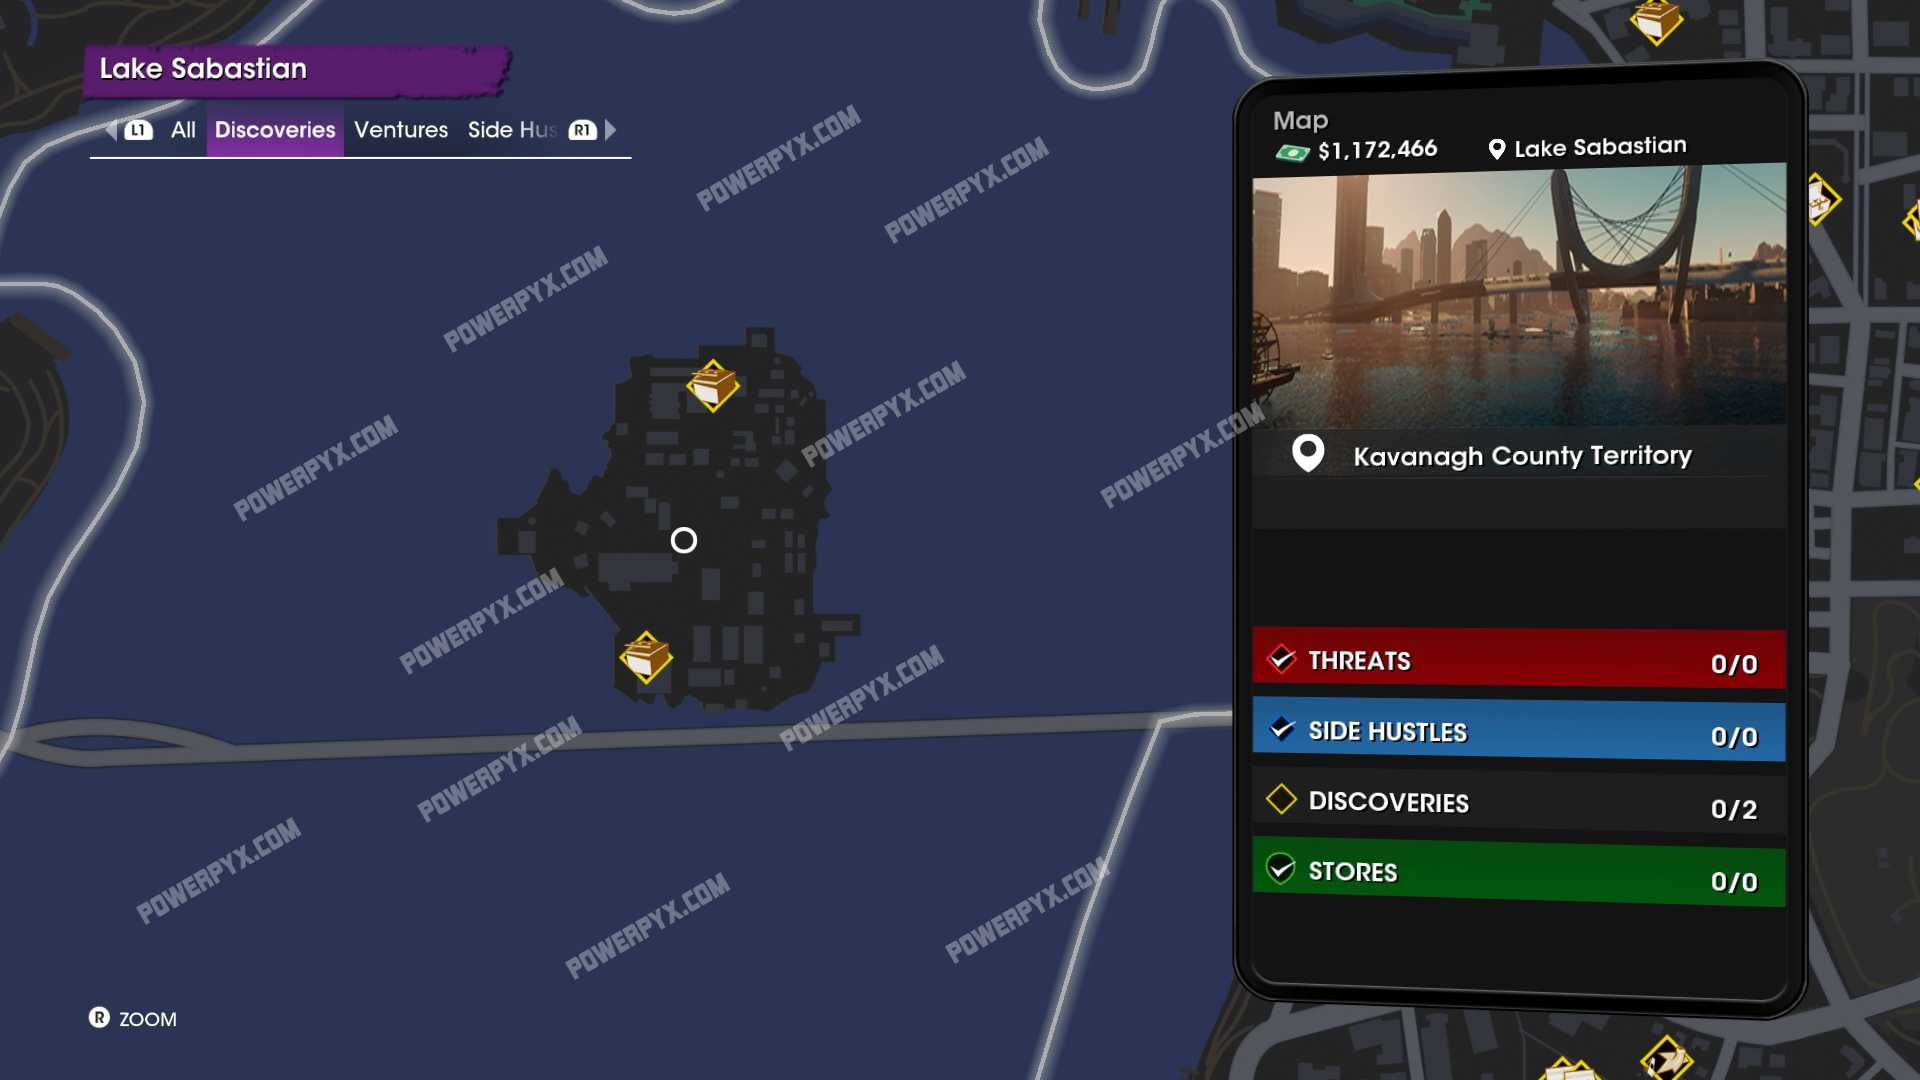
- Dumpster Diving: 2
- Total: 2
Badlands South
–> Not needed for “All Mine” trophy (100% in all 15 inner-city districts), only the ones containing threats count towards the trophy
Note: The “Fast Travel Photo (train icon) might only show on the “All” filter and not the “Discoveries” Filter for some players.
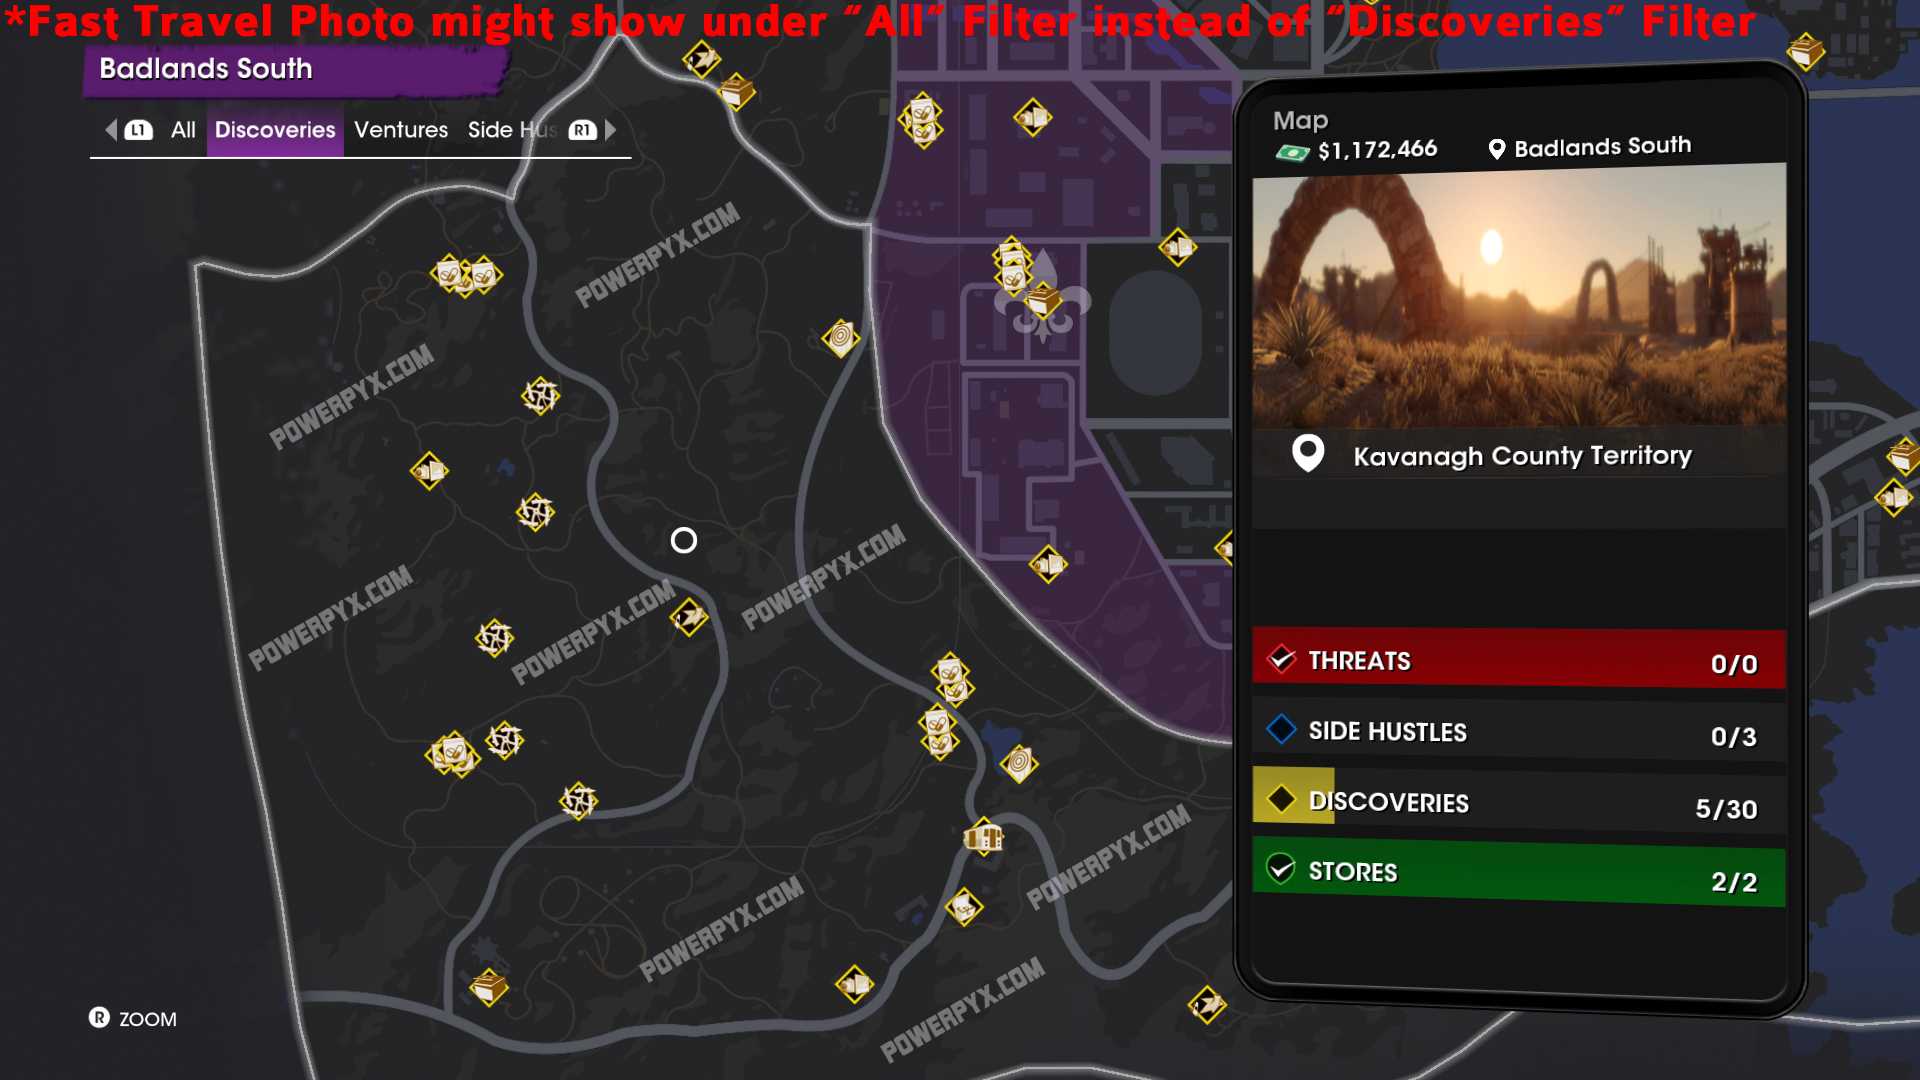

- Pallet Pickups: 10
- Photo Hunts: 2
- Hidden Histories: 1
- Dumpster Diving: 1
- Weather Stations: 5
- Fast Travel Photo: 1
- Shooting Galleries: 2
- Lost Wheels: 8
- Total: 30
Badlands North
–> Not needed for “All Mine” trophy (100% in all 15 inner-city districts), only the ones containing threats count towards the trophy
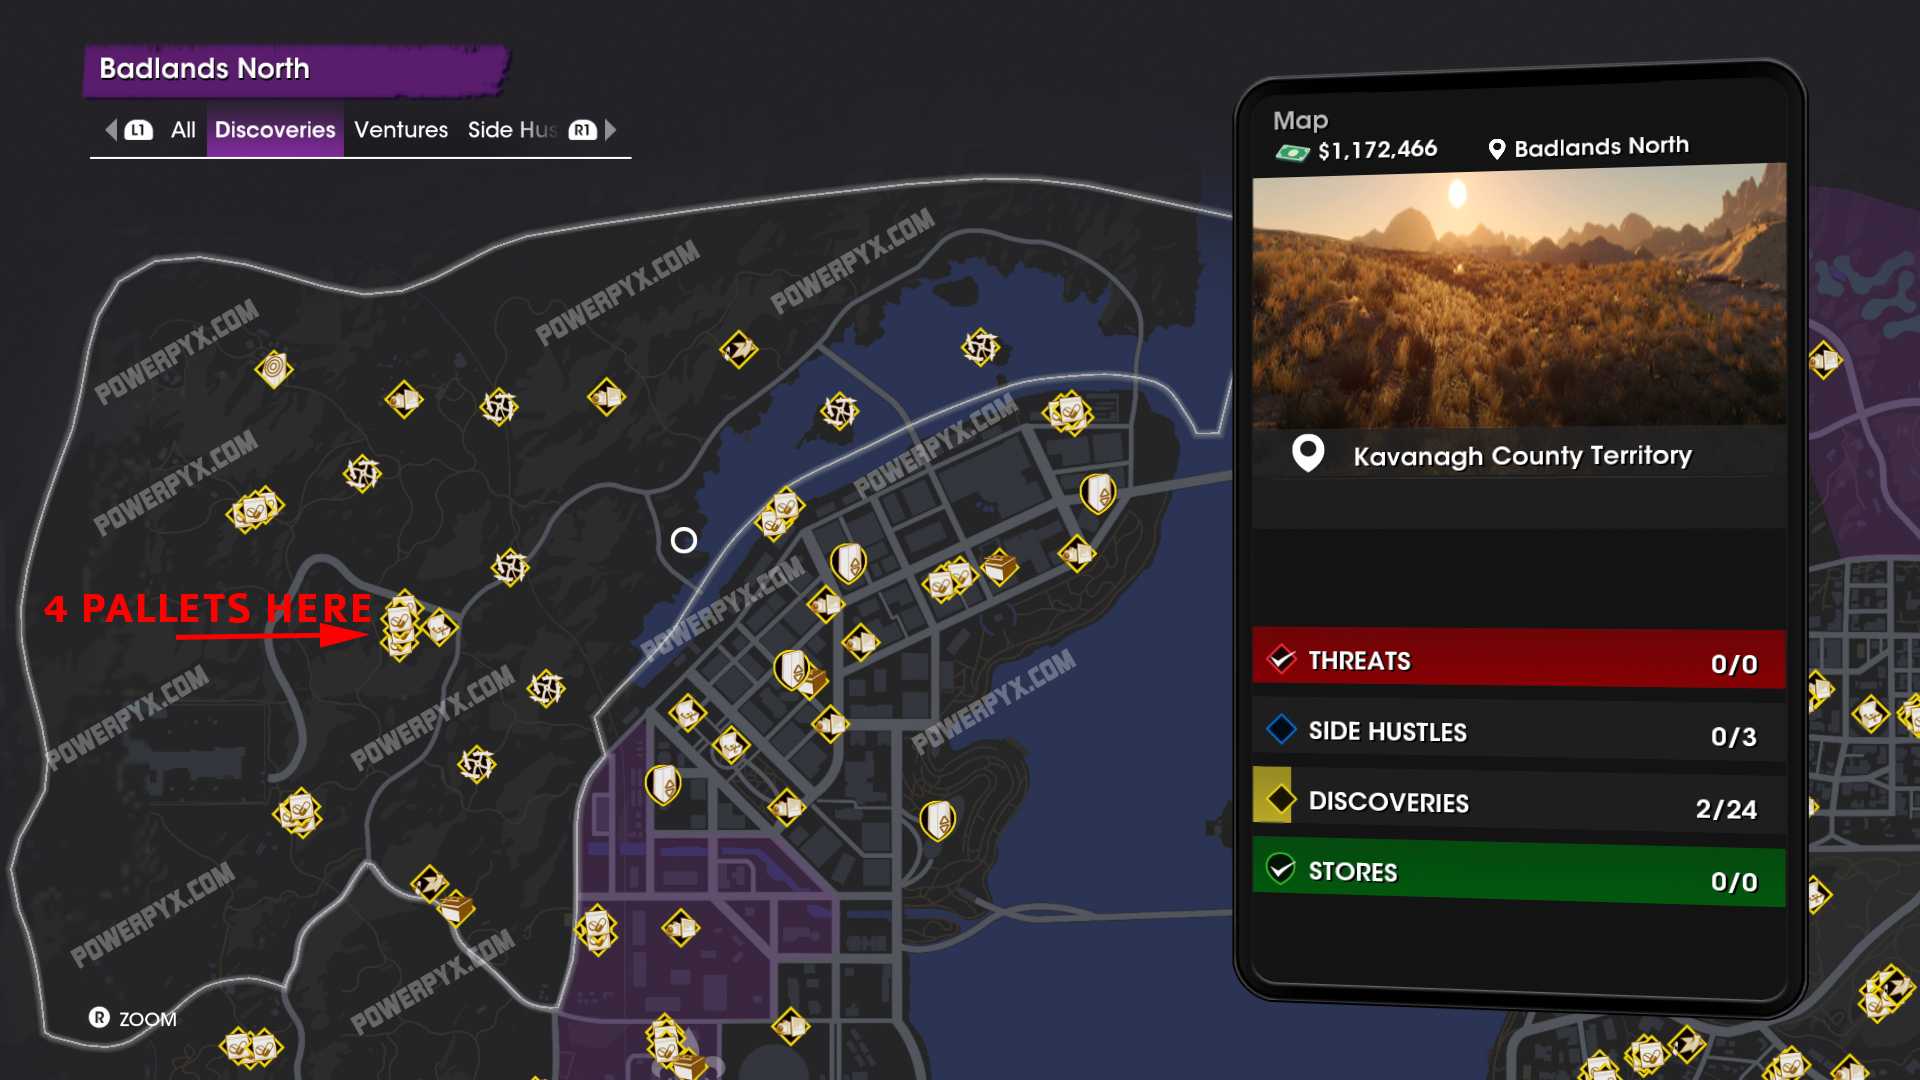
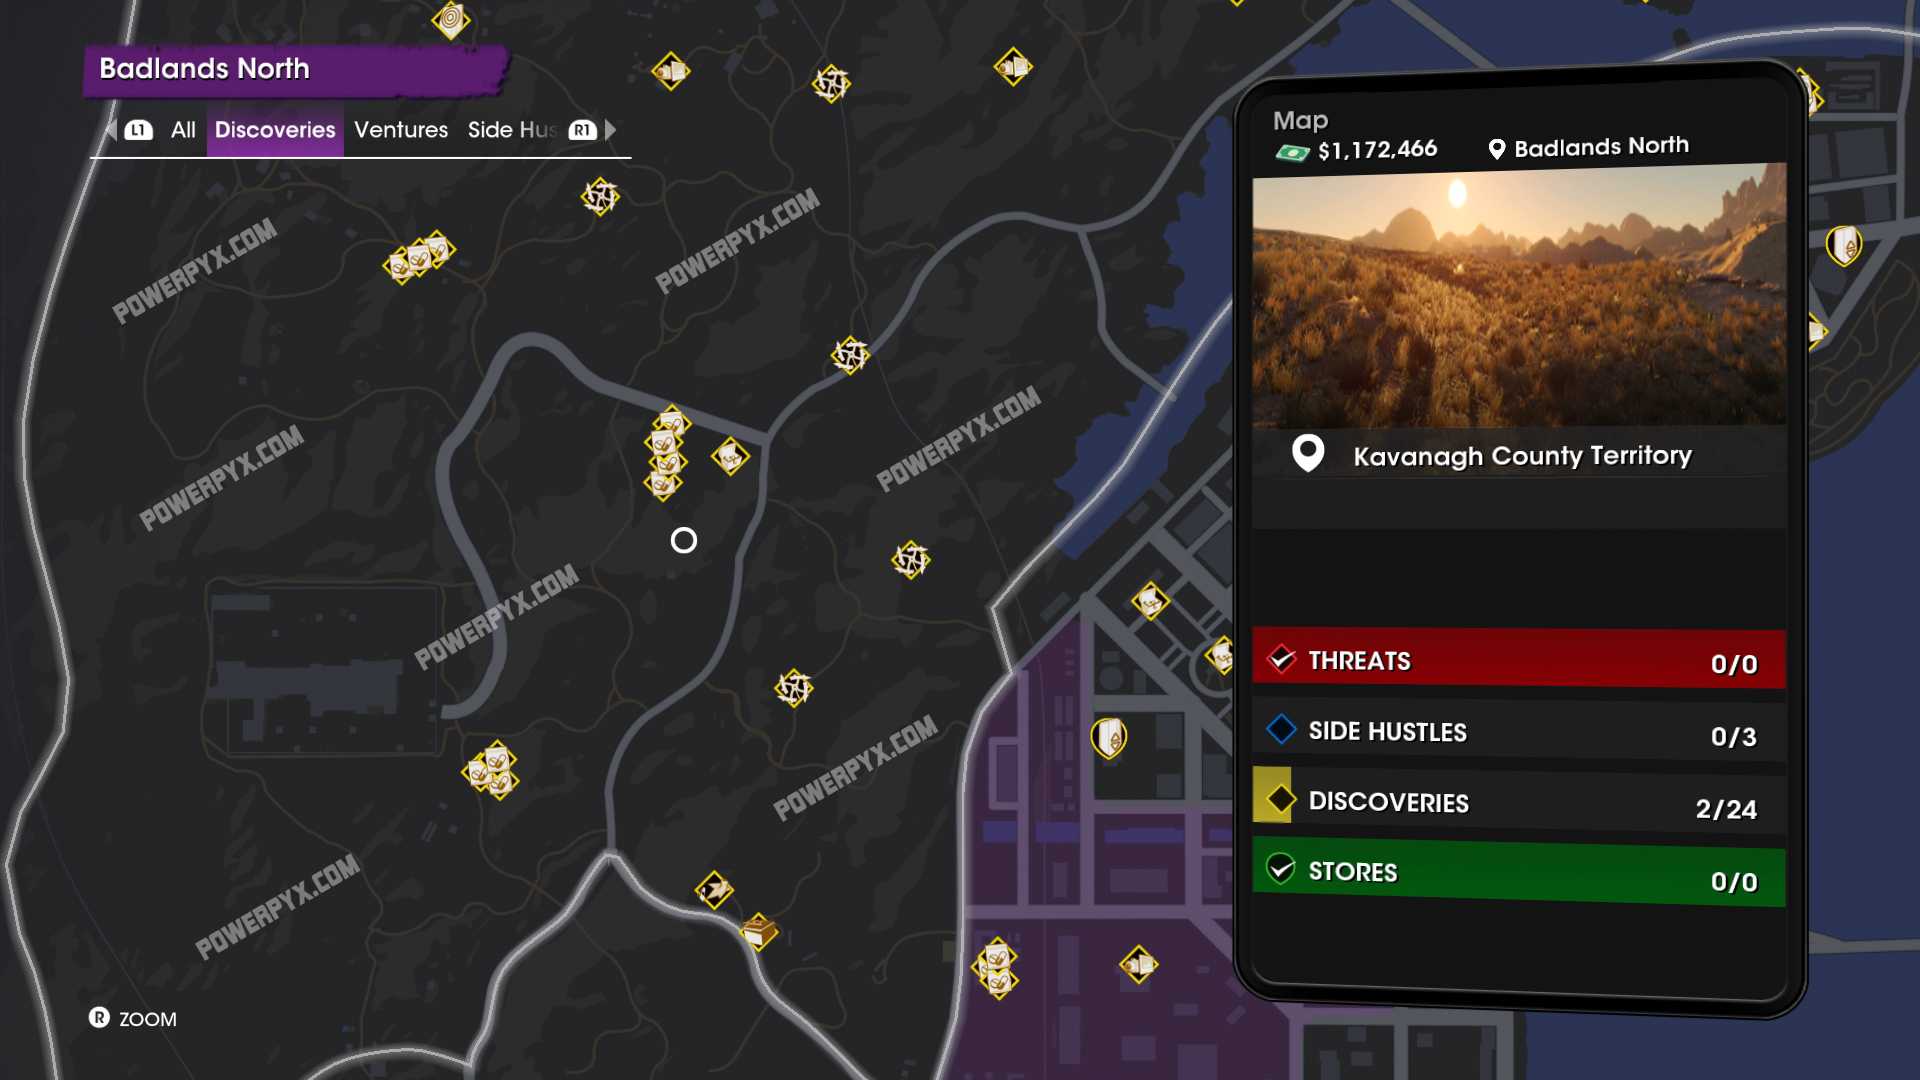
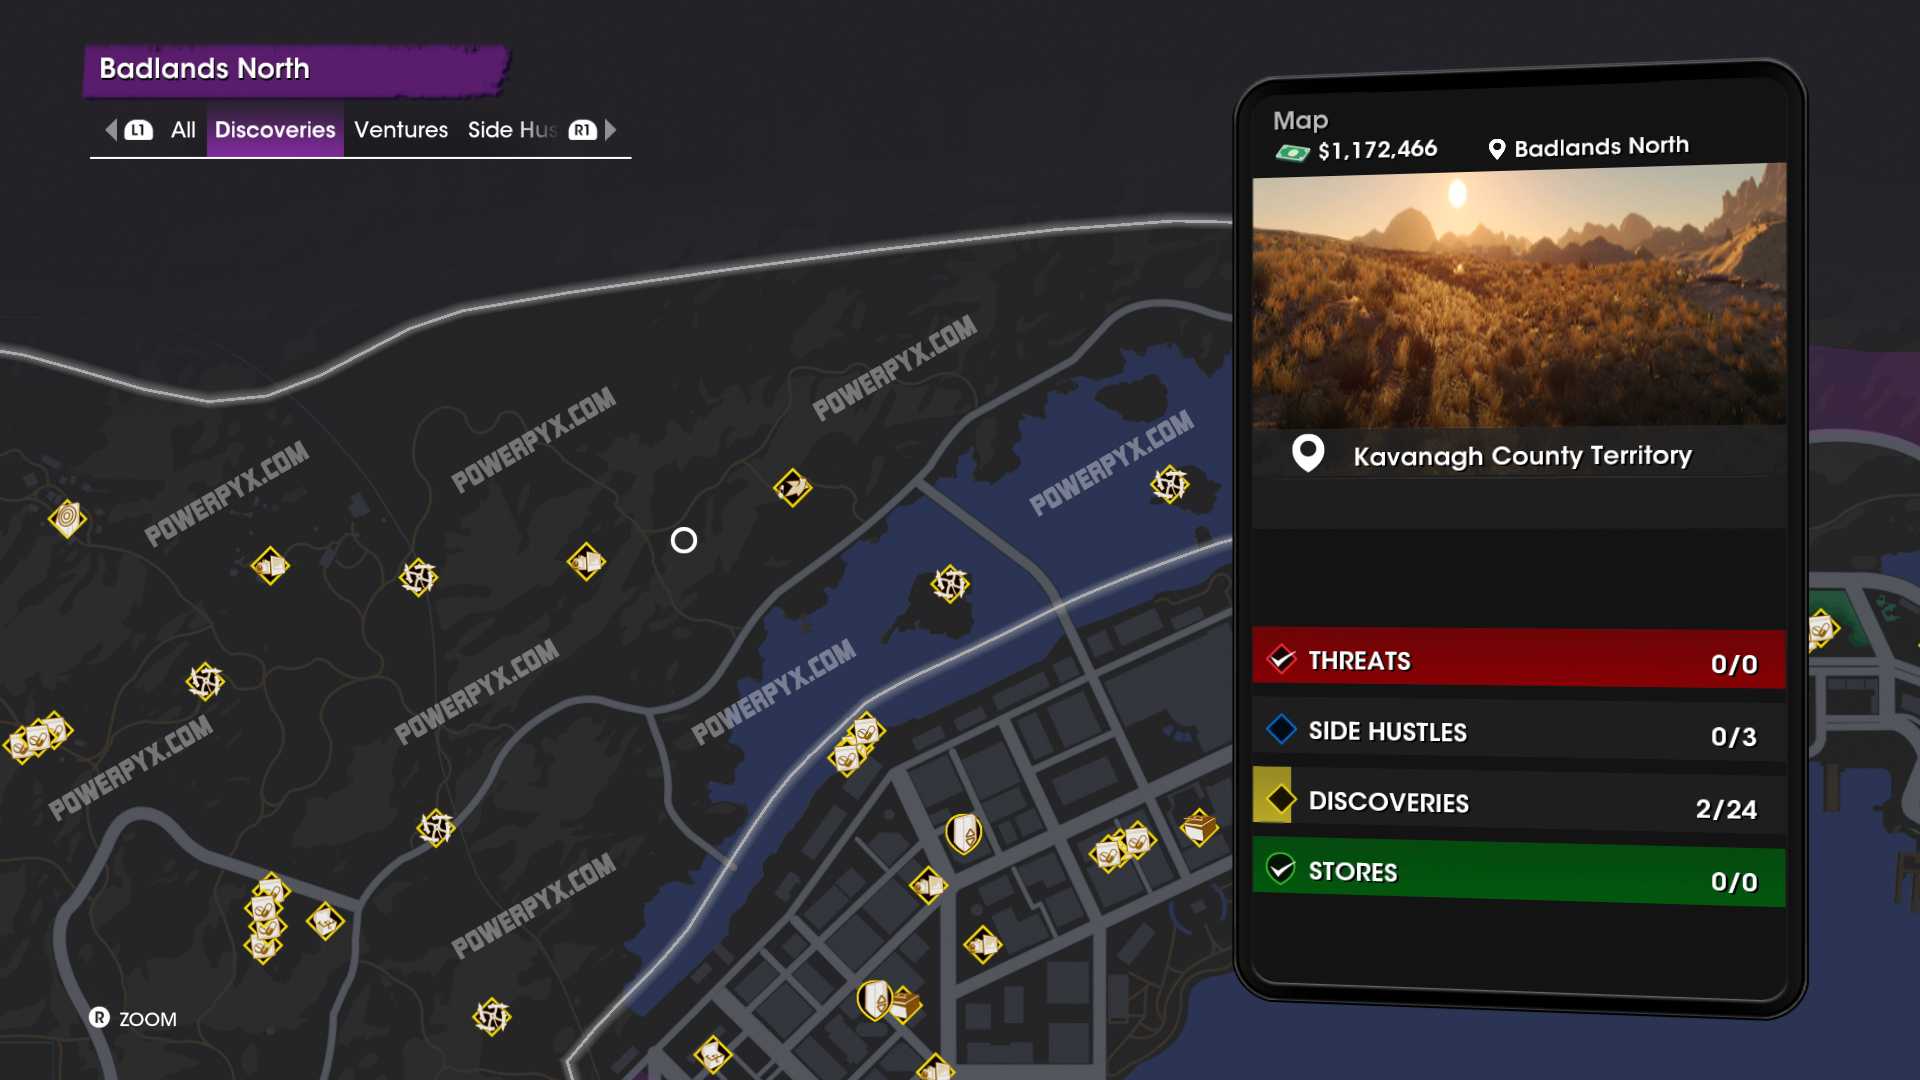
- Pallet Pickups: 10
- Photo Hunts: 2
- Hidden Histories: 1
- Dumpster Diving: 1
- Weather Stations: 2
- Shooting Galleries: 1
- Lost Wheels: 7
- Total: 24
That’s all of the Discoveries in Saints Row.
For everything else needed for 100% Completion refer to the Saints Row Wiki & Strategy Guide.
Santana says
Thanks for this guide saves me driving around forever, though there is one problem I’m having with Lakeshore North it says 10/11 but I’ve discovered everything there and I’m not sure what to do about that.
Mary says
Same with me I even followed the video guide to double check but in badlands north
Kyle S. says
Anyone else having an issue with getting weather stations to contribute to the discovery bar in each territory? I’ve got 2 territories missing one discovery and it seems to be the weather stations.
PowerPyx says
The weather stations automatically count when discovering their map icon, no need to interact with them.
When one is missing it’s usually a pallet, they always spawn in pairs of 3-4 in same spot. I’d recheck the pallets.
Jordan says
I’m also having issues with weather stations and can confirm it’s them. Both Badlands North and El Dorado. BLN I had 1/24 discoveries but both show up on the map. I went to each and it stayed at 1/24. Did all the other discoveries and now have 23/24. El Dorado it was on the map and after meticulously doing the other discoveries I am missing one.
PowerPyx says
@Jordan given your counter was already off by 1 before collecting stuff that would indeed imply the weather station is the issue. Then the only fix might be to reload an older manual save before discovering the station.
I assume you already tried using the weather stations and that didn’t fix it? (normally using them isn’t required but worth trying if they bug out)
anasterion says
I was a bit scared about Eldorado as also was missihg 1 discovery and for me issue was that I followed picture of map instead of video. So for me problem was that I photographed The Varmint building logo instead of fast travel El Dorado sign. Be sure to recheck that one. After you photo it the icon will turn purple and you will be able to fast travel there. Maybe the same issue is for you guys.
John Brant says
This game is terrible, bugs bugs bugs that’s all these devs know how to do anymore is come out with buggy games. I have 3 fast travel locations bugged with no way to fix it unless I restart game and not doing this all over again for it to bug out again.
Santana says
I personally like the game but the amount of times I had to close the application cause of bugs is ridiculous and I don’t even think the patch fixed anything in fact I had to close and reopen the application MORE times. I just hope they actually make an effort to fix their game like CD OR did with Cybperpunk (still not perfect but far better now than before)
GPAP360 says
Can’t find a clear answer anywhere.
Only the 15 district discoveries must be completed for the “All mine” trophy / achievement no?
The desserts discoveries must be completed only if you are looking for the 100% completion, but is not needed for any trophy / achievement.
PowerPyx says
Only the 15 inner-city districts are needed for the trophy. Lake Sabastian and the 4 desert areas can be skipped. You only need the Photo Hunts from those.
Rass says
I had 10/11 at Monte Vista and the Photo hunt trophy already so I thought it couldn’t be the photo there but it was. So the Photo hunt can popup earlier.
Jon says
If you don’t want to wait until the end of game, you can take a helicopter from either north Sky Canyon or Eldorado and get discoveries done at any time in any part of game.
crazytoons says
first thing thanks all the work you done it helps a lot but would you please update and add new discoveries from sunshine springs and Vallejo thank you
Ste says
Tourist Trophy Unlocked well early for me, I had about 13 photos left and it popped very strange. Anyone else get this?