
Resident Evil 4 Remake has 41 Treasure Locations in the Castle. Finding all Castle Treasures indicated on the treasure map unlocks the Raider trophy & achievement. The Castle section is only playable in Chapters 7-12.
For other regions refer to:
All Treasures are missable and must be found within a single playthrough for the trophy and achievement. Your Treasure Progress does not carry over into the next playthrough. There is no free-roam and no chapter select after the story. As you advance the story all areas gradually become inaccessible and cannot be revisted. So make sure you collect everything at the first opportunity.
It’s recommended to keep a Manual Save at the start of each chapter. If you miss something you can reload that save and recollect everything from there instead of having to start a New Game from scratch. If you die or reload saves you must recollect everything since the last checkpoint. Some collectibles can’t be reached on the first visit because you will be missing the necessary key items. You will revisit those locations later. Key Items needed for Treasures are also included here (such as Small Keys to open locked drawers).
Owners of the Deluxe Edition with the “Treasure Map: Expansion” DLC will have some extra Treasures spawning in the game, but those DLC treasures are not needed for trophies & achievements. This guide is based on the Standard version of the game without the DLC.
Chapter 7
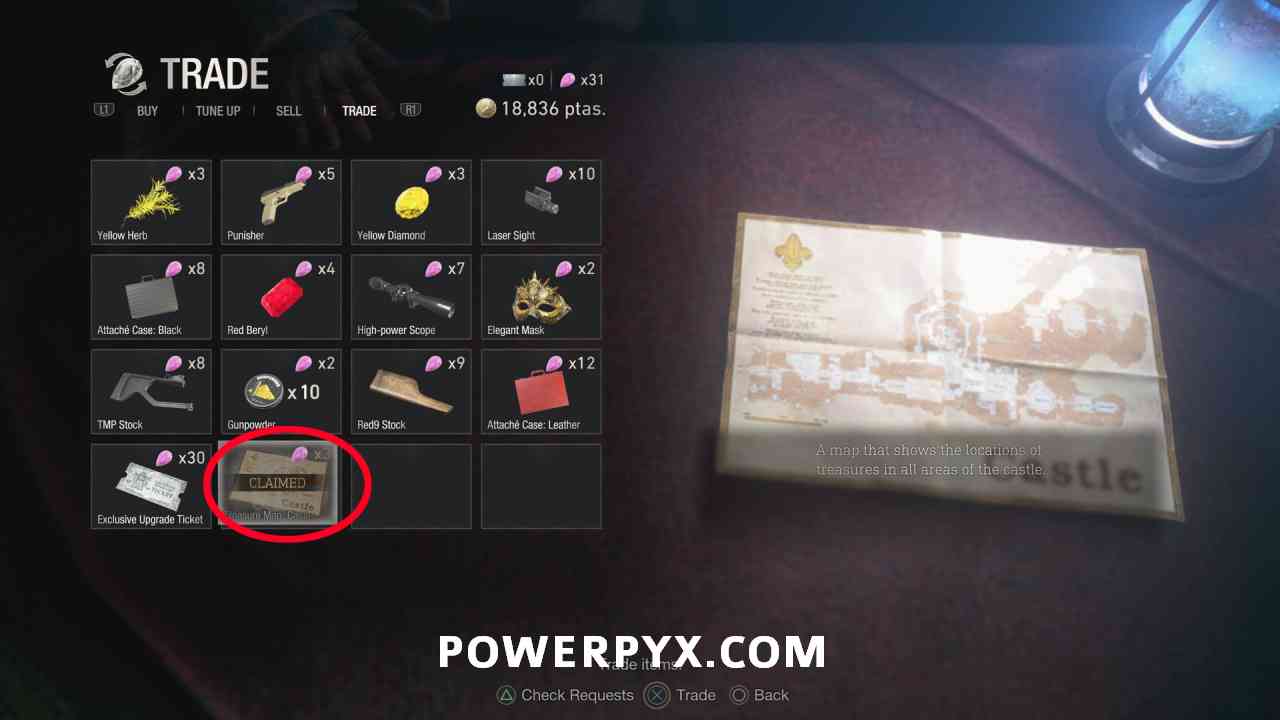
Treasure Map: Castle
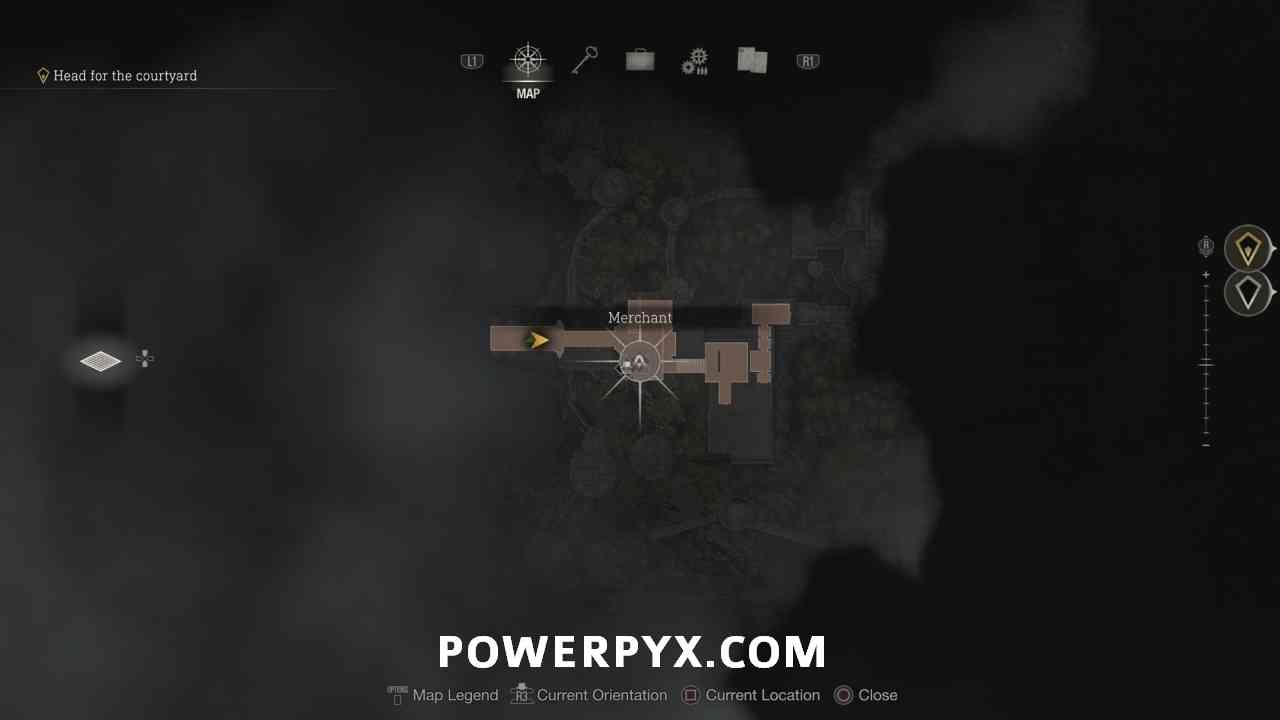
At the very start of the Castle, enter the first door on the right to find the merchant. Buy the Castle Treasure Map from him, this marks all treasures on the map and adds a progress counter in the bottom right of the map.
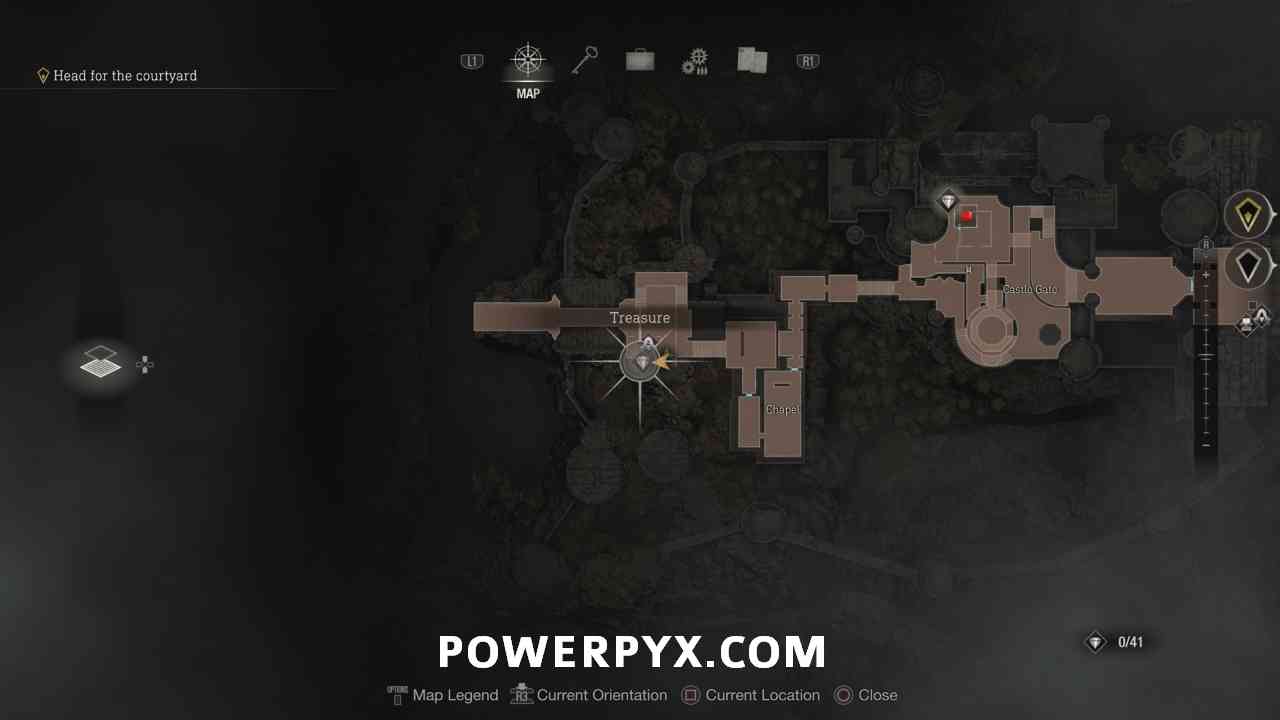
Treasure #1: Vintage Compass
Same place, this is behind the merchant on the other side of the building. Circle around the building to find it outside, in a chest.

Treasure #2: Elegant Bangle
After destroying the counterweight on the cannon (story related), climb the ladder and this will be before the next door you go through.


Treasure #3: Elegant Perfume Bottle
After defeating the enemies in the Audience Chamber, boost Ashley up the wall on the left, then she opens the gate. Go through the gate and turn right to find the chest at the end of the path.


Treasure #4: Ruby
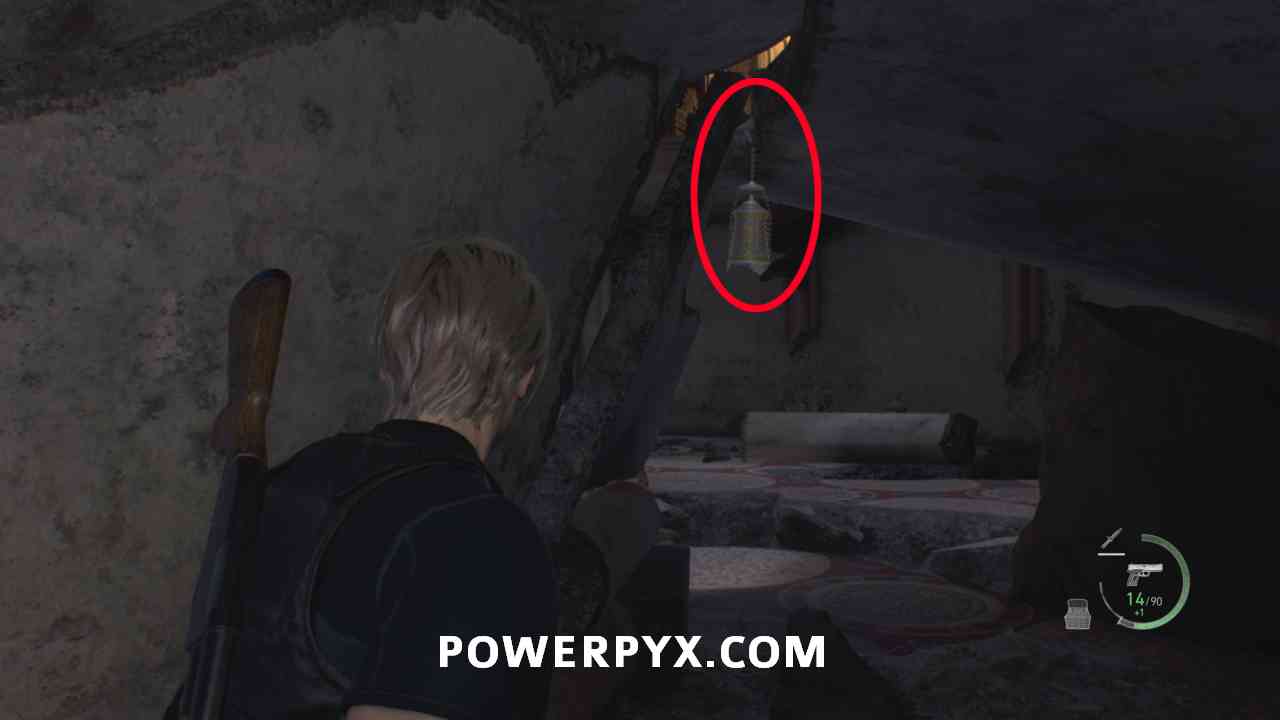
Now squeeze through the gap, then turn left and shoot down the silver container from the ceiling.


Treasure #5: Spinel
After opening the dungeon door and climbing up the ladder, you enter a storage room. This gem will be in front of you in plain sight.


Treasure #6: Gold Bangle
After solving the Treasury Swords Puzzle, in the next corridor, in treasure chest.


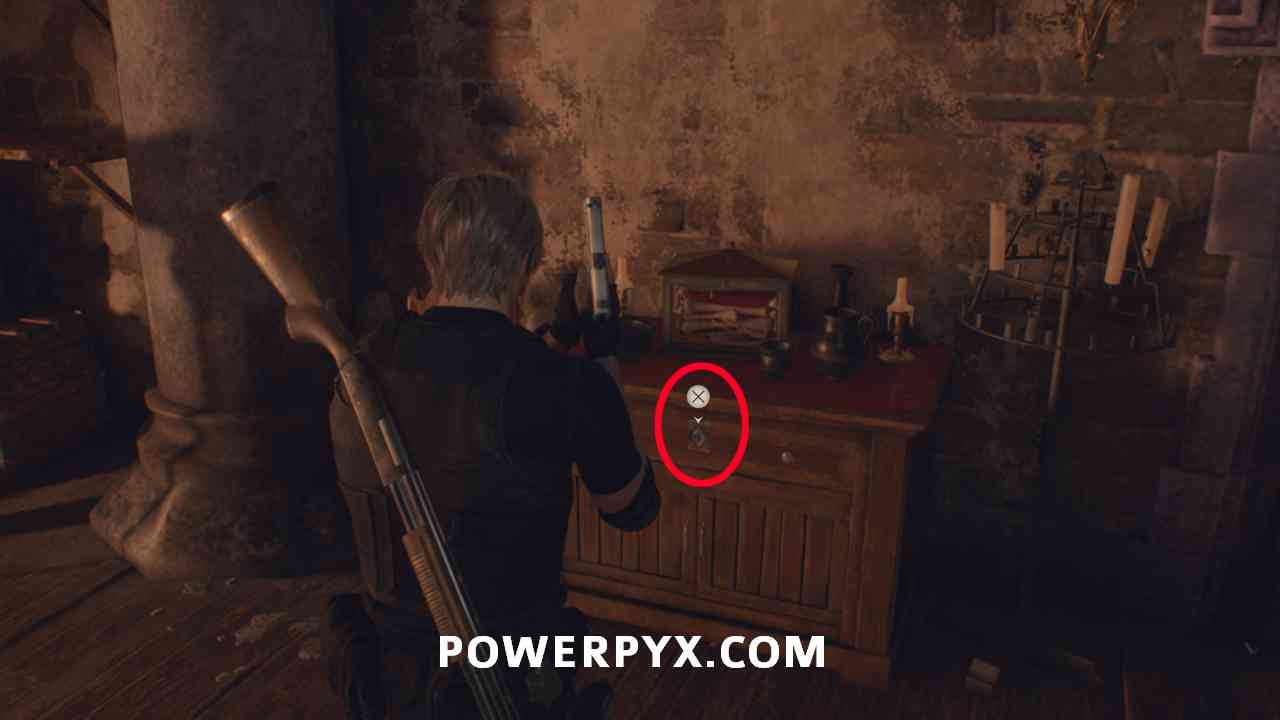
Treasure #7: Golden Hourglass
Go through the next door. Before doing anything else, kick down the ladder on the right of the path, this allows you to climb back up. Now jump across the chandelier on the right, after this turn right and drop down the hole to land in front of this treasure chest.


Chapter 8
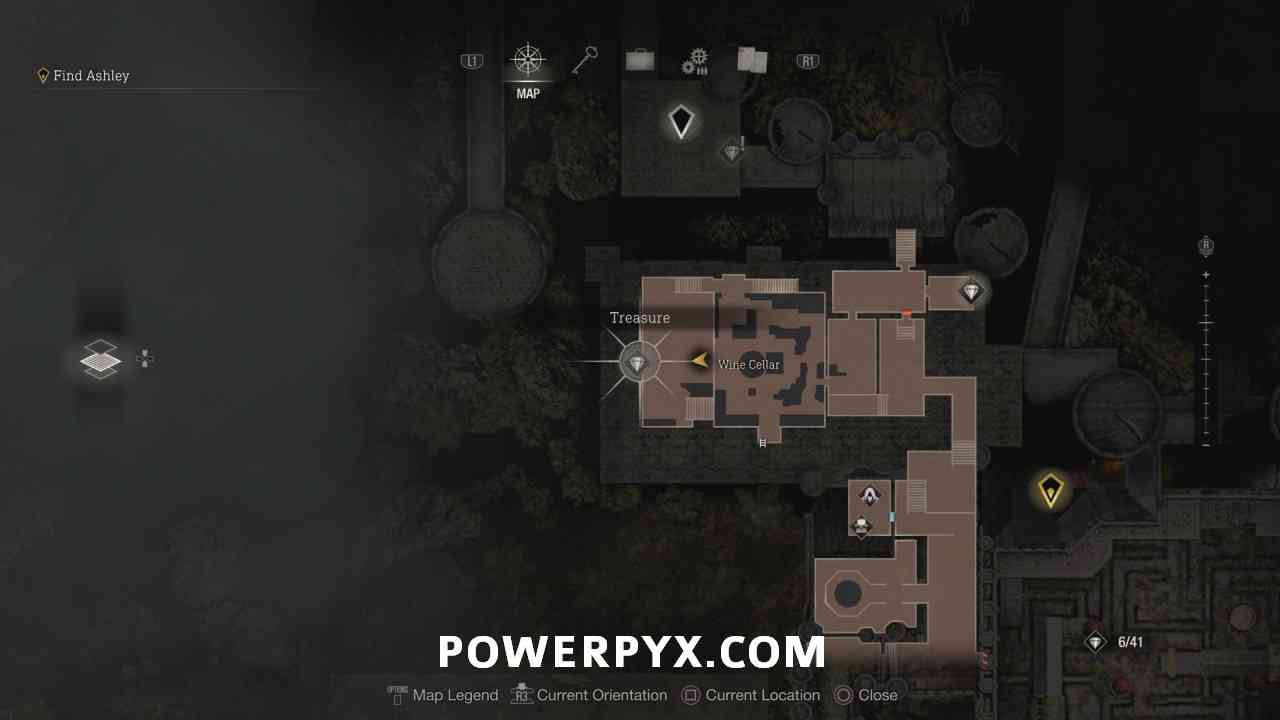
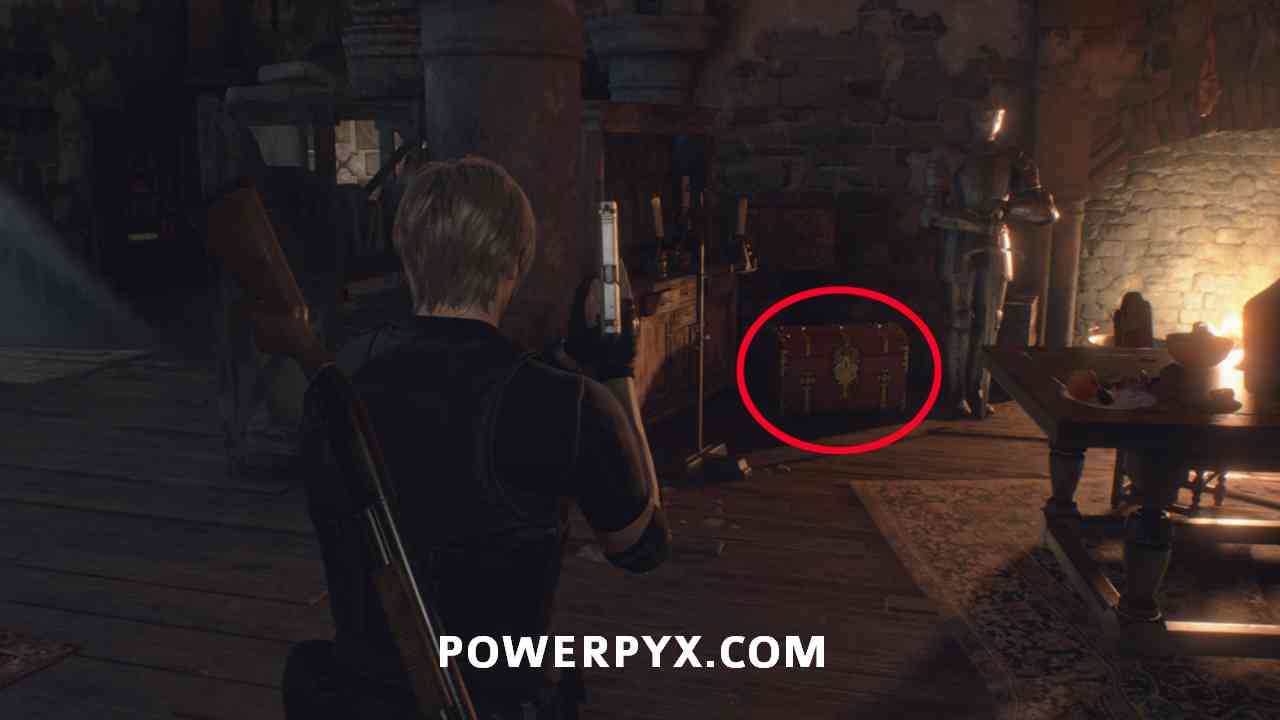
Treasure #8: Mirror with Pearls & Rubies
In Wine Cellar, Open the chest behind the Summoner enemy.
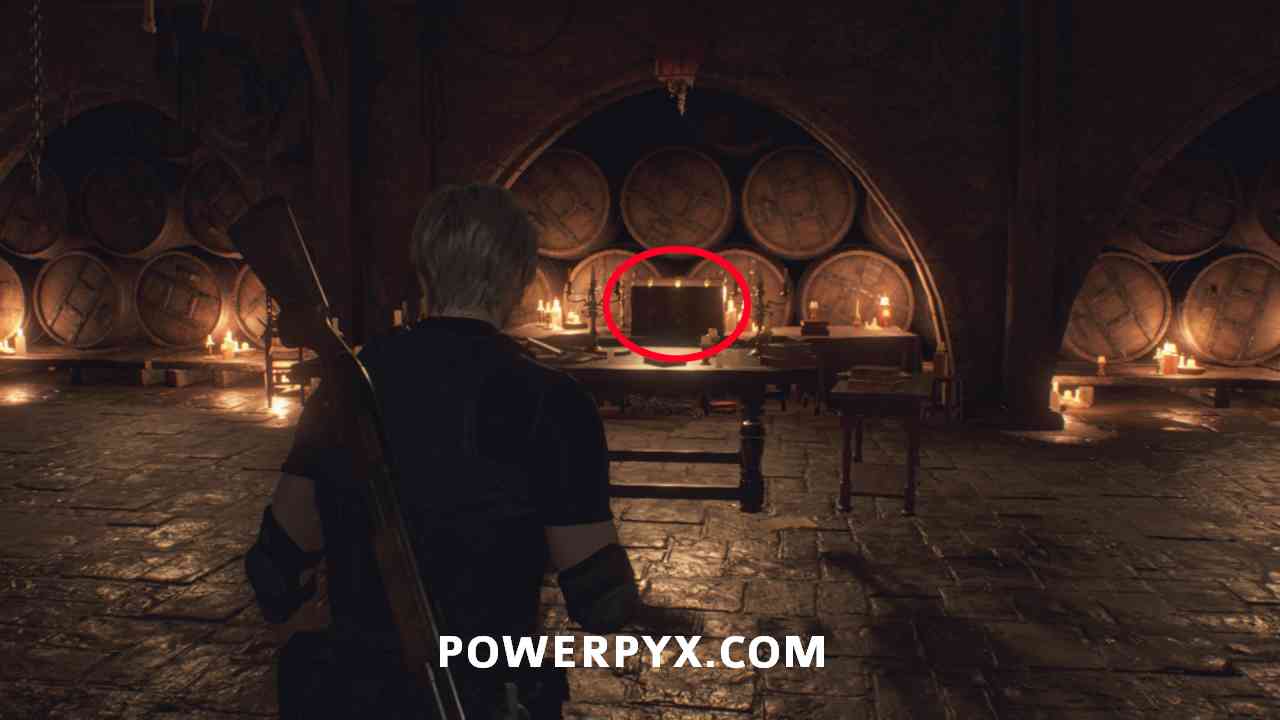
Treasure #9: Extravagant Clock
After a cutscene you will be inside the “Bindery”. In here open the treasure chest.

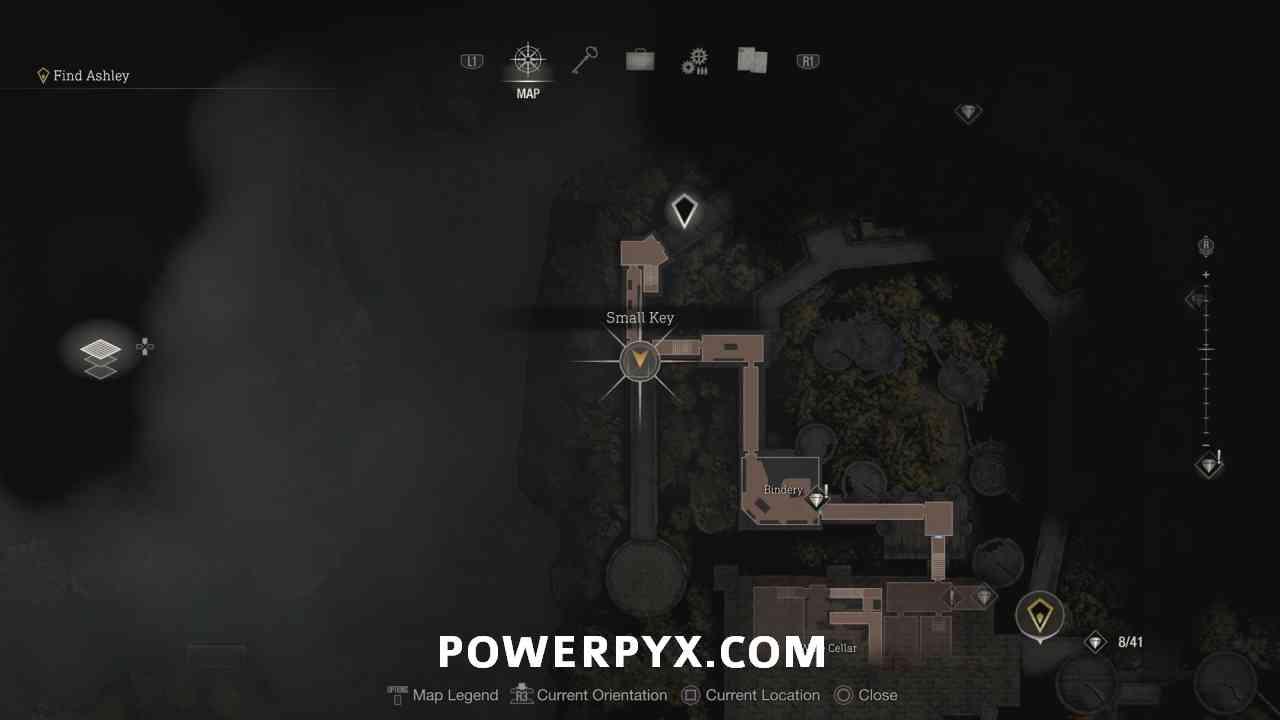
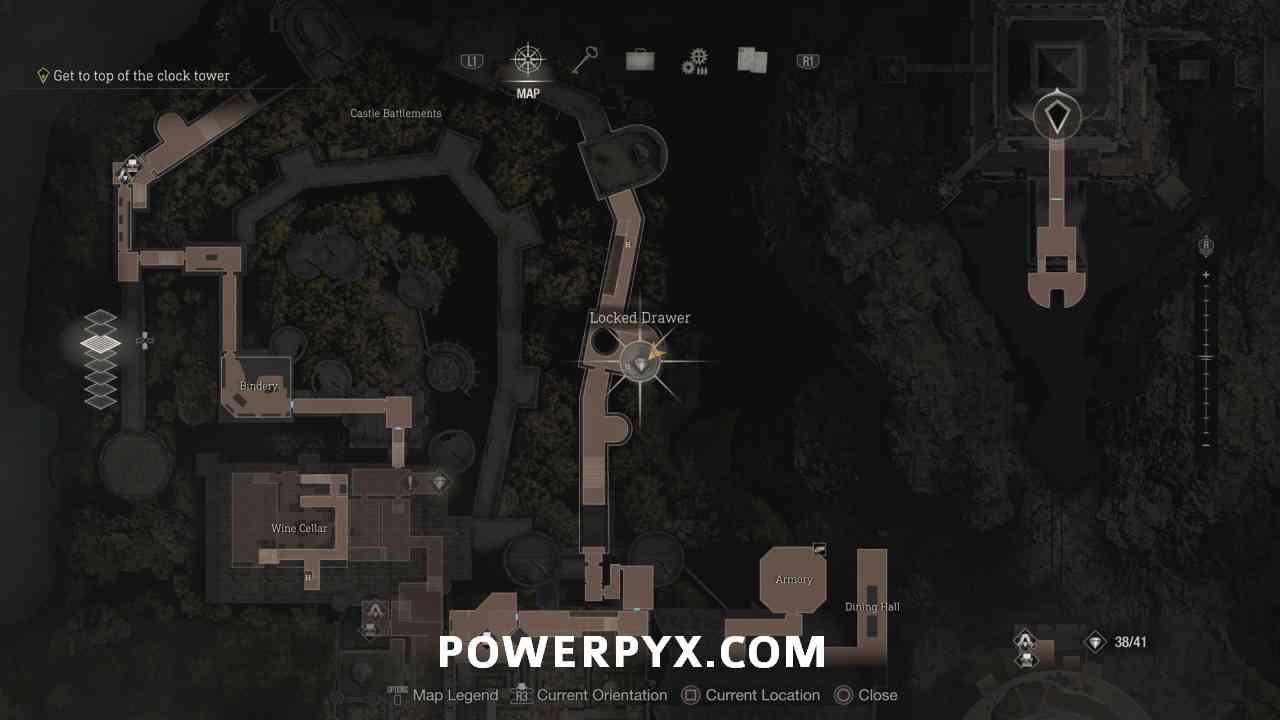
Key Item: Small Key
In the corridor after solving the Lithographic Stones Puzzle. With this key backtrack to the Bindery and open the locked drawer there for a treasure.

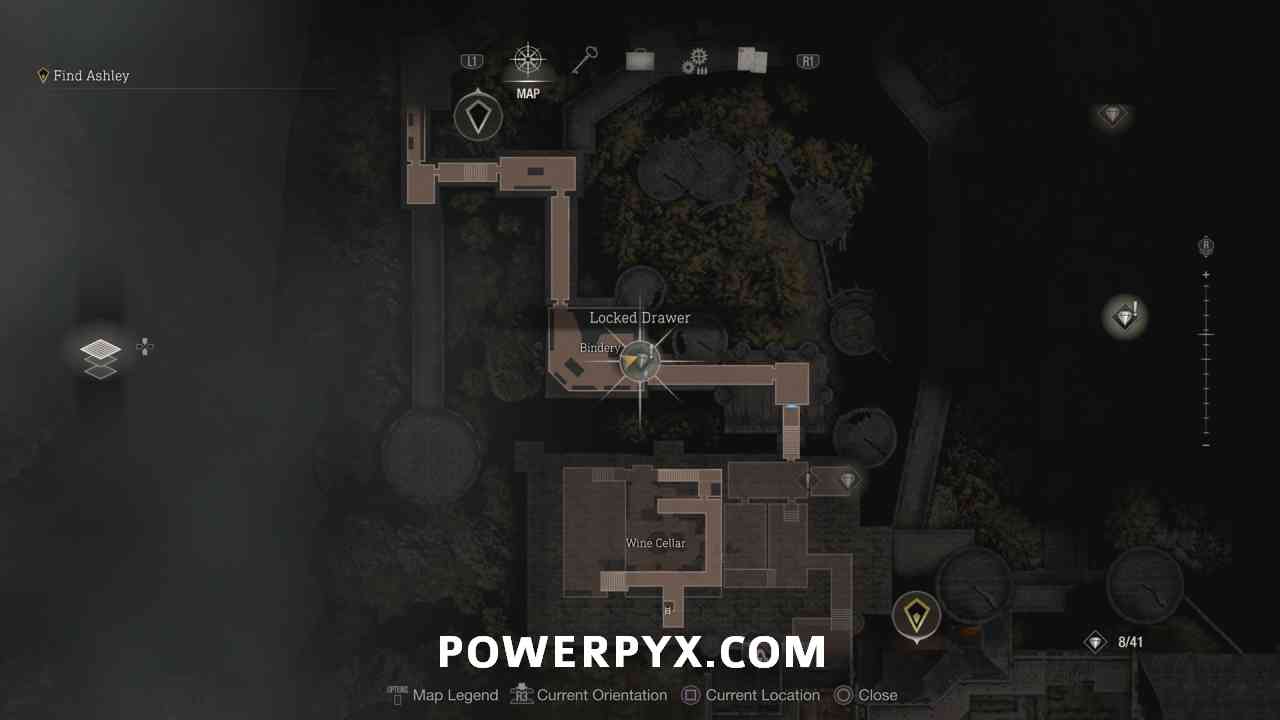
Treasure #10: Brass Pocket Watch
Backtrack to the Bindery and use Small Key on the locked drawer to get this.
Treasure #11: Ornate Necklace
While going through the Castle Battlements, you will come to a point where you must flip a switch to Night (yellow switches that let you pick between Day/Night to open gates). Then you must follow the path until you must climb up yellow rubble, climb up, then drop down through a hole to land near this treasure chest.


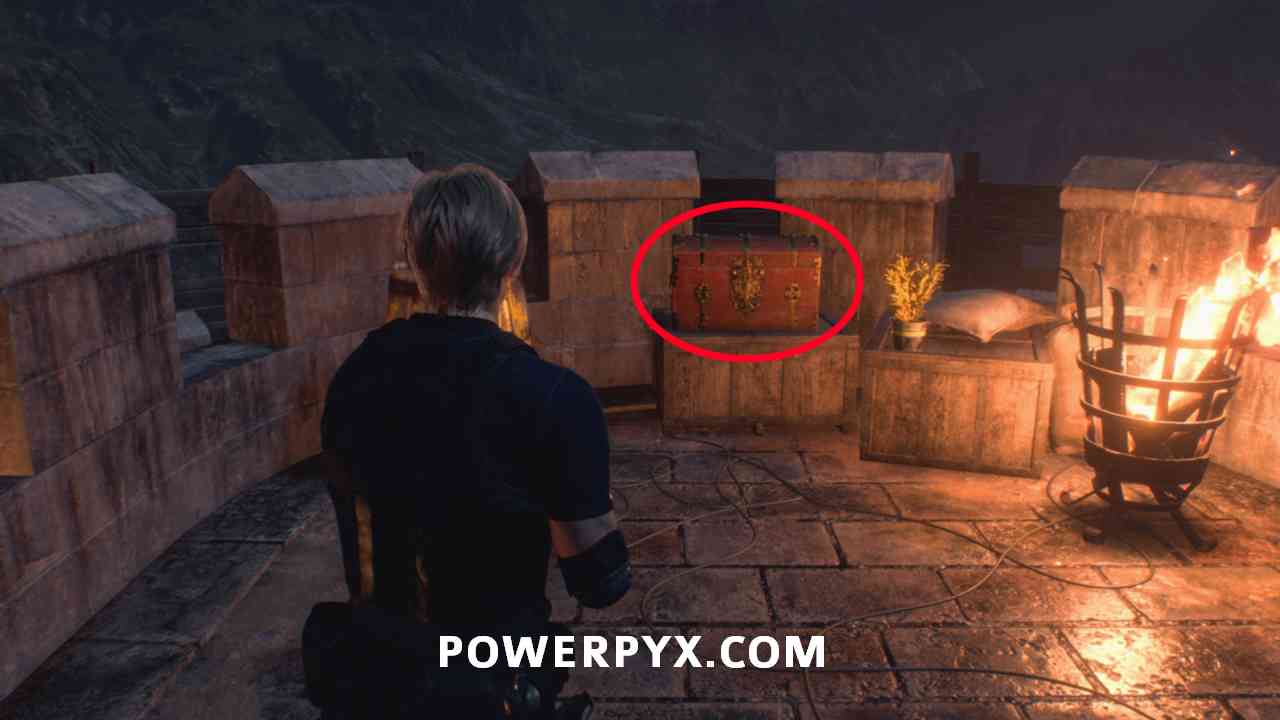
Treasure #12: Emerald
After reaching the top of the Battlements and going outside, where a big Ogre starts throwing rocks at you, drop down the RIGHT side of the battlement and go up the Battlement in the west. On top you find this chest.

Treasure #13: Ruby
Still in the Castle Battlements area, after passing the third tower on the map. Flip the switch to Day, then drop down to the bottom floor and enter the room under the third tower. You can shoot down the silver container here.


(Note: There’s a treasure in the last battlement inside a locked drawer which we can’t get yet. This is a Chapter 12 Treasure, we will backtrack for it then)
Chapter 9
Treasure #14: Elegant Chessboard
In the east of the maze.
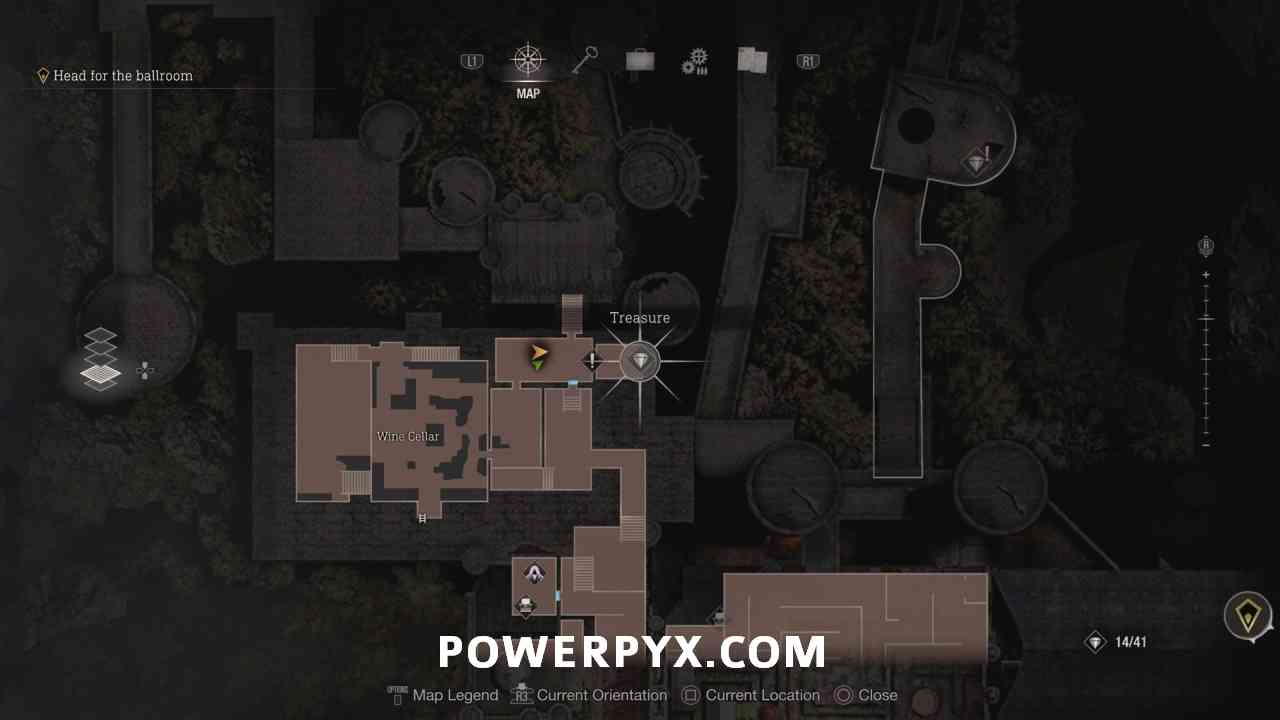
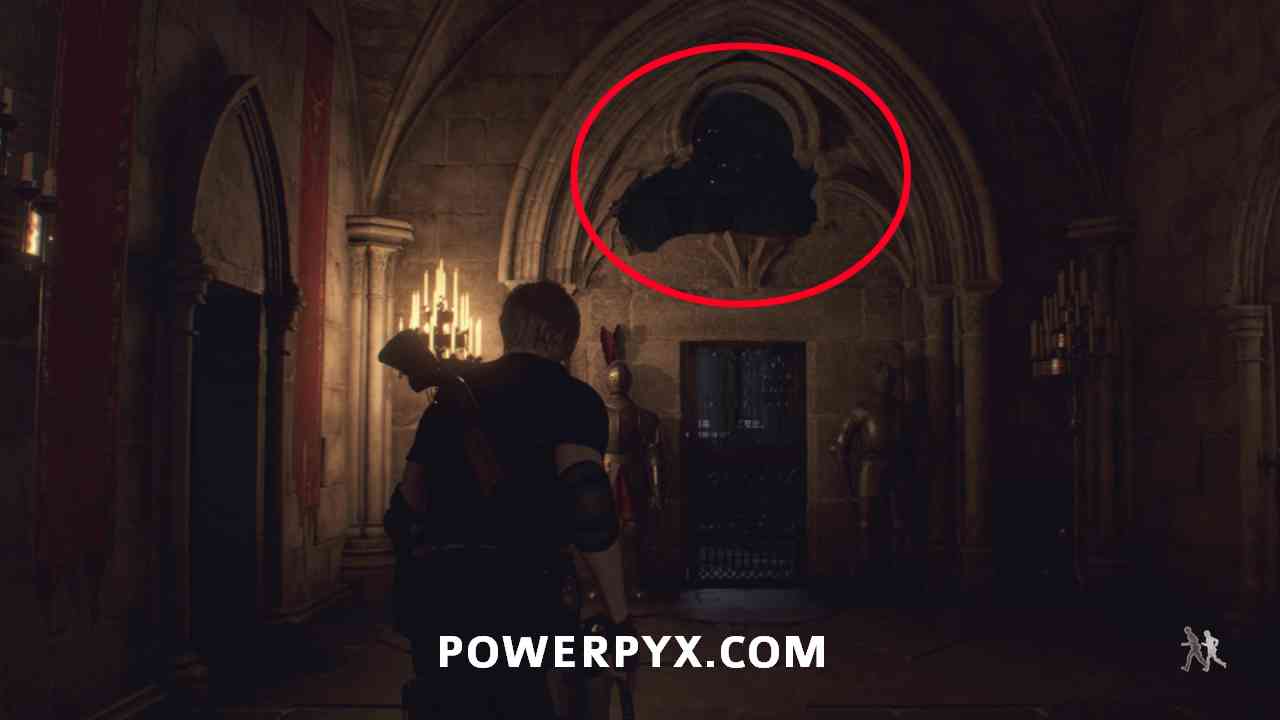
Treasure #15: Depraved Idol
After solving the maze, exit through the gate in the west and BACKTRACK to Wine Cellar. There’s a treasure behind a locked door you couldn’t get in Chapter 8. Now you can boost up Ashley to the gap above the door to get it. This is one of the most highly missable treasures in the game, in later Chapters you can no longer get it, you have to backtrack for it now.
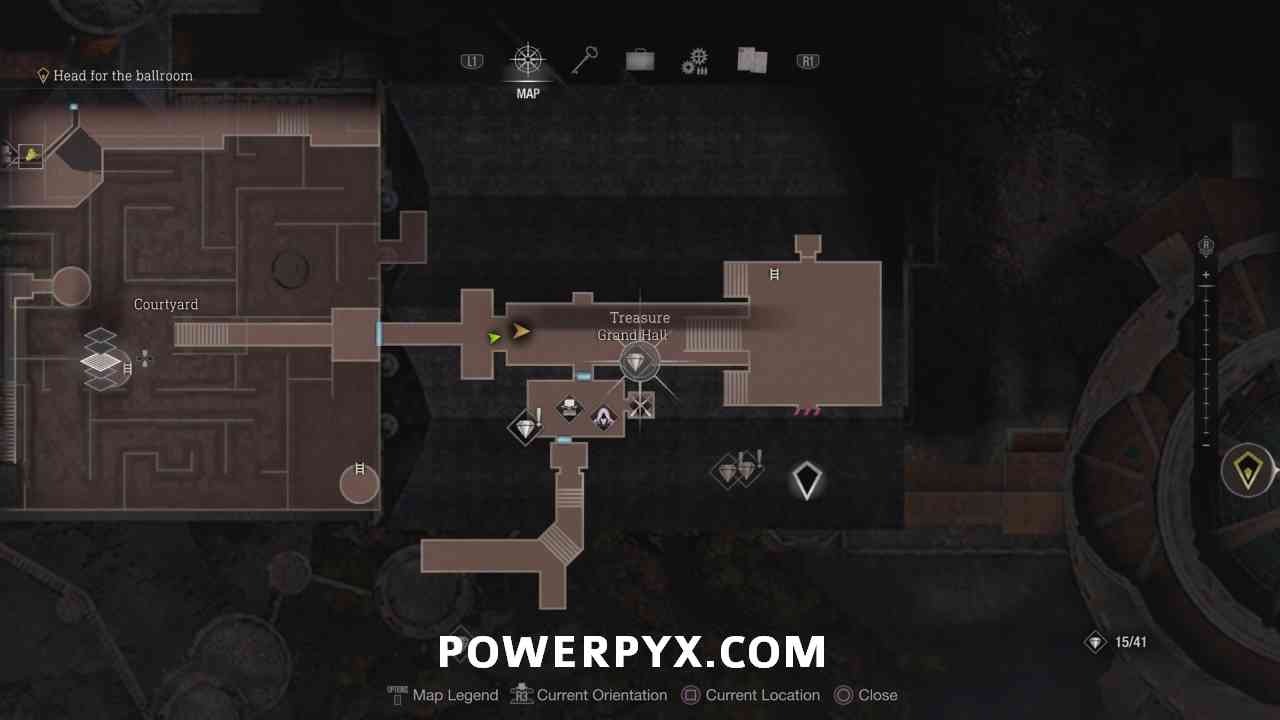
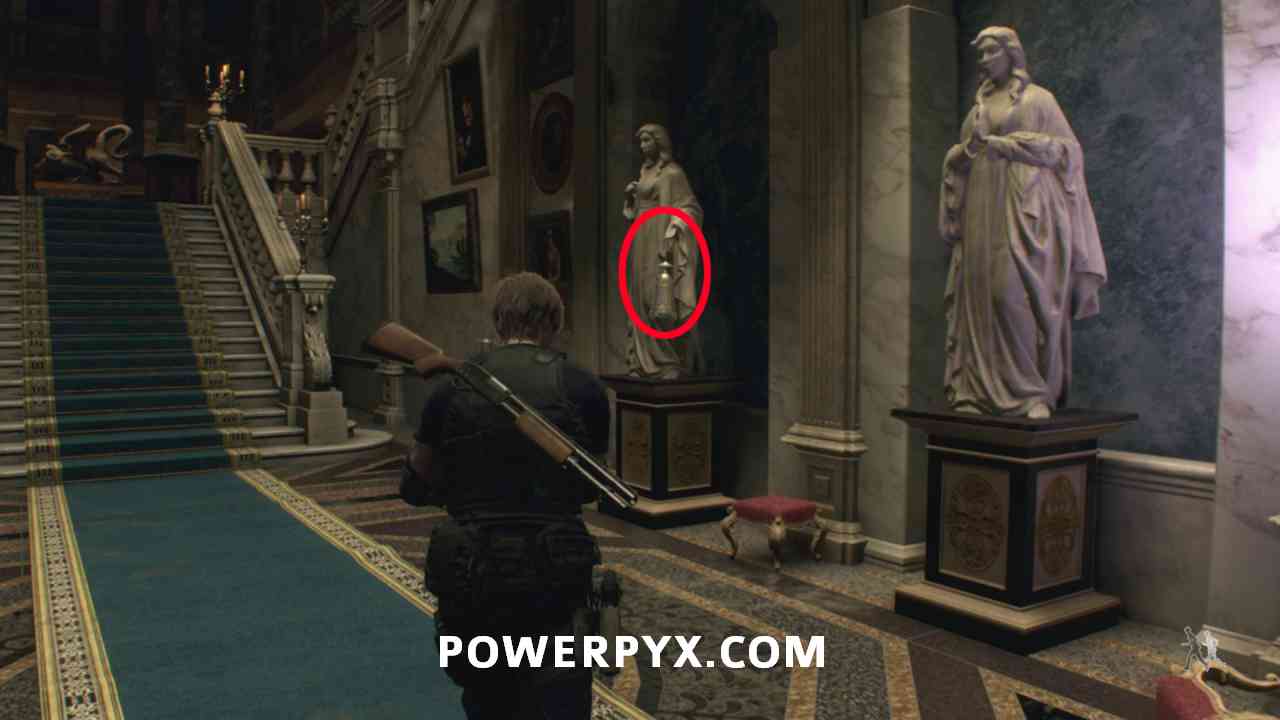
Treasure #16: Alexandrite
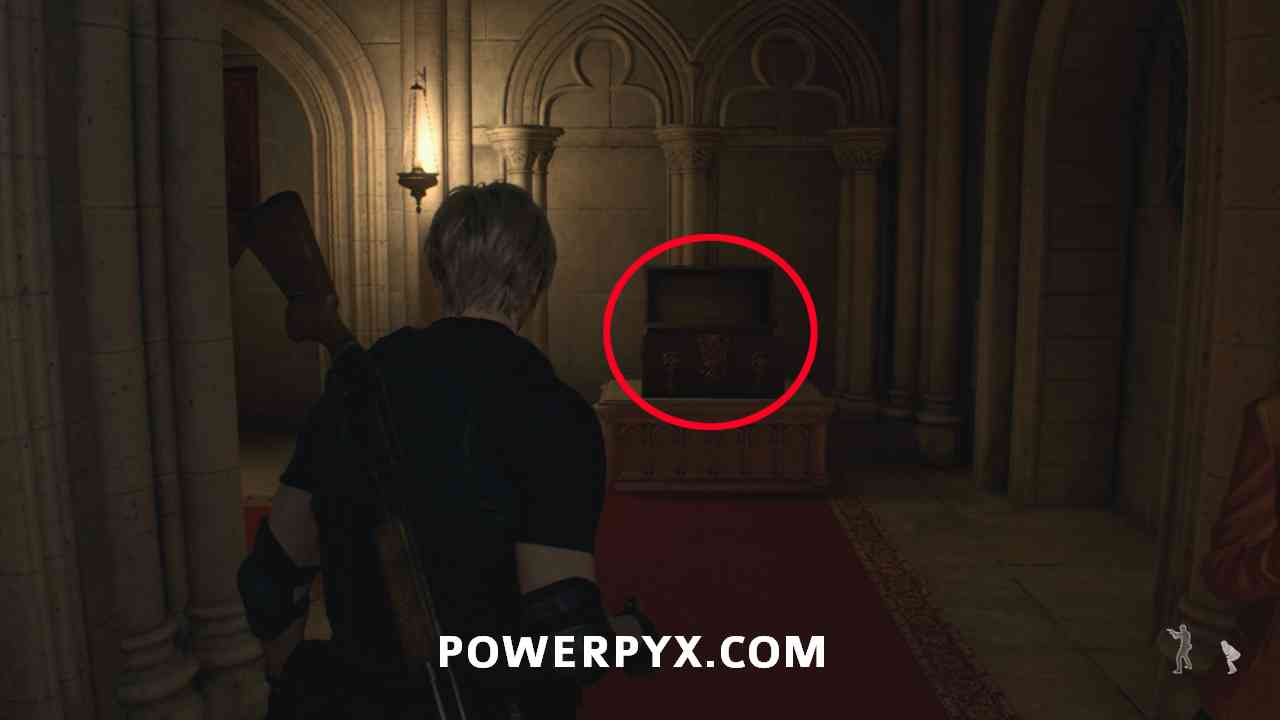
After exiting the maze through the east gate it’s in the next corridor (“Grand Hall”), shoot the lantern in the hand of the statue on the right.
Key Item: Small Key
Now enter the room upstairs in the north. Open the cabinet on the left for a Small Key, needed for a treasure.


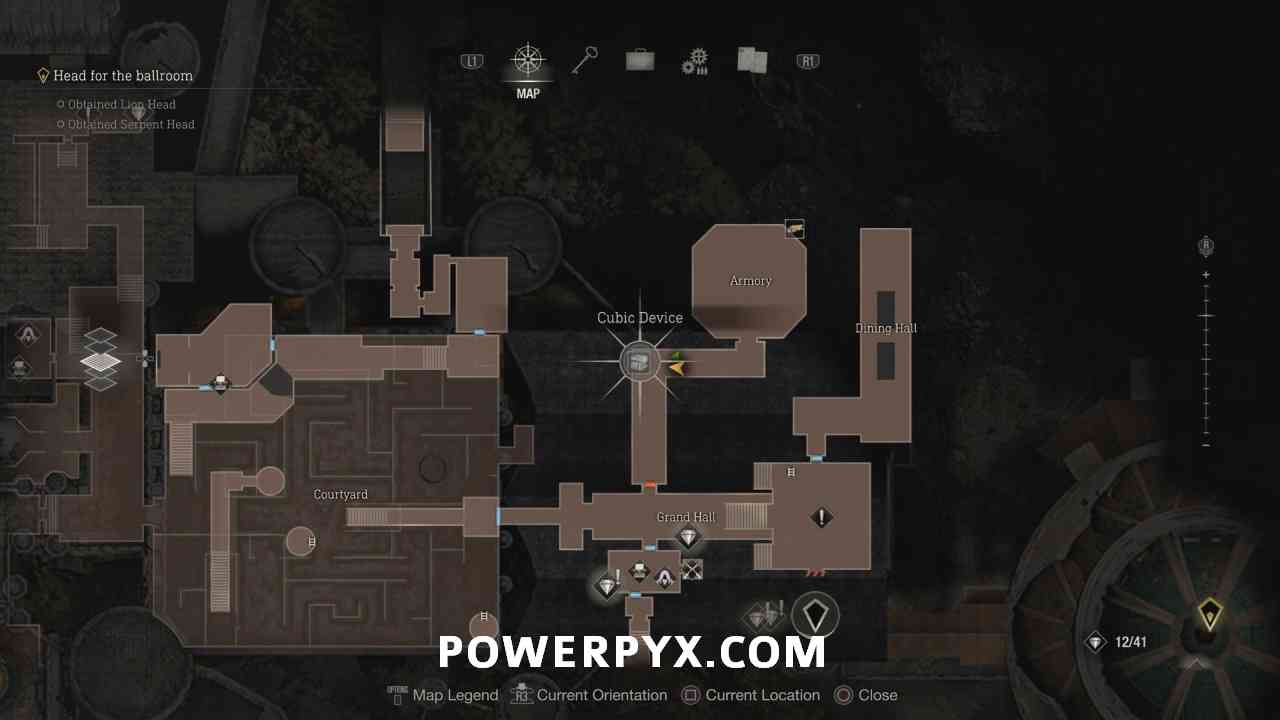
Cubic Device (needed for treasures)
In the corridor after exiting Armory, in a chest. This doesn’t count as a treasure itself but you need it to open the treasure shrines throughout Castle.
Treasure #17: Yellow Diamond
In the Gallery, climb up the ladder and pull the lever where the summoner enemy was. This reveals the treasure chest in the middle of the room.


Treasure #18: Butterfly Lamp
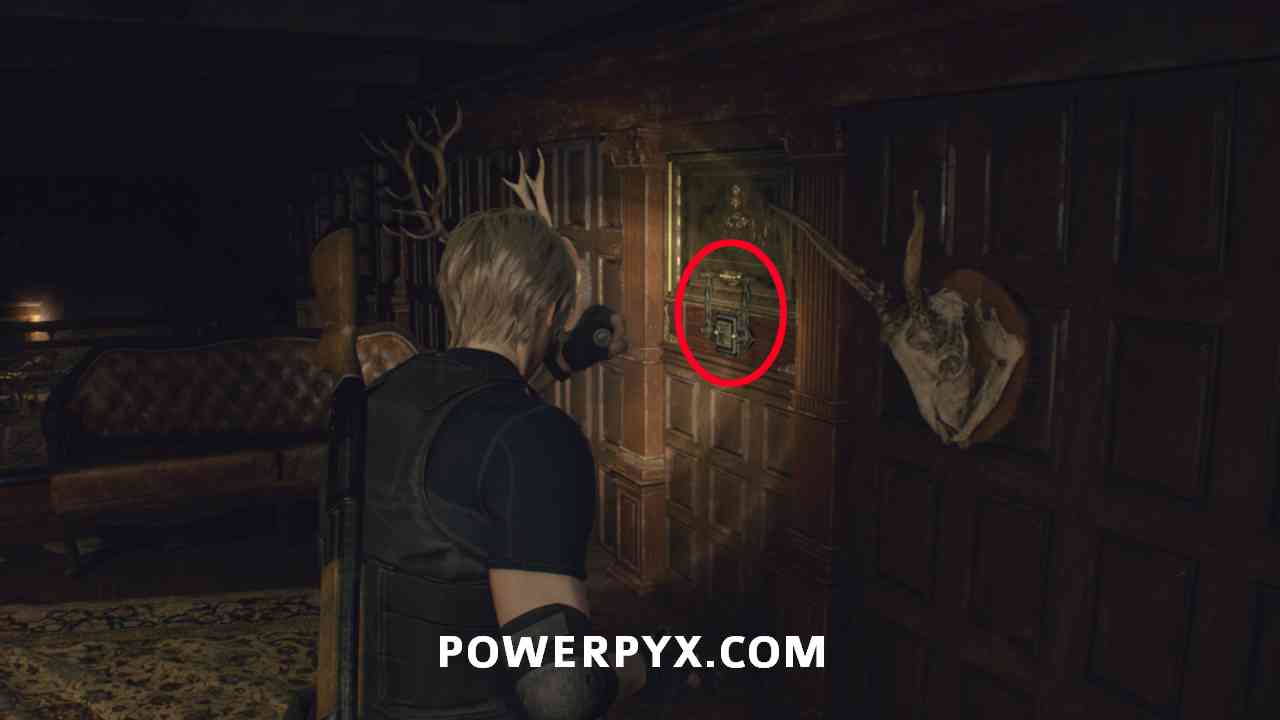
Before placing the 3 heads on headless statue, go back to the merchant in Grand Hall. Now you can use the Cubic Device on the Square Lock Box there.


Treasure #19: Justitia Statue
From same room, go through the door next to merchant and use the golden Gondola. You will arrive near Water Hall, from there backtrack to Audience Chamber. Now that we have the Cubic Device and Small Key, we can get the 2 Treasures that weren’t available in Chapter 7. Open the Square Lock Box for one treasure.


Treasure #20: Gold Bar
Same place, open the Locked Drawer in Audience Hall with the Small Key we found earlier. Now you can use the Gondola again to get back to the merchant and place the 3 heads on the statue to advance the story.


Treasure #21: Elegant Perfume Bottle
While playing as Ashley in the library. Crouch under the hole in the bookshelves to reach it. Use the 2nd key from the left to open it.


Treasure #22: Sapphire
From previous treasure, go to the north of the library and use 3rd key on the door and activate the elevator. This takes you upstairs to a typewriter save room. On the right of the room is a chest, use 4th key to open.


Treasure #23: Emerald
Next to the typewriter solve the clock puzzle by entering the correct time: 11:04 on Assisted / Normal or 7:00 on Hardcore / Professional. Backtrack to the room before the library where you find a clock puzzle on a door. Enter the time again there (11:04 / 7.00). Behind this door go down the path and use the elevator to reach the Mausoleum. Pull the 4 strings under the 4 symbols to open the door. Behind the door on the right is the treasure. Use 1st key to open it.


Chapter 10
Treasure #24 + Weapon: CQBR Assault Rifle (Weapon)
In the south of the library, go upstairs and use the Cubic Device on the Square Lock Box. If you don’t have enough inventory space, send some weapons to storage to free up space. You must pick up this weapon for it to count towards treasures and weapons. This item turns into a Gold Bar (L) if you already picked up the weapon in a previous playthrough.


Treasure #25: Golden Lynx
In the typewriter save room above the library, where Chapter 9 ended. As Leon, use the Cubic Device on the Square Lock Box.


Treasure #26: Ruby
In the Ballroom, ground floor, shoot down the silver lamp behind the rubble in the center of the room.

Treasure #27: Ornate Beetle
In the Ballroom, north side. You can circle around the ground floor to reach it.

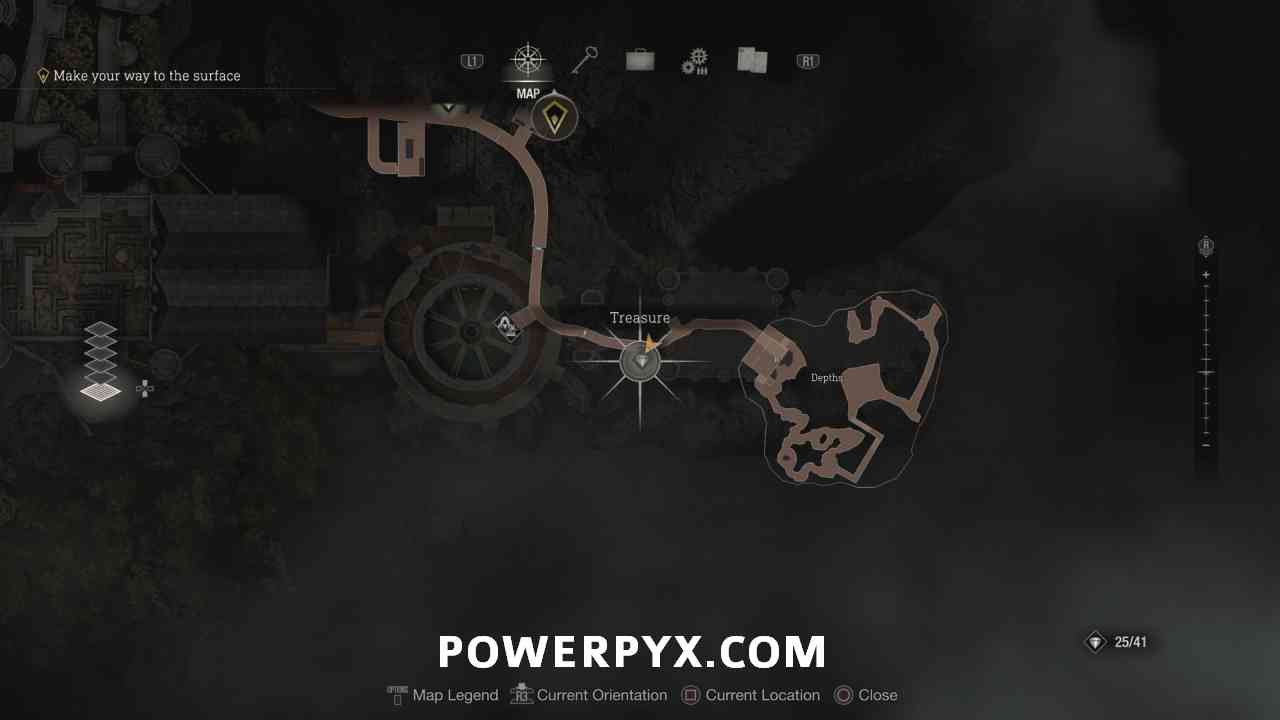
Treasure #28: Elegant Crown
In the “Depths” (Sewers), at the end of the flooded area before squeezing through a gap and climbing up a ladder.


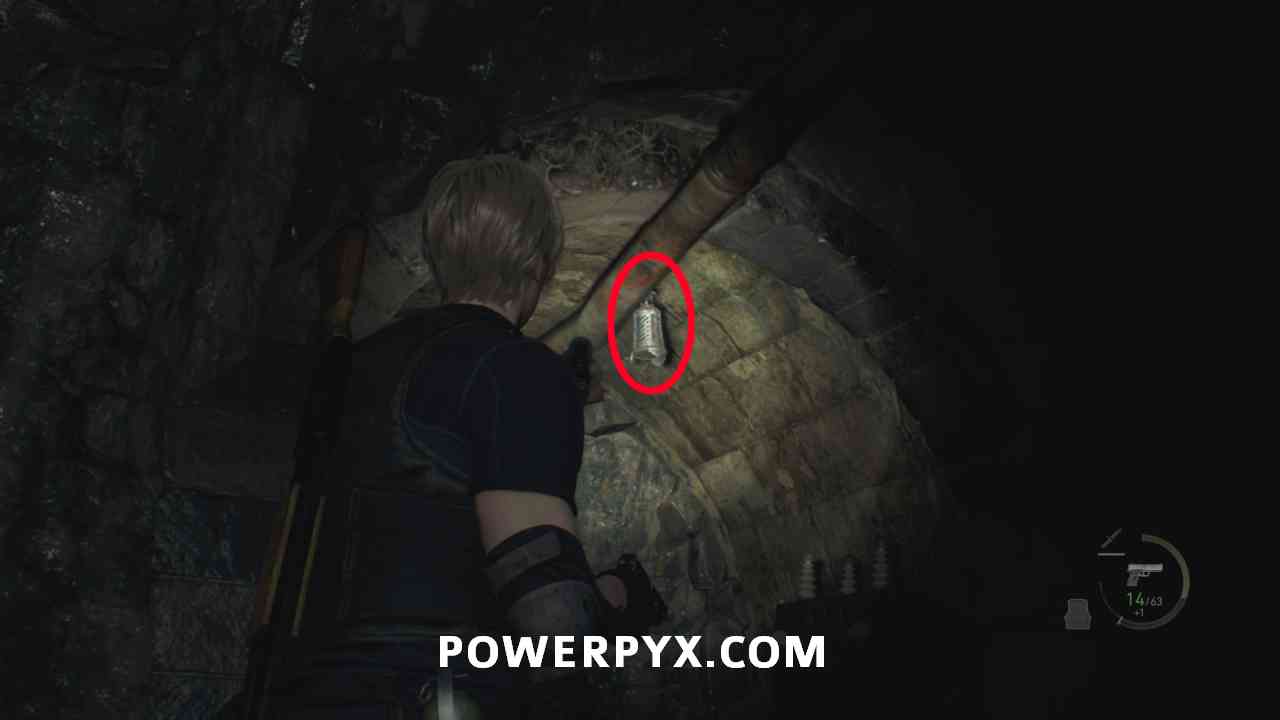
Treasure #29: Red Beryl
From the last treasure, break the wall on the left, squeeze through, climb up ladder. Then you enter the waterway. On an alcove on the left hangs a silver container you can shoot down. Just before the merchant / typewriter save room.
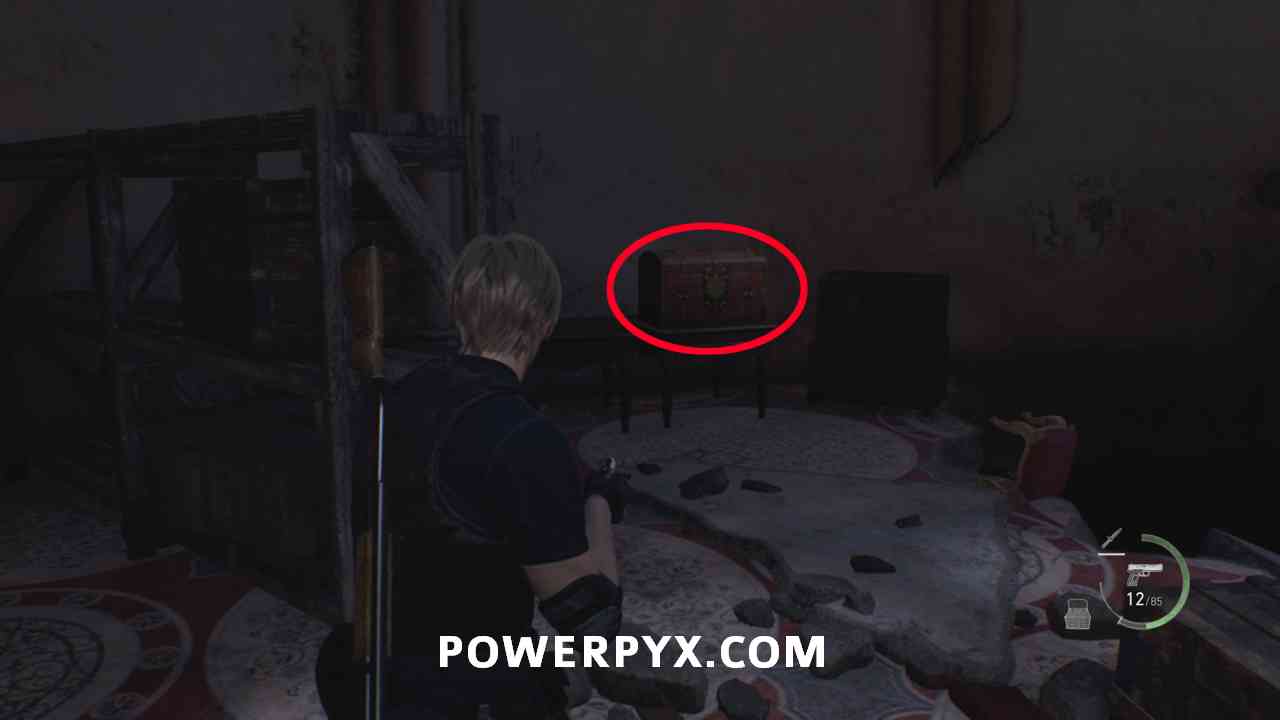
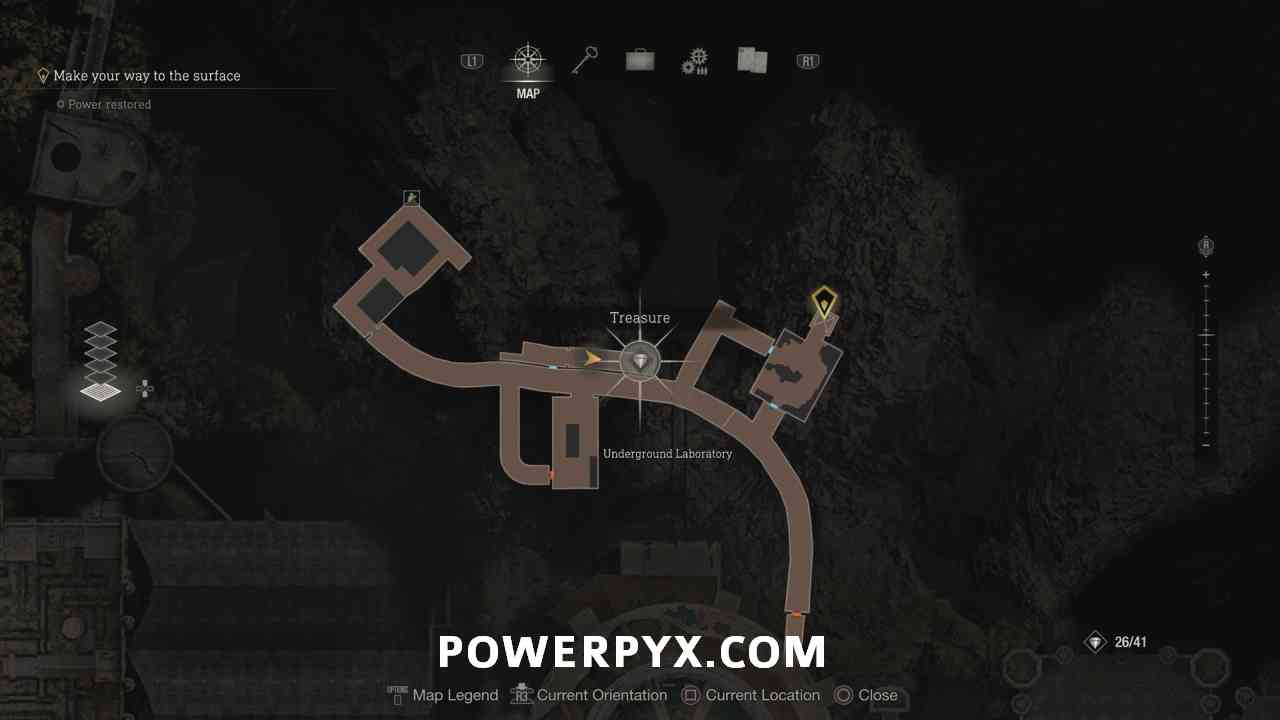
Treasure #30: Yellow Diamond
In the Underground Laboratory area, in the room where you must flip a switch to open a gate.

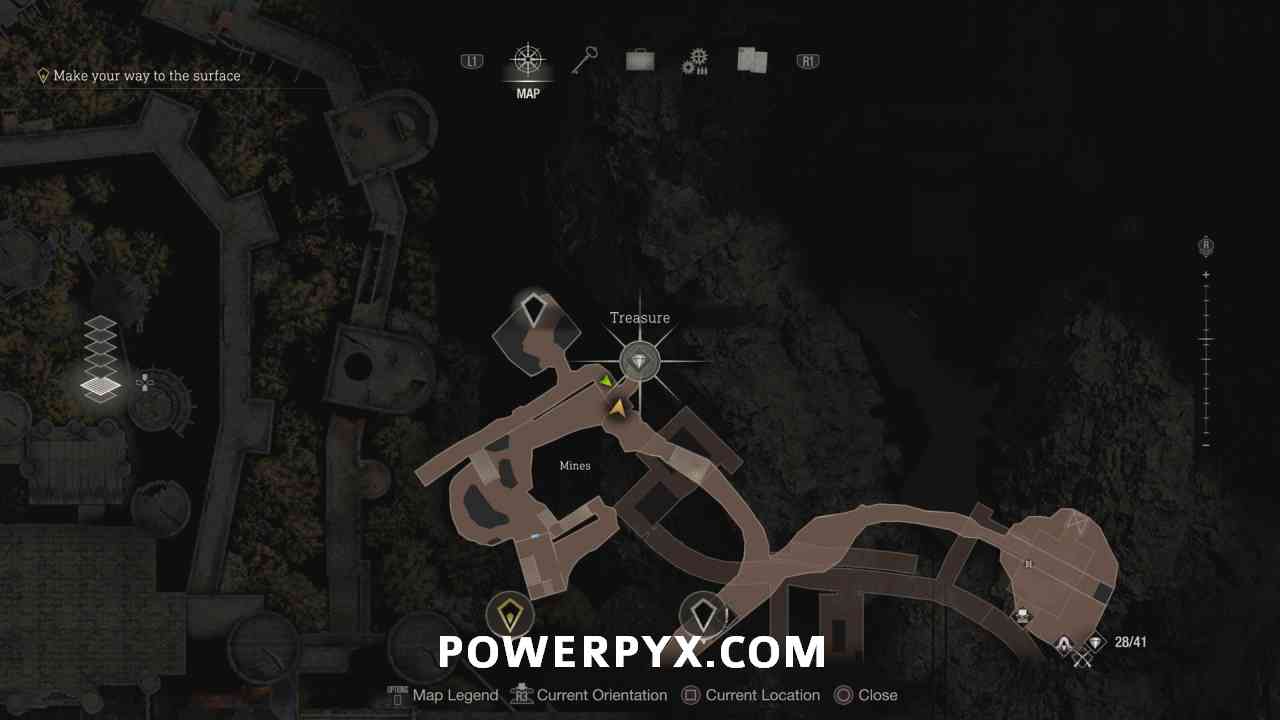
Chapter 11
Treasure #31: Sapphire
During 1st enemy encounter in this chapter, in “Mines” section. Go up the stairs on the right and shoot down the silver container hanging from the rusted metal bars.
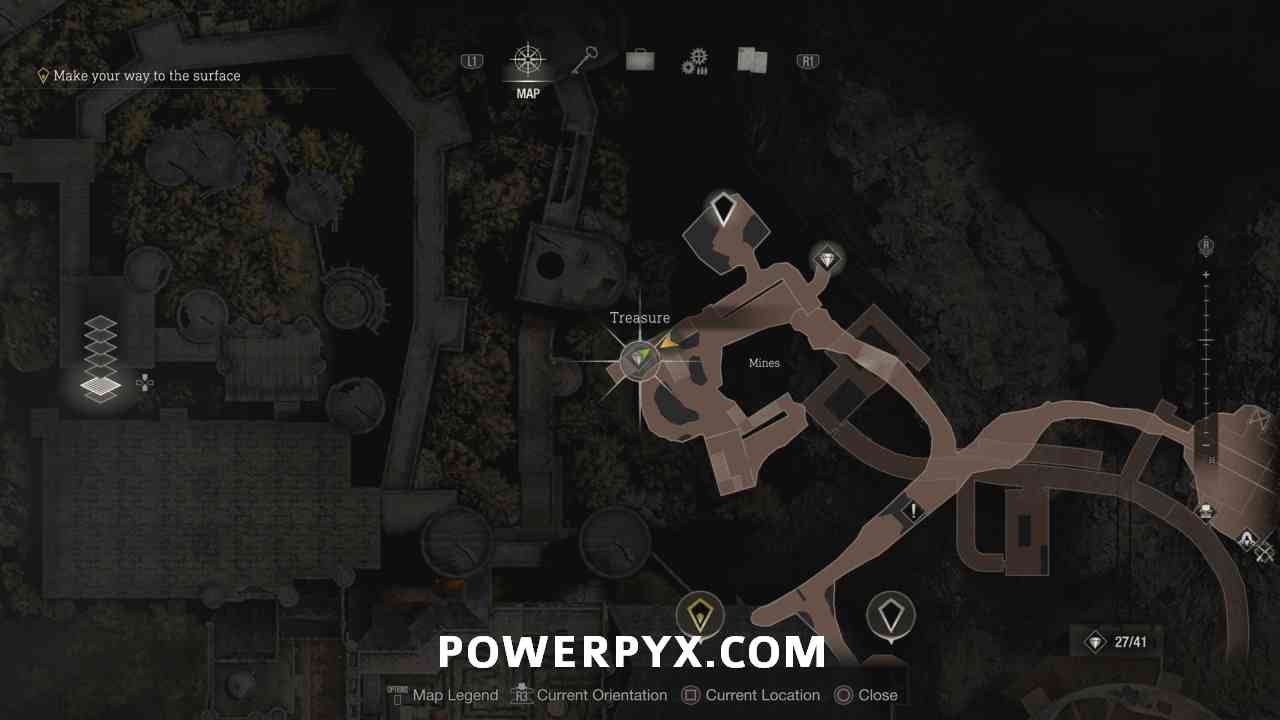

Treasure #32: Golden Hourglass
In the same room, after activating the lever to lower the bridge, go across the bridge and find this at the end of the path in an alcove. Just outside the room where you pick up the Dynamite.

Treasure #33: Flagon
After the first minecart ride, on the balcony of the “Stopover” building. Grab this and the next Castellan here before getting on the 2nd minecart.


Treasure #34: Gold Bar (L)
After 2nd Minecart ride, in the west of the Hive, in the tunnel, shoot the red explosive barrel to blow up the rubble, then behind the rubble open the treasure chest.


Chapter 12
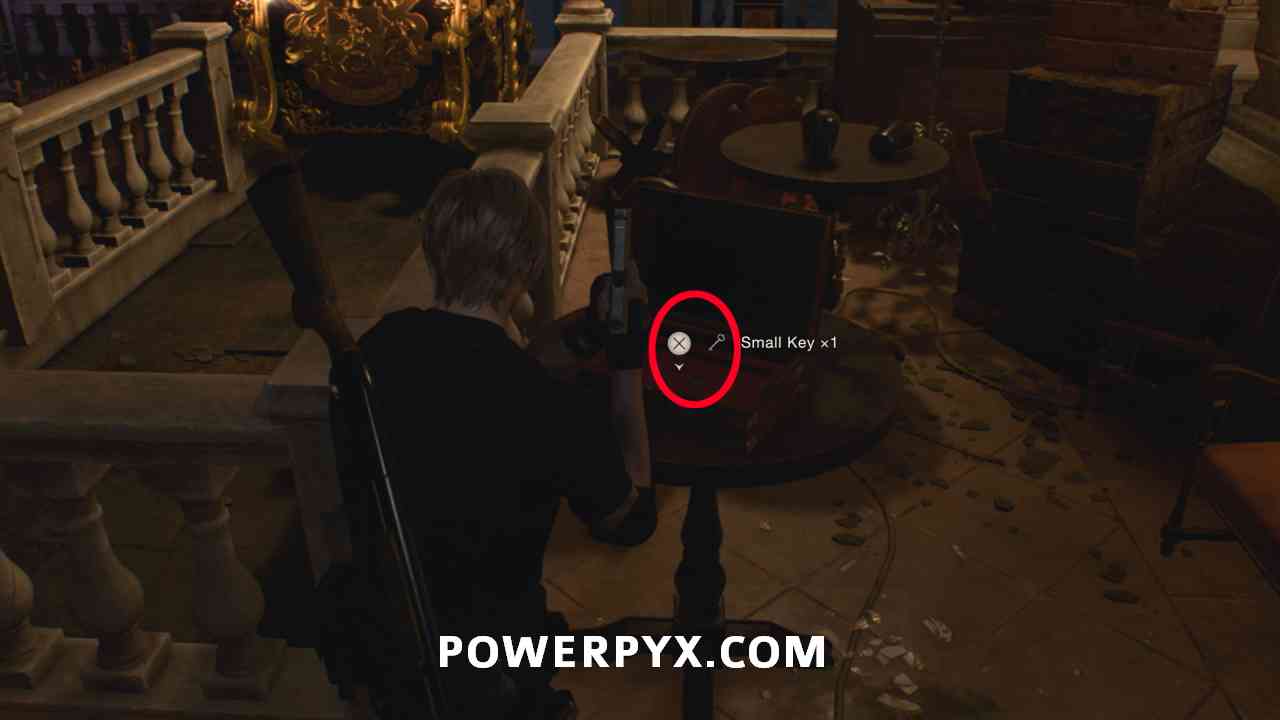
Key Item: Small Key
After using the elevator at the start of the chapter, it’s in a small briefcase straight in front of the elevator. We need this to open the locked drawer in the Battlements that was previously inaccessible in Chapter 8.
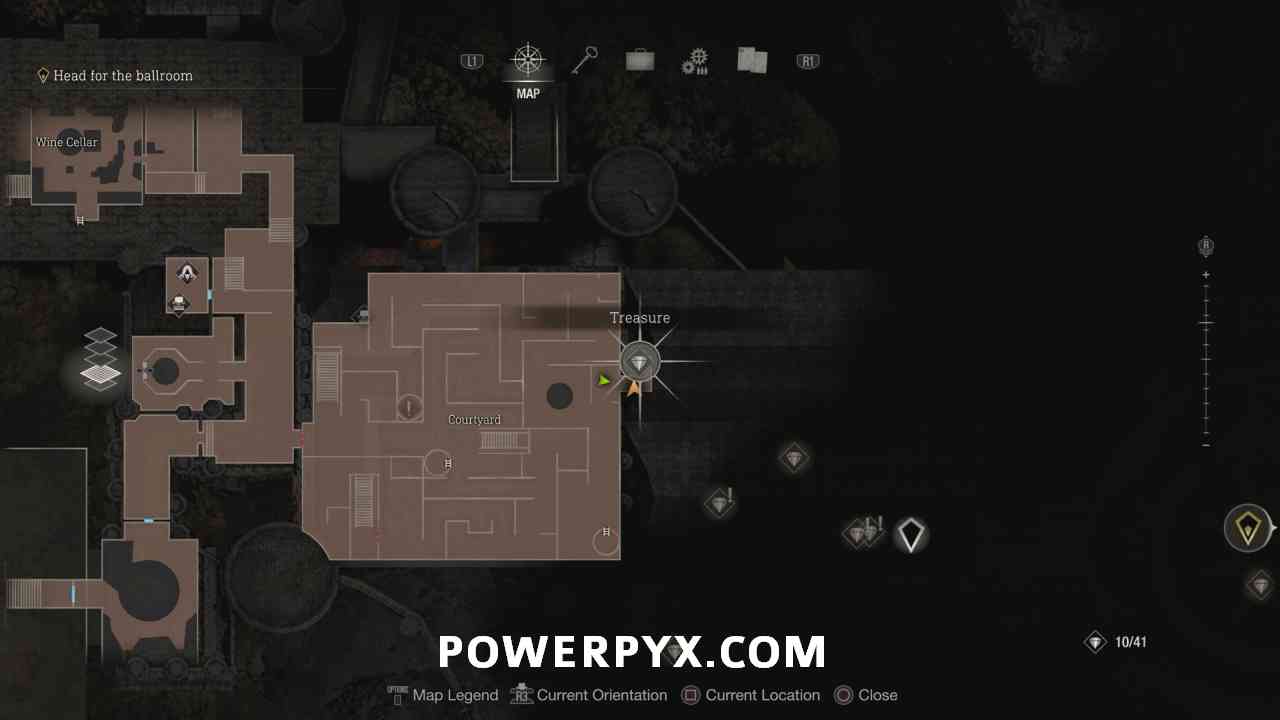
Treasure #35: Gold Chicken Egg
Go through the door opposite the Gondola (don’t go on Gondola yet). Then backtrack to the Throne Room in the east of the map. There you can use the Cubic Device to get a treasure.


Treasure #36: Ornate Beetle
Inside the Locked Drawer on the Castle Battlements. With the Small Key you found at the start of Chapter 12 you can now backtrack there and open the drawer. The quickest way is to go through the Courtyard typewriter save room, from there go east and then north, over the small stairs on the side of the Castle Battlements.

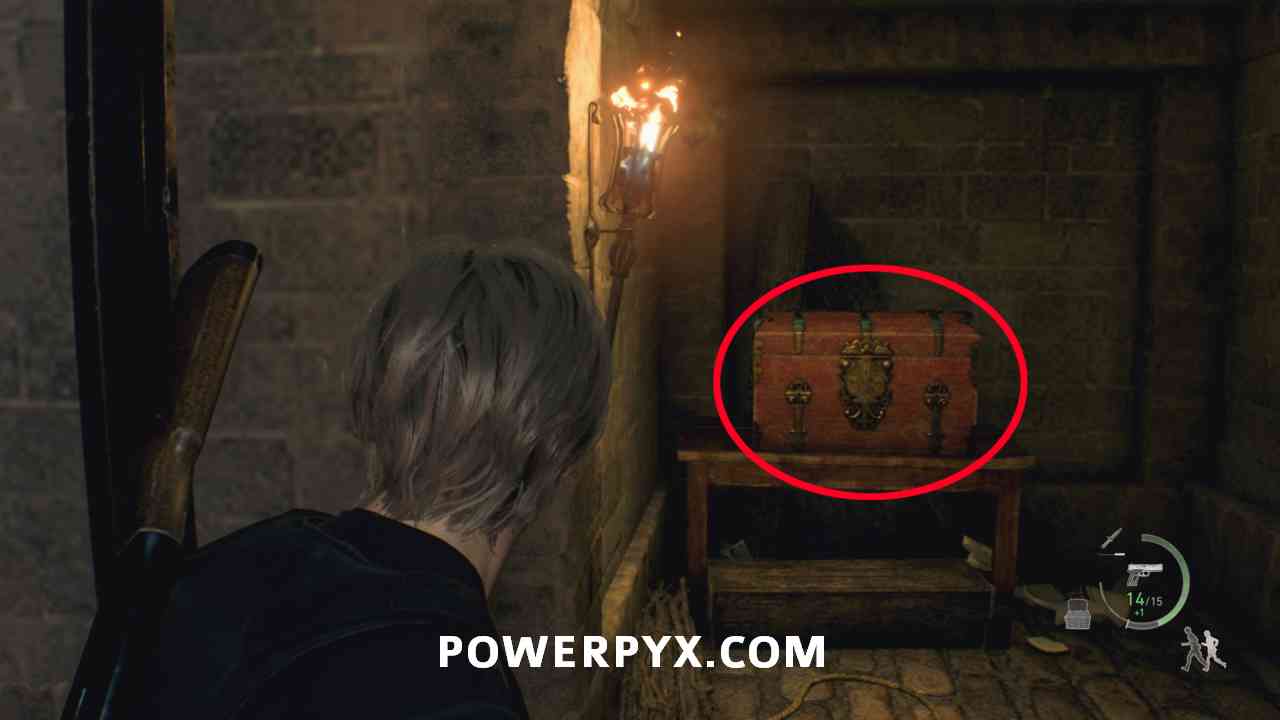
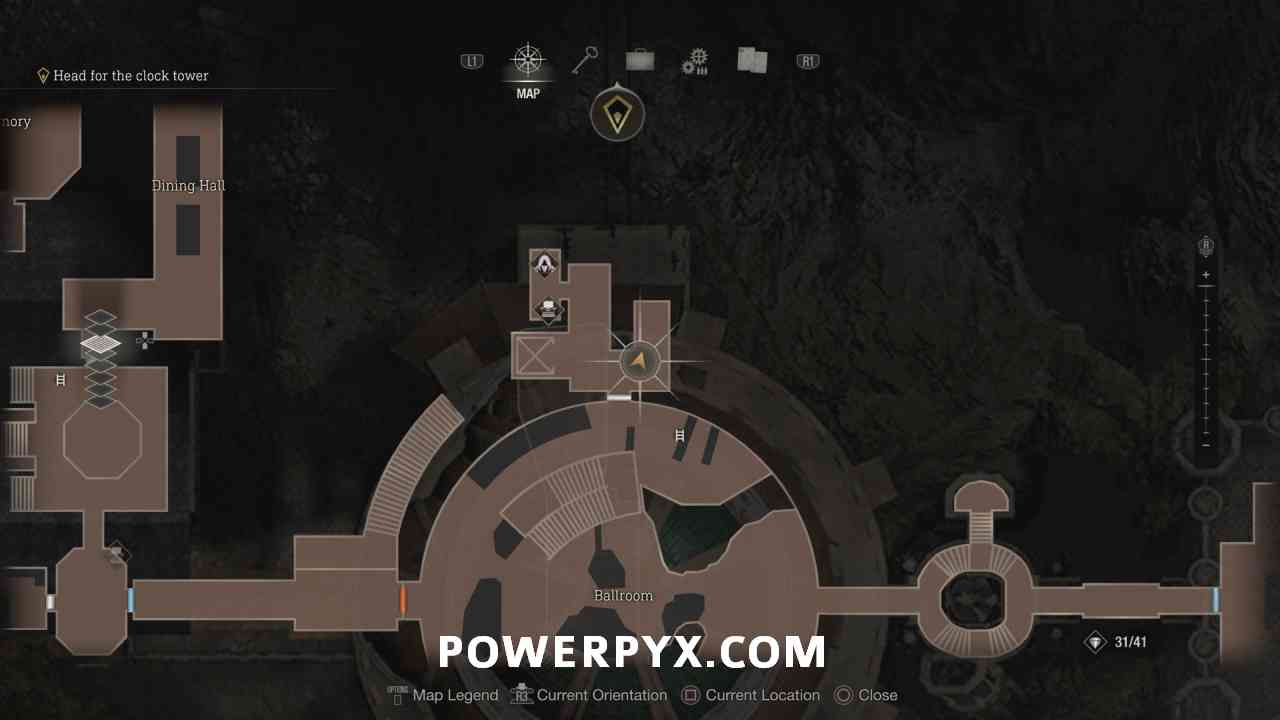
Treasure #37: Gold Bar
Now backtrack to the Gondola at the start of the chapter, enter the Gondola to reach the clocktower. Treasure chest is on the left side behind some boxes, still on ground floor before going upstairs.


Treasure #38: Alexandrite
From last treasure, go up one floor, but don’t go left where the firebreathing statue is. Instead, go straight to the end of the floor, then look up and shoot down the silver lamp.


Treasure #39: Mirror with Pearls & Rubies
Go up to the very top of the clocktower. There is an enemy at a lever that makes spiked balls roll down the stairs. DON’T drop down the ladder yet. Instead, behind the lever there’s a a broken stone railing, go through it to find the treasure chest.


Treasure #40: Extravagant Clock
Same area, at the very top of the clocktower drop down the ladder then find this on the left. DON’T pull the lever yet, doing so triggers a Point of No Return (elevator ride), after which you can no longer free-roam the Castle.


Treasure #41: Yellow Diamond
After the elevator ride and reaching the top of the clocktower, step outside, go across the wooden boards, shoot the silver lantern hanging from the scaffold. Go across the wooden boards slowly while crouched or else they will break and you fall down.


That’s all 41 Castle Treasures in RE4 Remake. For all other Treasures and Collectibles refer to Resident Evil 4 Remake Collectible Locations Guide.
yogaaga says
As a Resident Evil fan, I found this article extremely helpful. Thank you for taking the time to write a detailed guide on finding all the Castle Treasures in Resident Evil 4 Remake. The tips you provided, such as manually saving at the start of each chapter and revisiting areas later, will definitely come in handy during gameplay. I appreciate that you also included information on DLC treasures and their relevance to trophies and achievements. One question I have is whether there are any difficulty-specific requirements for obtaining the Raider trophy and achievement. Overall, great job on the article!
PowerPyx says
There are no difficulty-related requirements. You can find all treasures on all difficulties.
Dere says
Re: Treasure 7
Fun fact: if you don’t knock down the ladder before dropping down to receive this treasure, Ashley will actually kick it down for you! She has dialogue for it too. Thought that was a nice detail.
Crimnoist says
Can I do this without buying the treasure map? planning to unlock the trophy “Silent Stranger” where you don’t talk to the merchant.