
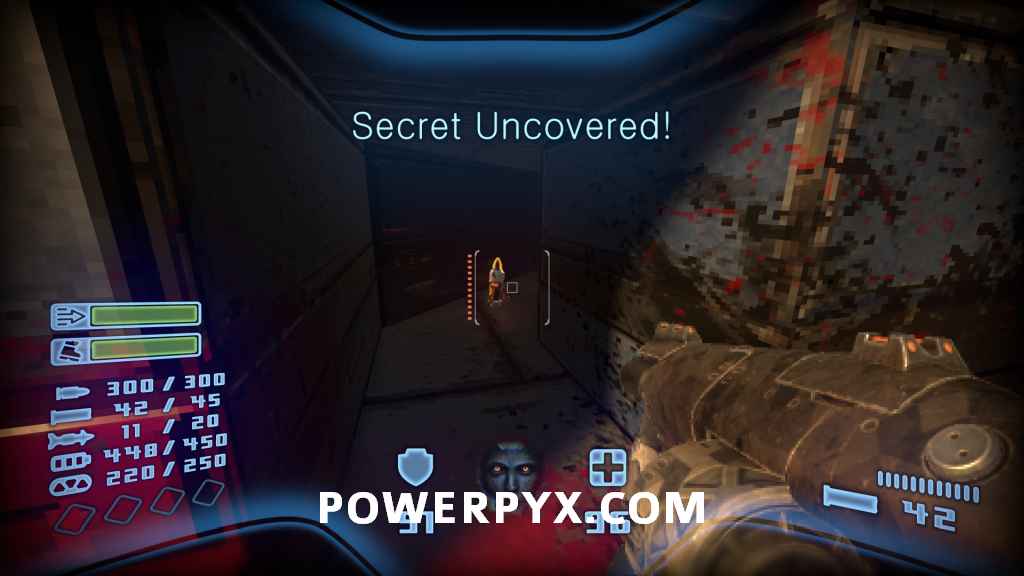
Prodeus has 123 Secret Locations and 1 Secret Exit. Finding all Secrets in a level is one of the 3 requirements to getting 100% on a level, the other two being completing the level without dying and killing all enemies. Nothing is missable! These requirements do not need to be done in the same playthrough of a level, you could do three playthroughs getting one in each and it would count as 100% Complete. Completing all levels with 100% is required for the Go Get Some Fresh Air trophy and achievement.
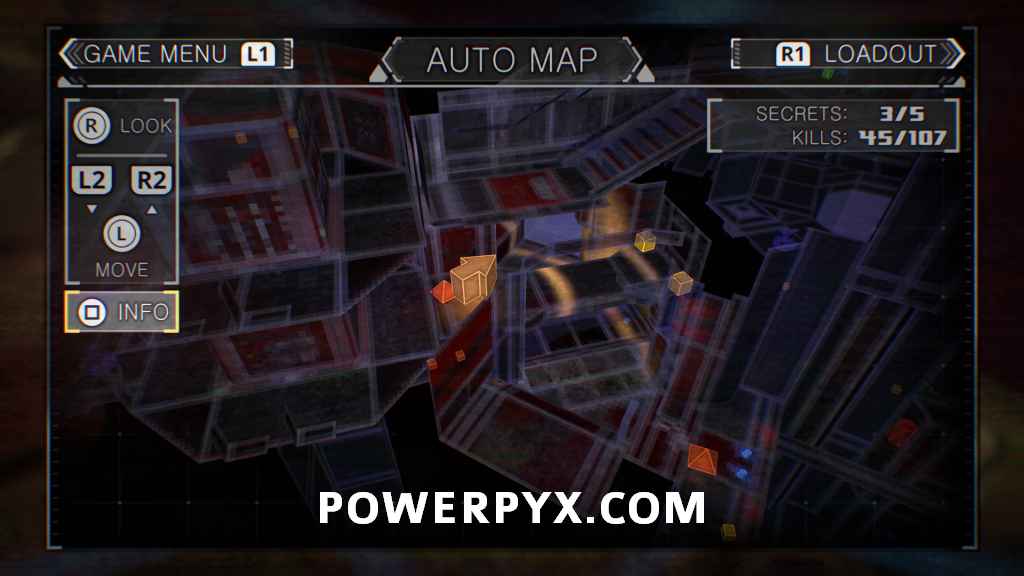
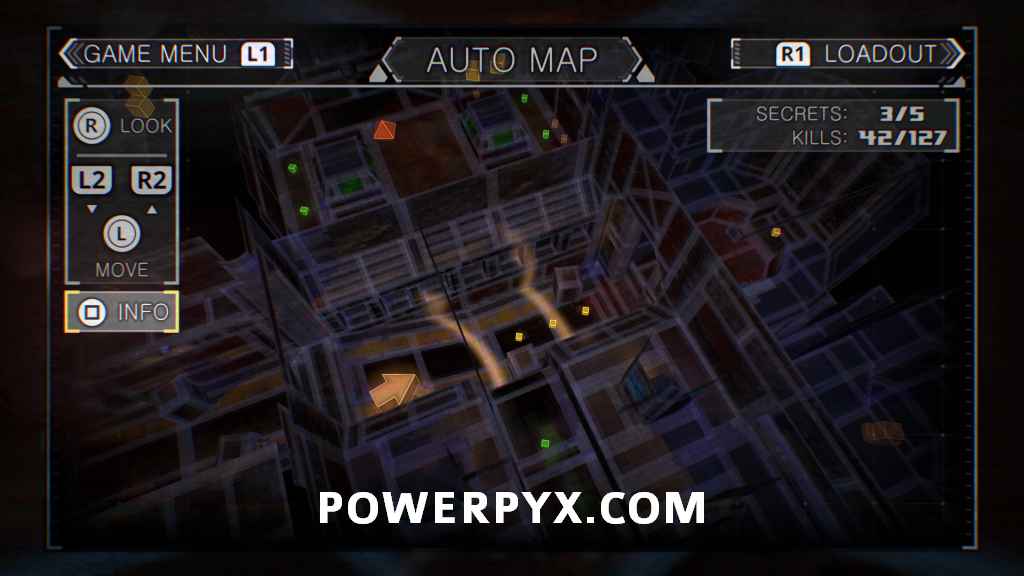
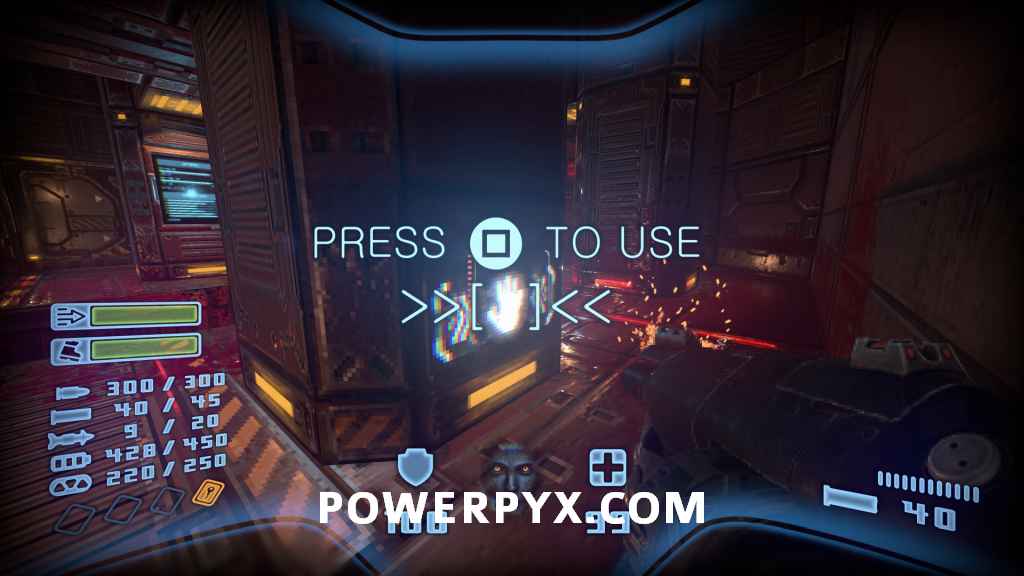
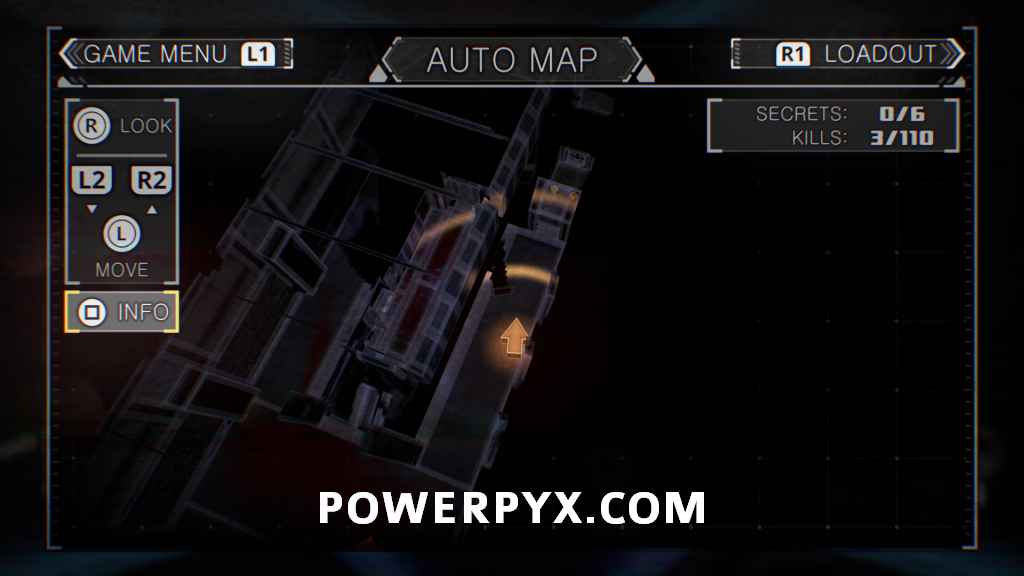
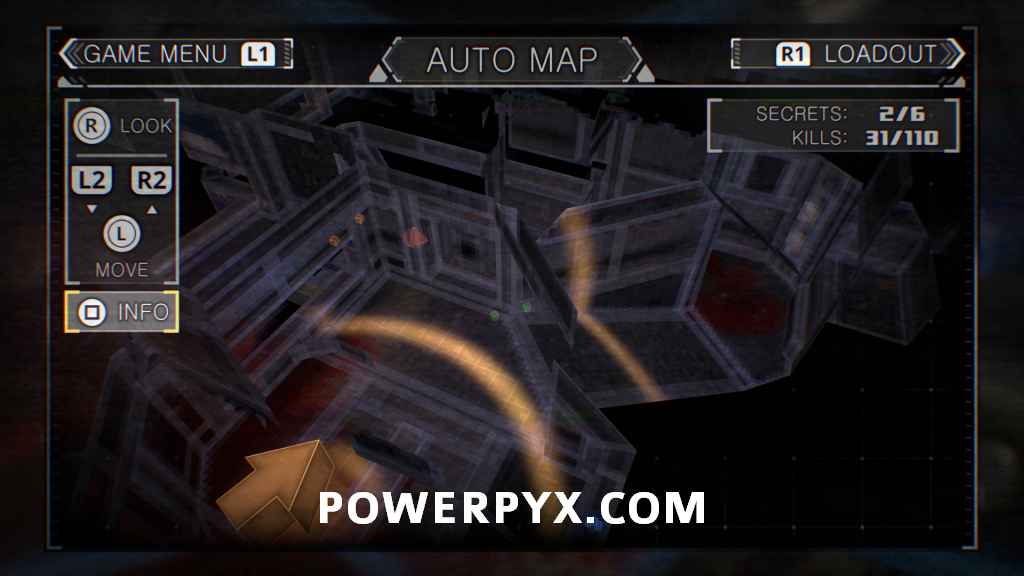
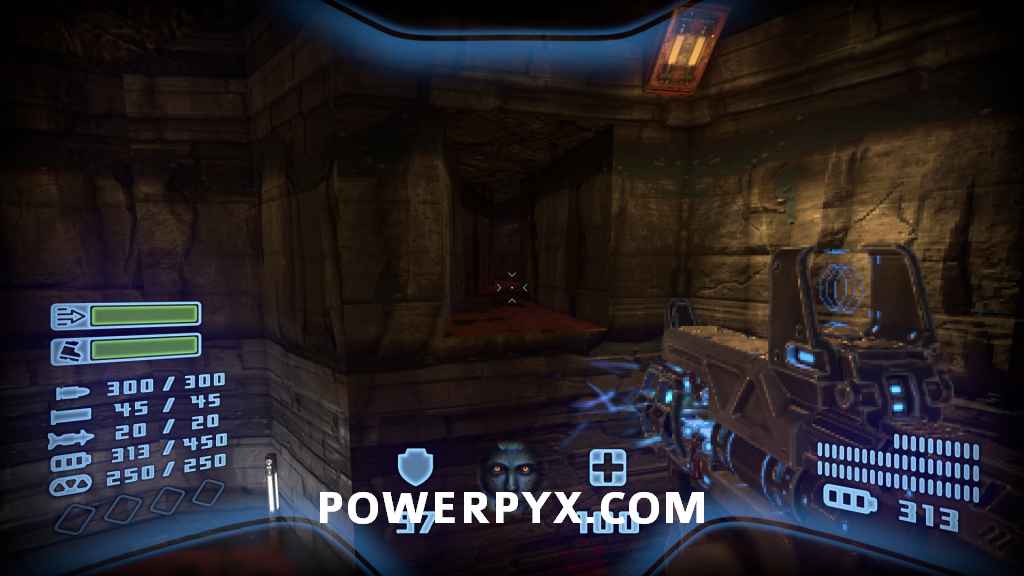
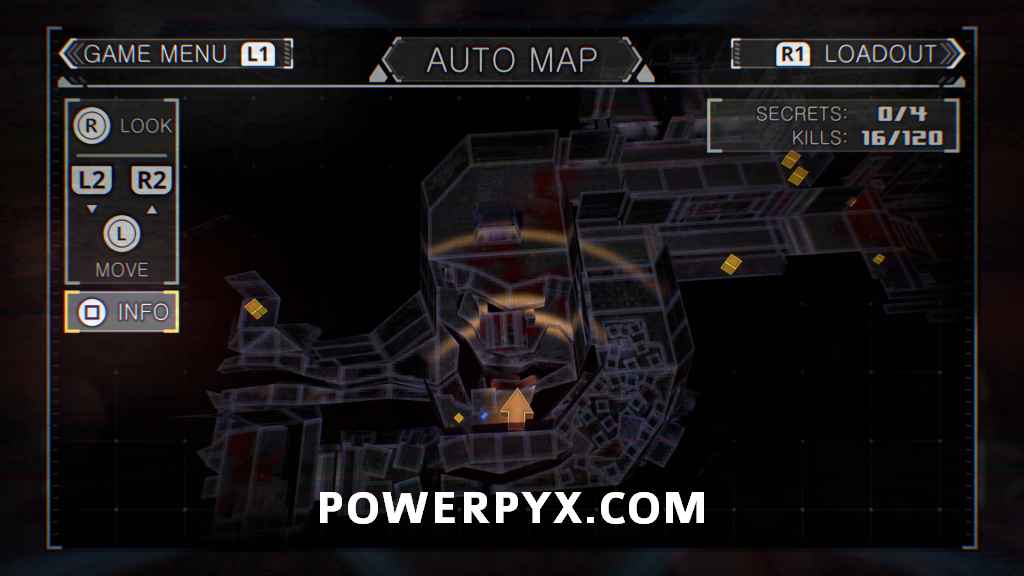
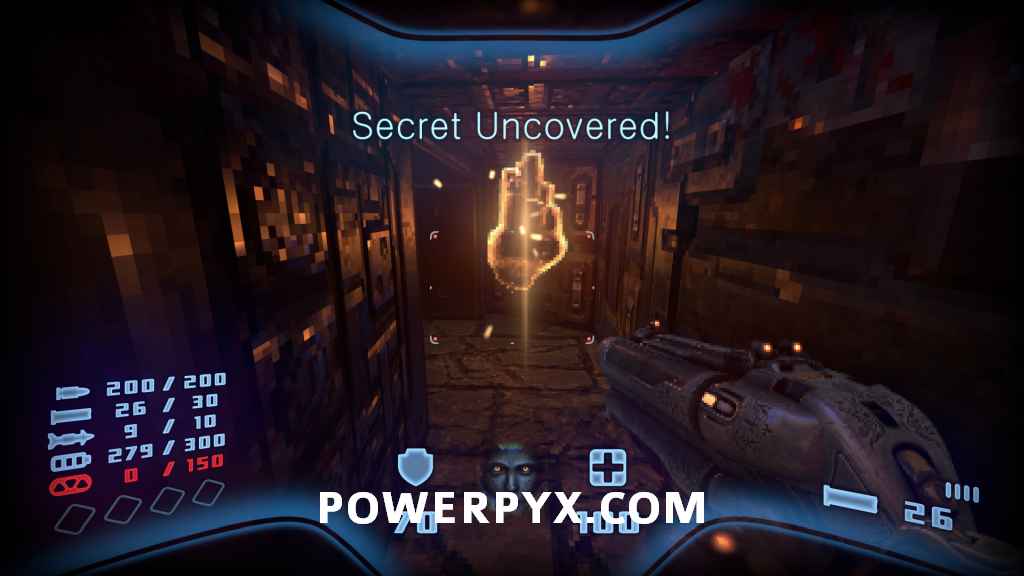
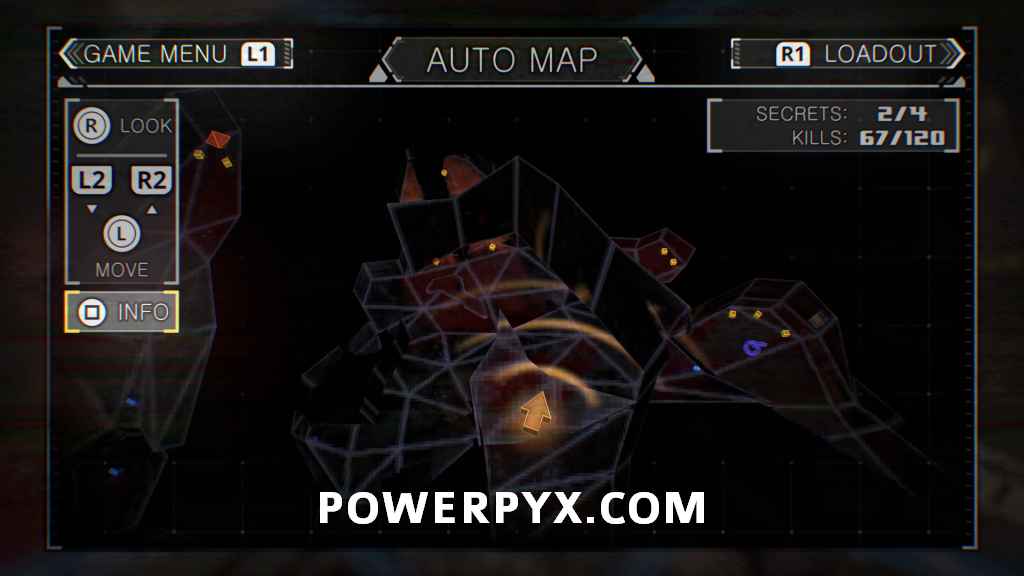
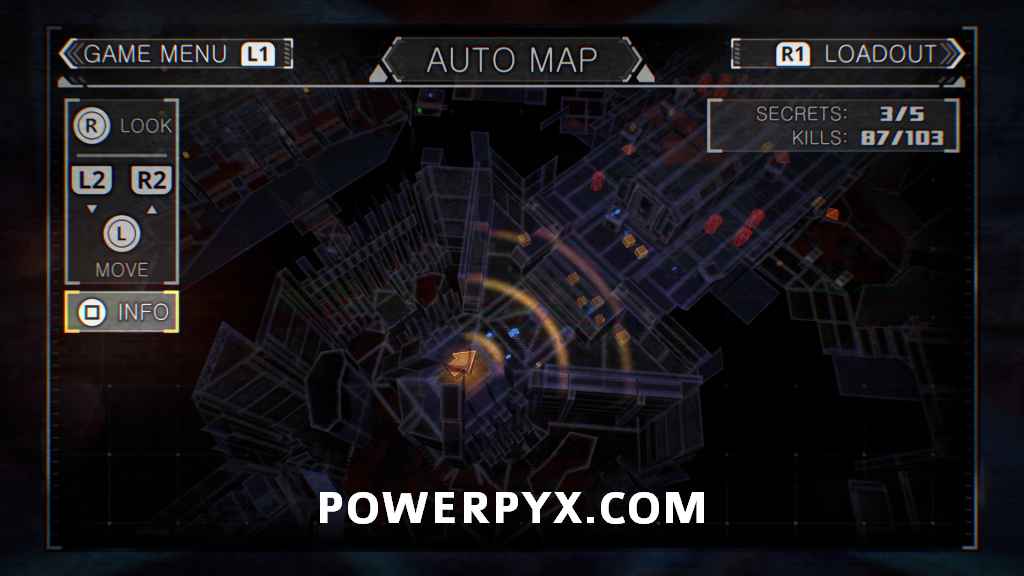
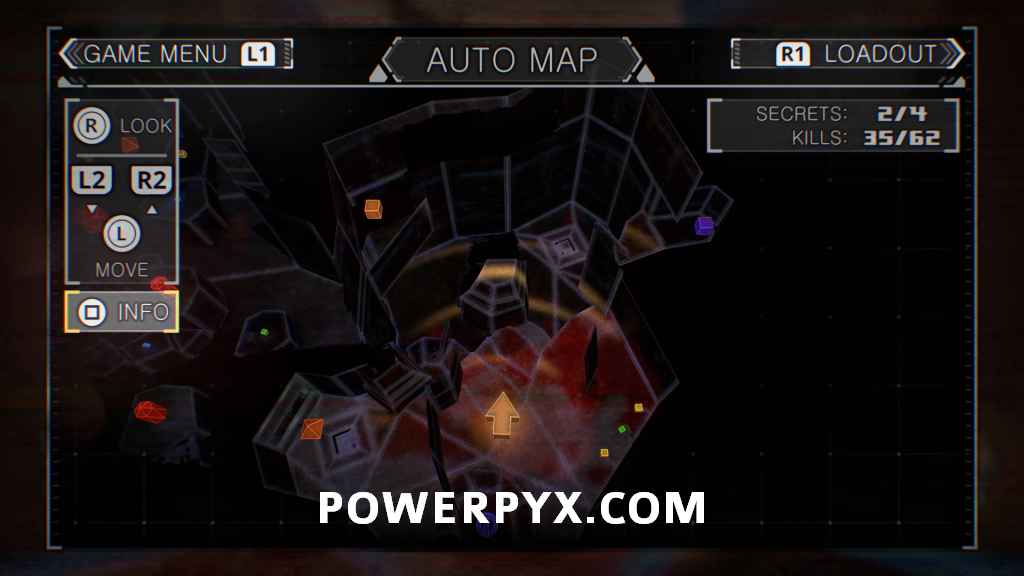
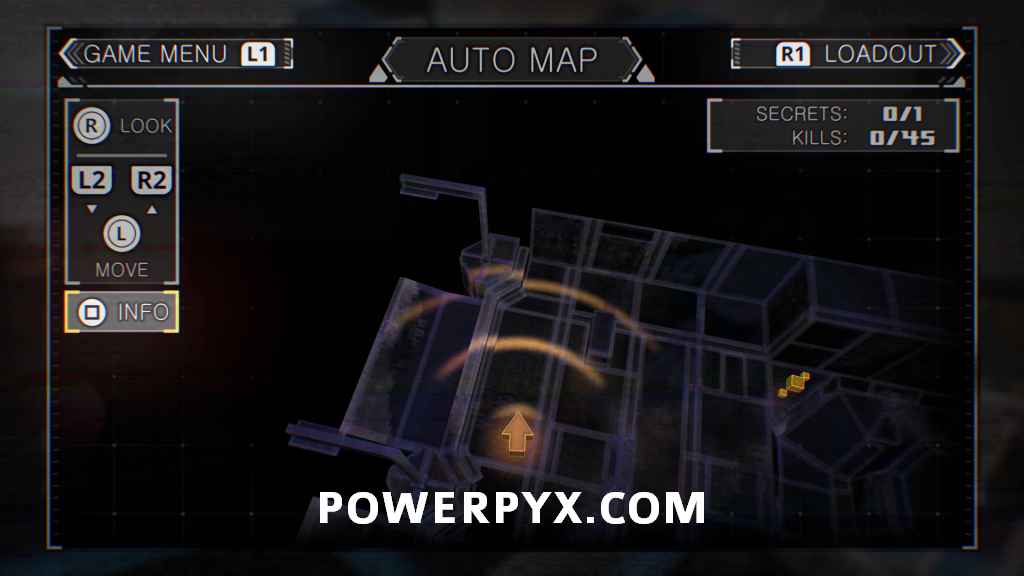
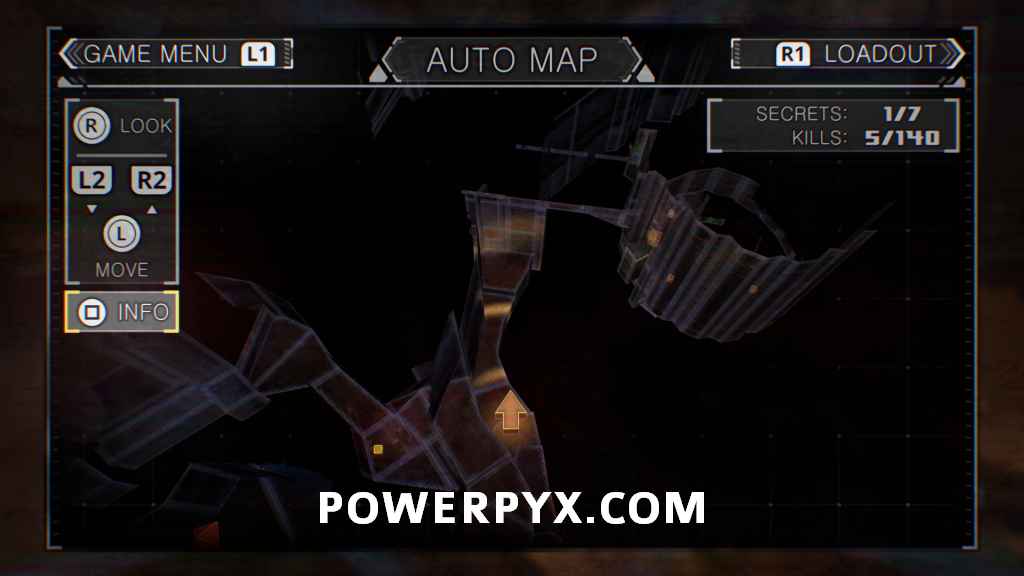
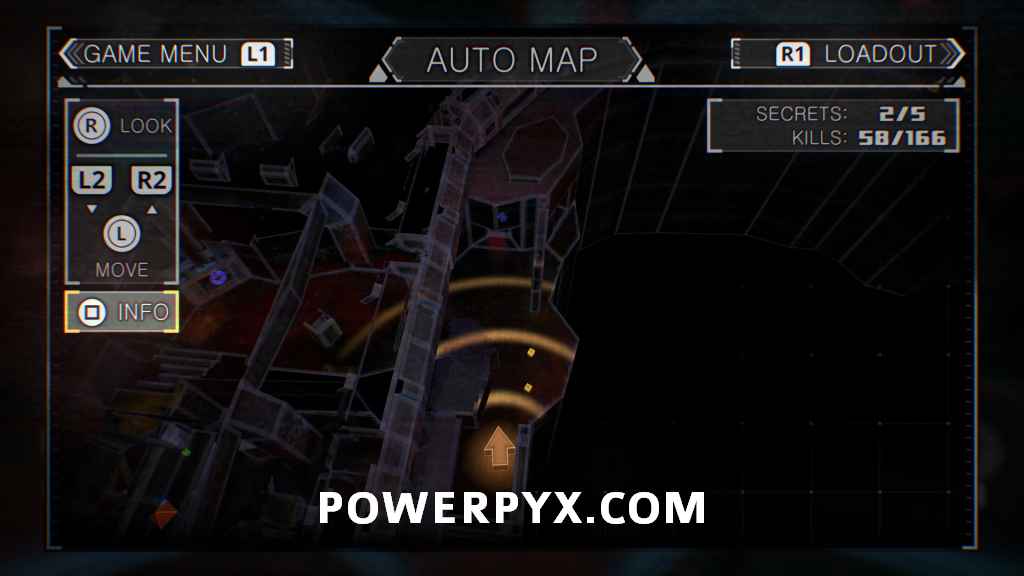
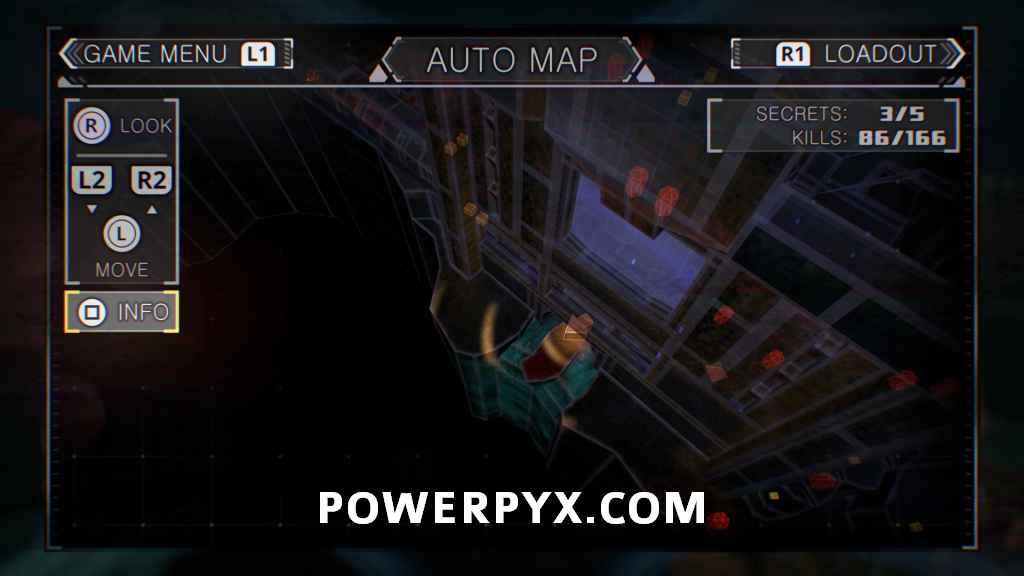
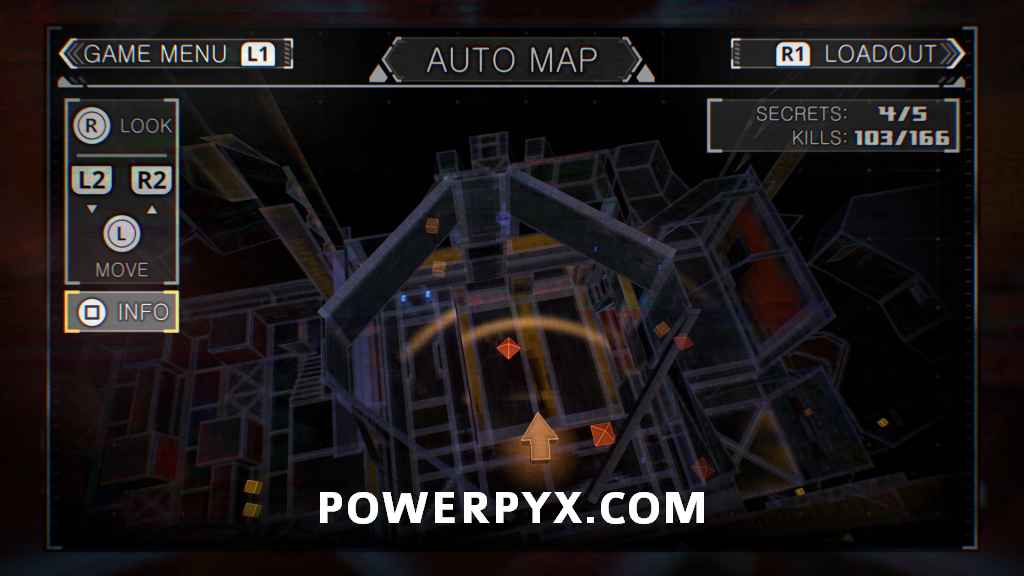
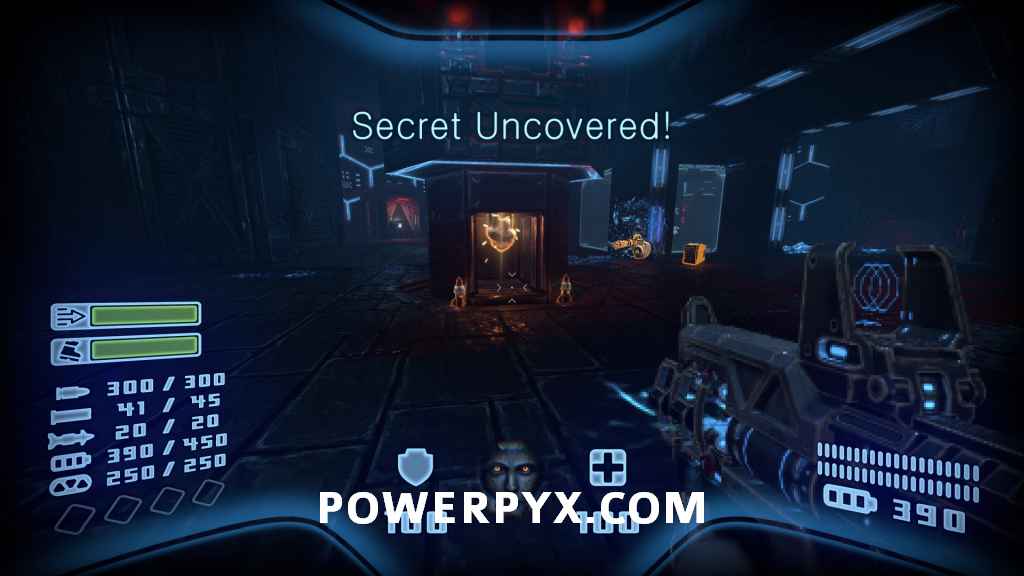
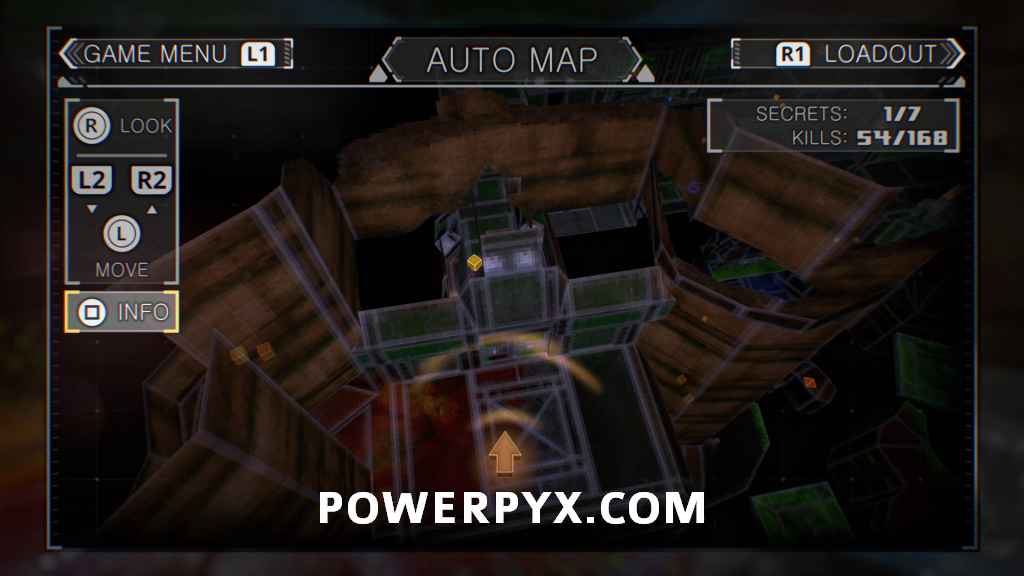
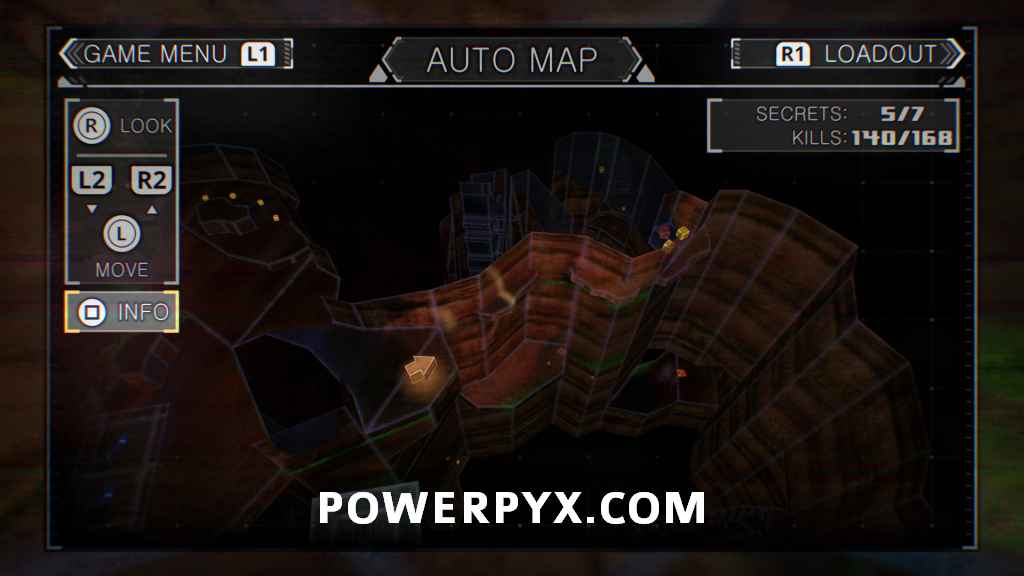
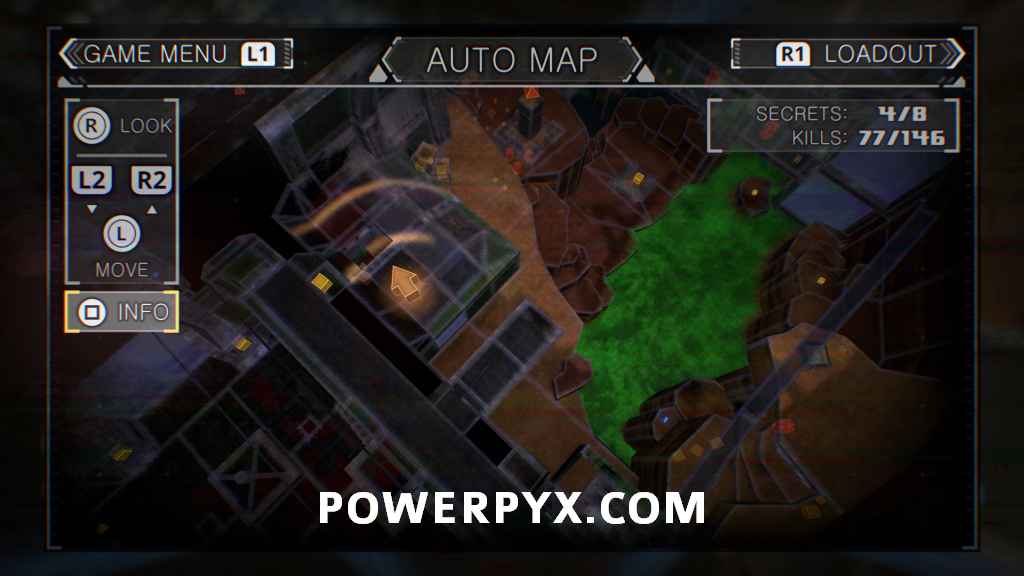
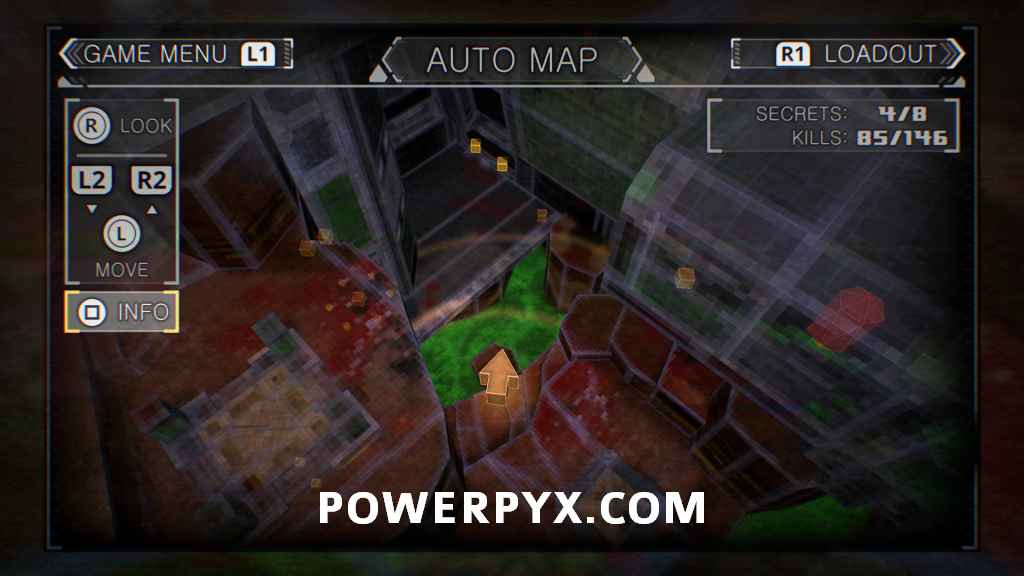
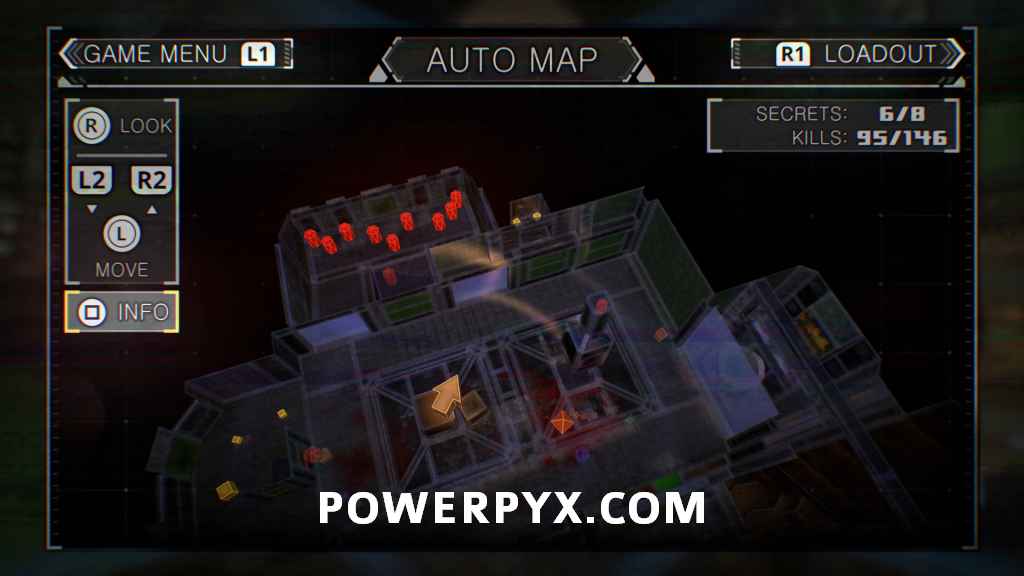
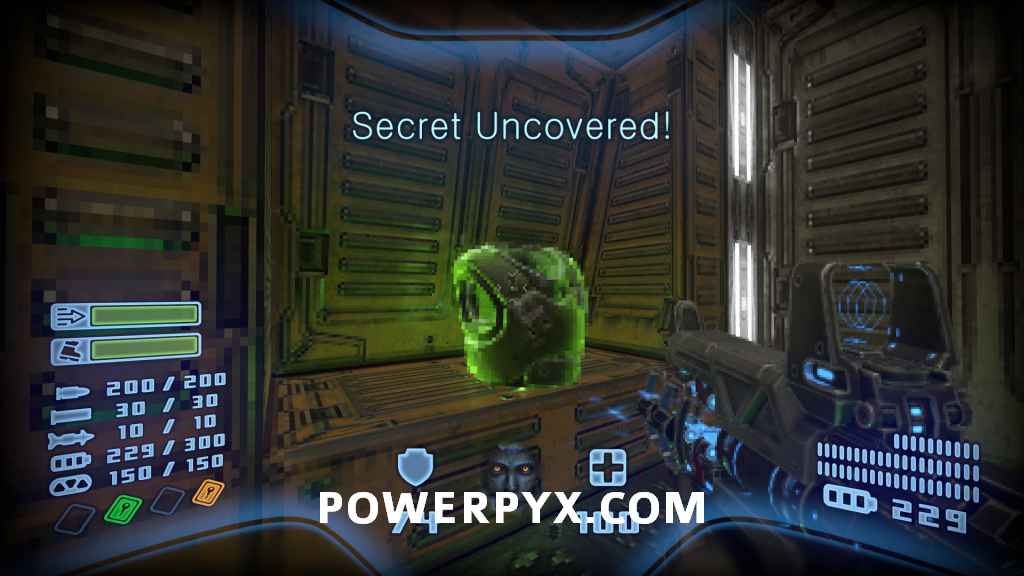
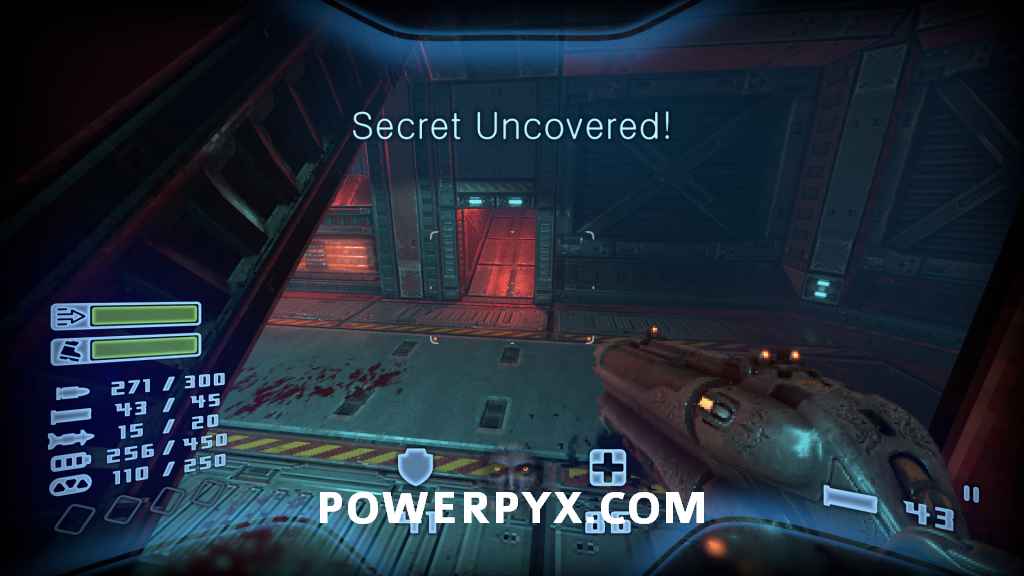
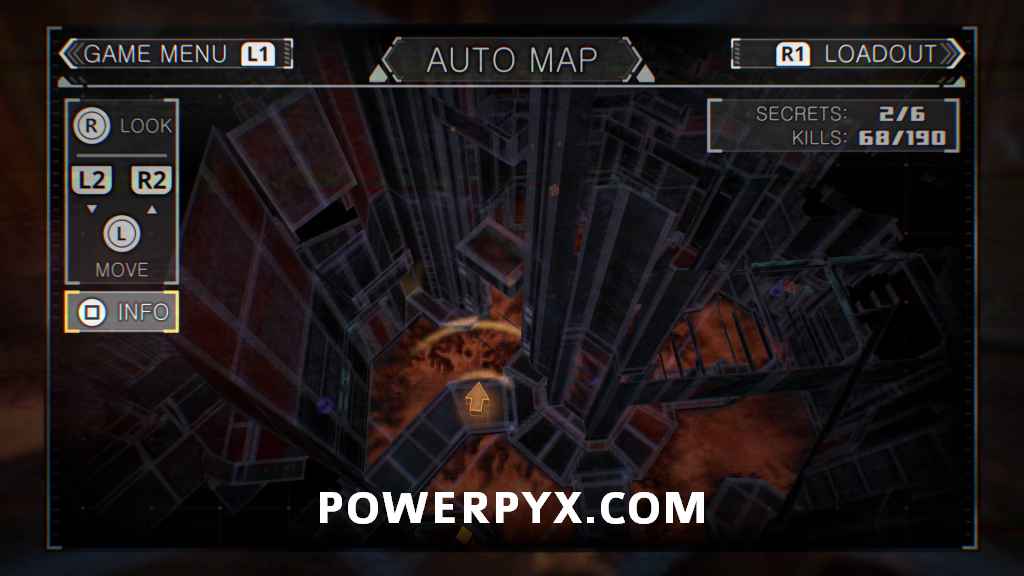
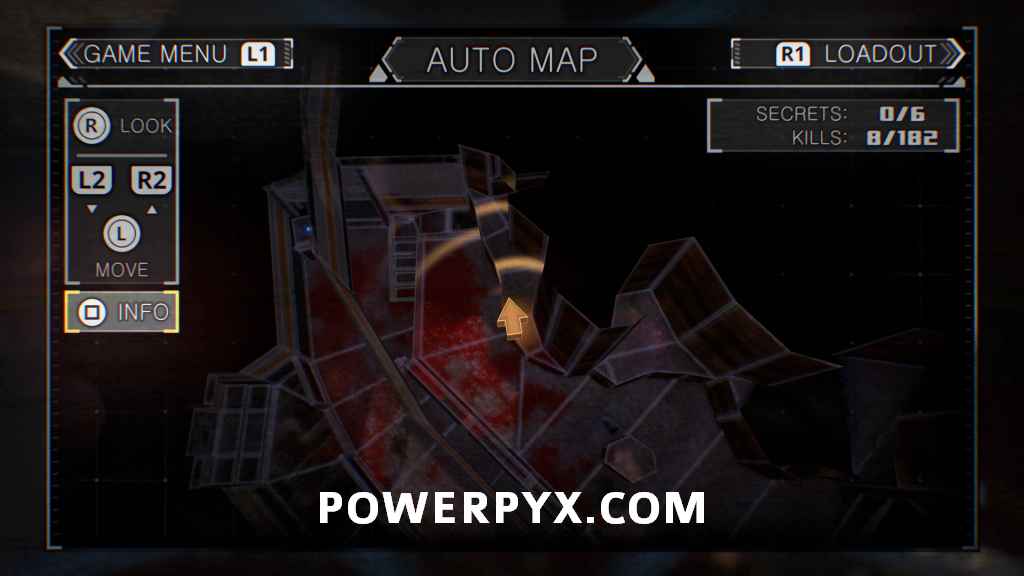
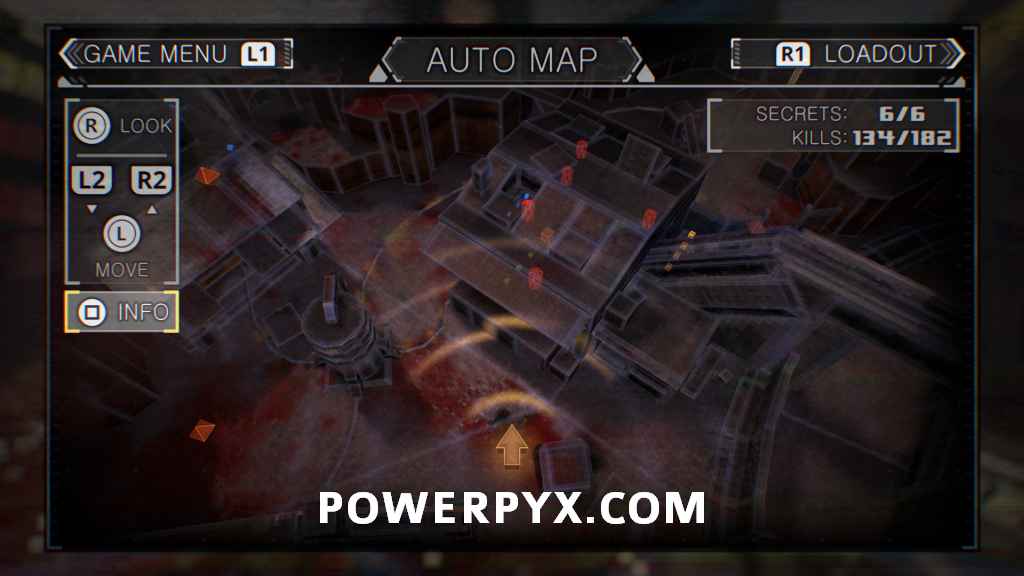
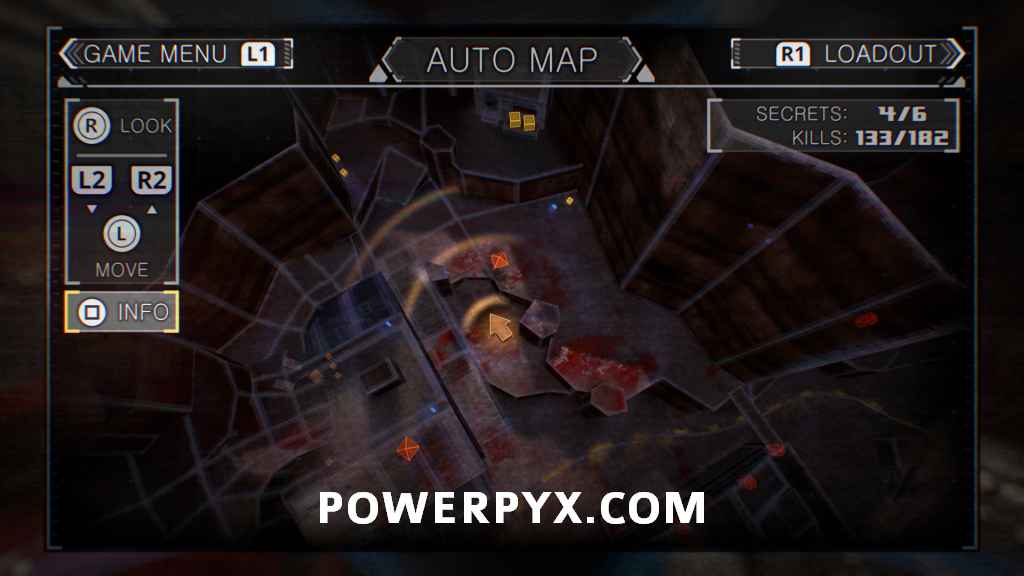
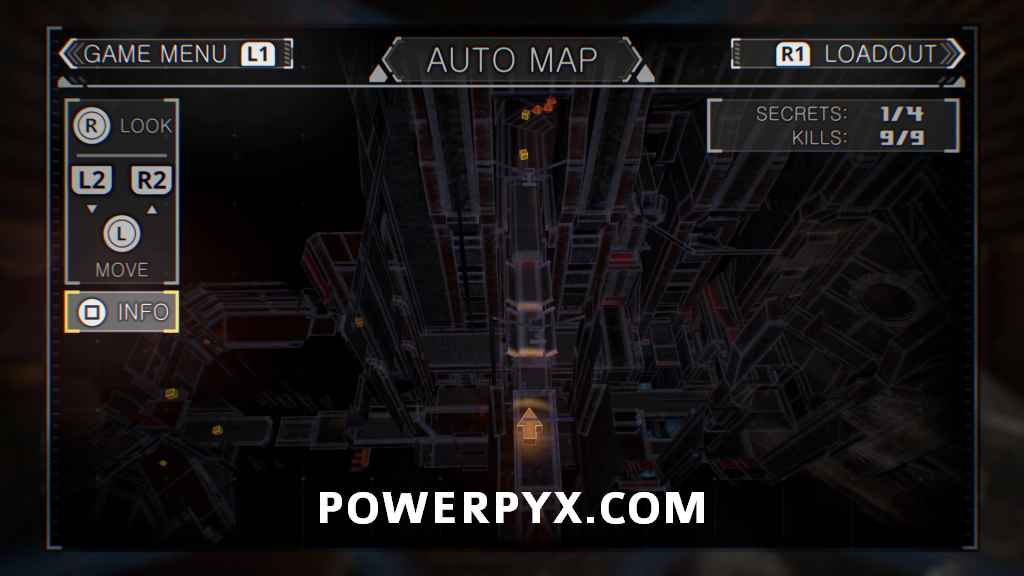
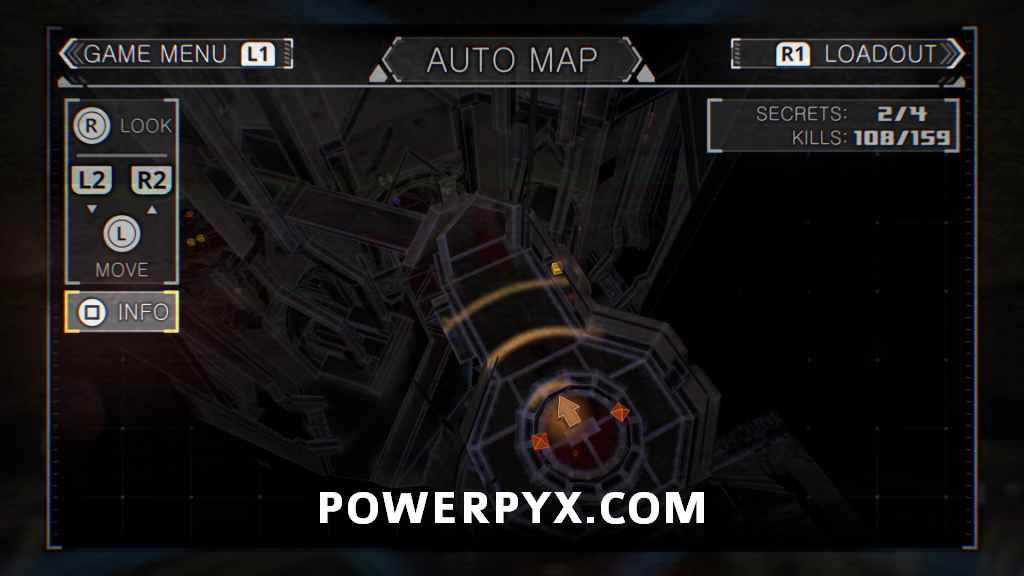
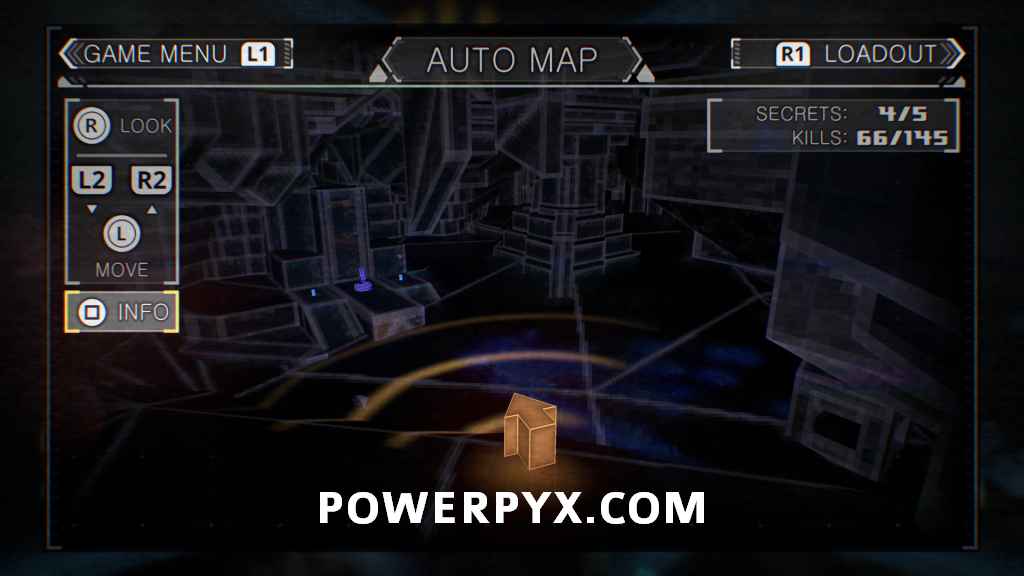
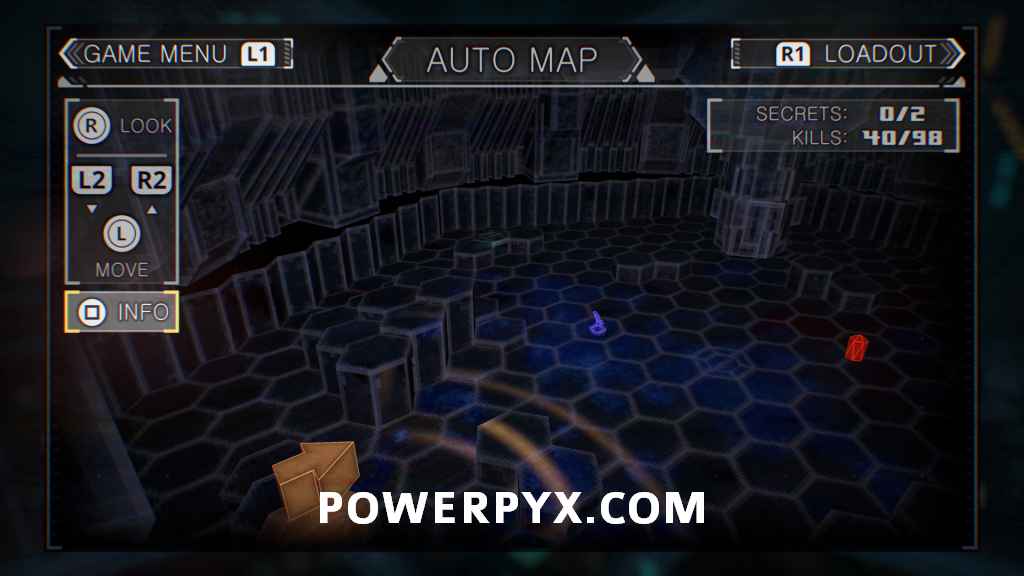
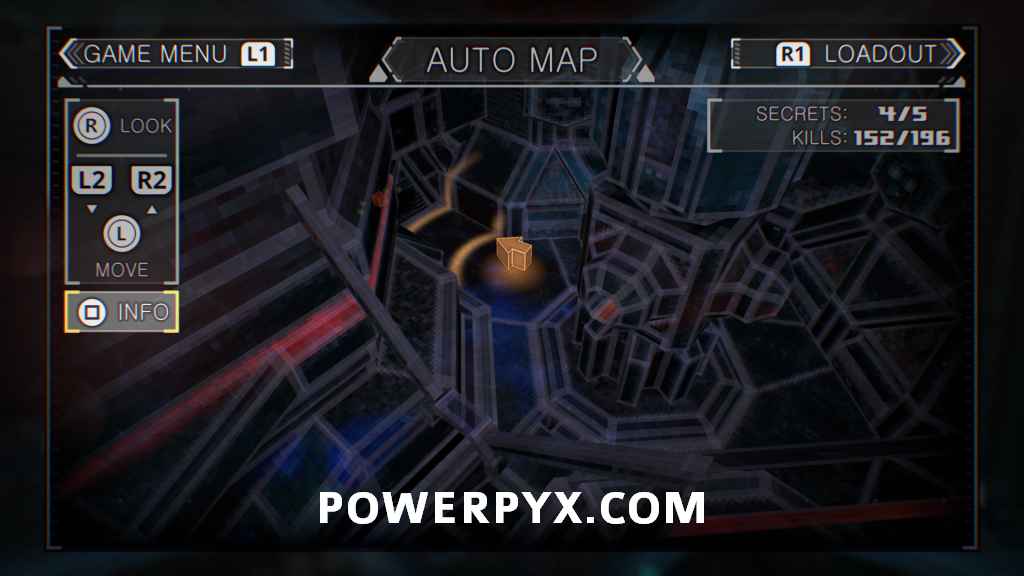
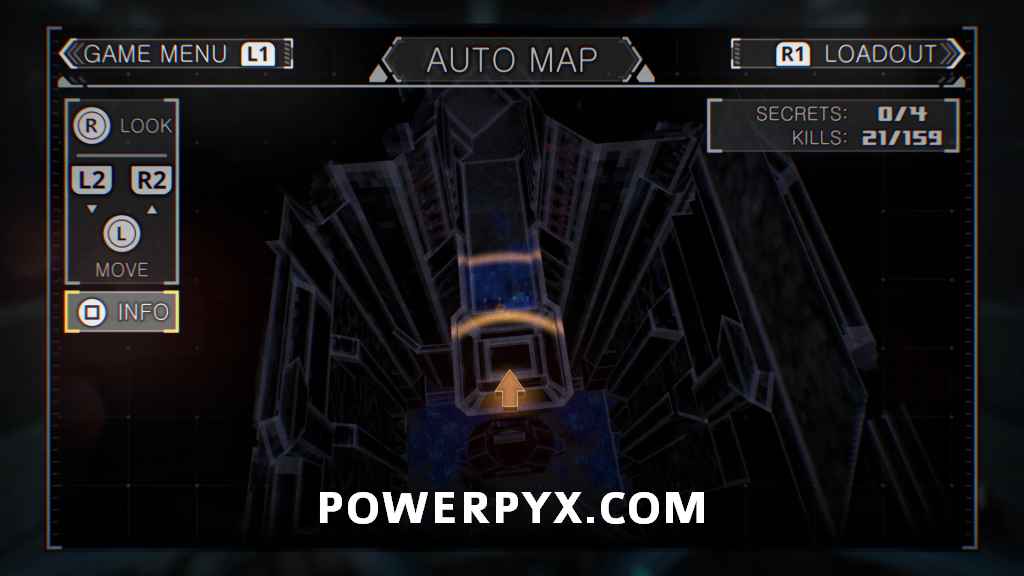
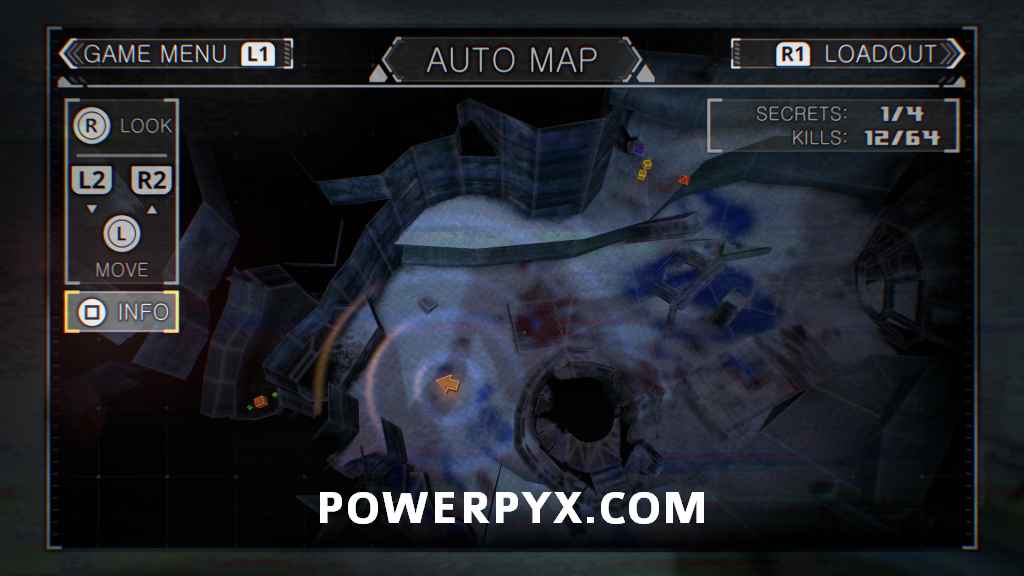
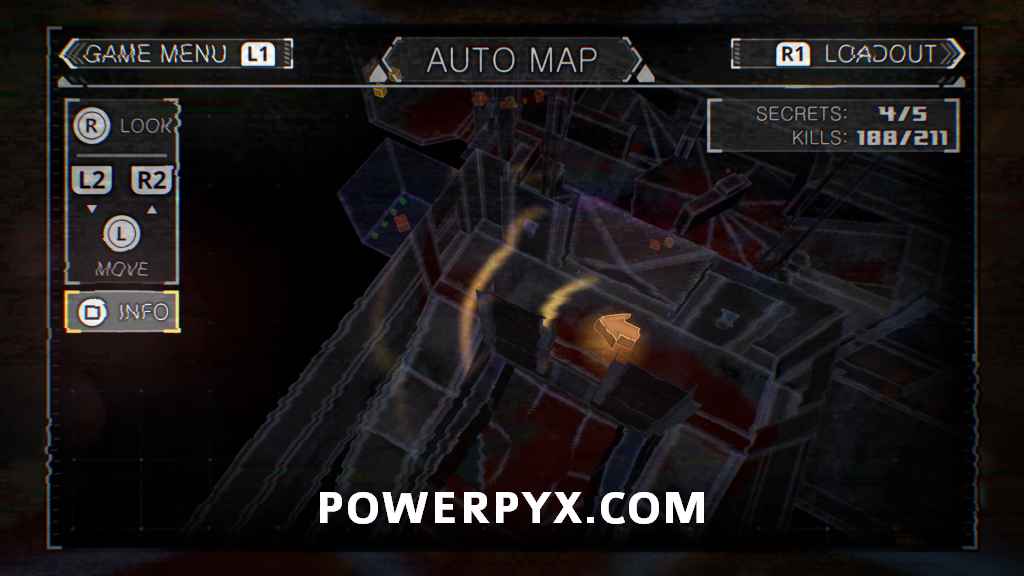
Secrets can be triggered by interacting with switches throughout the levels, or by stepping into hidden locations. You can check your progress towards Secrets on any given level by using your Automap with  , as well as to check your kill progress. Each level has 1 Automap that can be collected (sometimes found within a Secret), which will reveal the whole map to help locate certain Secrets. Each level will also have multiple Ore Fragments to collect, but these are not required for 100% Level Completion.
While the vast majority of Secrets can be obtained without extra abilities, it is recommended that you get Double Jump and Dash Boost from the store as soon as possible, as they will help with general traversal, plus are required for a few in later levels.
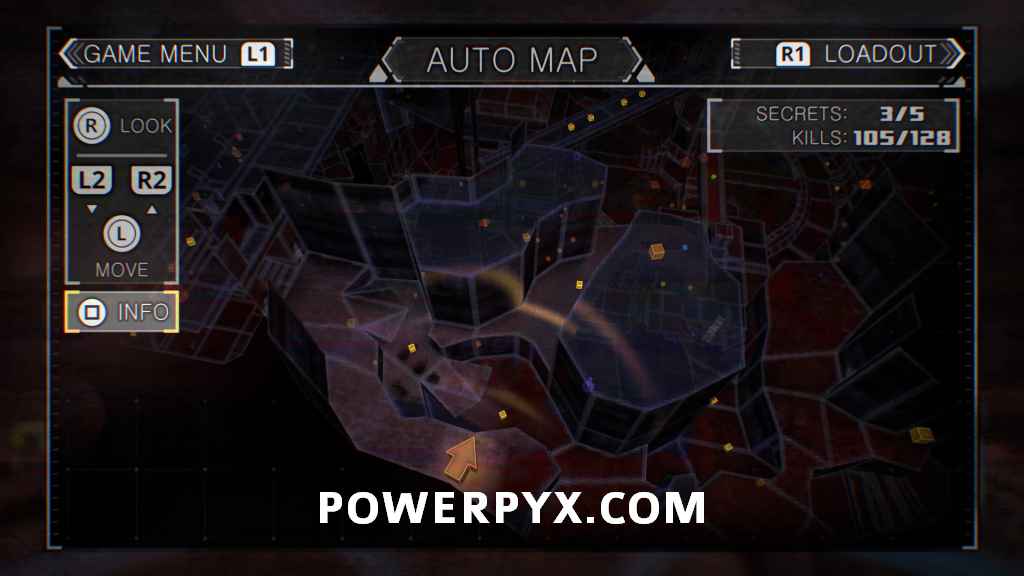
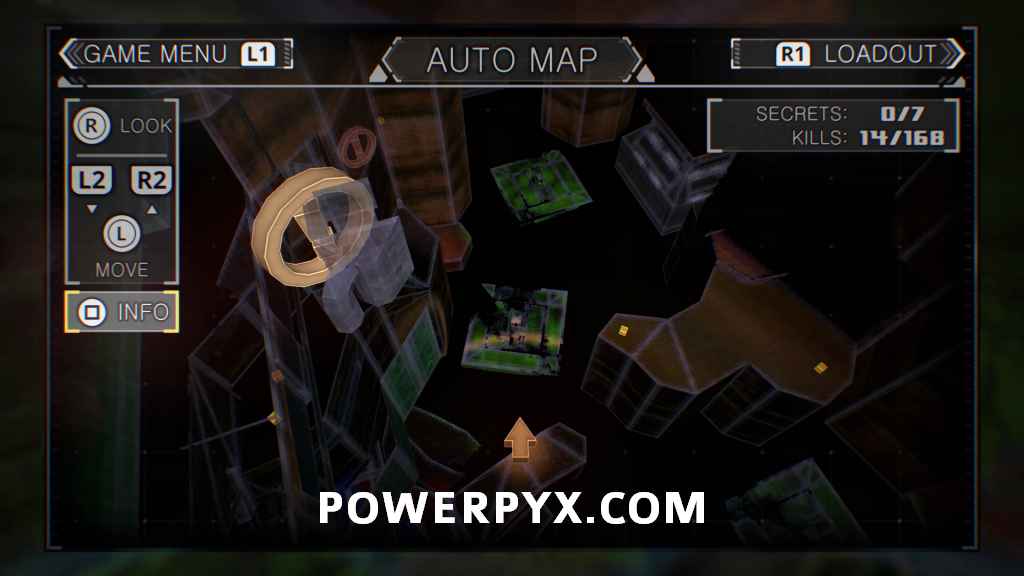
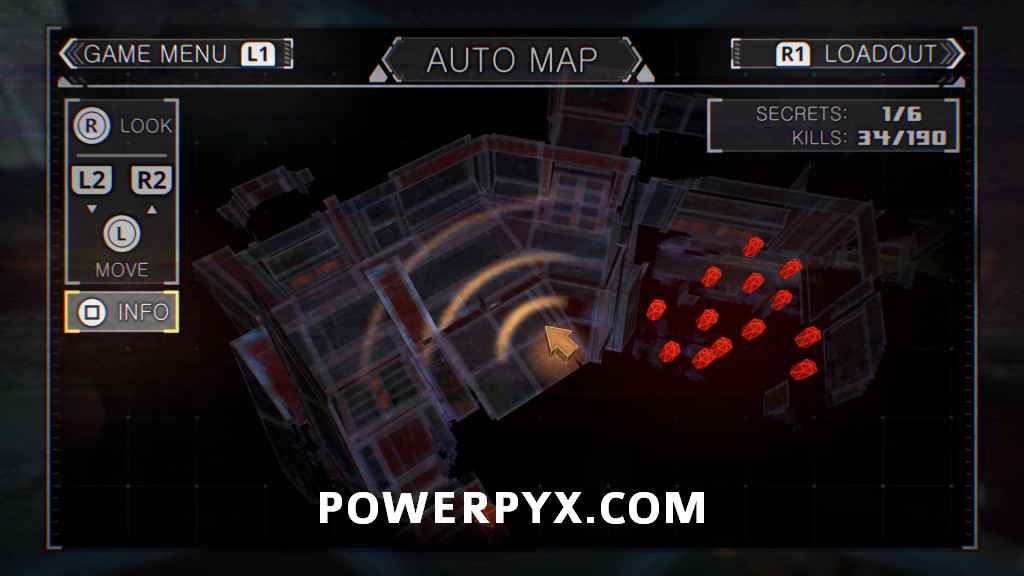
When going for 100% Kills on levels, make sure to go into all areas, as enemy spawns can trigger in optional areas. It is recommended that you do kills while doing secrets because enemies can spawn when entering some secret areas. Enemies will appear on your Automap as a red rectangle when you’ve gone near them, so you can check your Automap to see if there are any enemies you’ve missed. The Automaps are included here in this guide too.
Level 1 – Sacrum
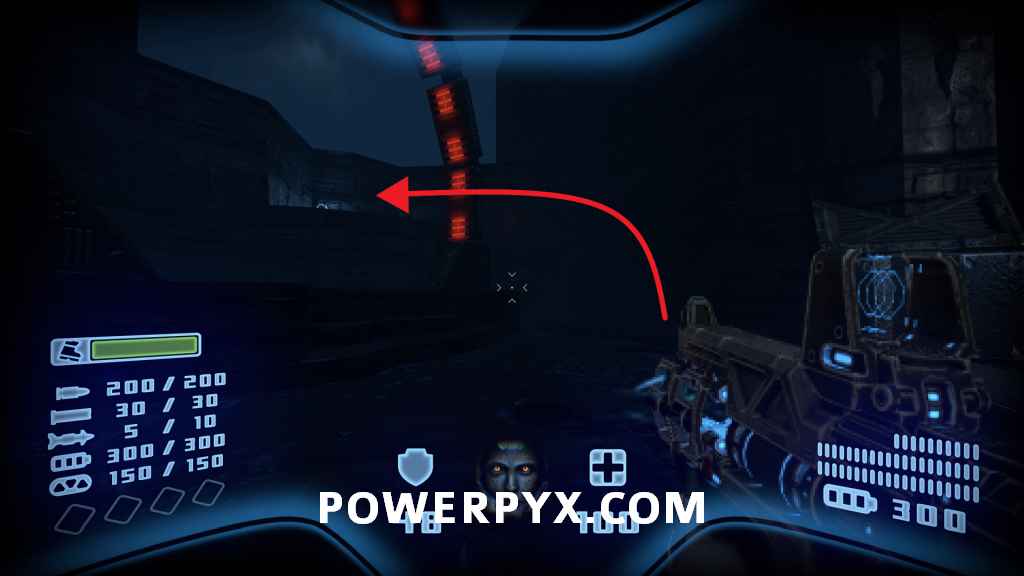
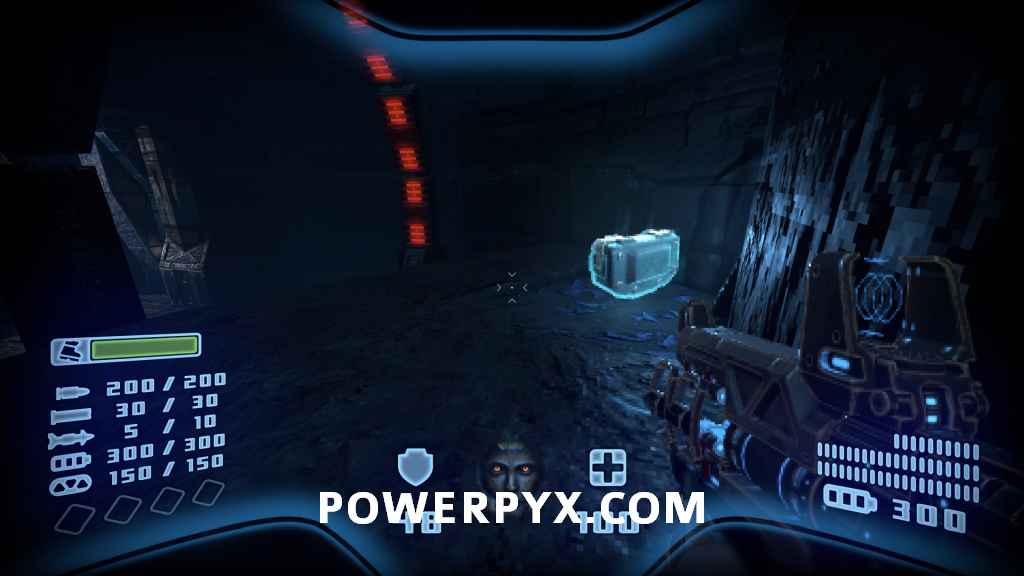
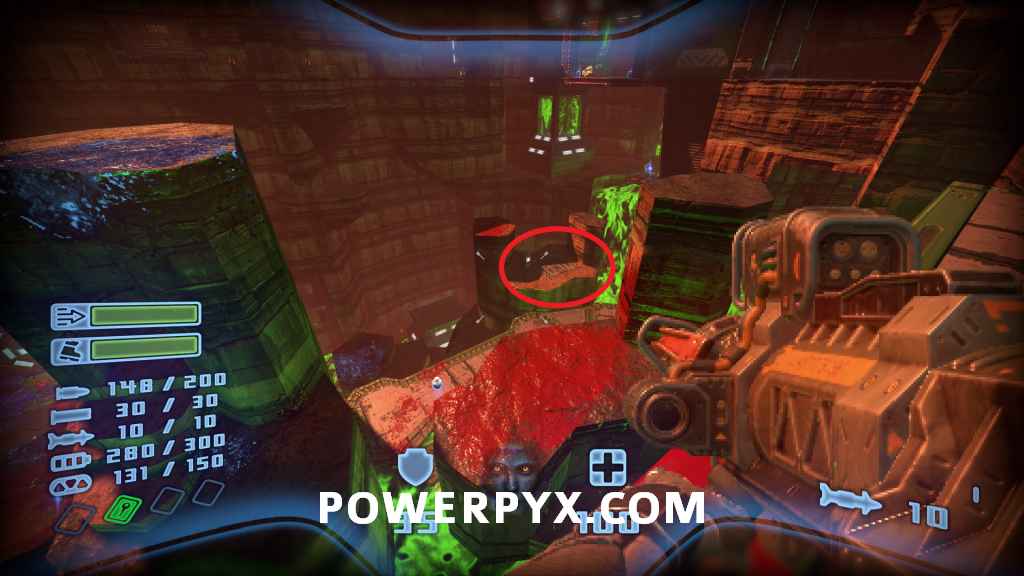
Secret #1
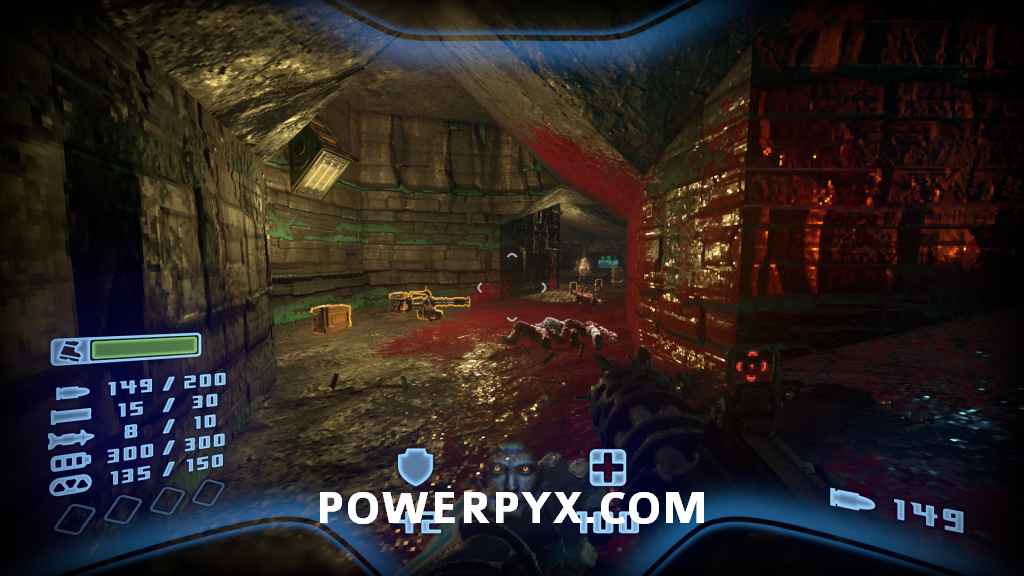
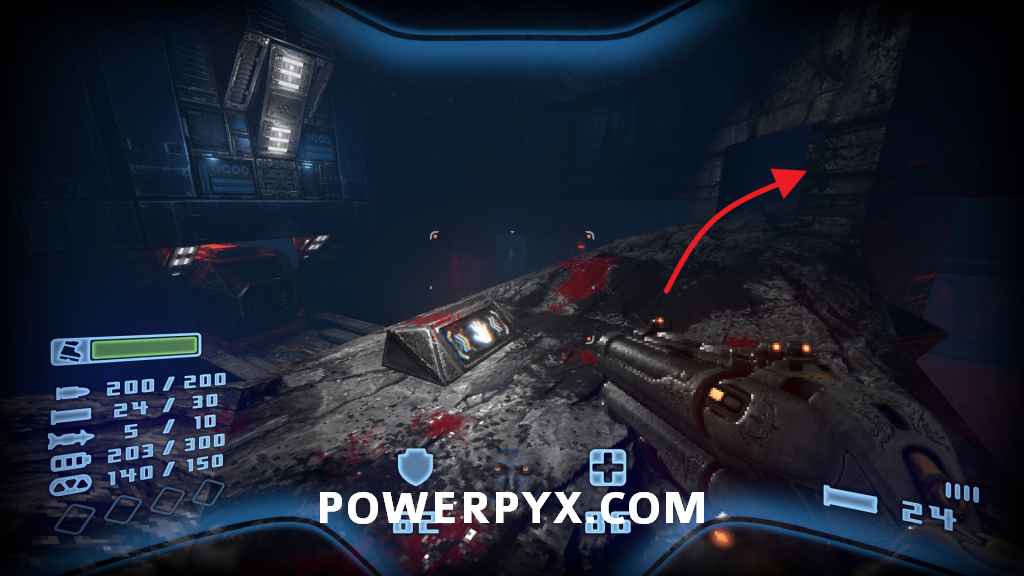
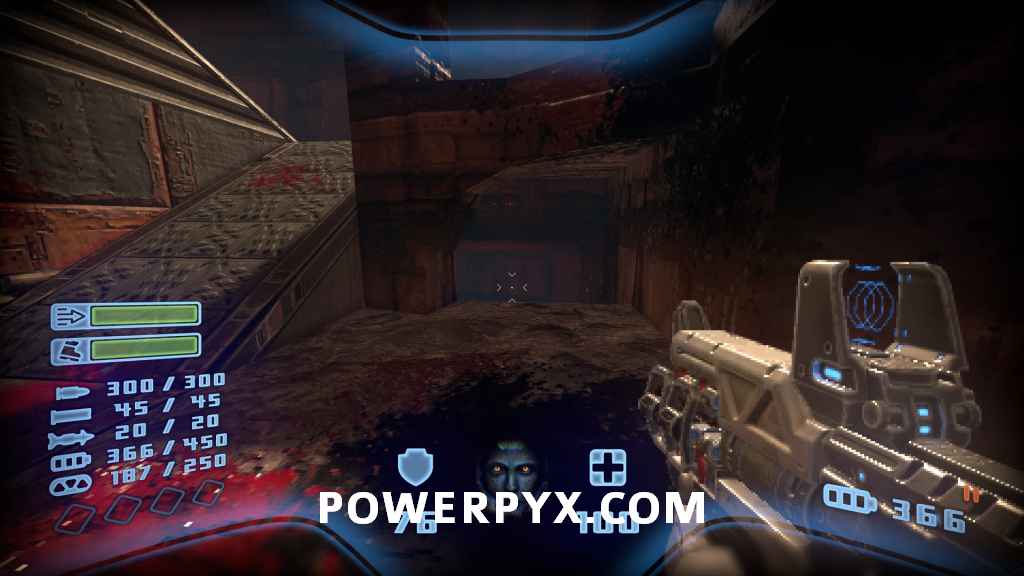
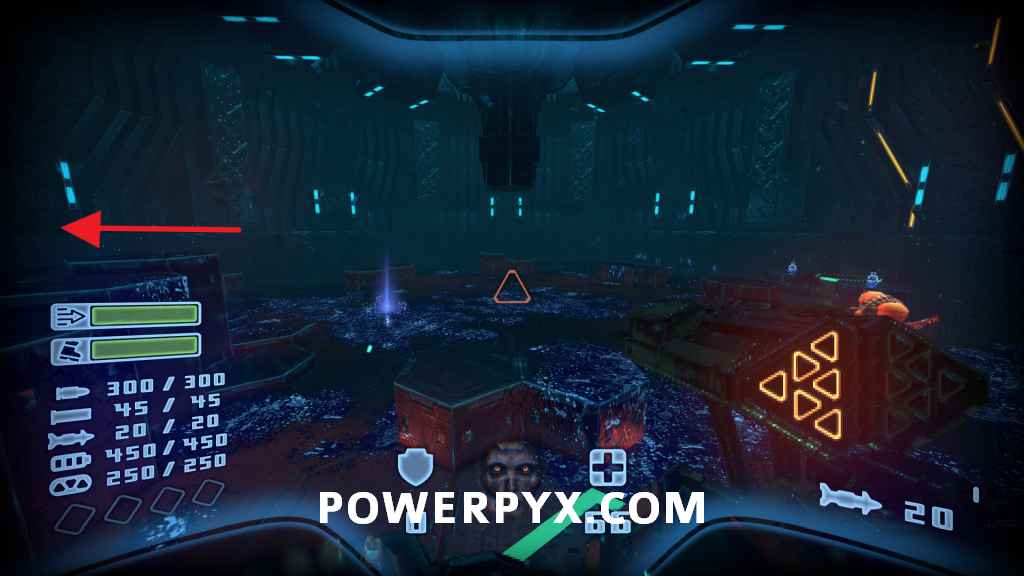
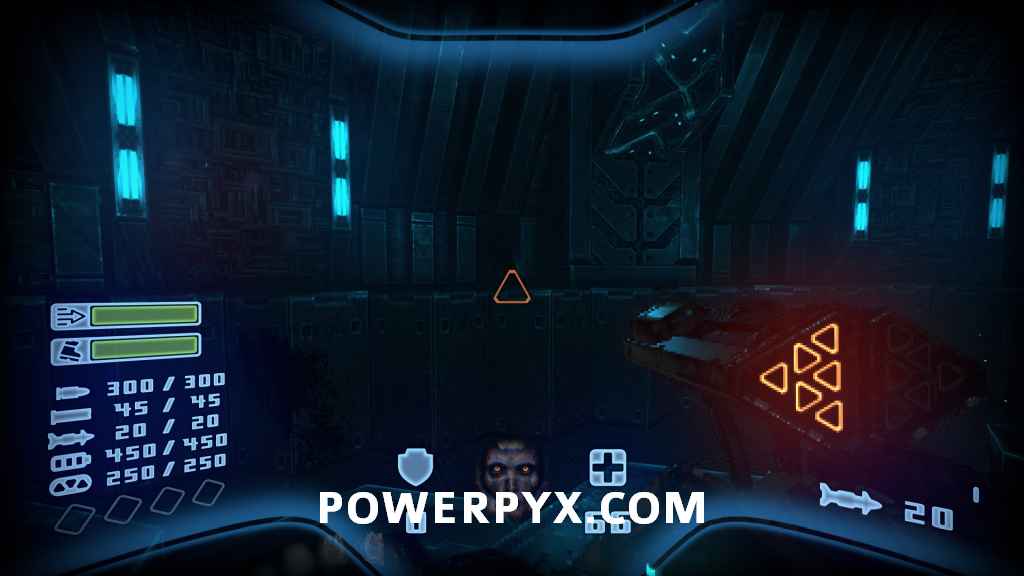
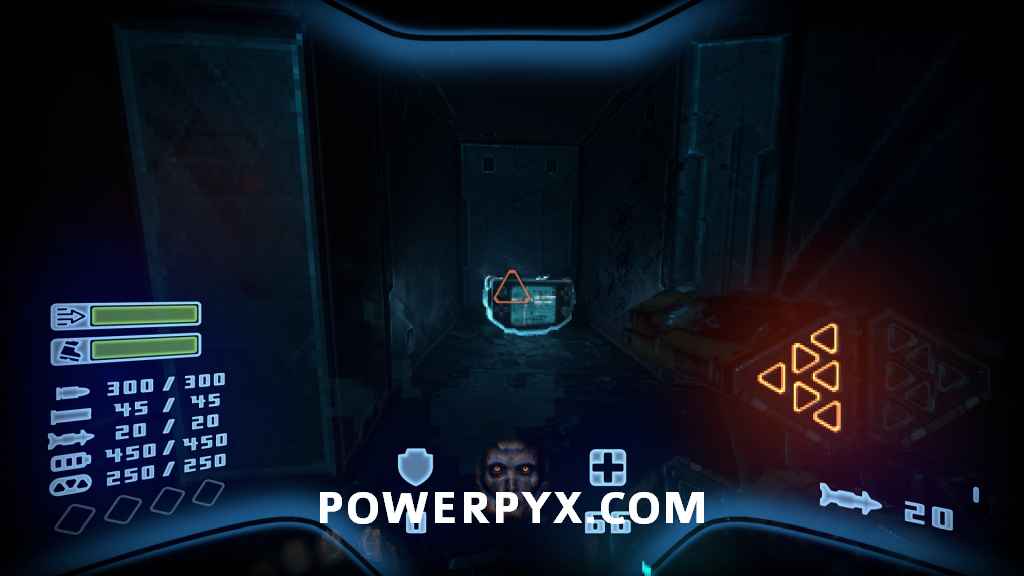
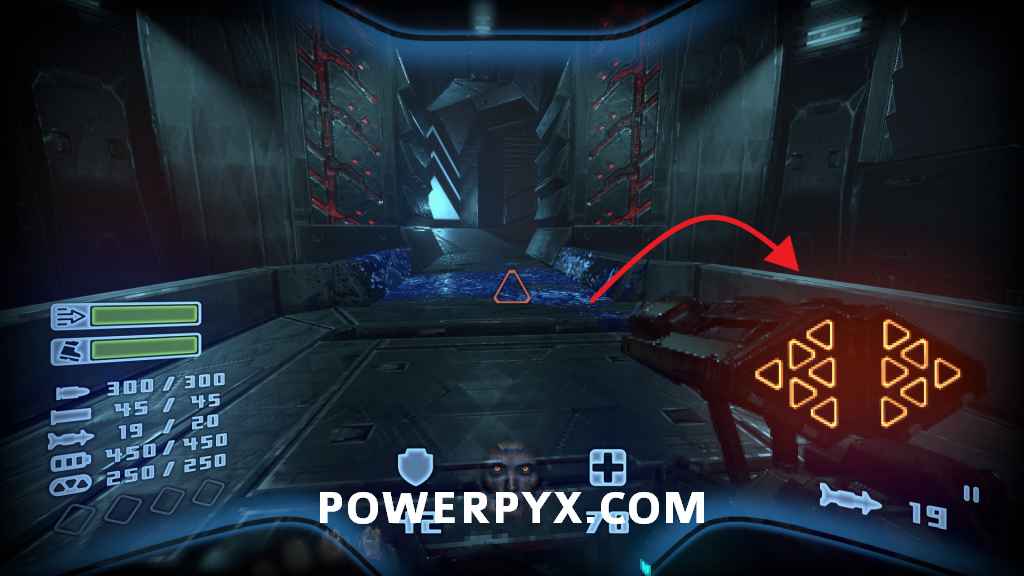
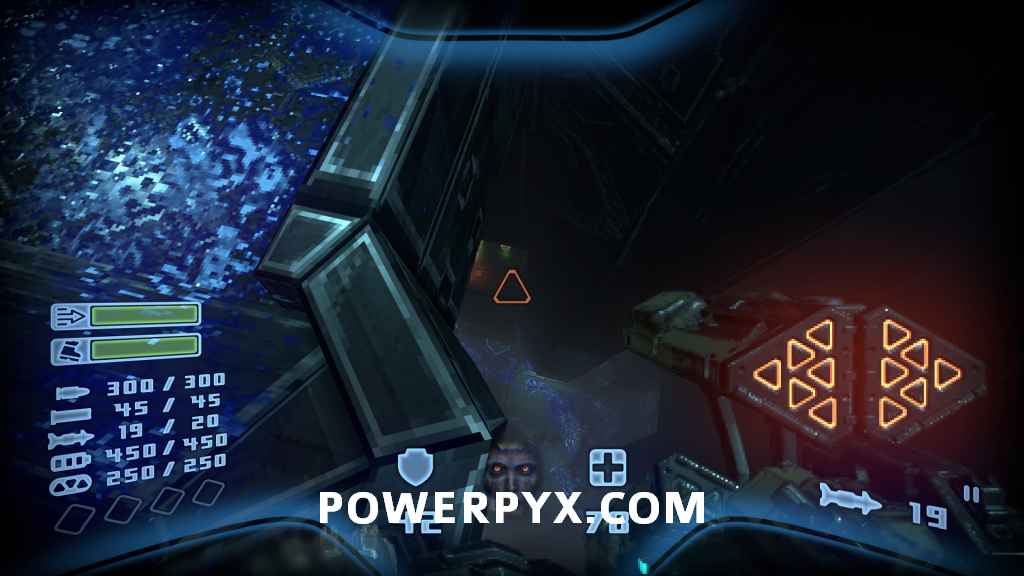
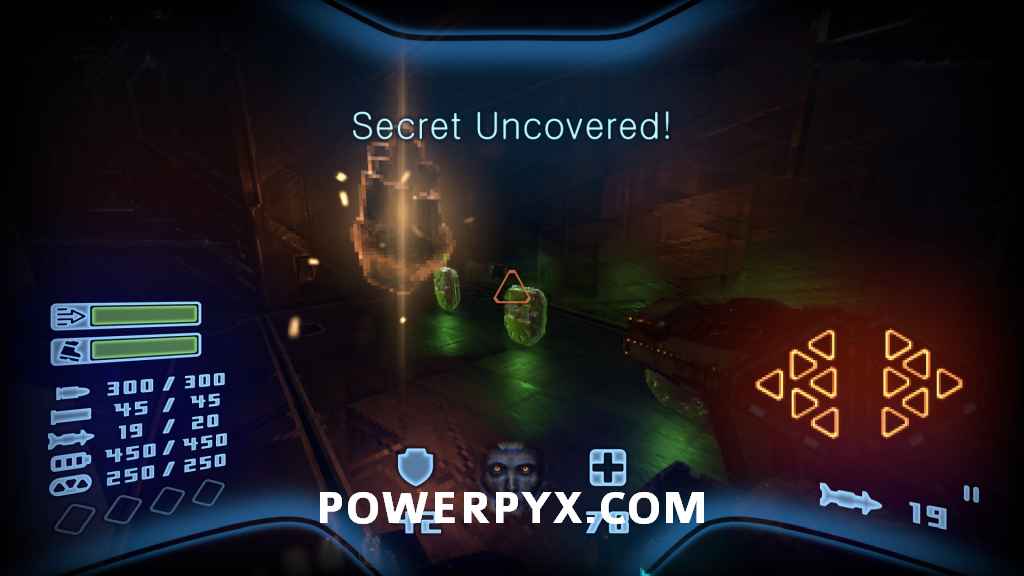
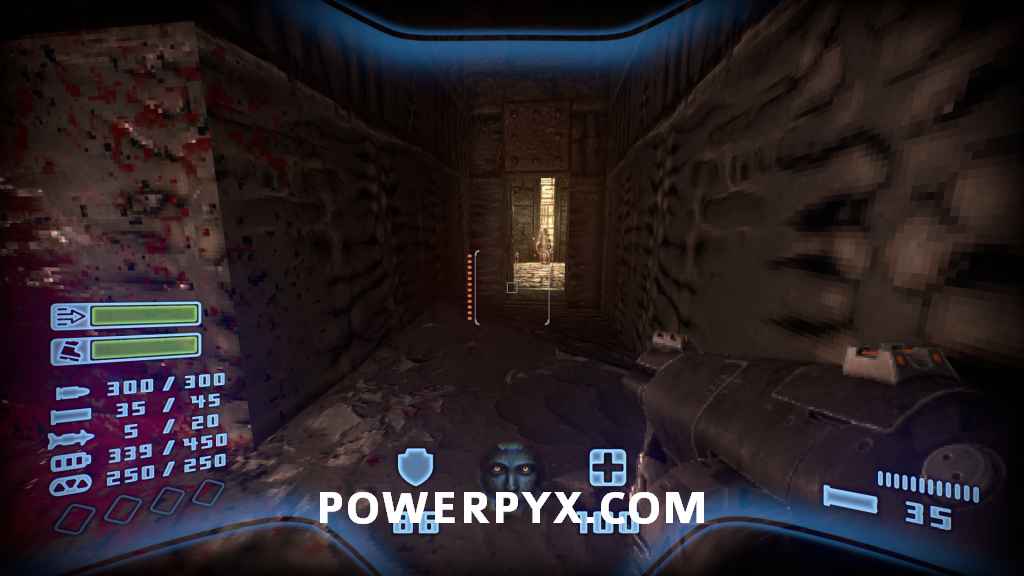
After receiving the shotgun and going through the room of zombies, head left down the hallway to find this secret.


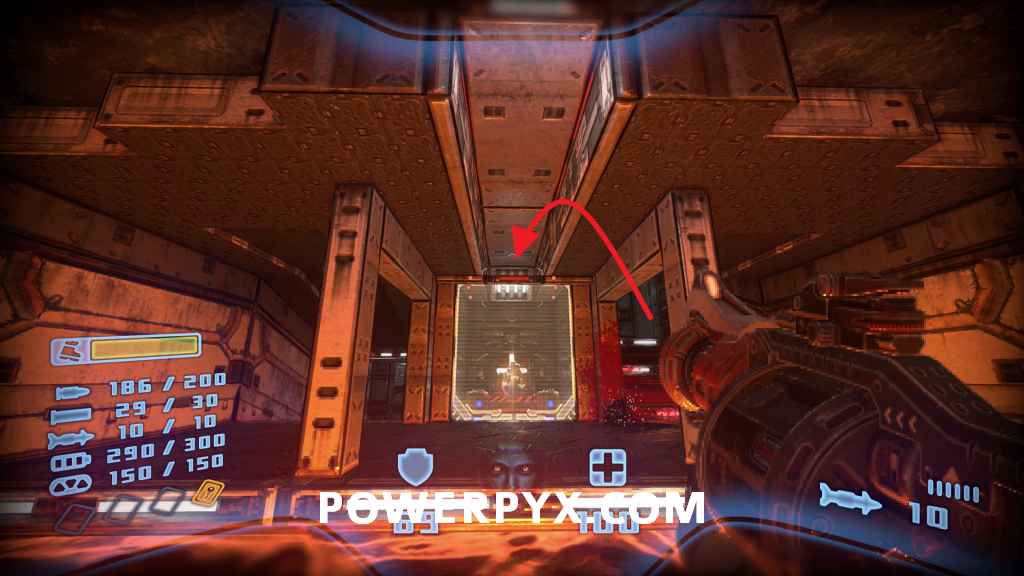
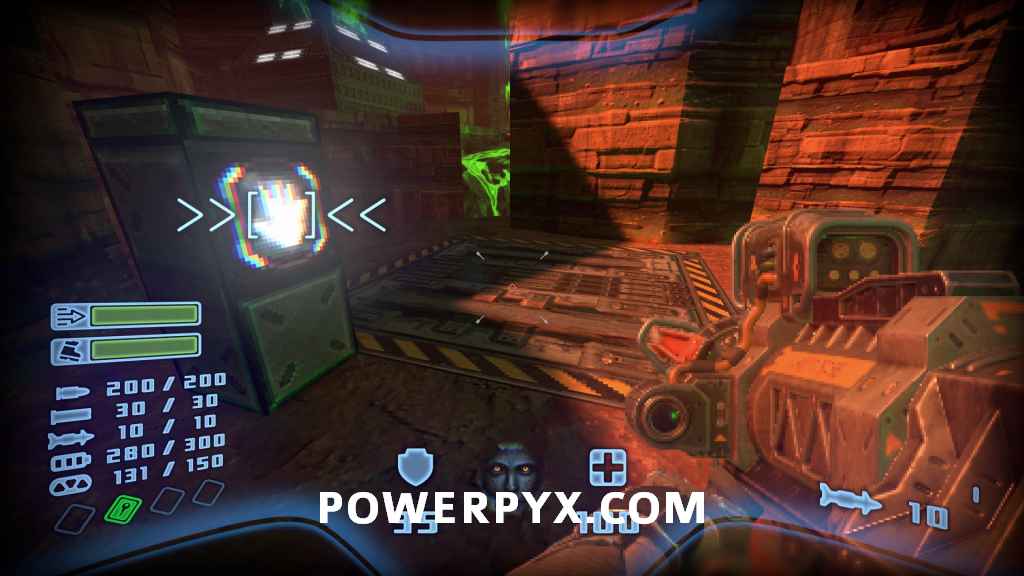
Secret #2
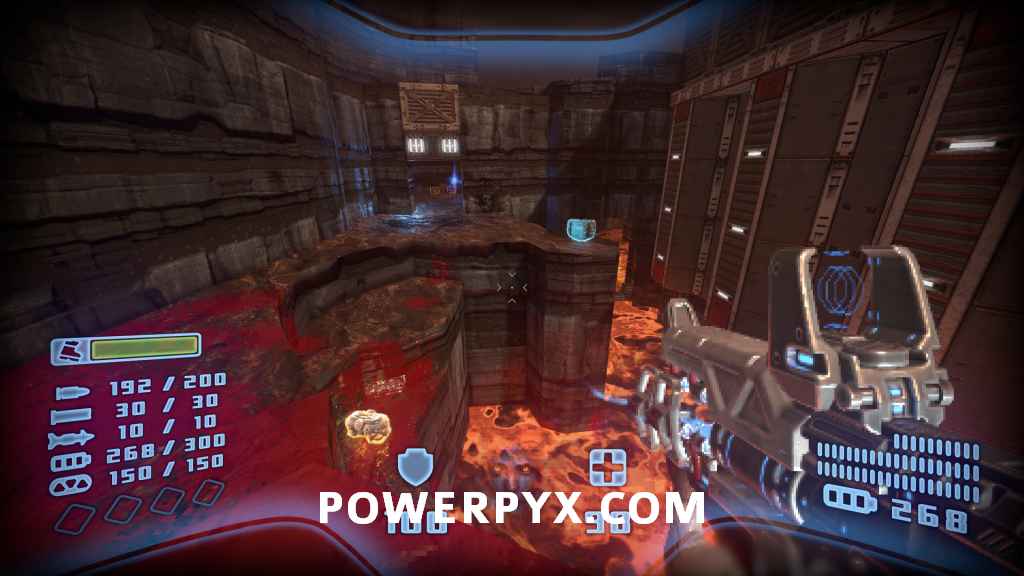
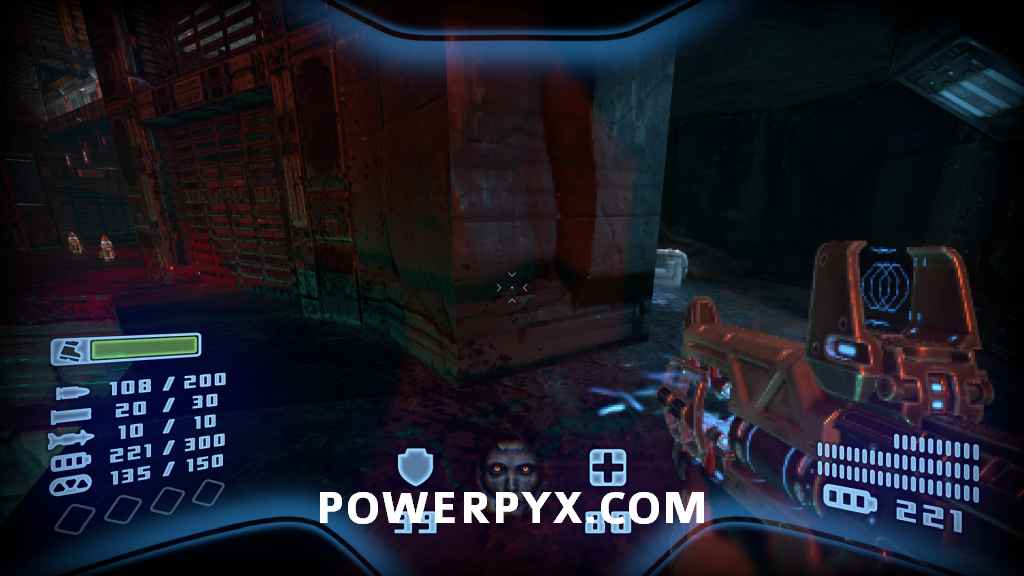
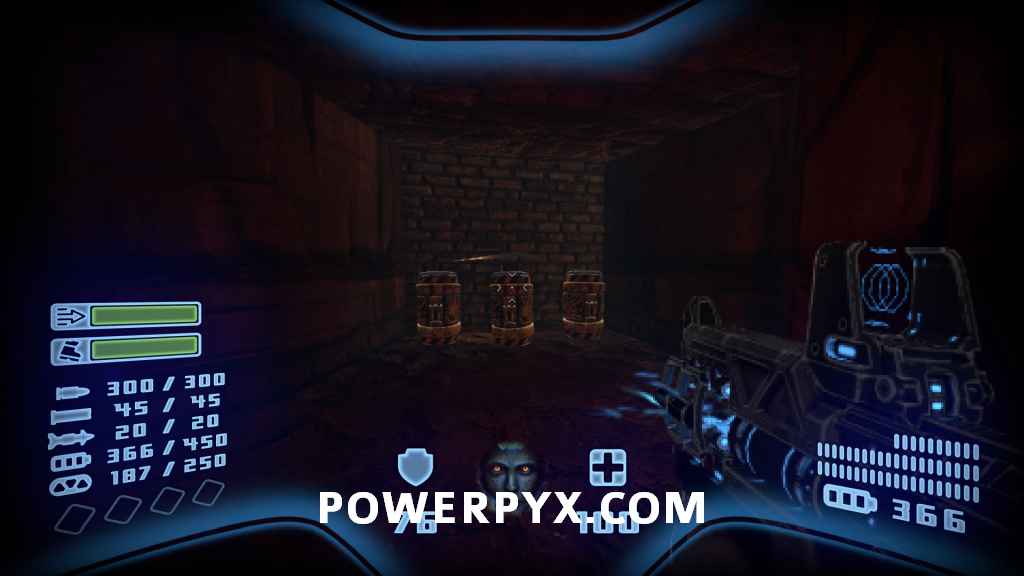
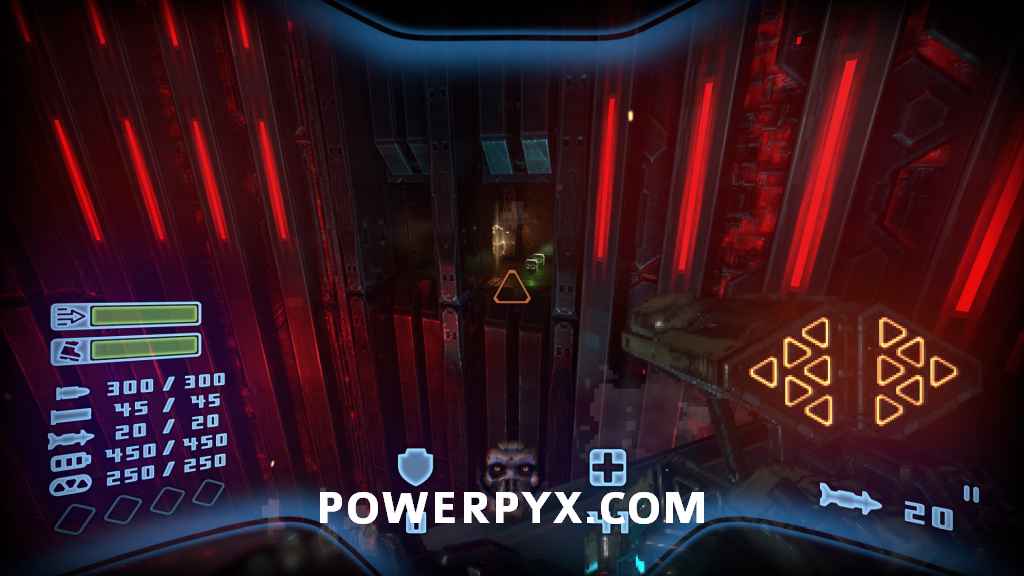
Return to the hallway and head right where you will see armor behind some glass. Climb up onto the middle platform and jump over.


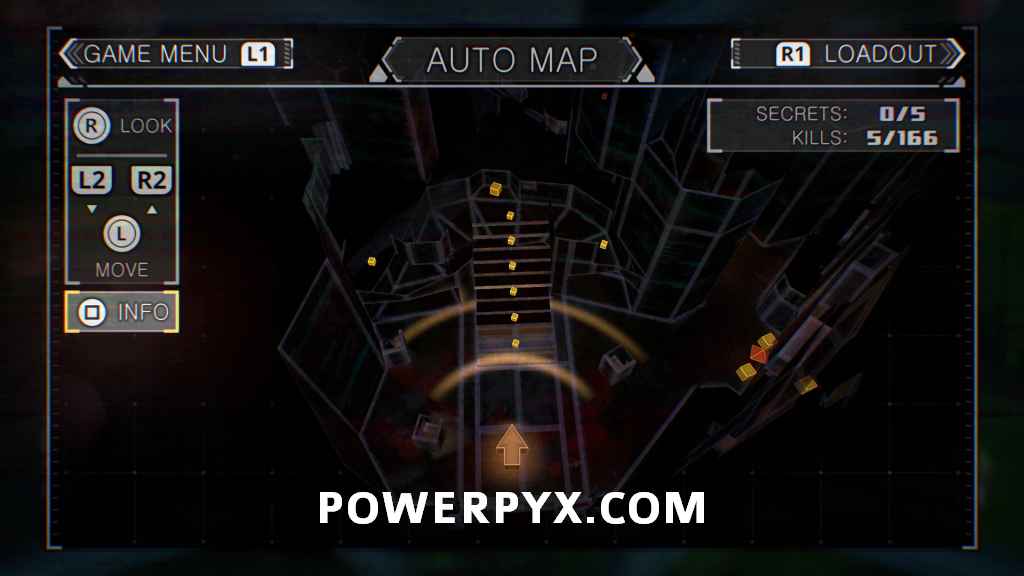
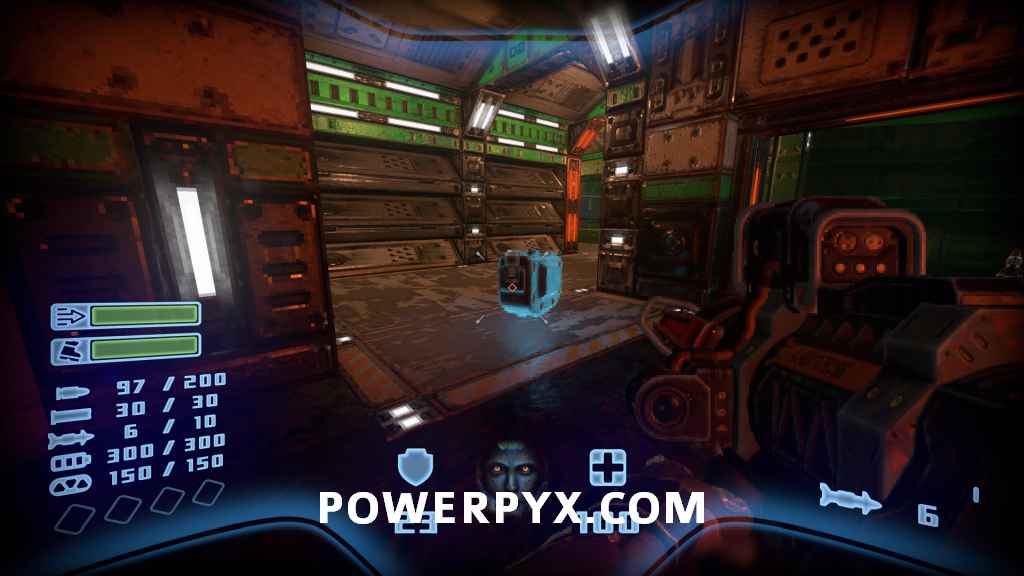
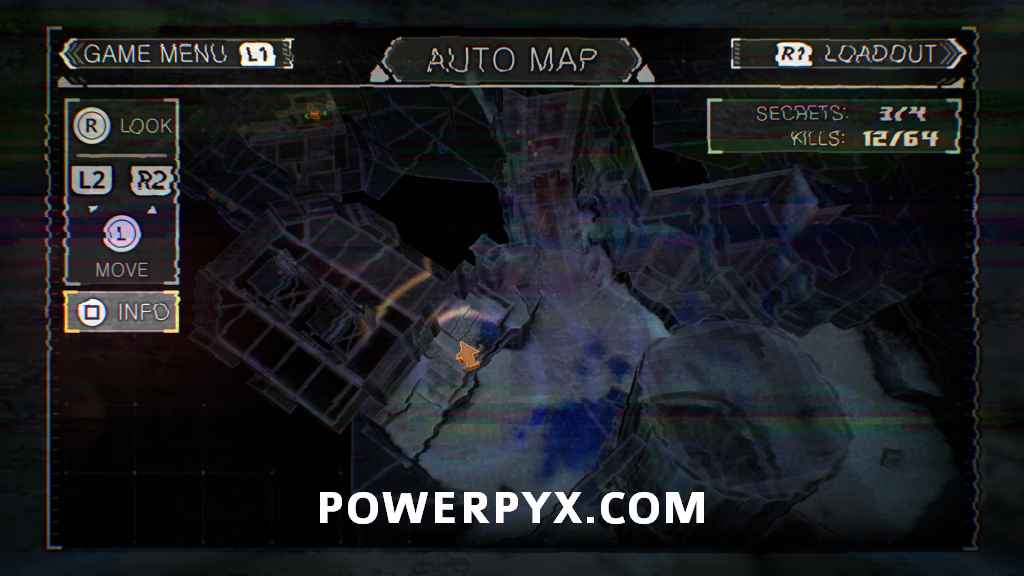
Automap
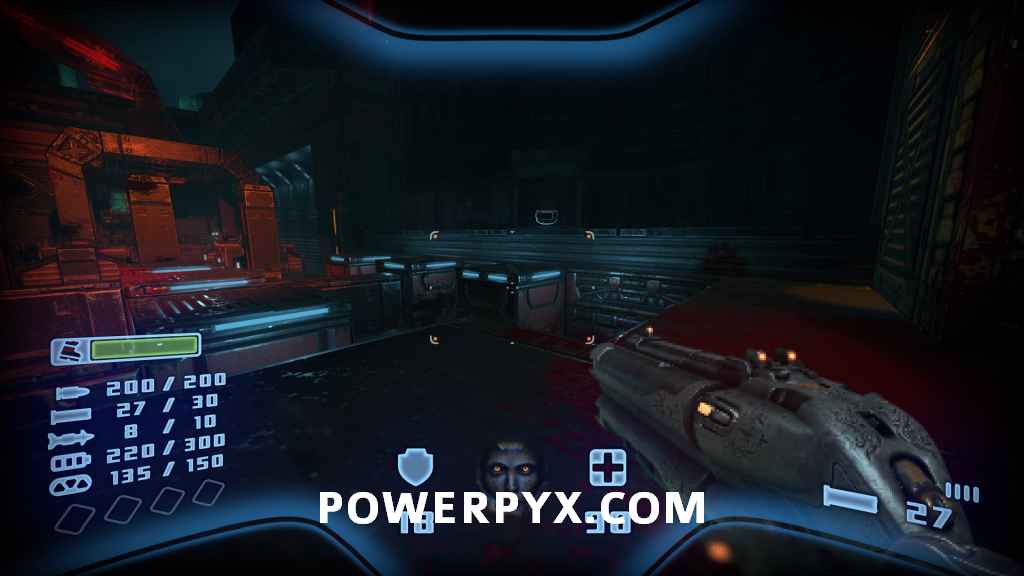
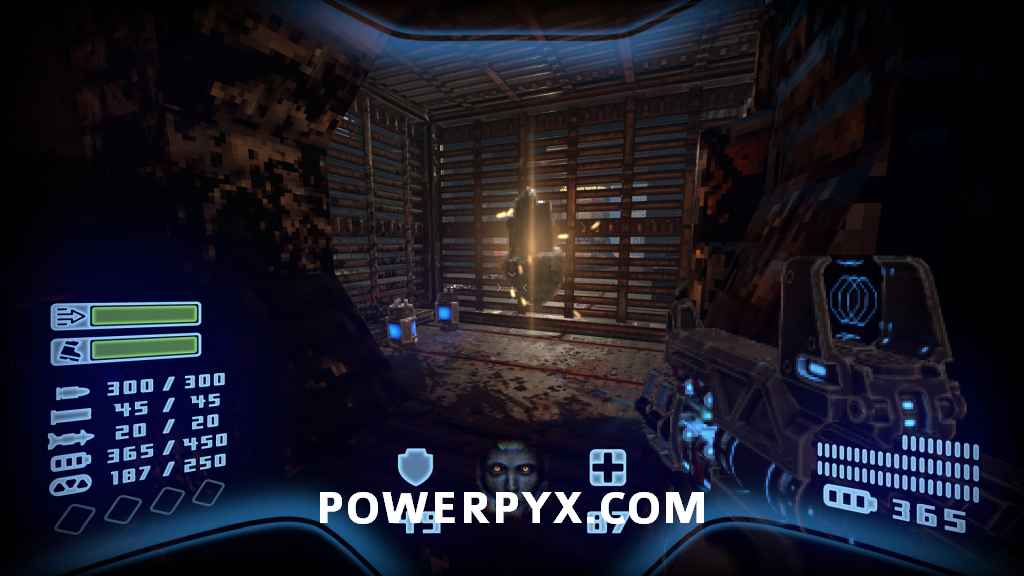
Immediately in front of you as you come outside.


Secret #3
From the Automap, turn around to see some armor in a nook. Jump onto the ledge and jump inside for the secret.


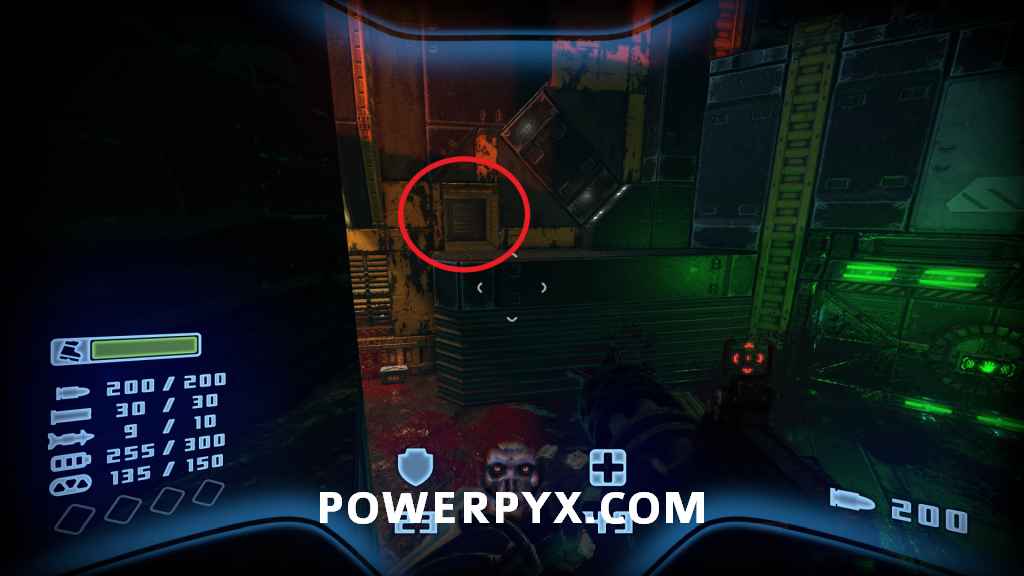
Secret #4
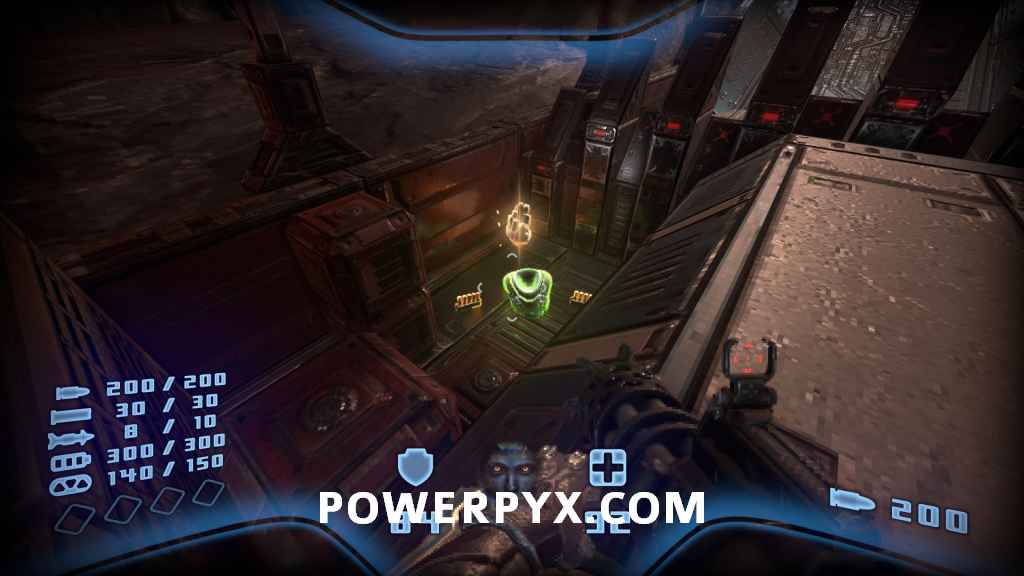
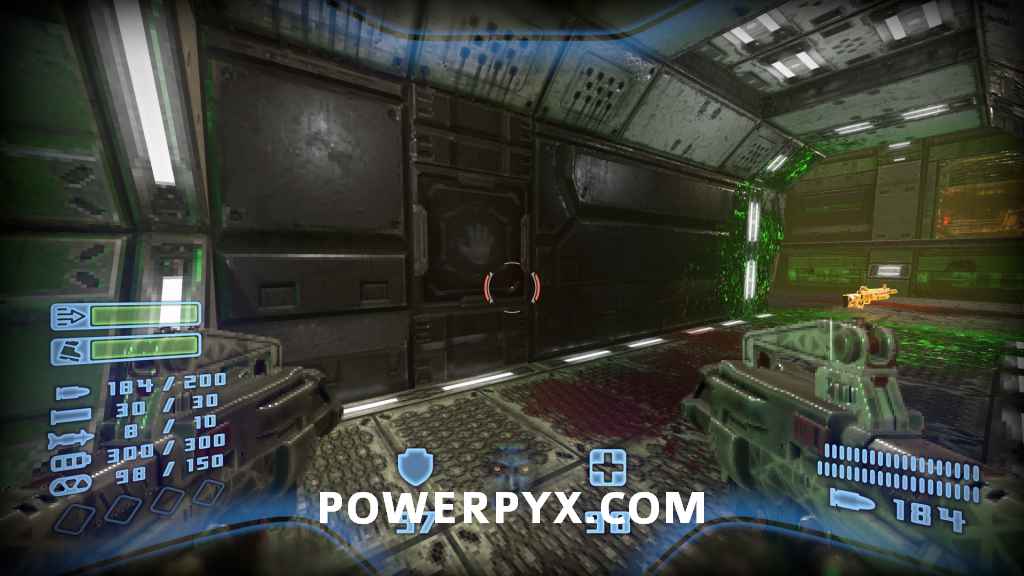
Once back inside, you will acquire the Shredders. Drop down and turn around to see a door you can open that contains this secret.


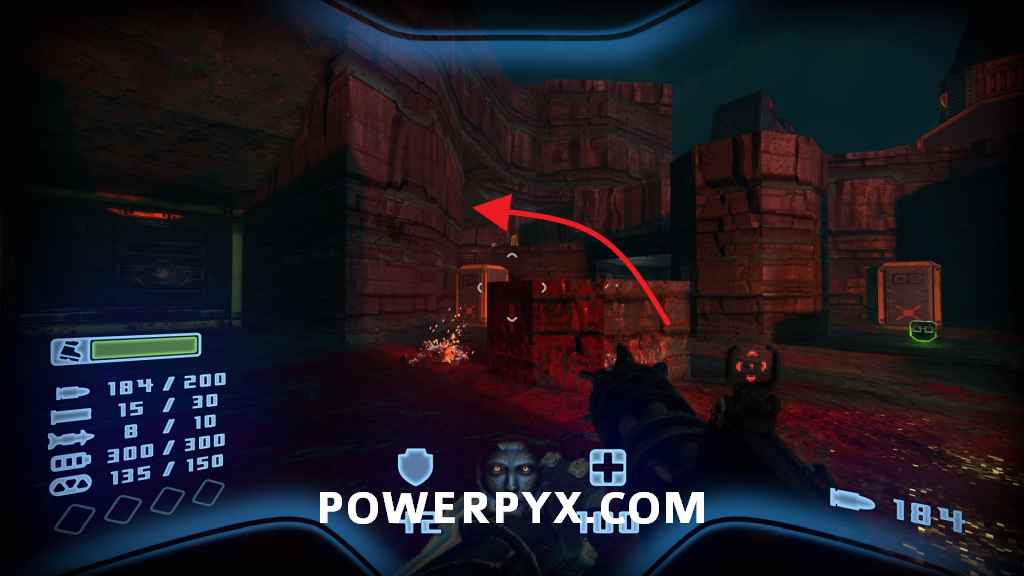
Secret #5
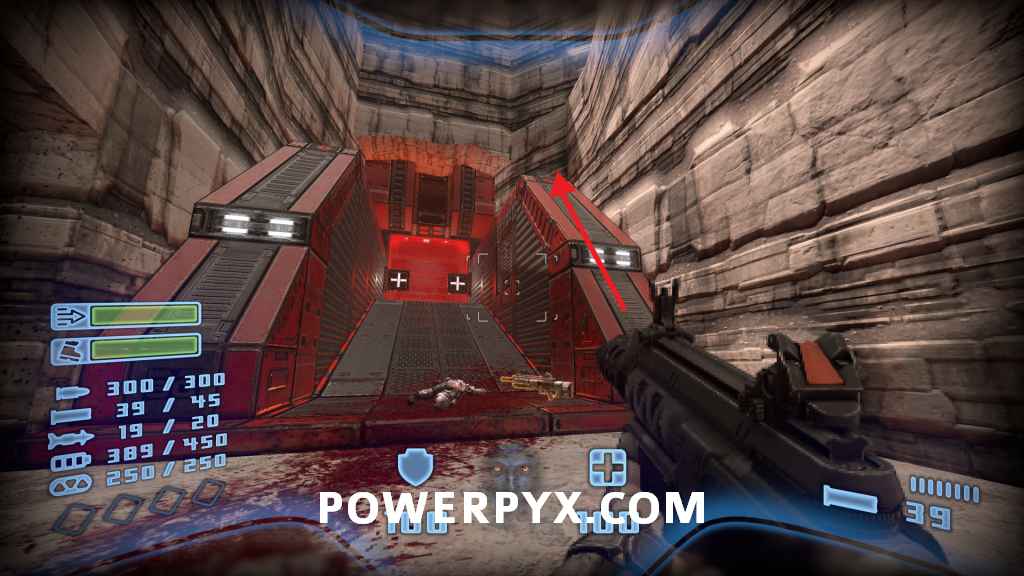
After getting the Red Key, drop off the raised bridge to the left and head up the stairs.


Level 2 – Research
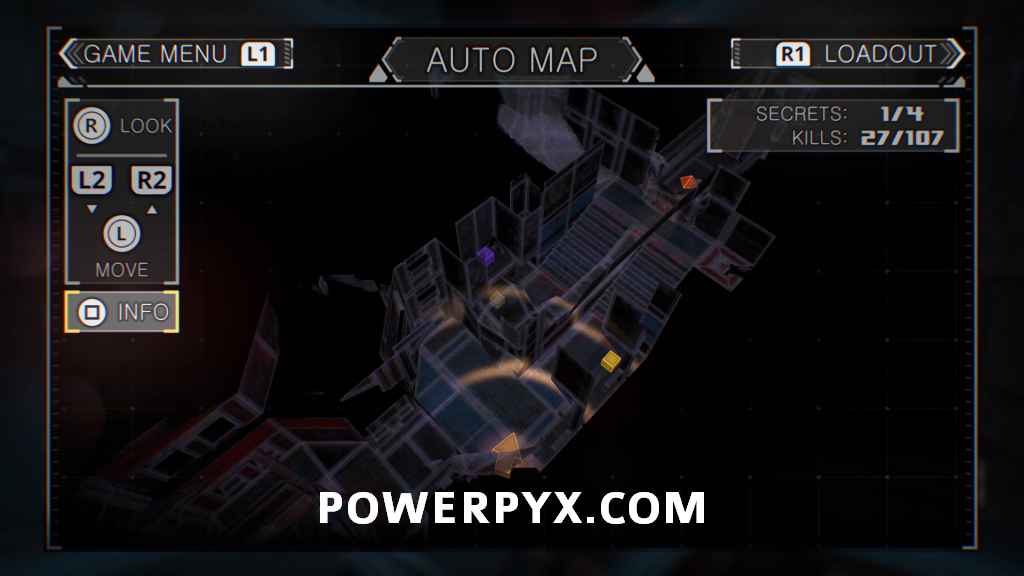
Secret #1
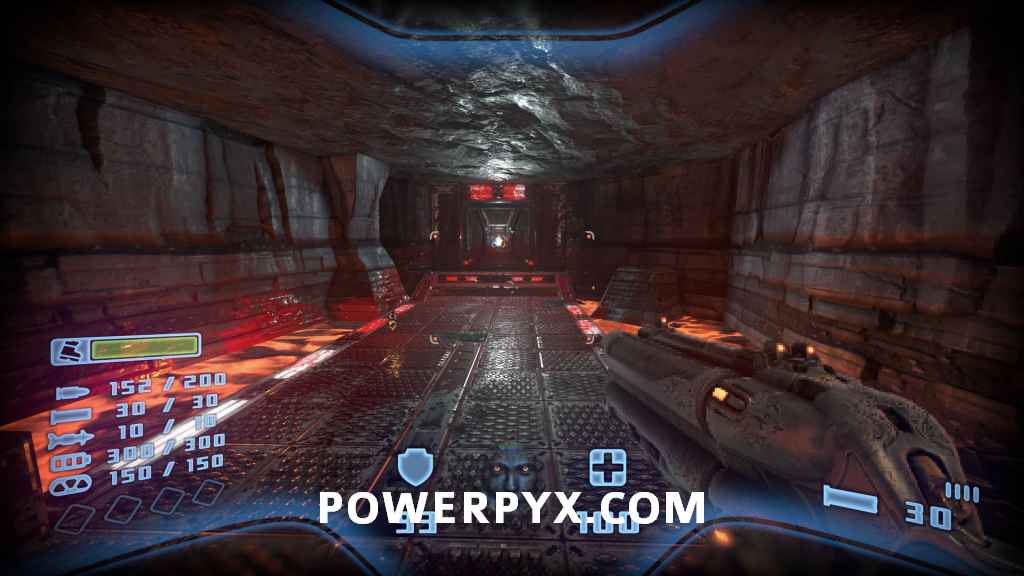
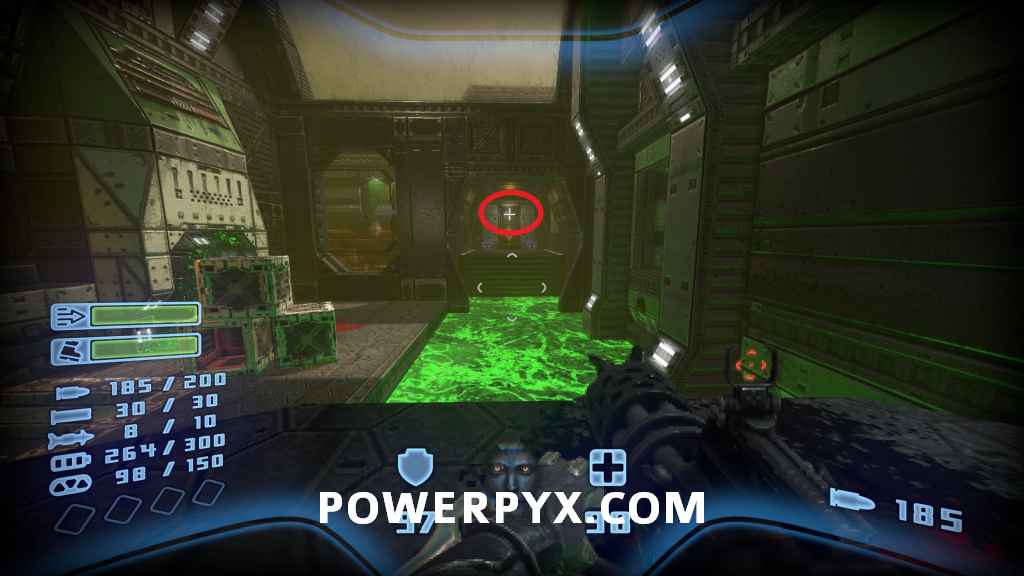
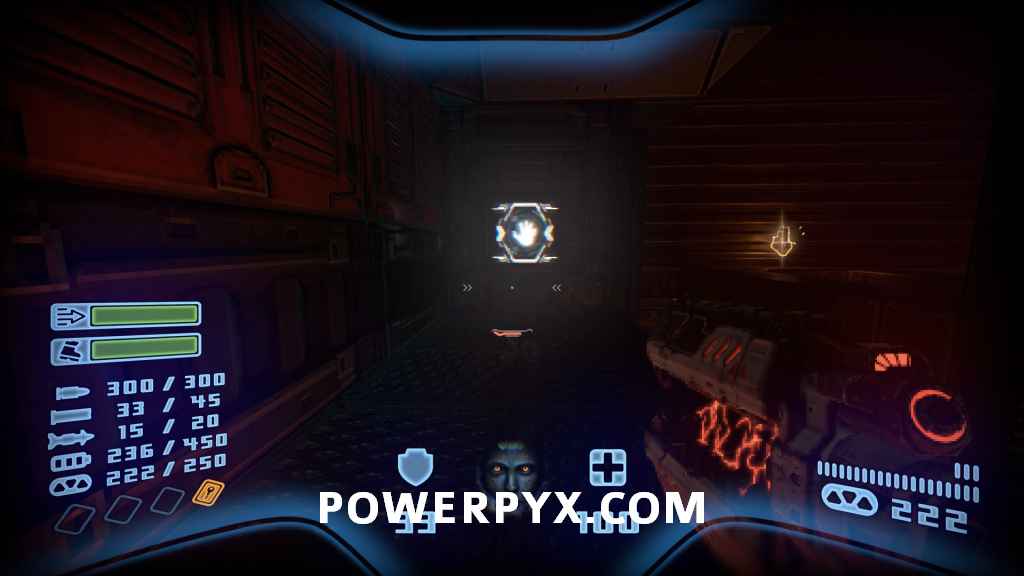
Head towards the portal at the start and walk to the ledge where it closes. Jump across the lava to get behind the fence, then walk up the ramp into the hidden room.


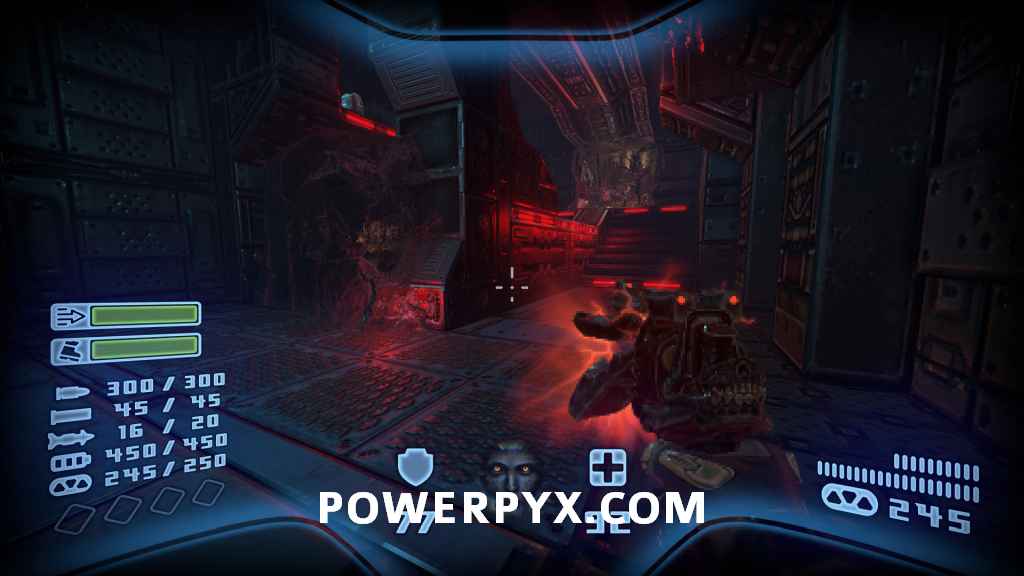
Secret #2
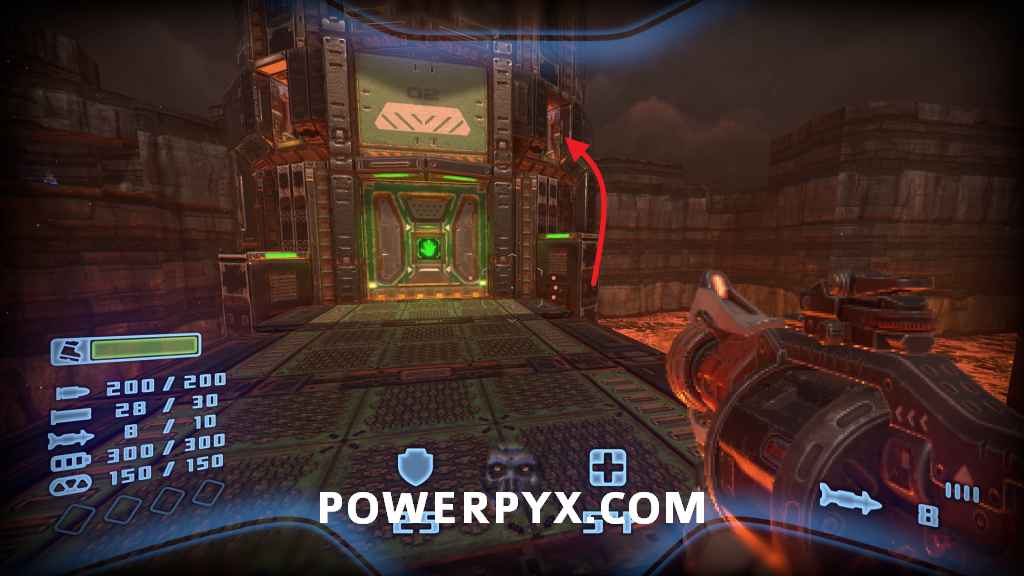
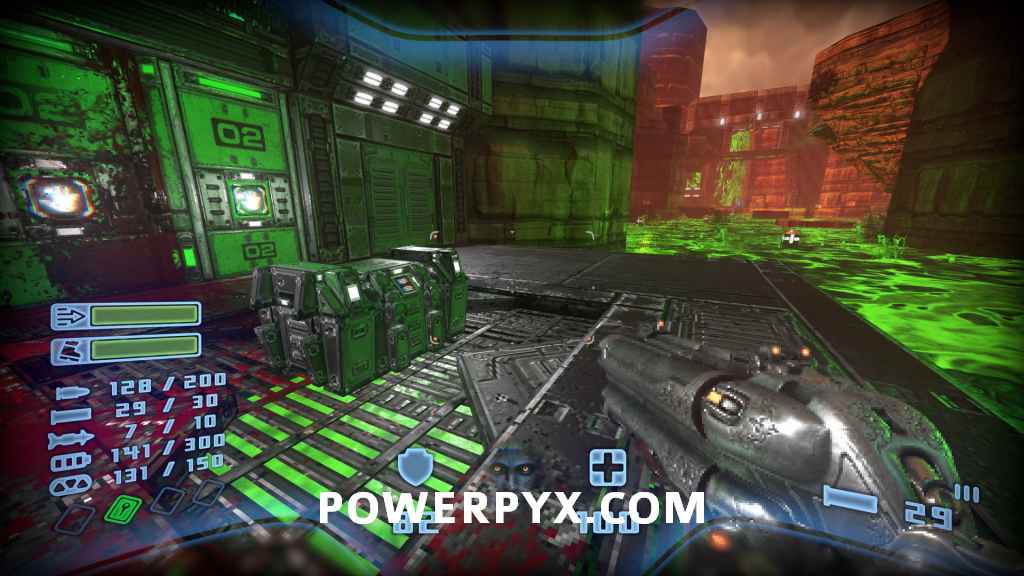
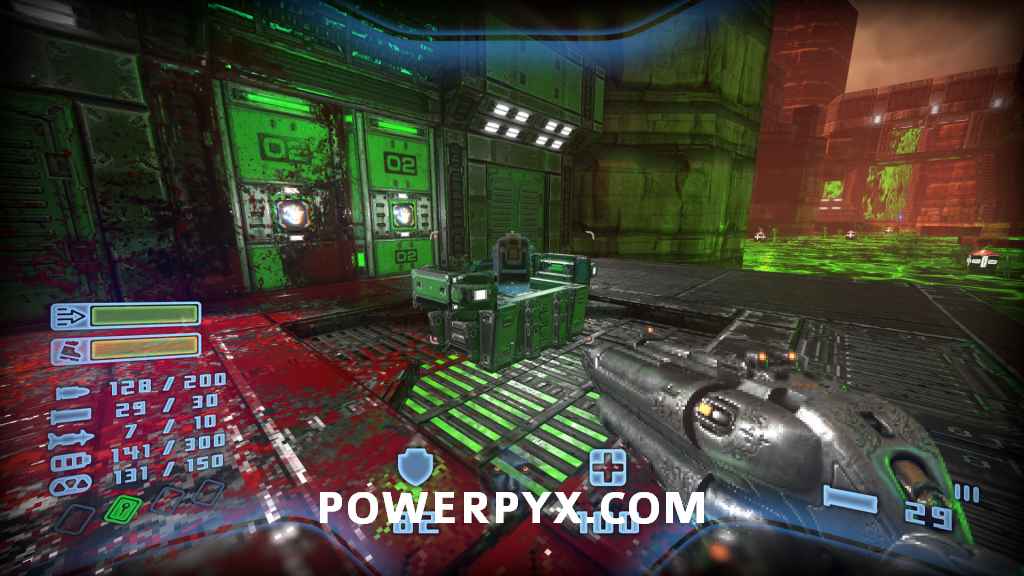
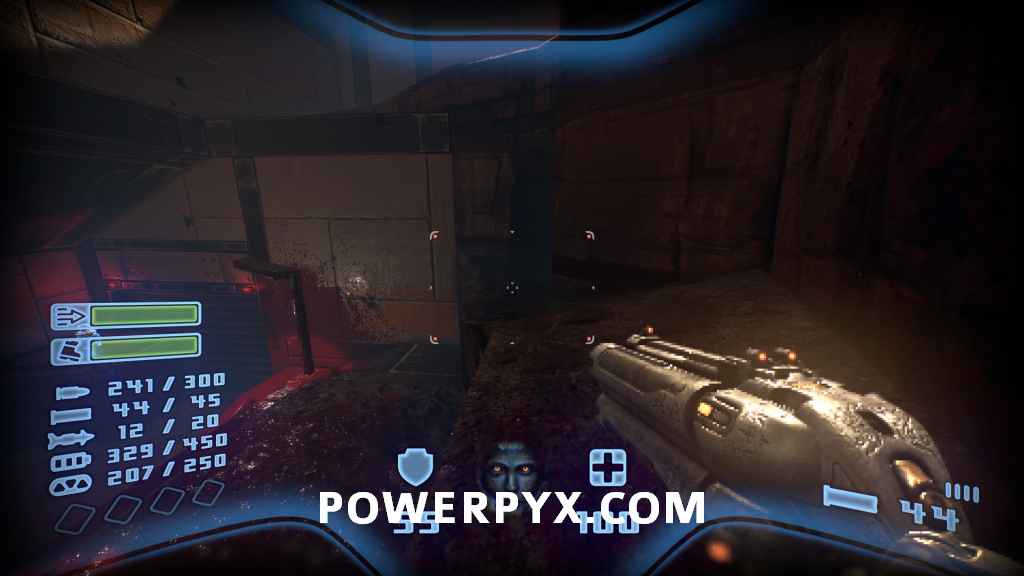
Continue to the other side of the first area where there is a door you can open to an elevator. Jump onto the ledge here and across to reach the secret above.


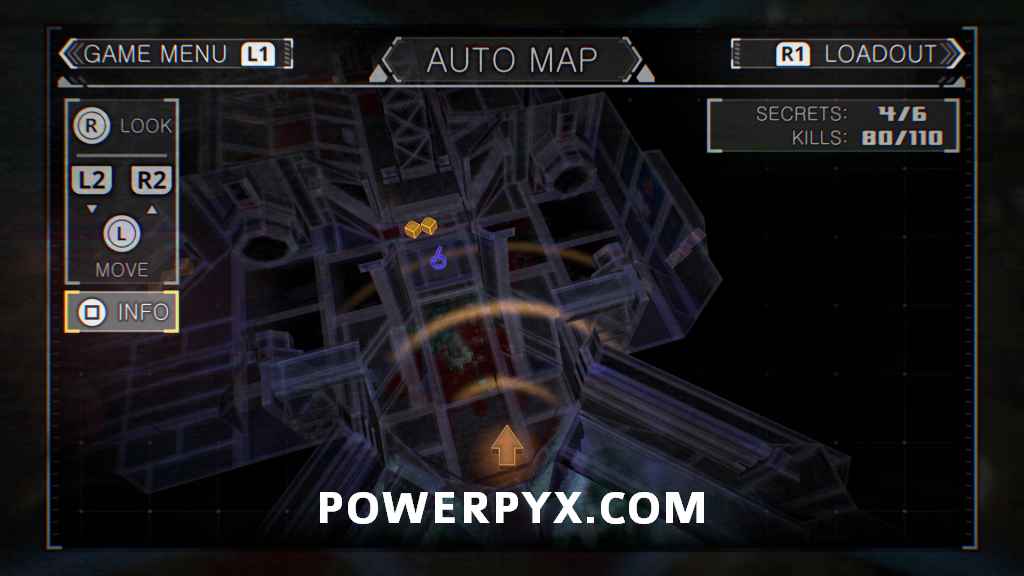
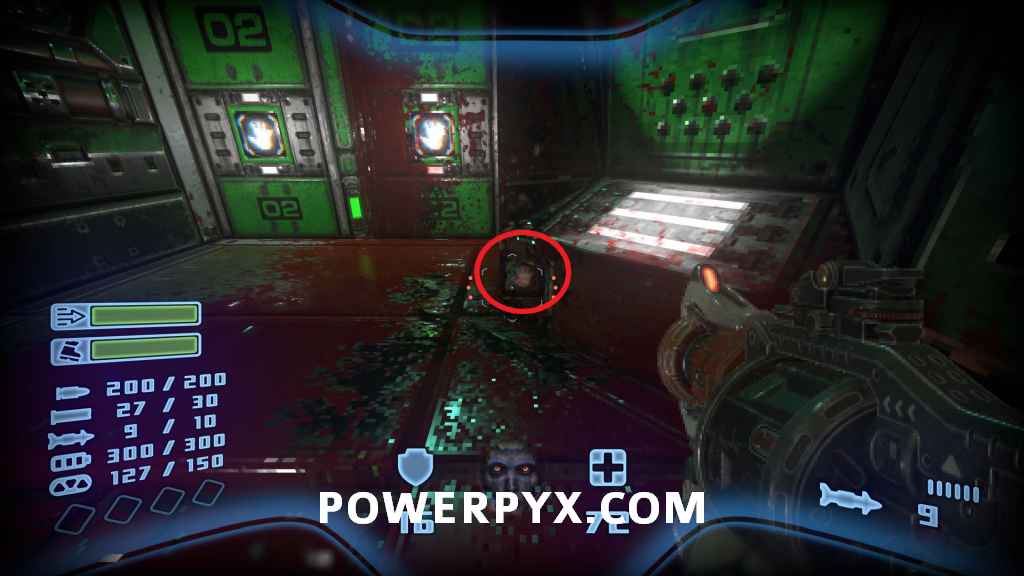
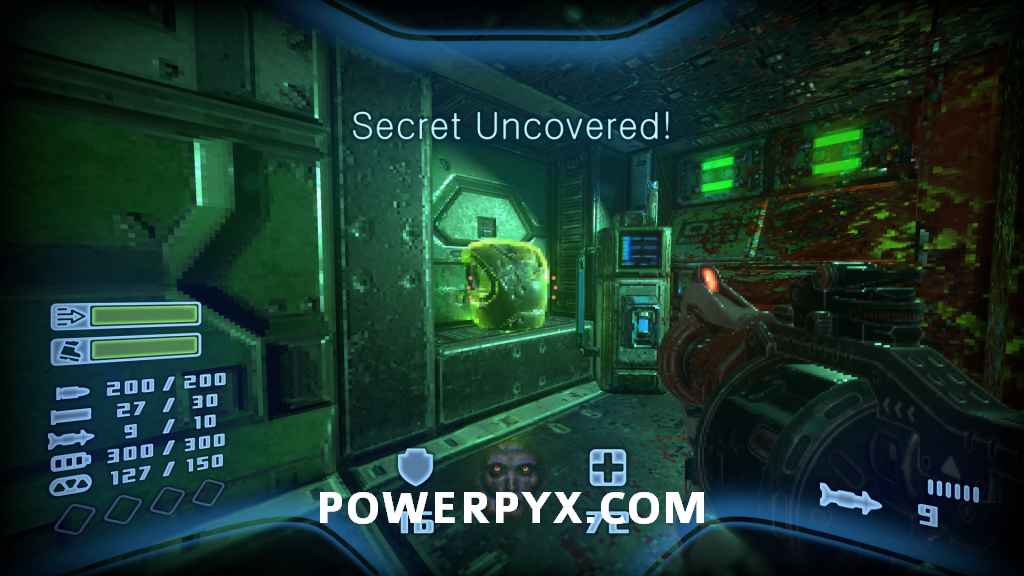
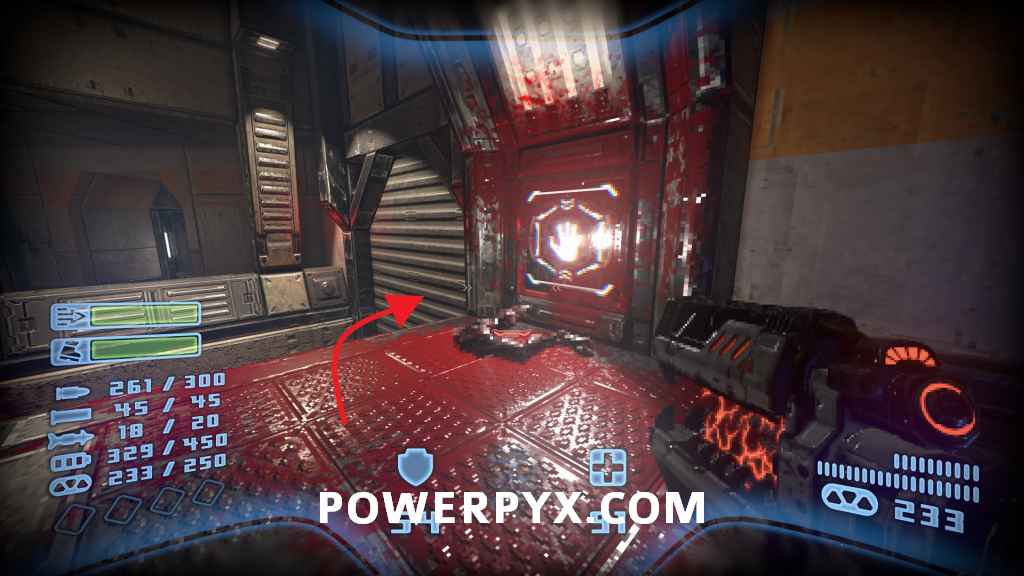
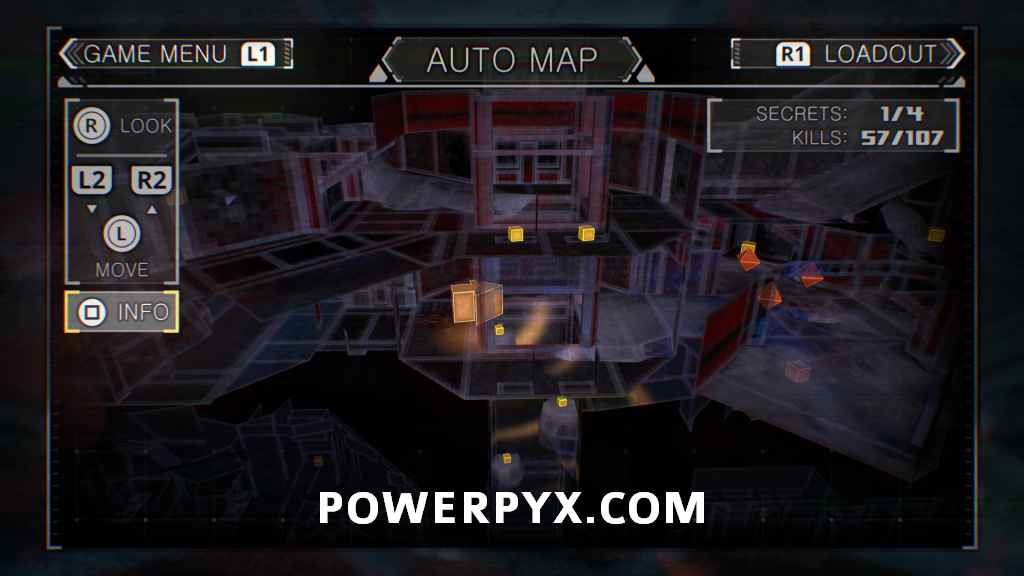
Secret #3 + Automap
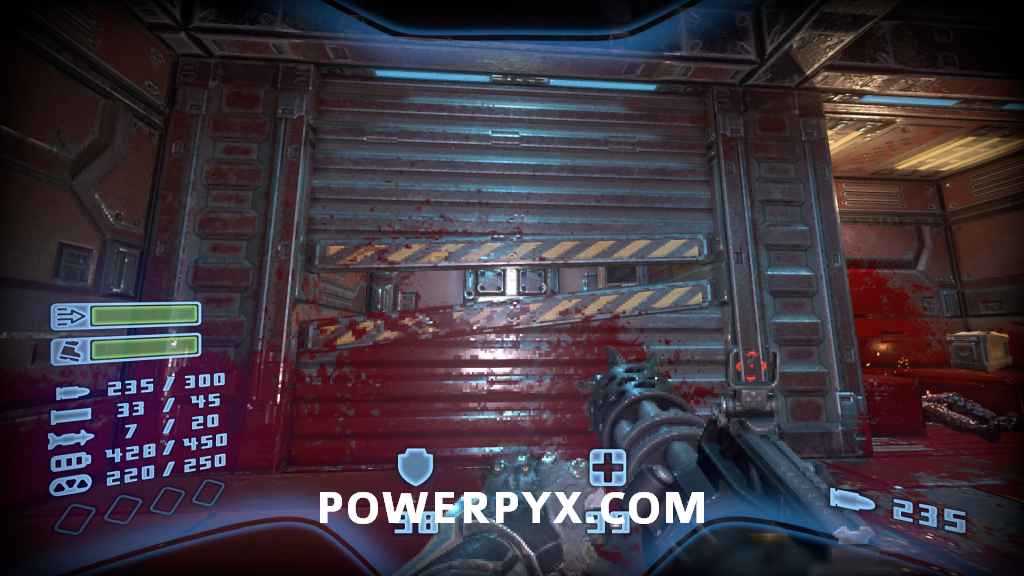
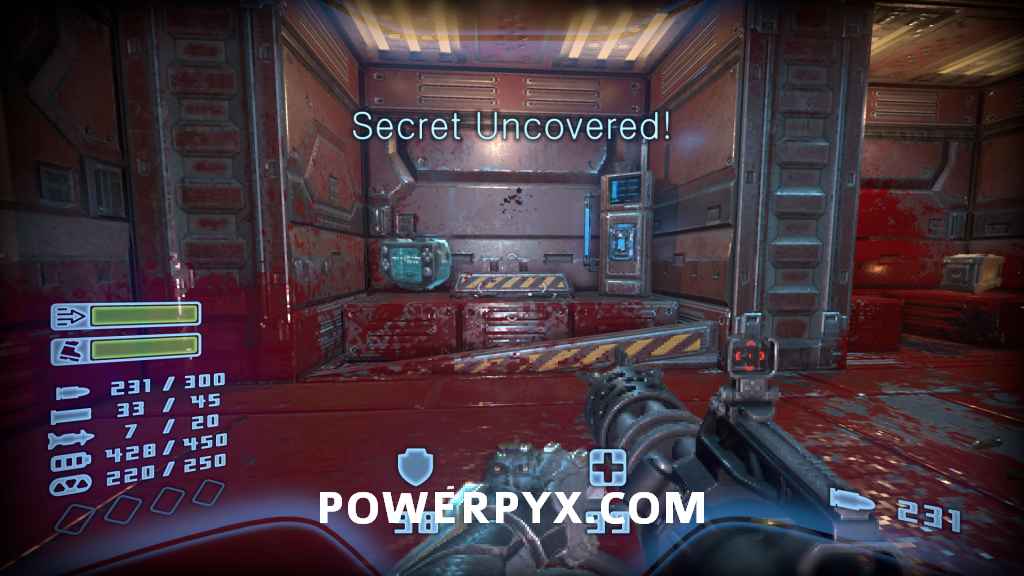
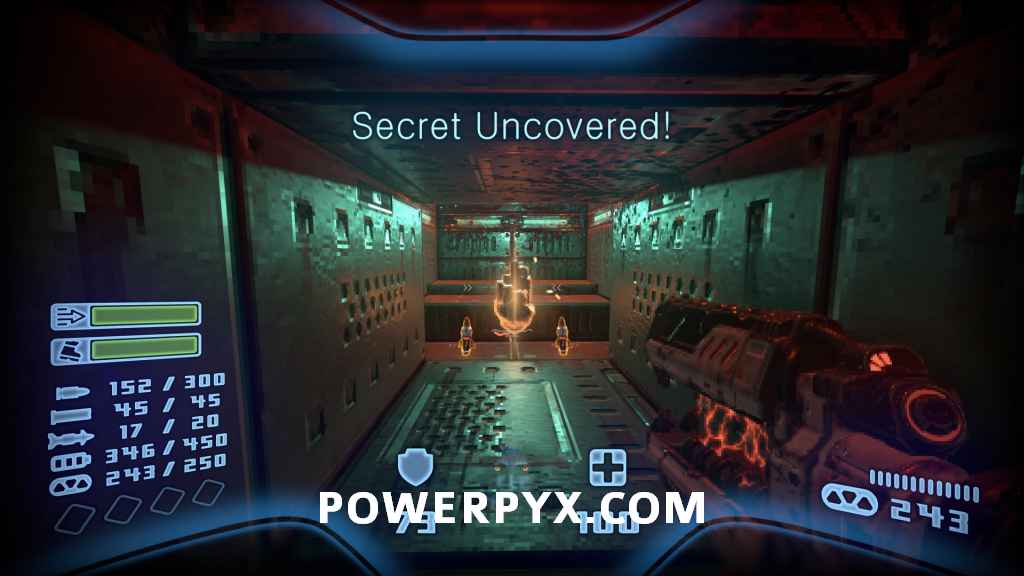
Once inside, you will make your way to a side room with a main switch on the left and some shutters on the right. Go to the second shutter and shoot the button inside to open it.

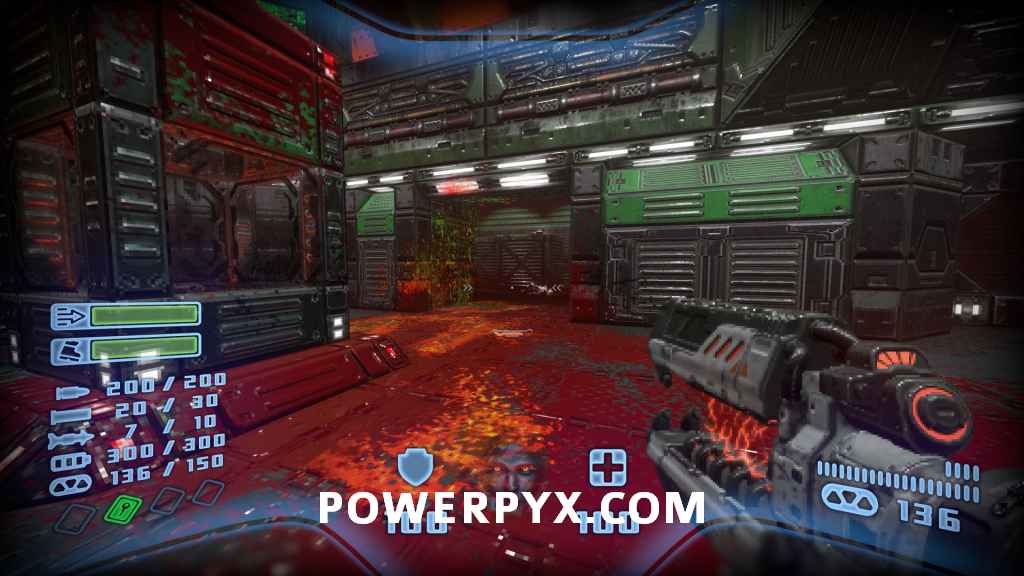
Secret #4
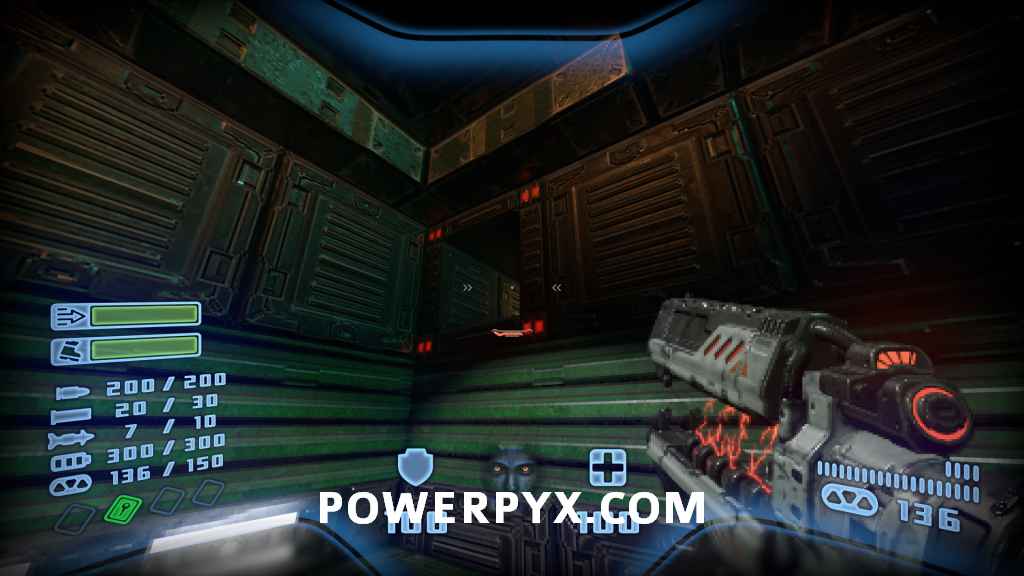
After pressing the main switch above, head into the newly opened area and jump onto the containers. Jump across and enter the vent for this secret.


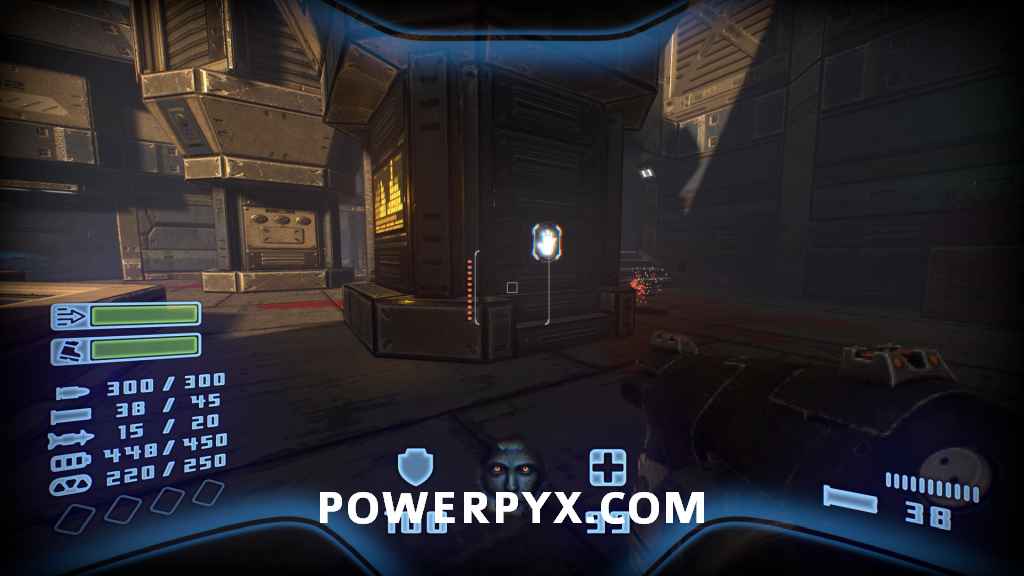
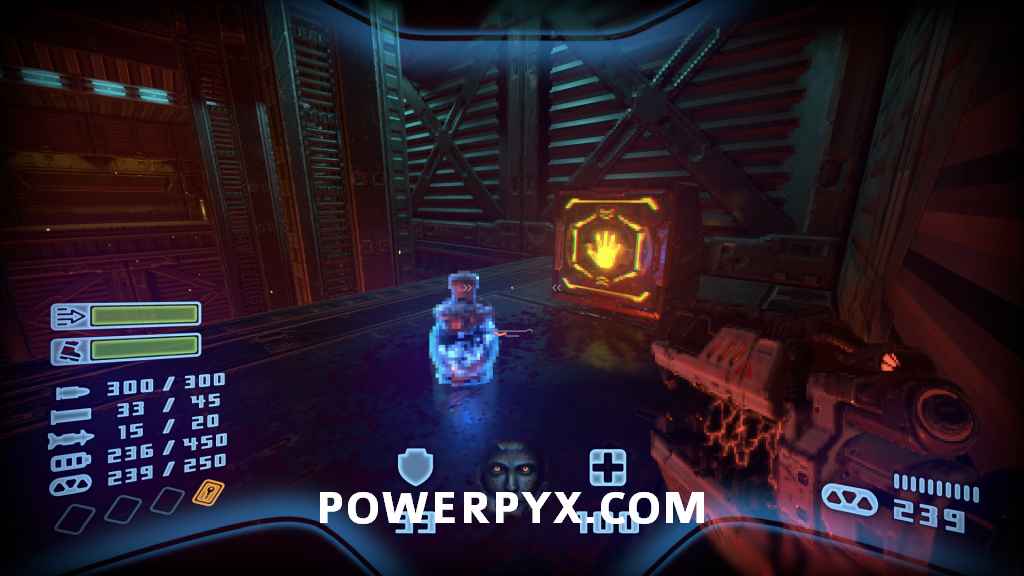
Secret #5
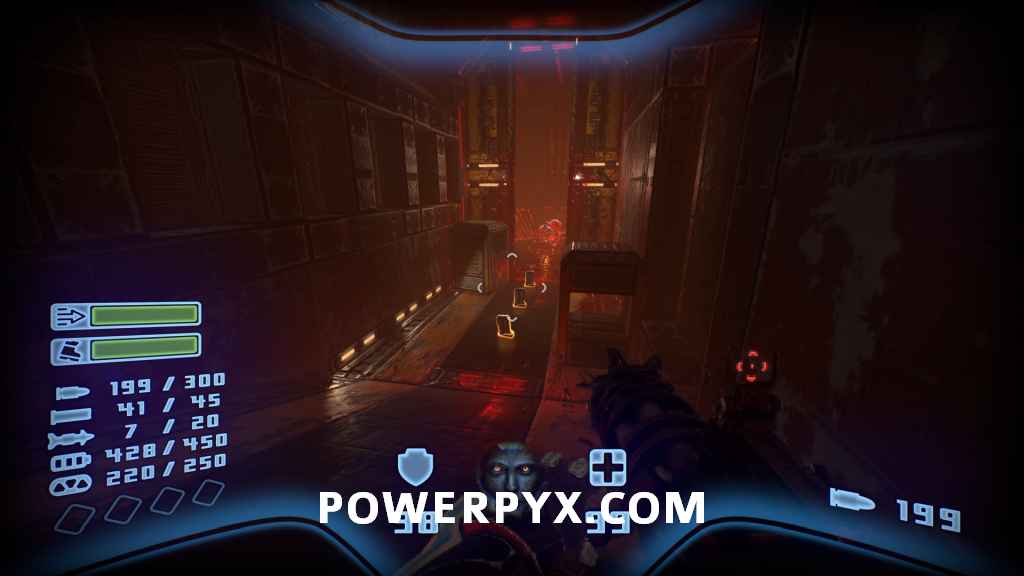
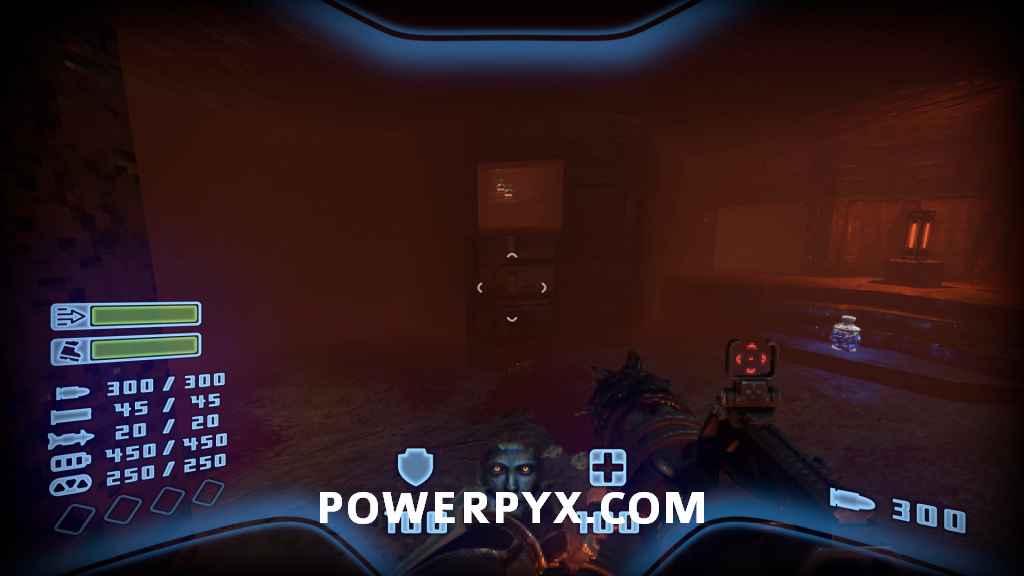
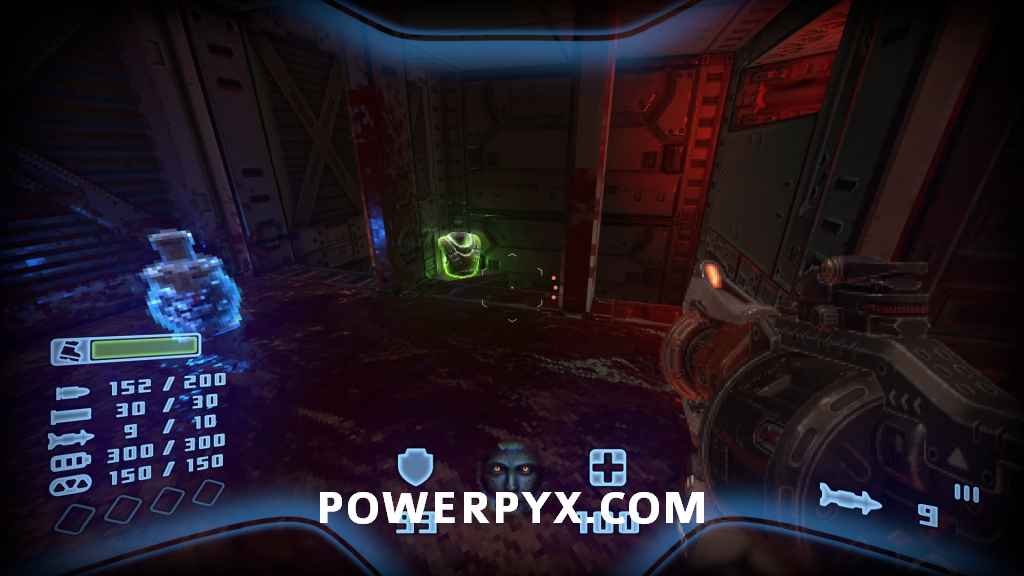
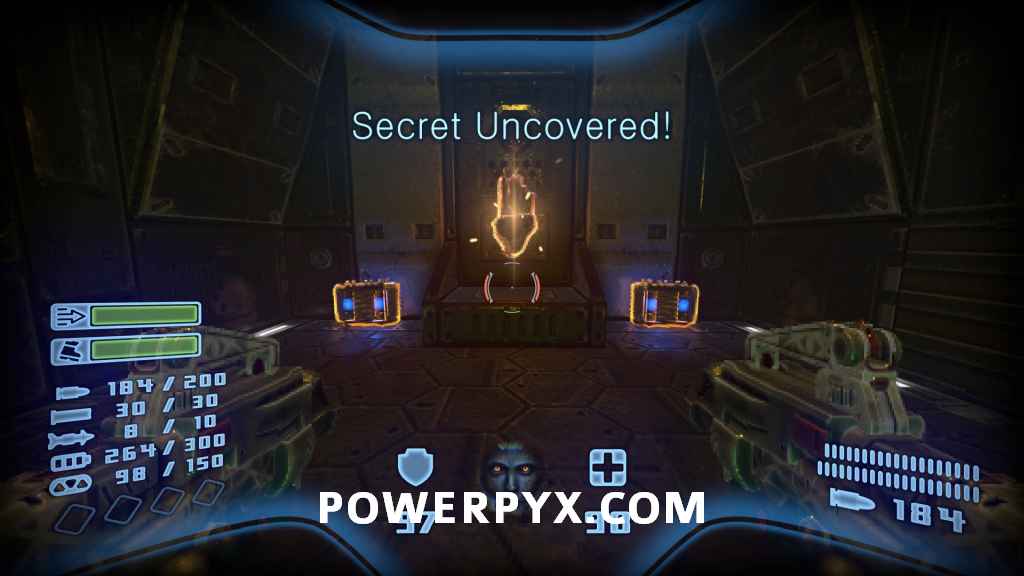
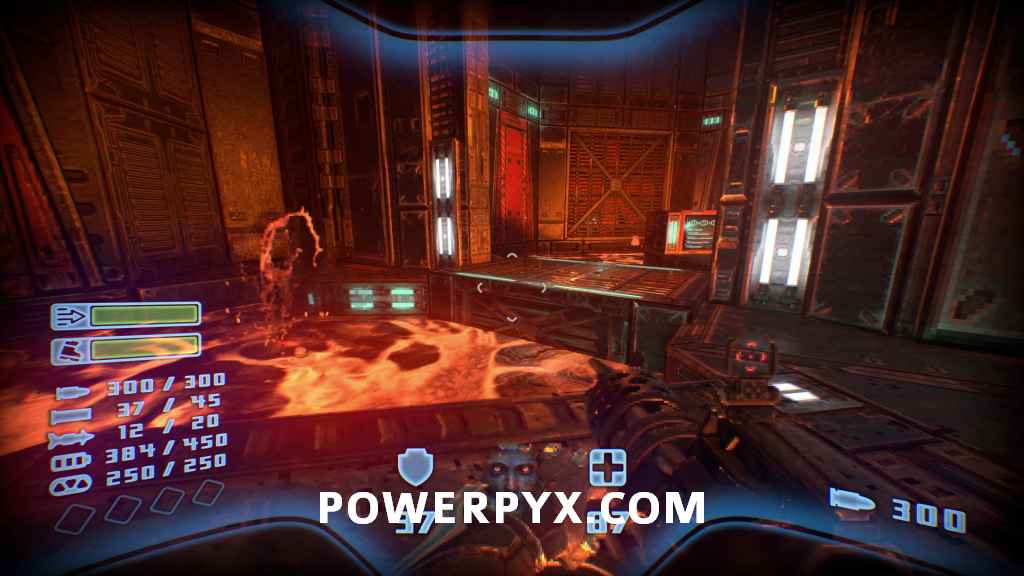
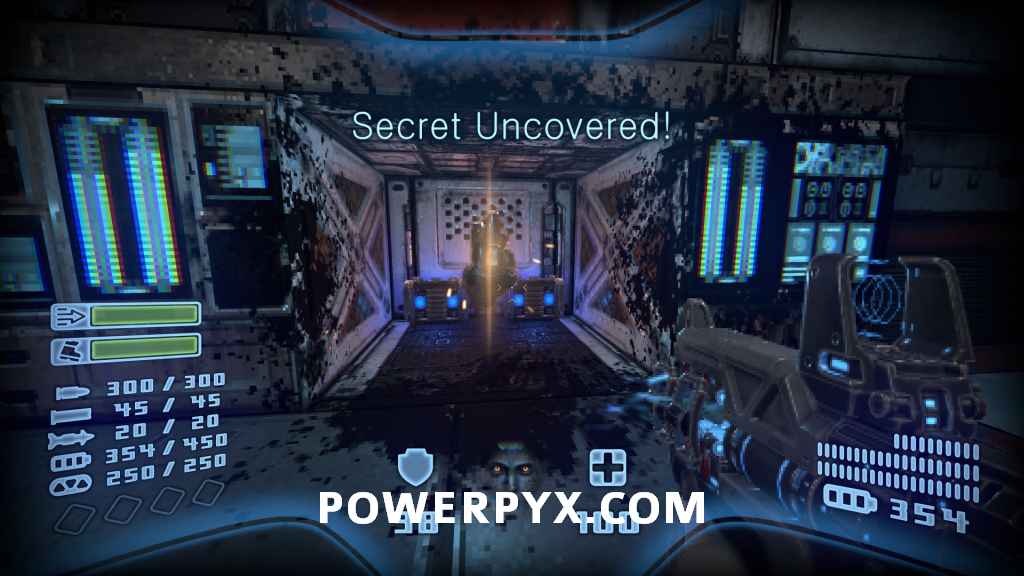
After getting the Yellow Key and going up an elevator, you will be in a room with six pillars with blue screens. Head behind the pillars opposite to find a button, which reveals the secret at the back of the room.


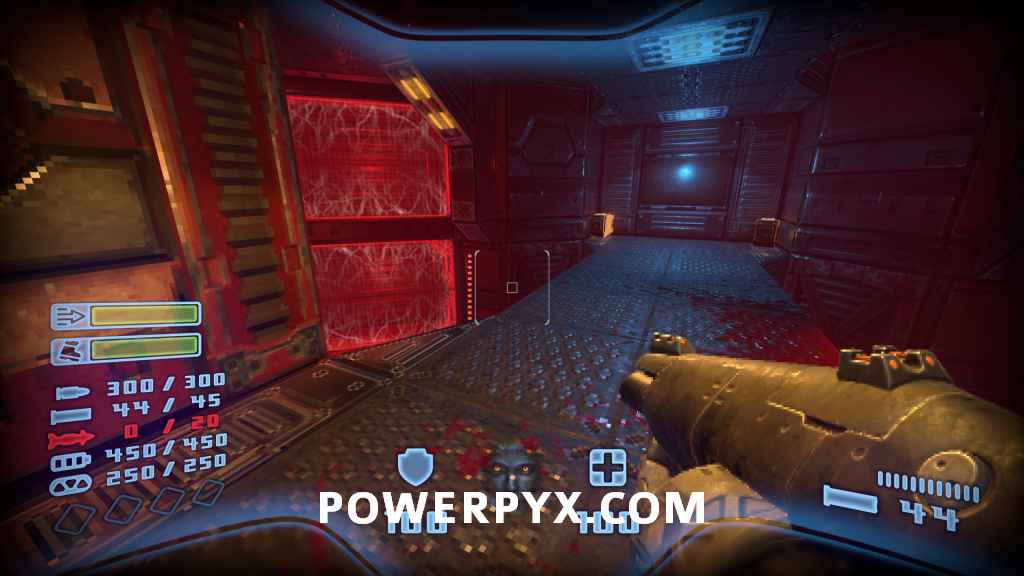
Level 3 – Fuel
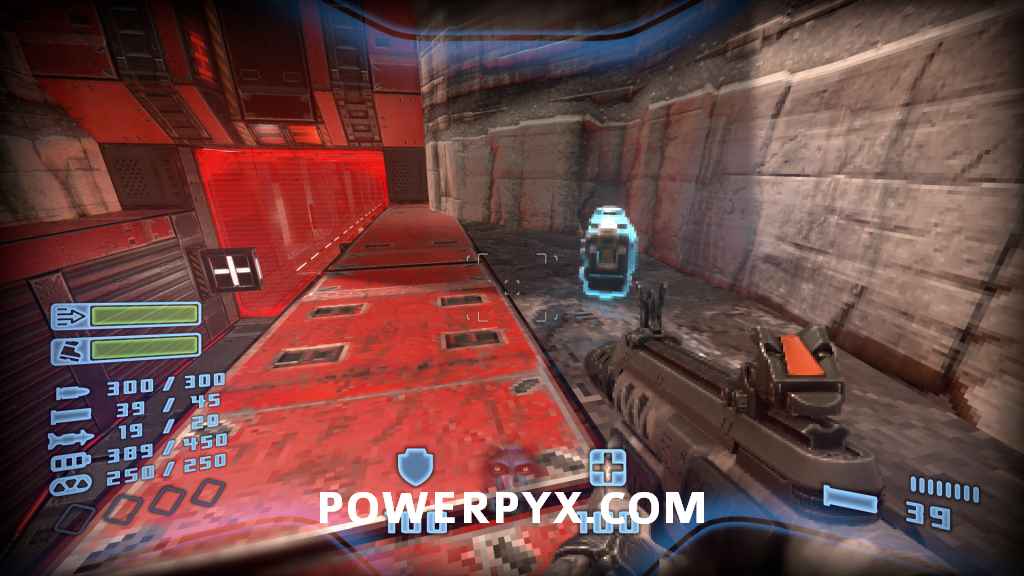
Secret #1
At the beginning of the level, head around to the opposite side of the train to see this secret behind a fence. Walk around to the back and shoot the switch to get inside.


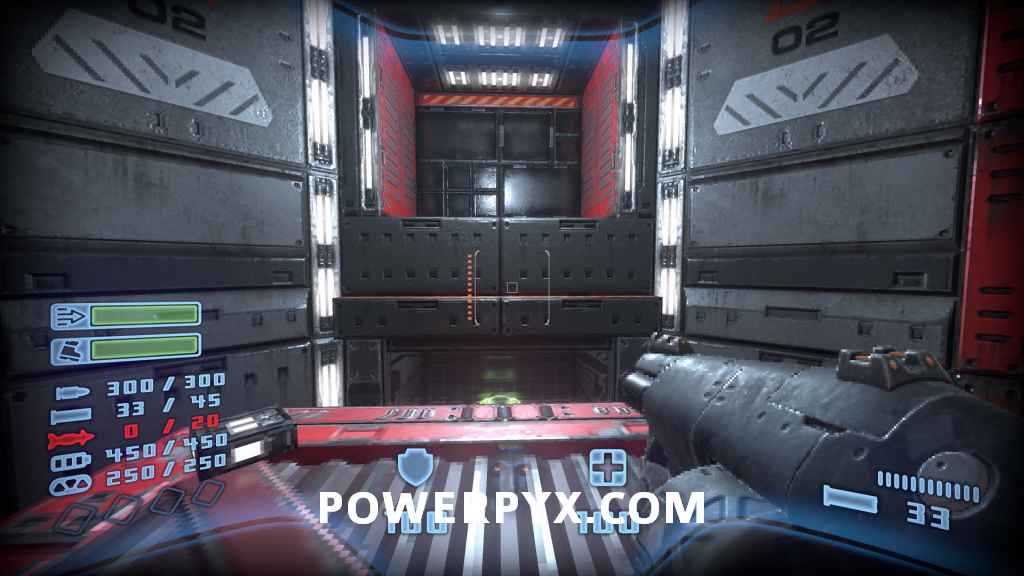
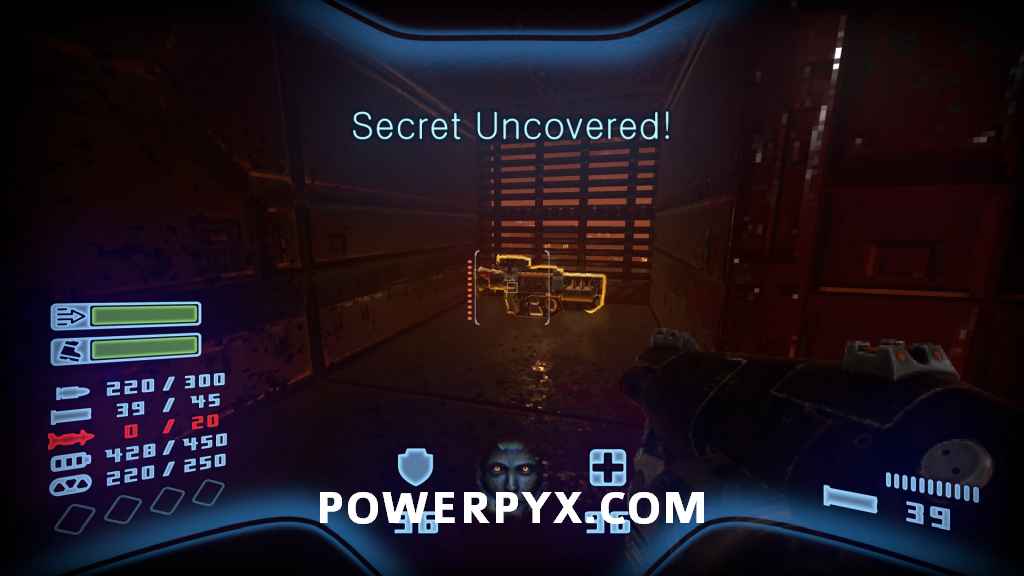
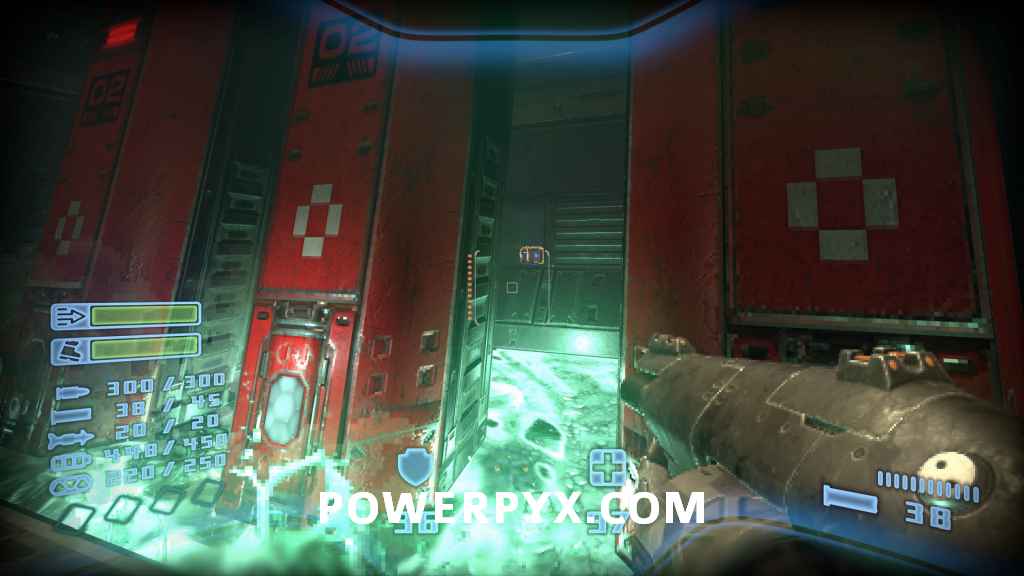
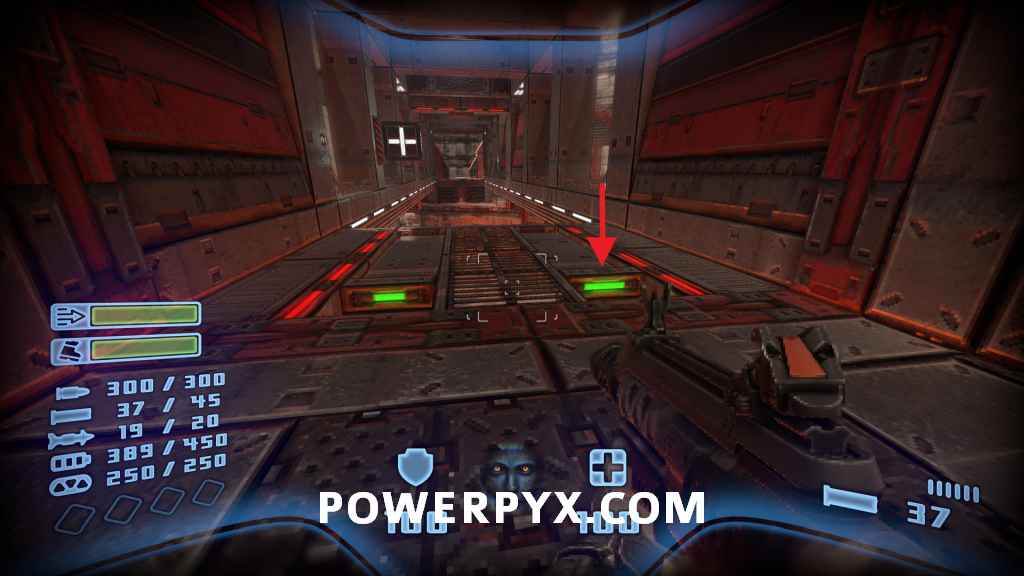
Secret #2
Continue until you have a split path. Go down the ramp instead of through the door and head to the lowest section to find a button. Press it to open the secret.


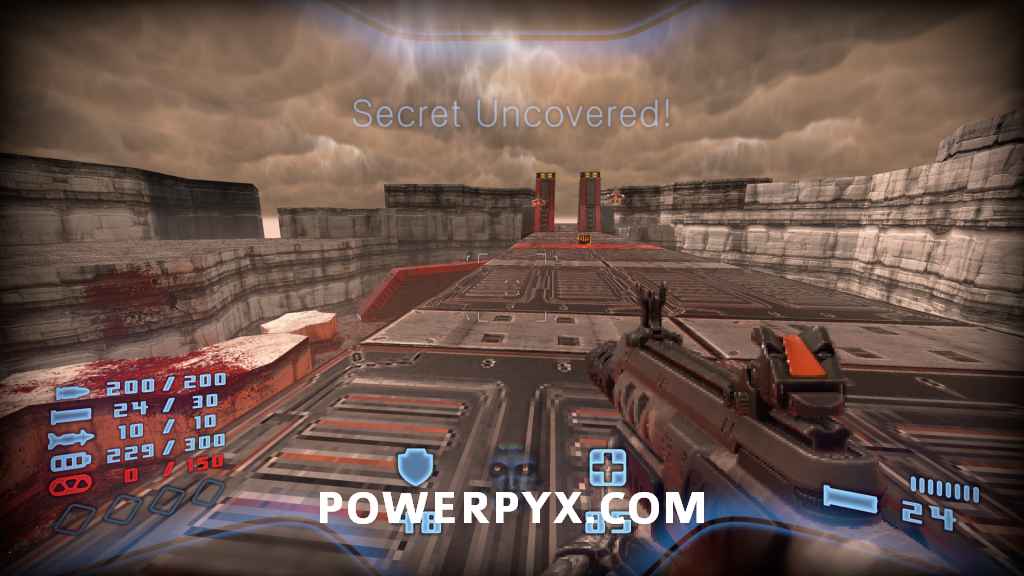
Secret #3
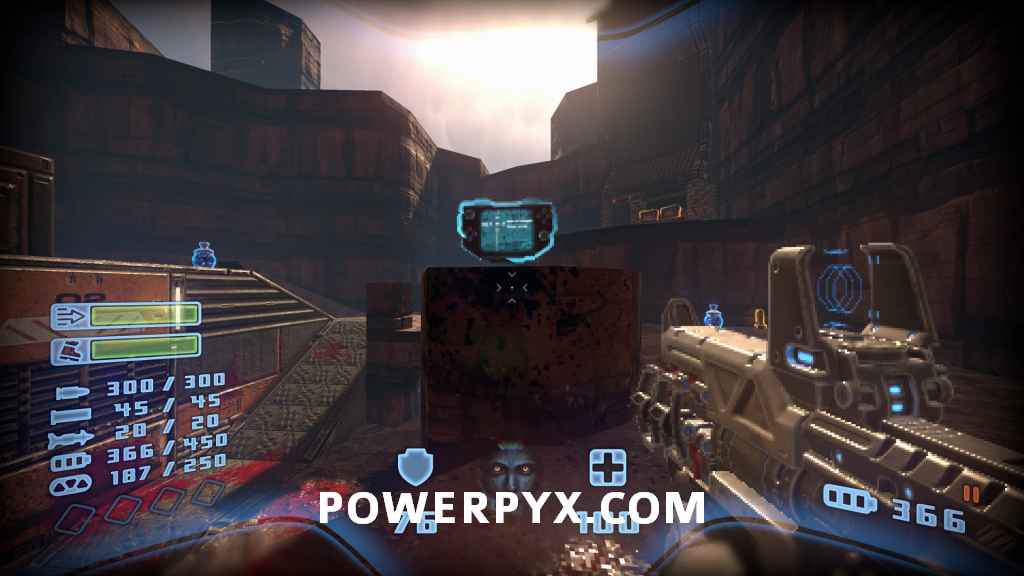
Once back outside with all the rolling barrels, jump onto the wall and then onto the container in the middle at the top of ramp. Finally jump onto the platform at the back to find the secret.


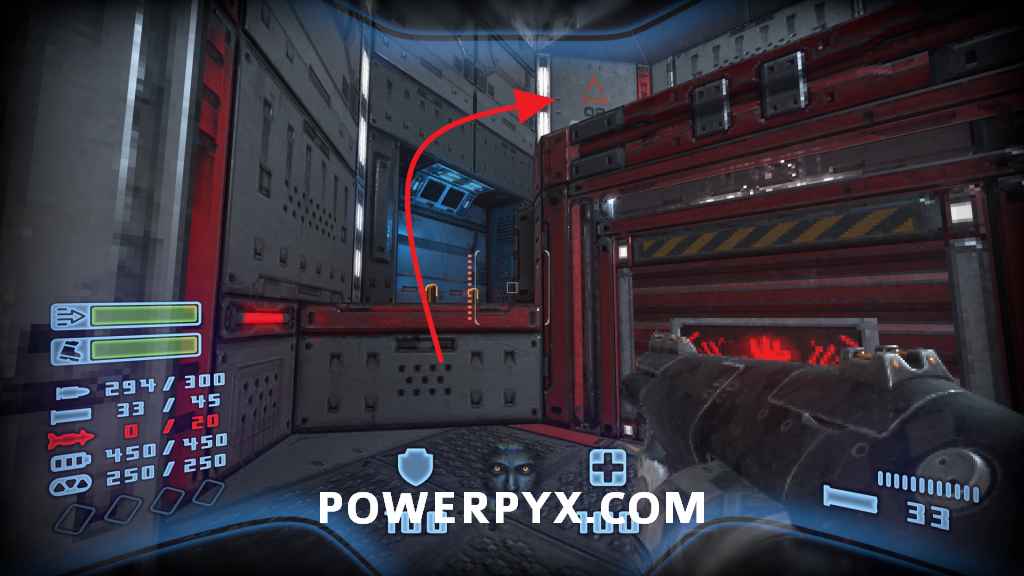
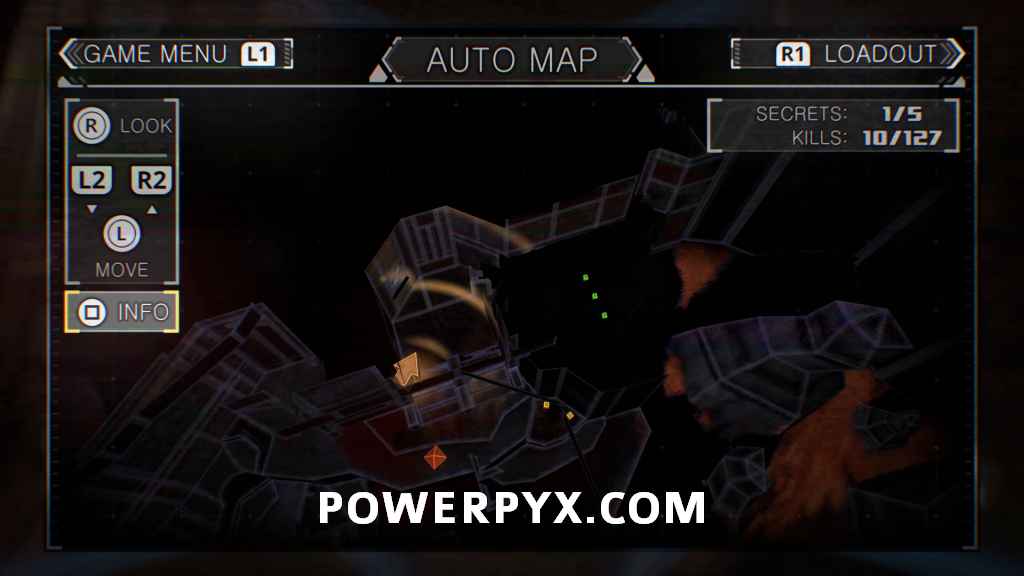
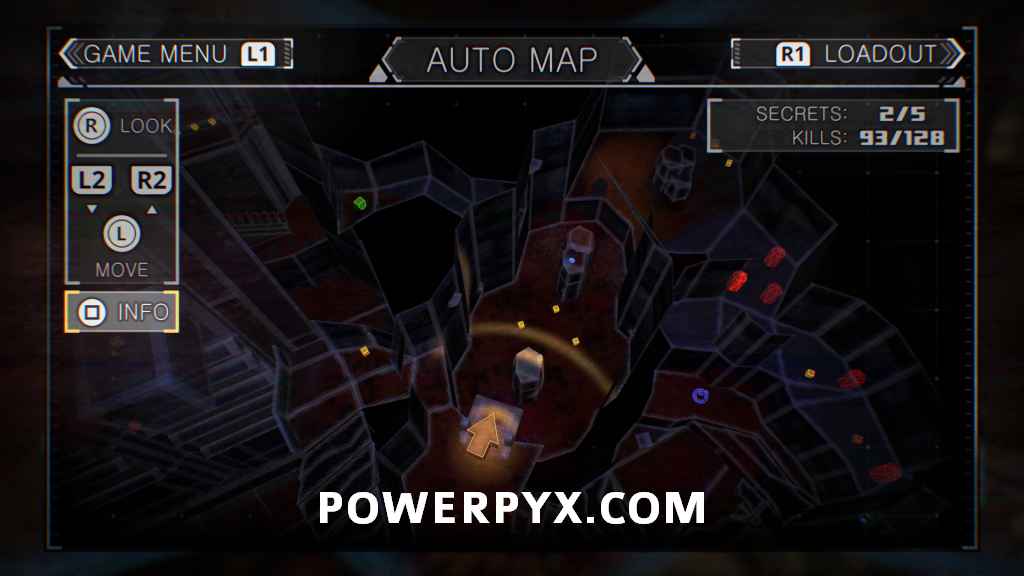
Automap
After seeing a minigun enemy behind some glass, the Automap will be directly in your path before heading outside.


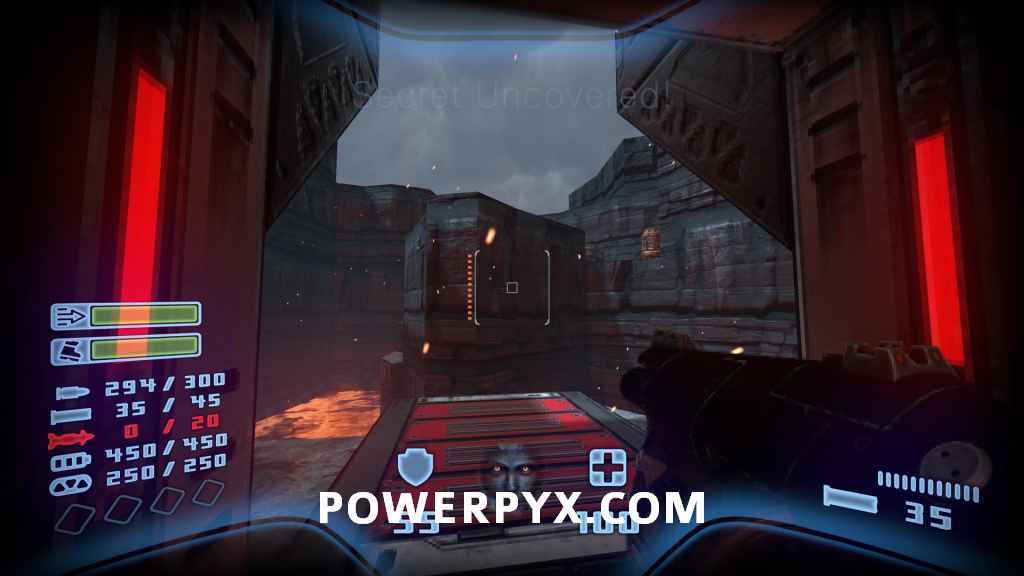
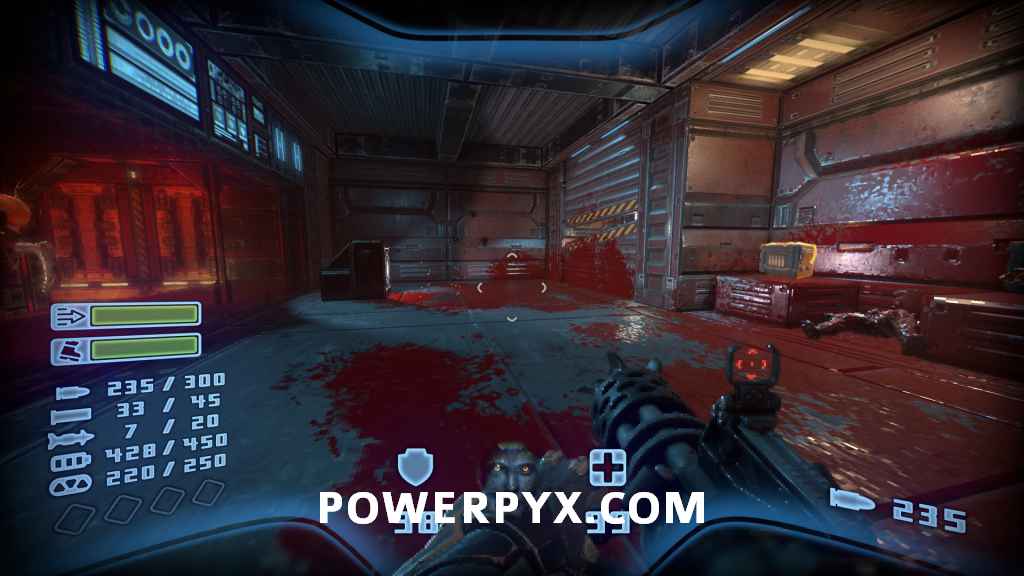
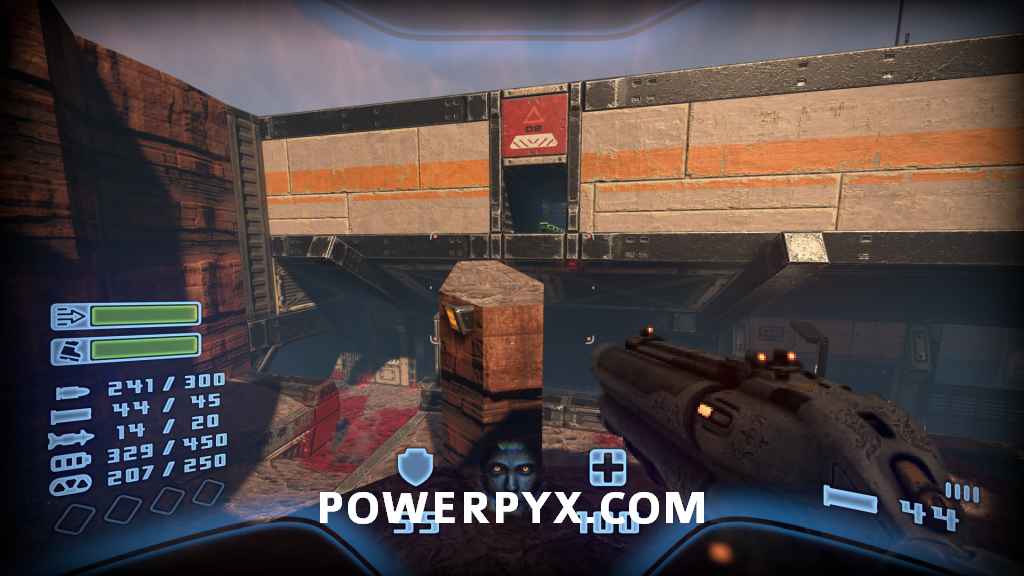
Secret #4
Immediately after heading outside from the Automap, head around the large pillar to open it with a button.


Secret #5
Once you pick up the Rune, the pistons on the sides of the room will open. Head to the right piston to find a button hiding behind it. press it to open this secret.


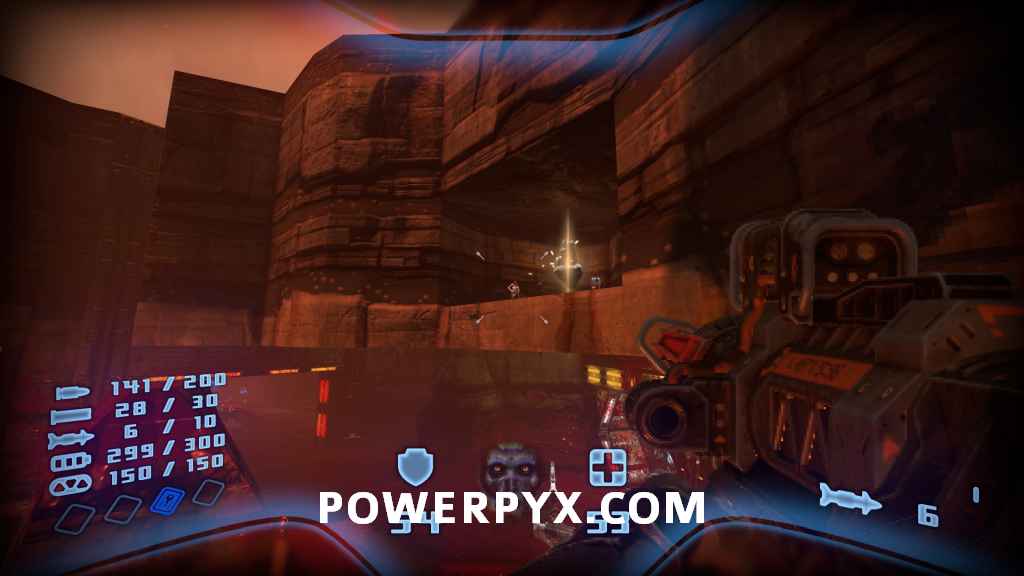
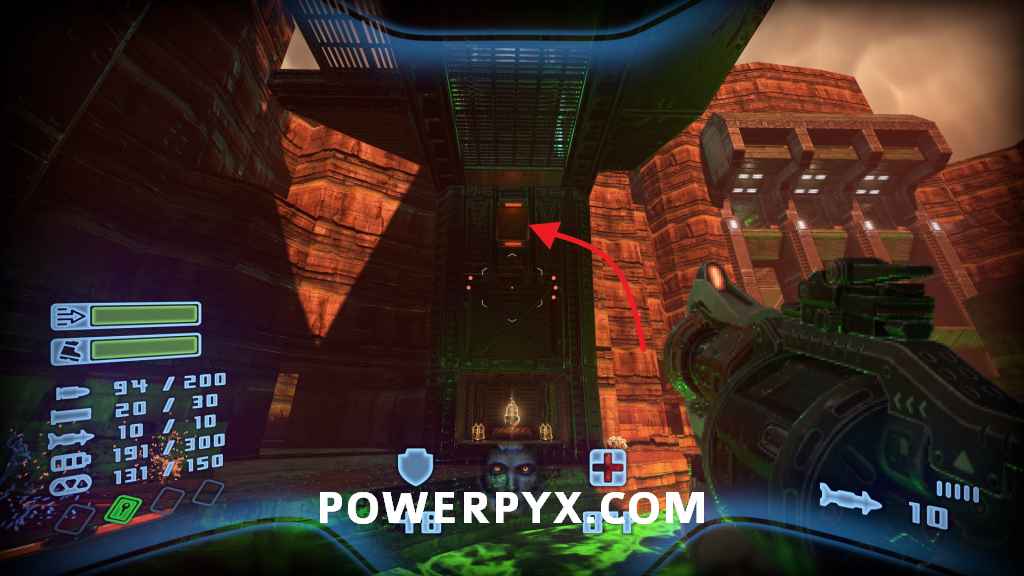
Secret #6
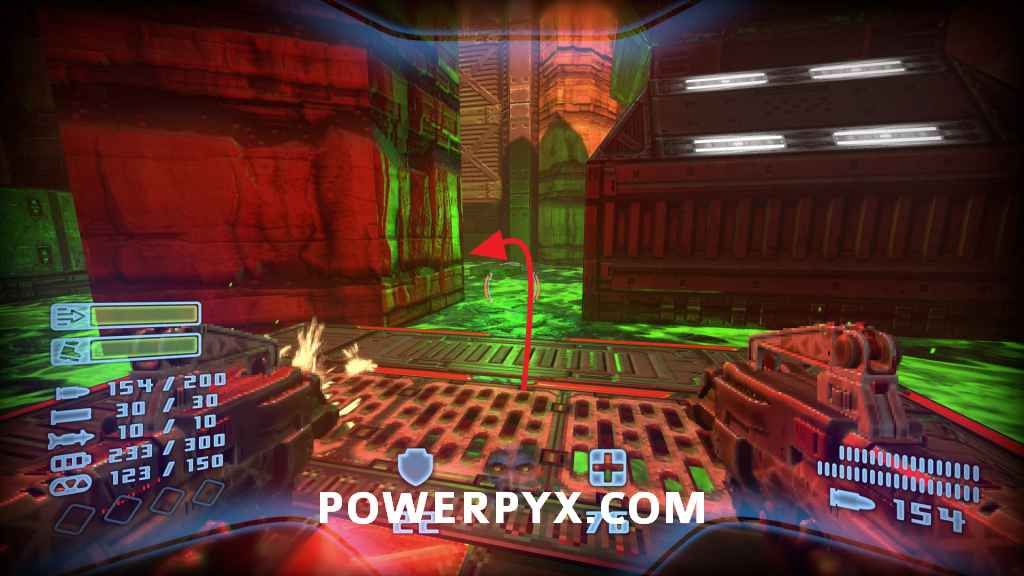
Continue forward to a room with green liquid on both sides and several red pillars. Behind the middle pillar on the right is a secret you can jump across to.


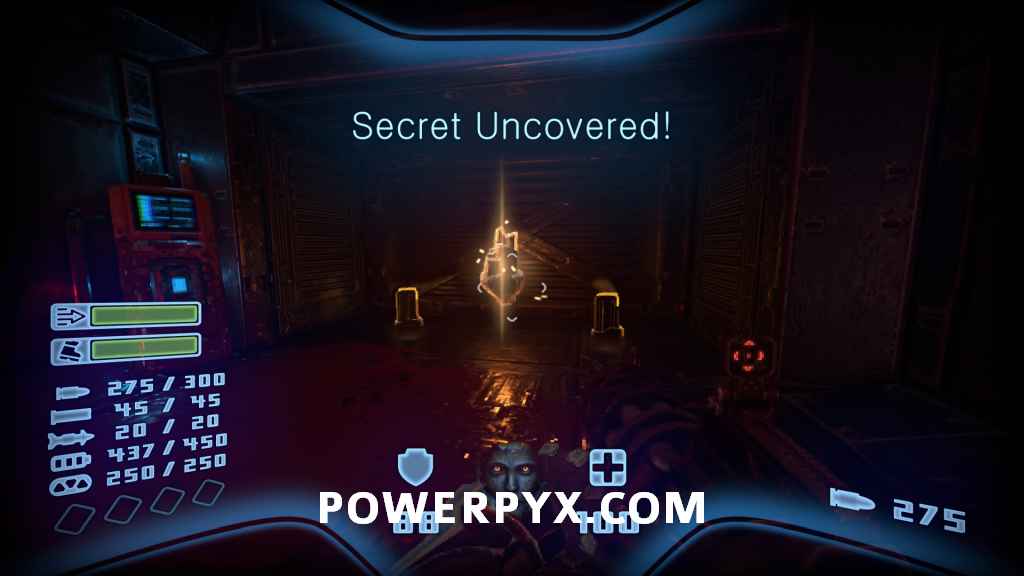
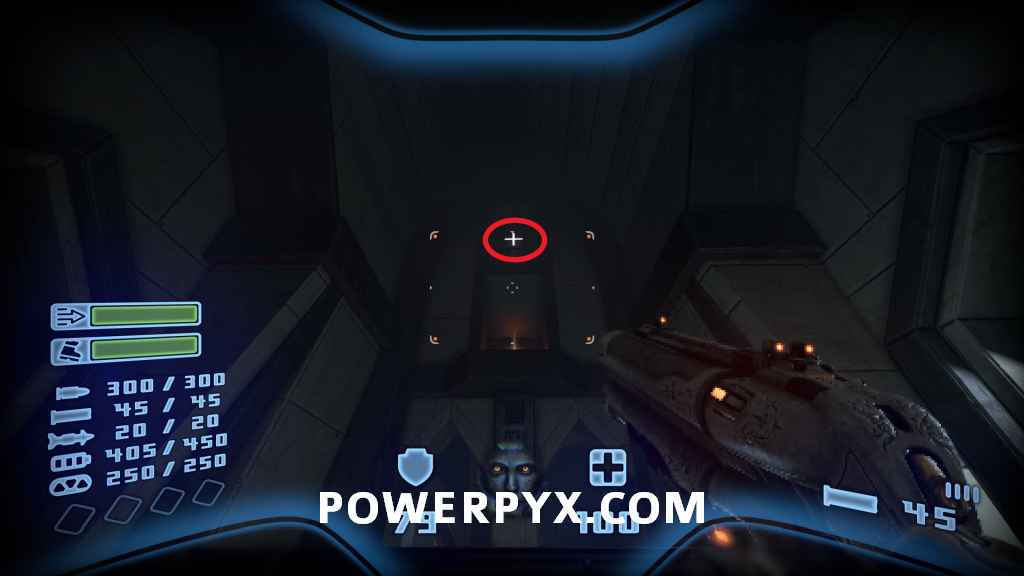
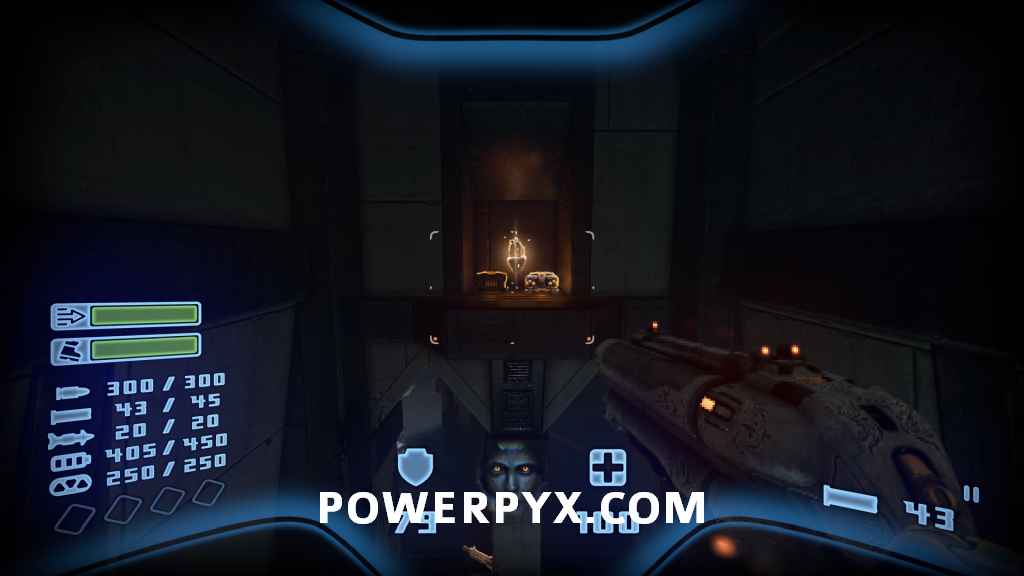
Level 4 – Wretch
Secret #1 + Automap
Near the beginning of the level you will press a button to enter a small room with a nexus point. The automap and secret is inside a nook that you must jump up to. Make sure you enter the nook for the secret, as simply picking up the Automap will not register it.


Secret #2
After crossing a bridge you will enter a room with doors on either side. Next to the door on the right is a switch will make the ore obtainable.


Secret #3
Eventually you will pick up the Rune and go inside an area with a rotating object. Once you press the switch in the middle to stop the rotating object, head back to the side of the room to find an open area with 2 imps. Go inside and interact with the switch on the side for the secret.


Secret #4
After going outside you will head back into a tunnel with pillars to jump across. Jump onto the second pillar and jump into a tunnel on your left for this secret.


Secret #5
Continue progressing and you will pass through a big pillar and appear near some rocks. From these rocks you can pass through to appear above where you entered the area and jump onto a beam connecting to the large central pillar.


Level 5 – Trial: Shotgun
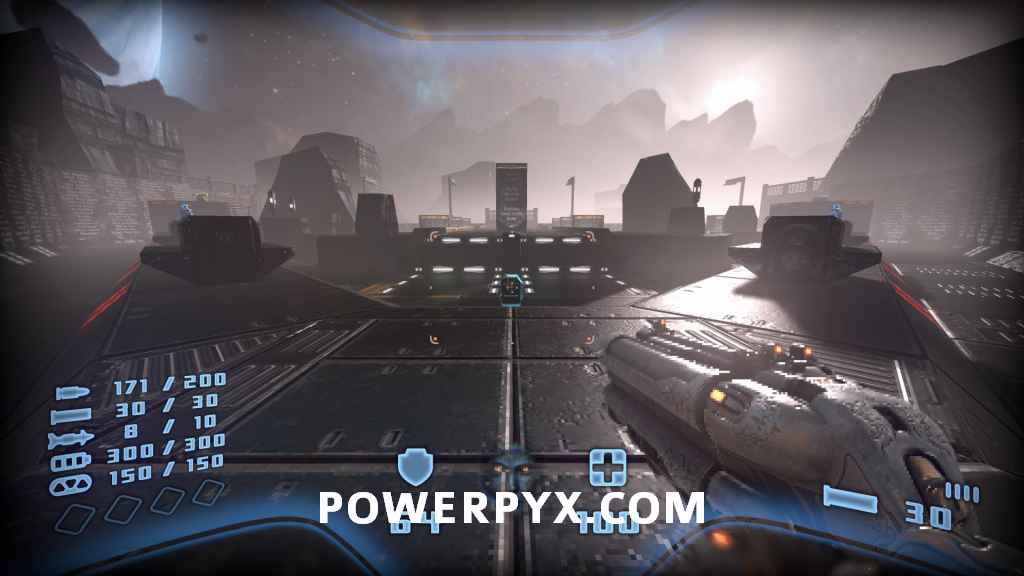
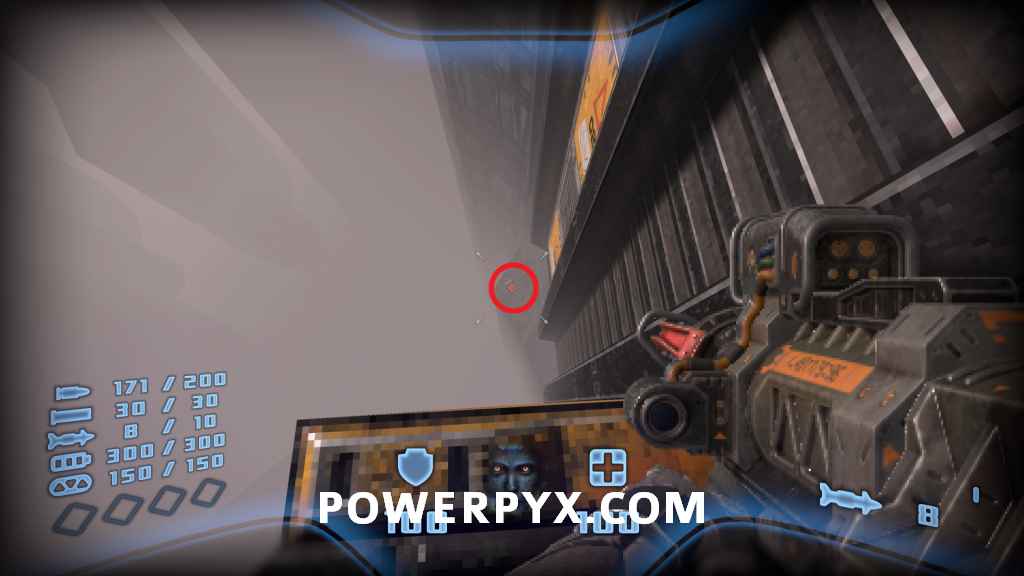
Automap
When you reach the outside area with two targets, climb up the side of the structure to find the Automap.
Secret #1
After shooting the previous 2 targets, drop down the hole in front of you and follow the tunnel for the secret.


Secret #2
Once you reach the hole at the end of tunnel, head left and drop off the ledge. Follow it for the secret.


Secret #3
Head up instead of dropping down and climb on top of the structure for the final secret.


Level 6 – Genesis Part 1
Secret #1
After seeing the crater and returning back inside, go around the ramp to the right to find the secret.

Secret #2
Once you press a button that opens the way forward, head left instead of progressing right. Press a button on the wall to move the containers to access the secret behind.


Secret #3
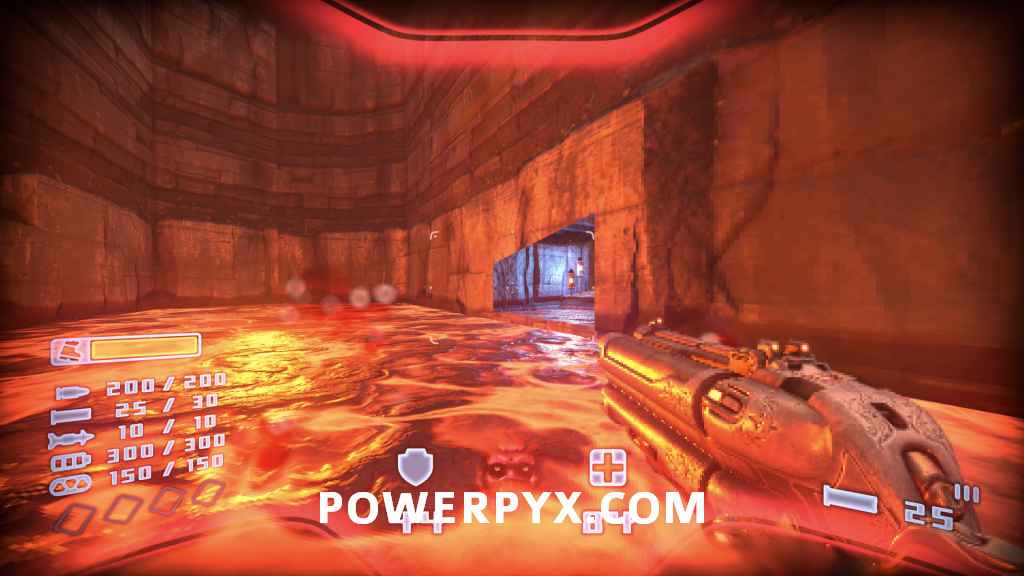
Eventually you will enter the crater and see a lava pit. Head into the lava pit to find the secret at the back.


Automap
Continue down the tunnels from the previous secret to find a split path. Head down the right to find this at the end.

Secret #4
Near the end of the tunnels you will need to press a switch to open the way forward. To the right of this switch is an opening you can go into that drops down to the secret.


Level 7 – Genesis Part 2
Secret #1
Near the beginning of the level, after the initial firefight. There will a split in the path where you can backtrack to the right, follow this and enter the cave.


Secret #2
Once you reach the first building, shoot the two switches above the doorway to reveal this secret in the lava.


Automap
Inside the building at the back.


Secret #3
In the section immediately after the building where you must lower the shields, drop off the bridge above the lava and go underneath it to find a hidden switch. Press it to reveal the secret.


Secret #4
After defeating the Reaper and getting the Rune, head up the elevator and turn around. Jump onto the rocks to the right and head into the opening for the secret.


Secret #5
At the very end of the level, instead of getting in the train climb over it for this secret.


Level 8 – Trial: Shredders
Secret #1 + Automap
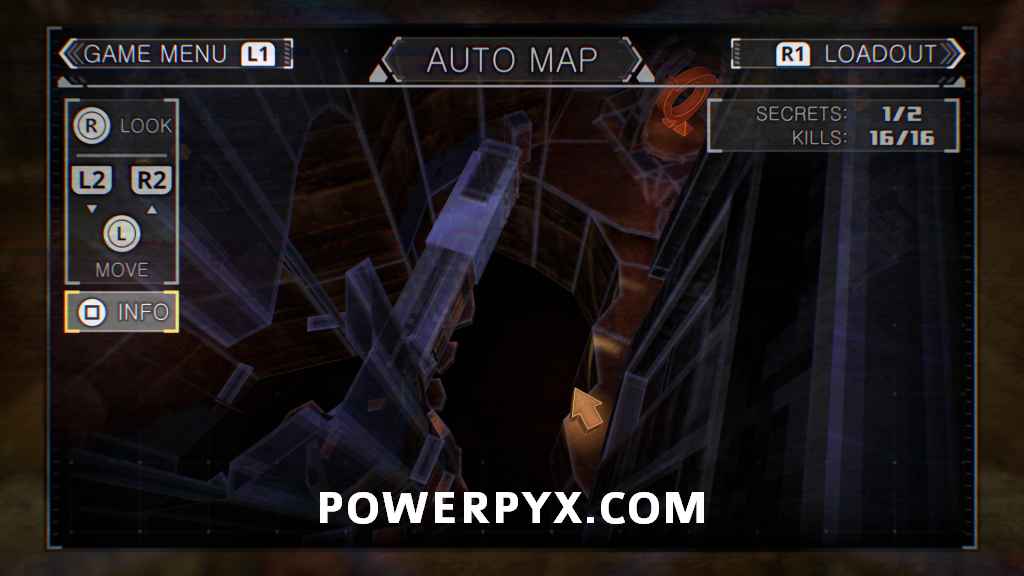
Halfway through the level you will shoot a target to lower a crusher, and will need to shoot it again to raise it. Before shooting it, stand next to it and jump on top after shooting it. Cross over to the Automap for the secret.


Secret #2
At the end of the level, there is a tunnel you can enter by jumping down from the ledge. Head inside for the secret.


Level 9 – Chaos Generator
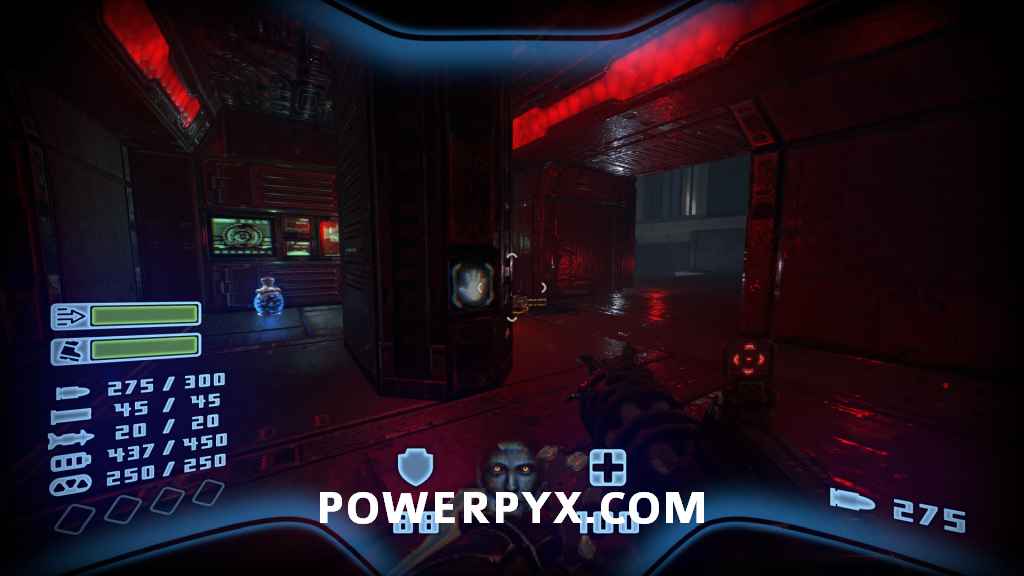
Secret #1
After attacking the shields for the first time and heading into the left room, go up the ramp to your right and jump across to the opening to find this secret.

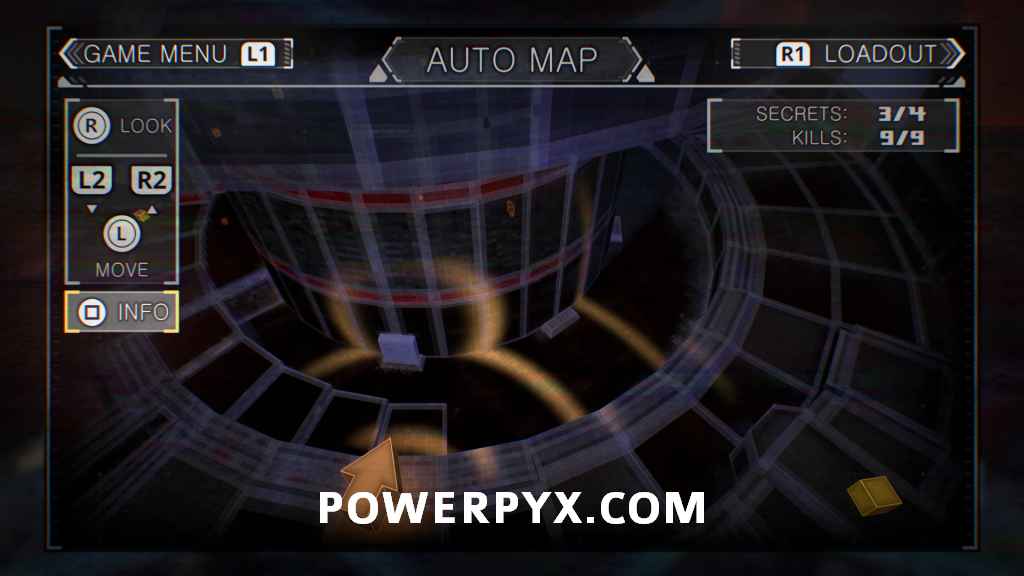
Secret #2 + Automap
After attacking the shields for the second time, head back through the starting area into the newly opened area. Jump onto the rock in the middle and then to the ledge to your right.


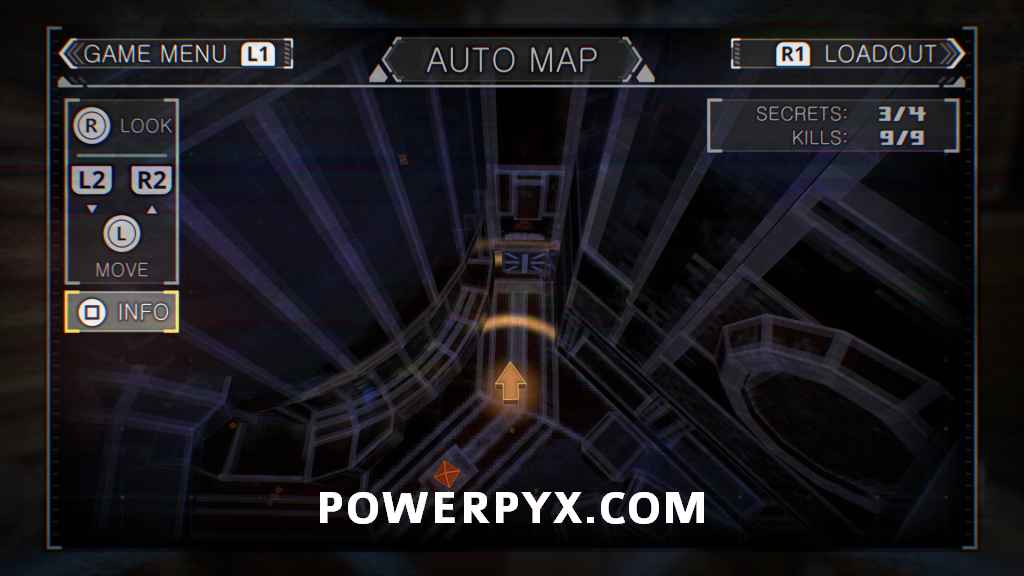
Secret #3
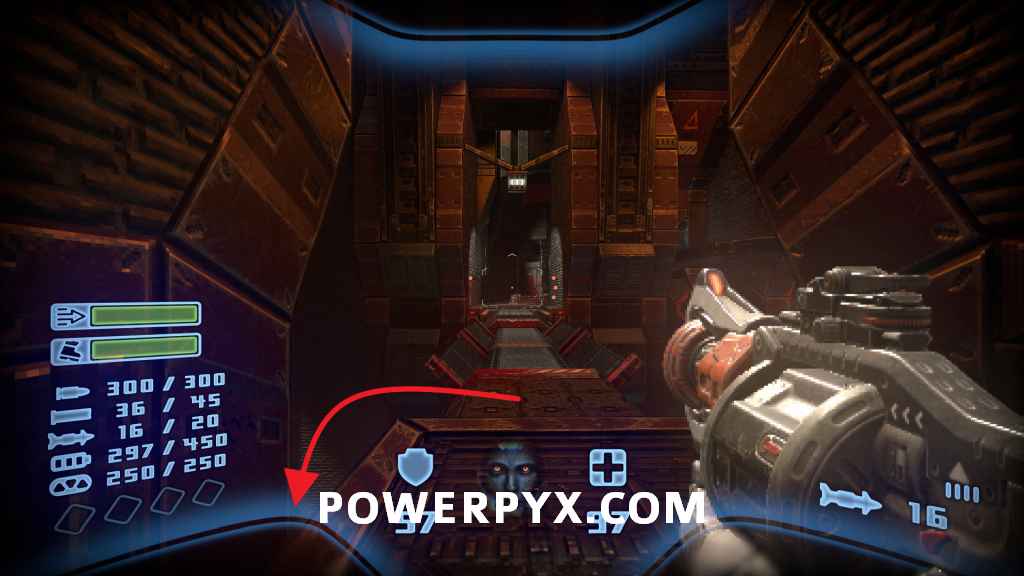
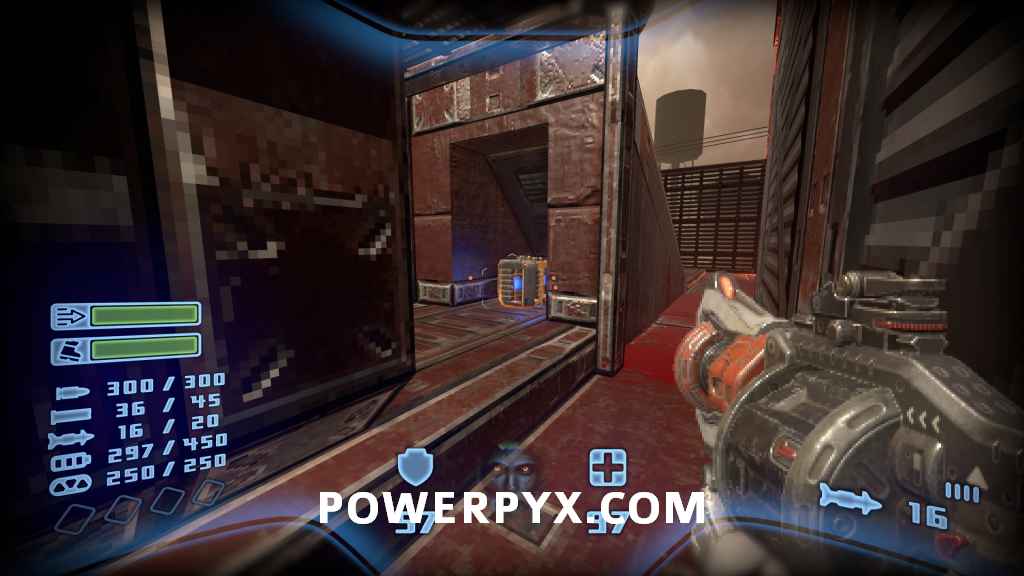
In the next area, near the back will will be a switch above your head that you can shoot, which reveals a path. Before you can access this path however you will need to obtain the Blue Key. With the Blue Key, return to this and go inside to get the secret at the end.


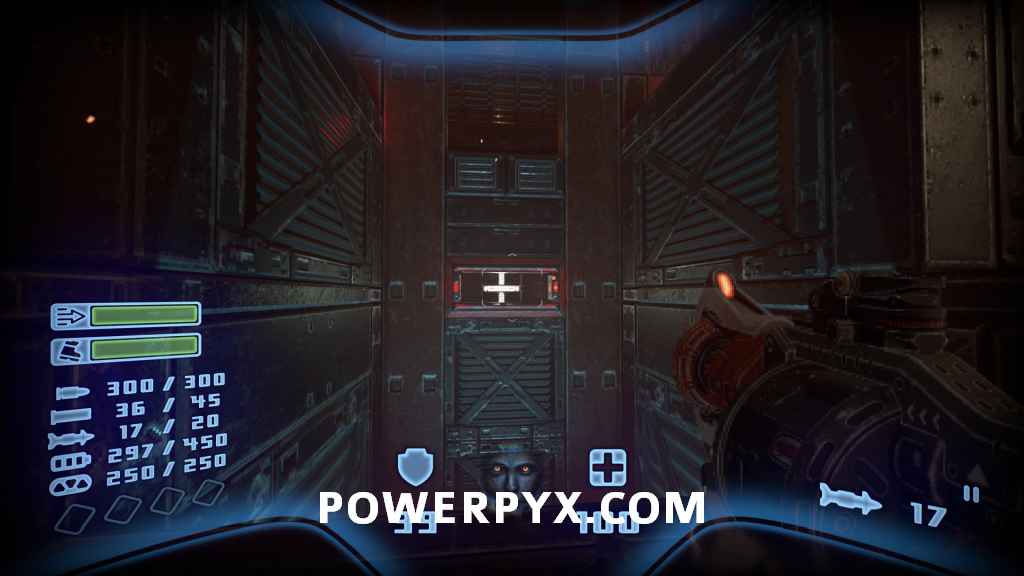
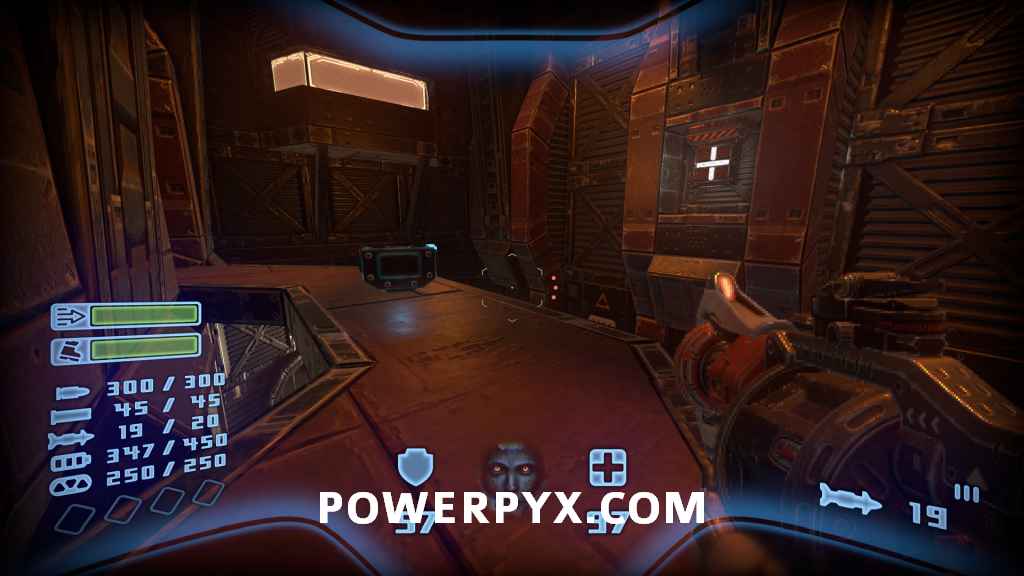
Secret #4
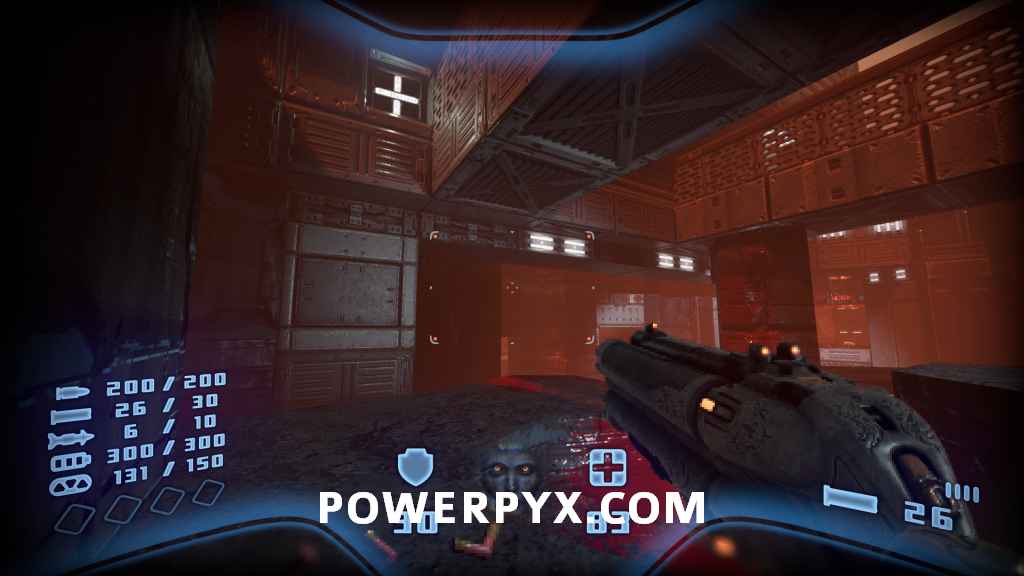
From the spot where you get the Blue Key, or where you drop down from Secret #3, look up to the white cross above the first area. Shoot this with your Rocket Launcher to open the nook next to it for this secret.


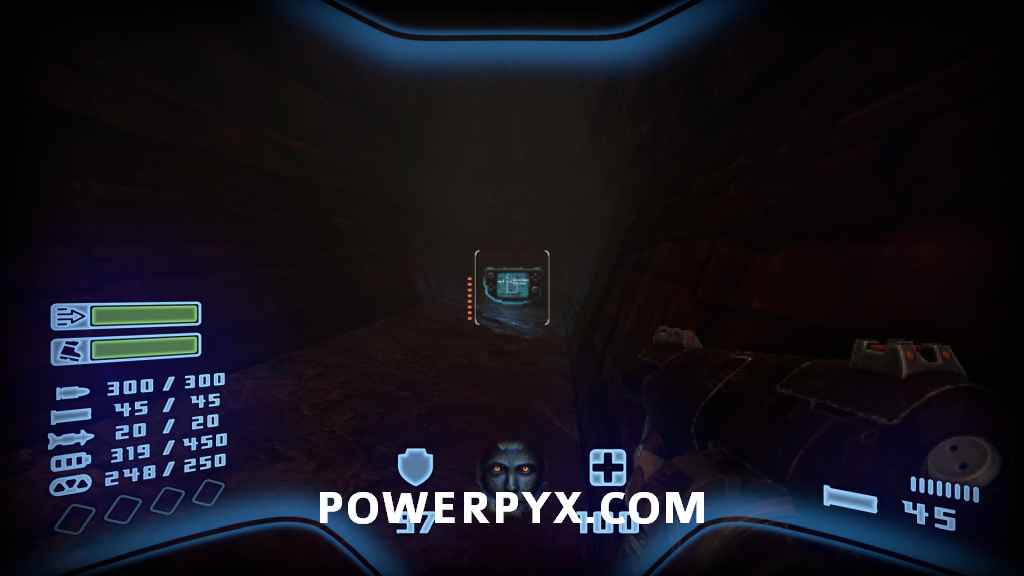
Level 10 – Memoriam
Automap
Immediately in front of you as enter the arena.

Secret #1
At the back right of the arena, jump on to the ledge. Look down and shoot the object below to reveal a secret room to your right.


Level 11 – Excavation
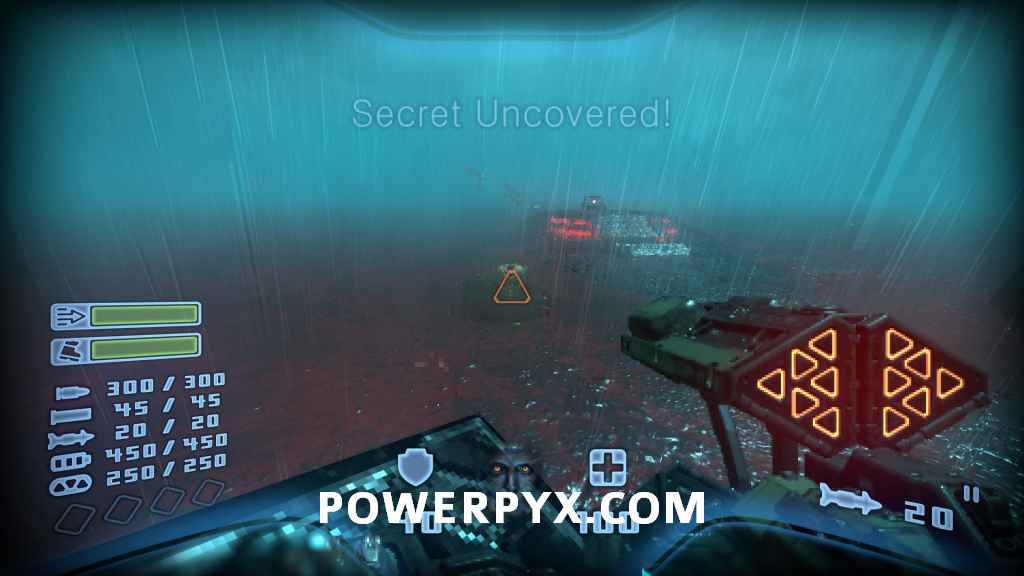
Secret #1
At the beginning of the level, once you appear outside jump down towards the lava and jump around the wall to find a cave. Go inside to find this secret.


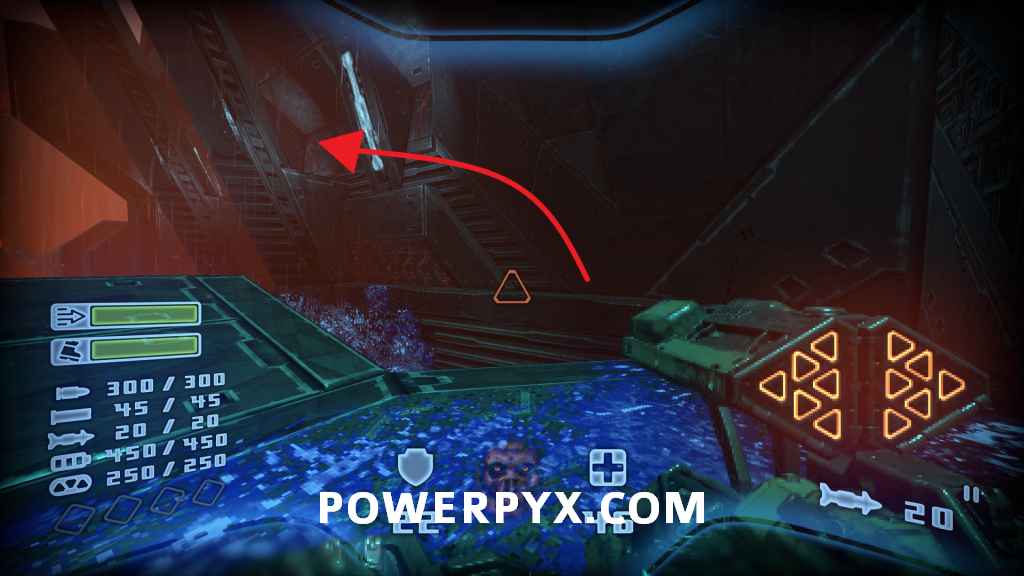
Secret #2
From where you jumped off previously, there is a lower section you can go down to with a button on the wall. Interact with the button to make the objects next to the green door move up and down. Head onto the bridge and jump onto one of these to ride it up and go inside to activate a switch. Go into the middle section with the armor for the secret.


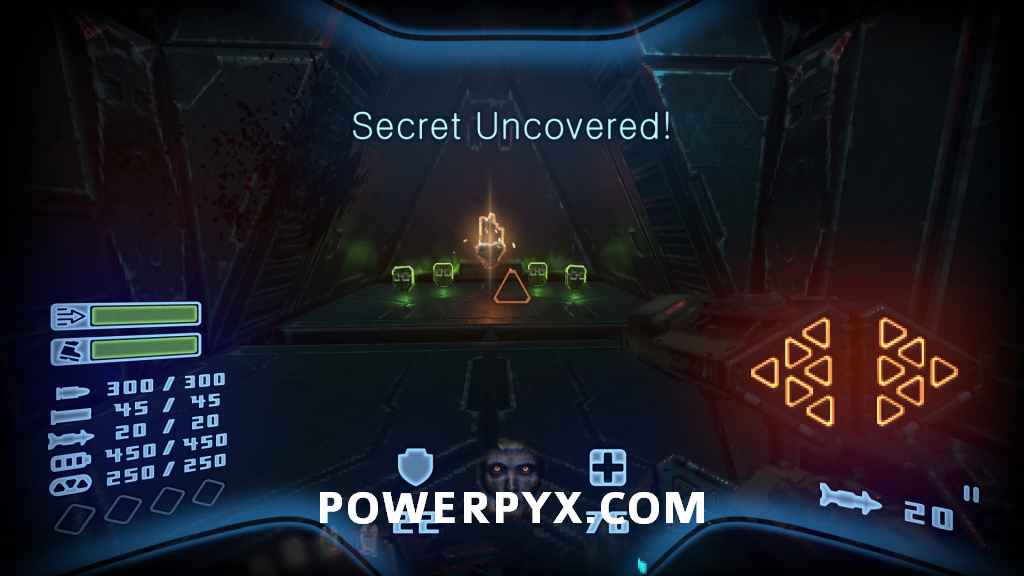
Secret #3
Once you reach the section with the portal where you need two keys, follow the right path. As you come into the open area, to your left is a shielded area. Use your Grenade Launcher to bounce a grenade off the white panels to hit the switch inside. Go inside for the secret.


Automap
Progress through the level until you reach the upper section of the previous area. The Automap is on your path.

Secret #4
After getting the Yellow Key, you will enter another corridor with stairs. Instead of going up the stairs, interact with the wall directly to the right of the entrance to reveal a passage. Go up the elevator to find the secret.


Secret #5
Continuing on you will reach a yellow room. From the platform you are on, jump across into the opening and follow it for this secret.


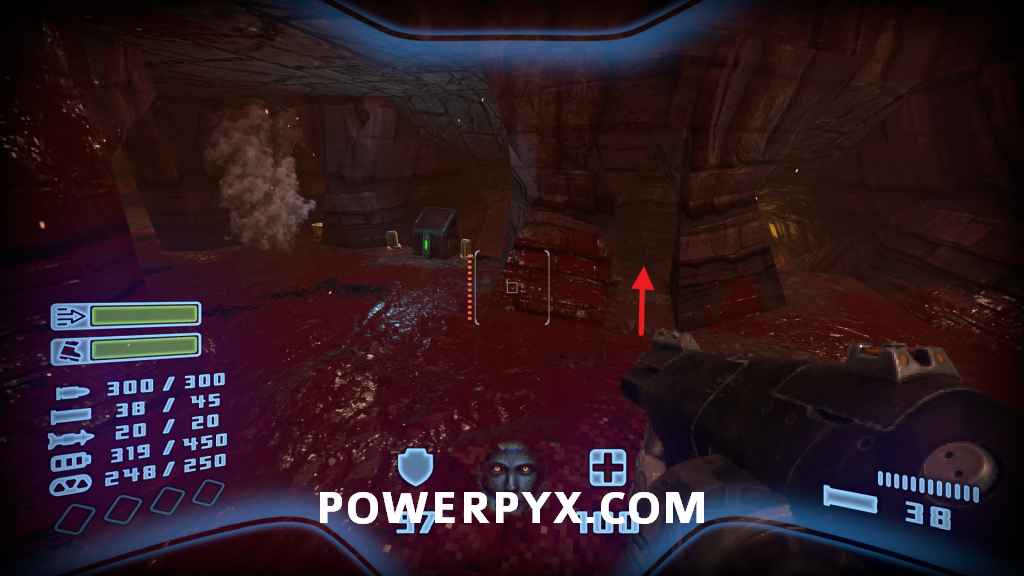
Secret #6
After returning to the central area where you need the keys, head through the left side. On the wall in the first room there is a bloody button you can press, which reveals the secret in the lava.


Secret #7
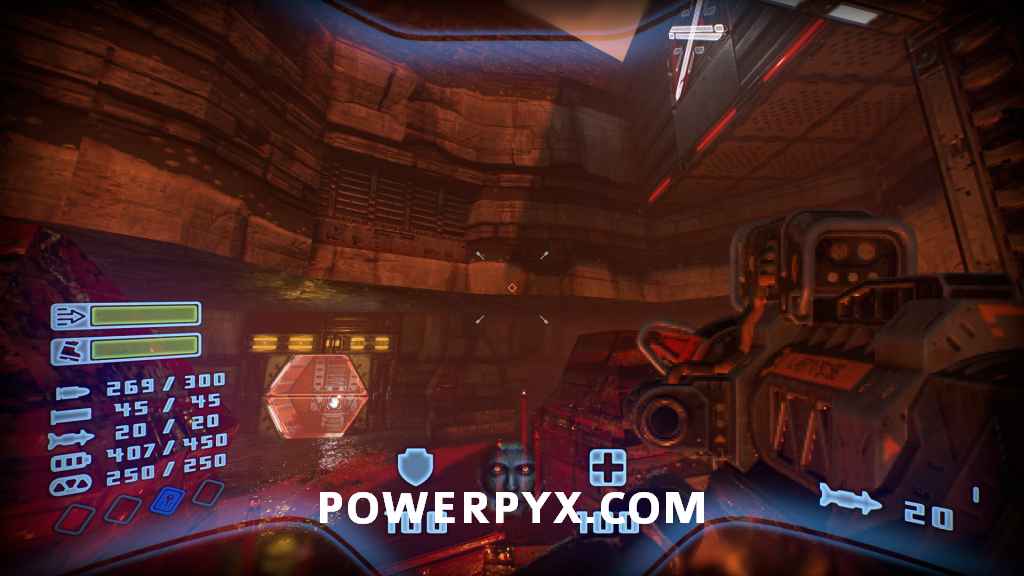
Continue through until you see a Grenade Launcher on a platform in the lava. Jump over to it, then turn around and shoot a grenade above the shield to hit the switch.

Level 12 – Marksman
Secret #1
Near the beginning of the level you will arrive at a staircase. Go up and go to the ledge to the right and jump across. Go inside the vent to find this secret.


Secret #2
Proceed until you go up a small elevator to a higher section. Jump onto the platforms to reach a cave with this secret.

Secret #3
As you progress you will find a way inside. Before heading inside, run along the ledge behind the wall to find this secret.

Automap
After turning off some shields so that you can progress, head through until you reach the base of the building. Turn around to find the Automap in a nook to the side.

Secret #4
Once you drop into a hole you will come out on a cliff. Head right instead of left to find this secret.


Secret #5
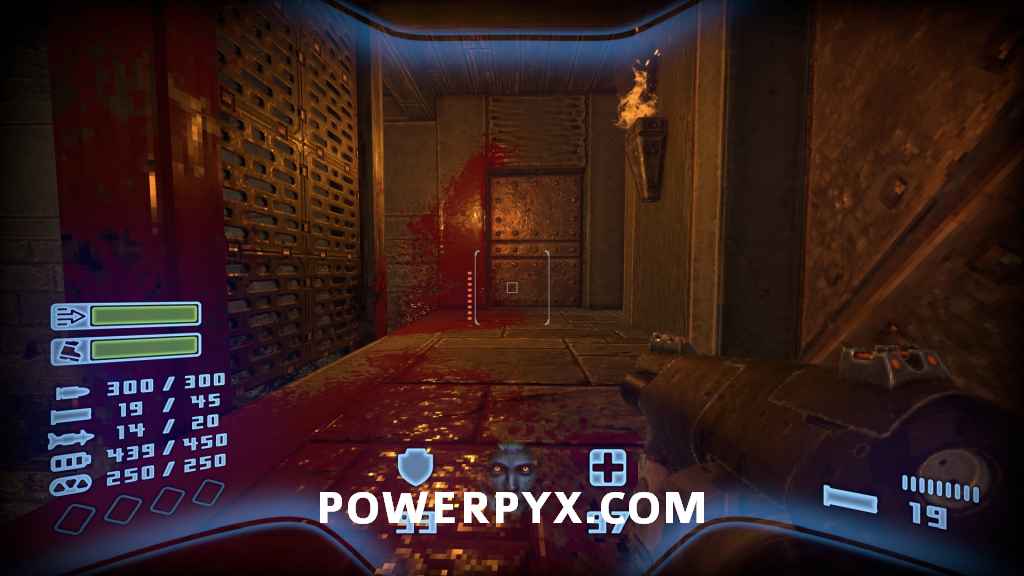
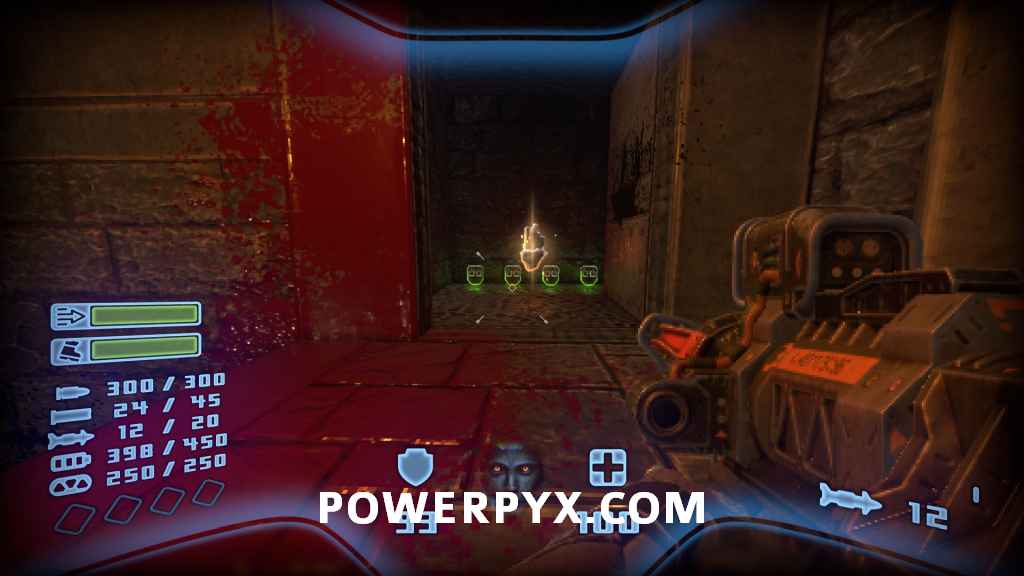
Inside the tower with the 4 Arc Rail enemies, shoot the switch on the wall to reveal this secret at the back of the room.


Level 13 – The Descent
Secret #1 + Automap
At the beginning of the level, turn left and jump up the rocks to reach this secret and automap.

Secret #2
In the first area, there is an opening above you to the left. Shoot a grenade inside here to open a secret in the vents below. Alternatively if you have Double Jump and Dash Boost you can jump in here, but if you choose to do this make sure you finish with everything on this floor first.


Secret #3
Once you reach the next floor below with the Harbinger in the middle, head into the room to your right. There is a switch low on the wall, press it to open the secret next to you.


Secret #4
In the opposite corner of the room with the Harbinger, interact with the red switch on a container to reveal this secret.


Secret #5
Once you head down another floor, you will go into a cave area. On the platform where you must press a switch, head into the opening and follow it for this secret.


Level 14 – Hazard
Secret #1
As you are progressing across the hazardous waste near the beginning, there will be a gap between a rock and a structure you can go through to reach a small platform. Head hear and jump into the nook for the secret.


Secret #2
After raising the waste for the first time, continue forward until you reach a building to enter. Turn around once inside to find a small hidden switch. Press it to reveal the secret below.

Secret #3
Inside the area where you get the Green Key, head inside the side room and climb into the vent. Follow it through for this secret.


Secret #4 + Automap
After raising the hazardous waste a second time, jump along the platforms around to the right to find a chest you can now open with your green key.


Secret #5
Now head across to the opposite side of the waste, where you will find a secret behind a shield. Shoot a grenade into the hole above to hit the switch.

Secret #6
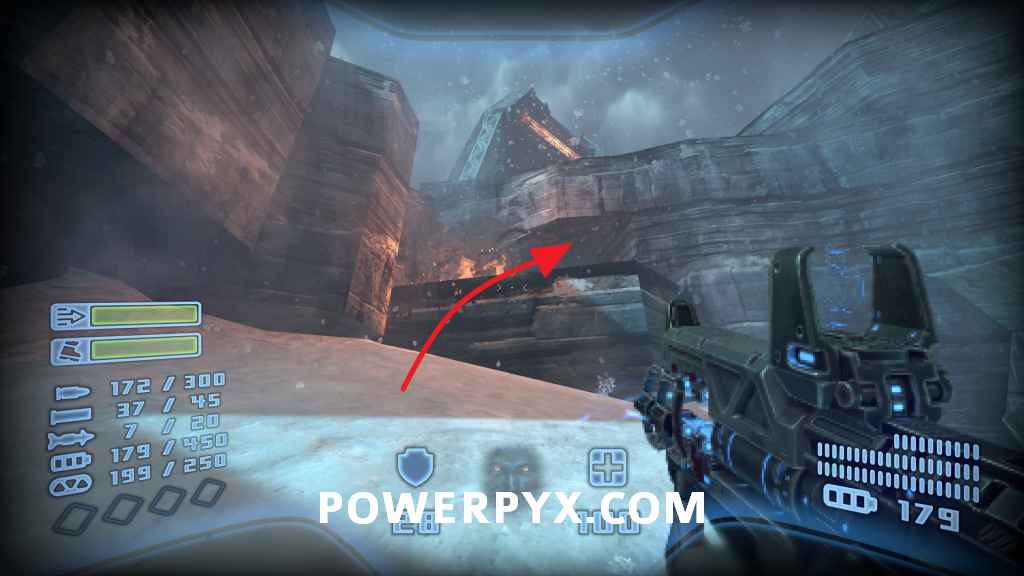
After raising the waste for a third time and opening the door to the next area, head across but go right around the rock instead of through the doors. There’ll be some ledges you can jump across to find this secret.

Secret #7
After acquiring the Rune and returning outside, the waste will have lowered completely. On a rock to your right you will see a button you can press. Jump across to this and interact with it.


Level 15 – Trial: Rockets
Secret #1 + Automap
Halfway through the level, the Automap will be visible behind some shields to your left. Shoot the target in front of you to access it.


Secret #2
When you reach a room with an elevator, instead of going up go outside and head along the ledge and drop down to a platform. Head in the hole for this secret.


Level 16 – Meltdown
Secret Exit – Requires Double Jump and Dash Boost
In order to reach the secret exit, you will need double jump and dash boost from the shop. Once you get onto the bridge, jump onto the pillar, then double jump dash across to the roof of the building. Once there, go into the building in the rock and open the next door to reveal the secret exit.


Secret #1
Once inside the facility, go up the elevator to the right. On the wall is a switch which will open the secret.


Secret #2
Head back down the elevator and into the same area from the floor below. Immediately to your left will be switch on the wall you can interact with to open this secret area.

Secret #3
Continue into this room to where the hazardous waste pit is located. Look across it to see a target you can shoot. Shoot it to reach the secret.

Secret #4
After getting the Yellow Key, return to the hub area and head into the left area. Climb into the building on your left and drop inside the roof for the secret.

Secret #5
Continue to the smaller of the two waste pools in this area. Jump onto the platform and then across the waste to find the secret in a nook.


Secret #6
After ascending the elevator and entering a new room, there is a switch you can press. Before pressing it, jump on to the boxes next to it and then across to the pillar. Jump into the hole in the wall for the secret. If you have already raised the pillar by pressing the switch like in the screenshot, you will need double jump to reach the secret.

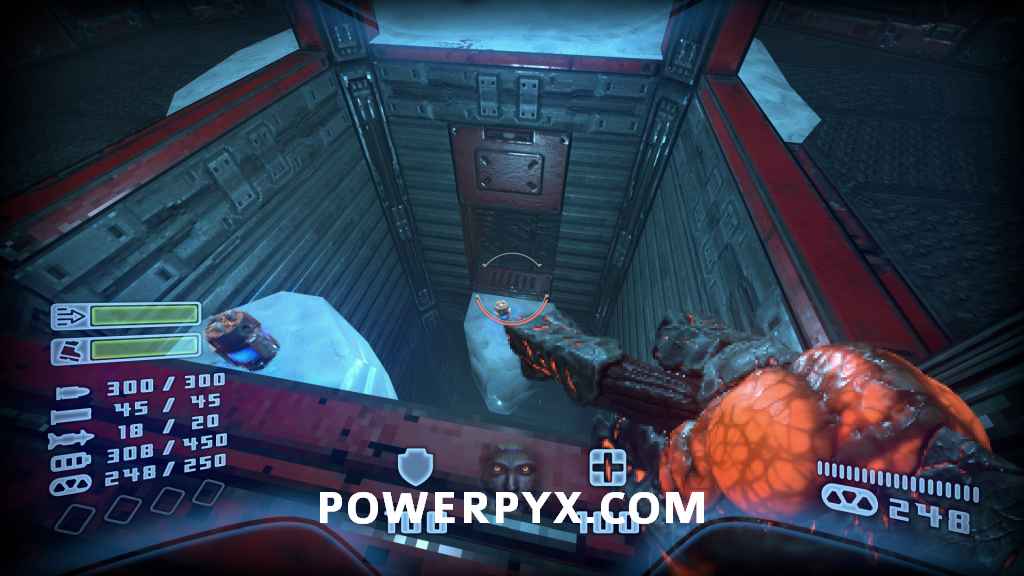
Secret #7
After acquiring the Green Key, head towards the shaft with the large cauldrons that are being lifted. Drop onto one just as it comes out of the waste and turn around to see the secret.


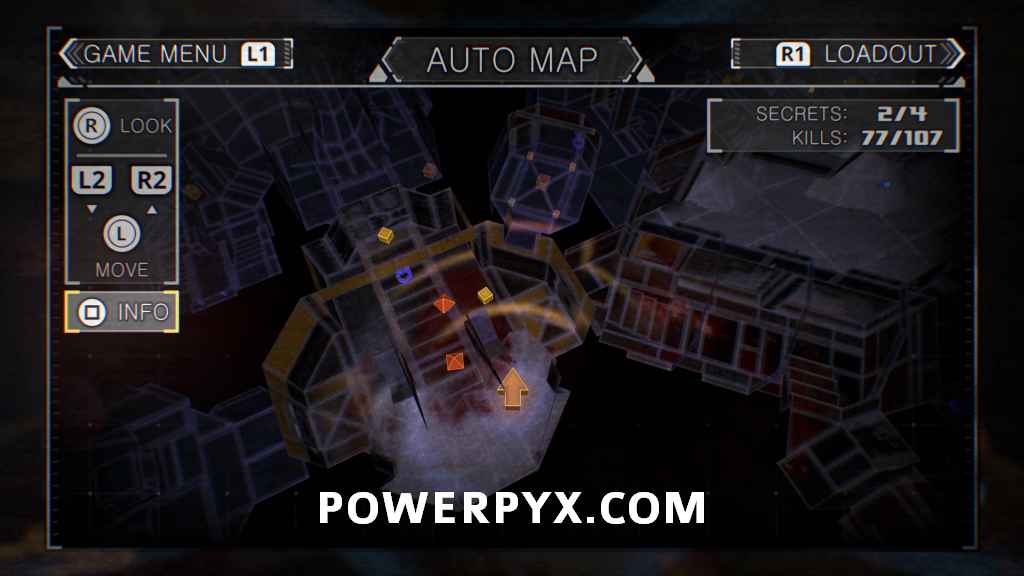
Automap
Ride the large cauldrons back across to the cliffside to find the Automap. If you already got the Automap prior, you will still want to ride the cauldrons as this will spawn some easily missed enemies.


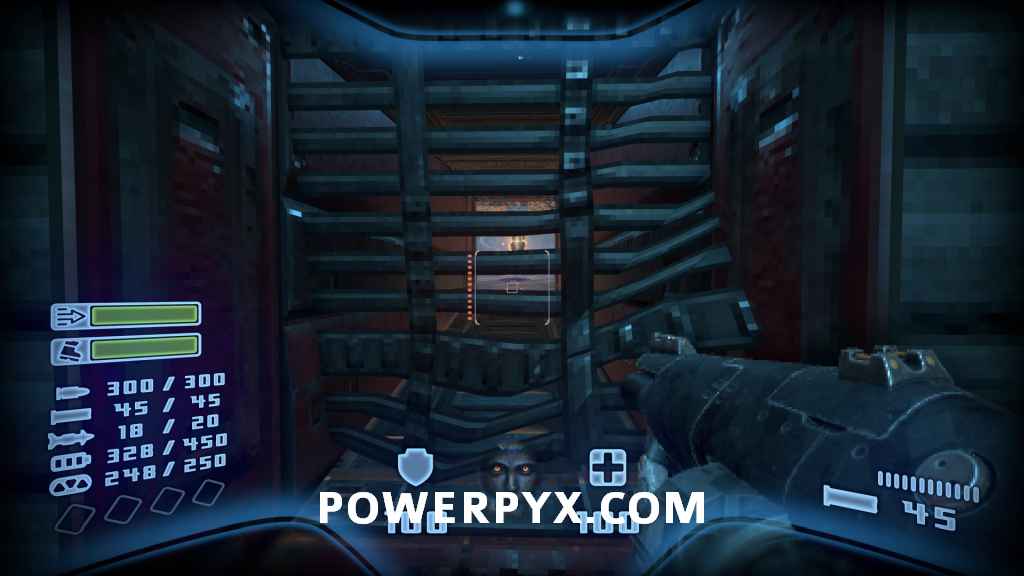
Secret #8
Head back into the hazard waste area and return to the elevator you went up previously. You can now drop down below it to find this secret.


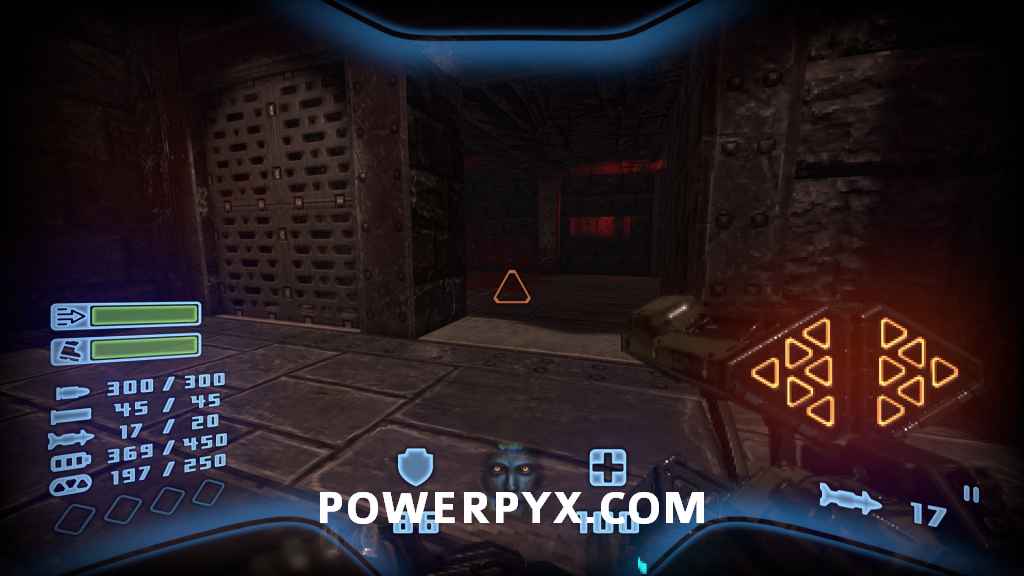
Level 17 – The Forge
Secret #1
As you progress through the corridors at the beginning of the level, there will be a pillar with a red button on it. Press it to reveal the secret.


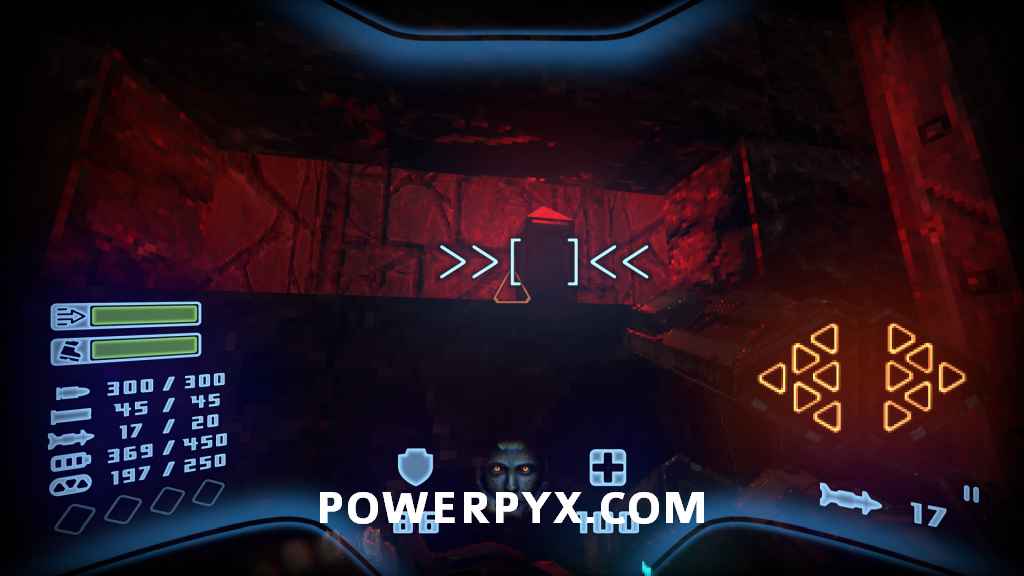
Secret #2
In the next room there will be a room overlooking the are you can see. Nearby will be a ledge you can jump on with a button to press. This will open a path through to the aforementioned room.


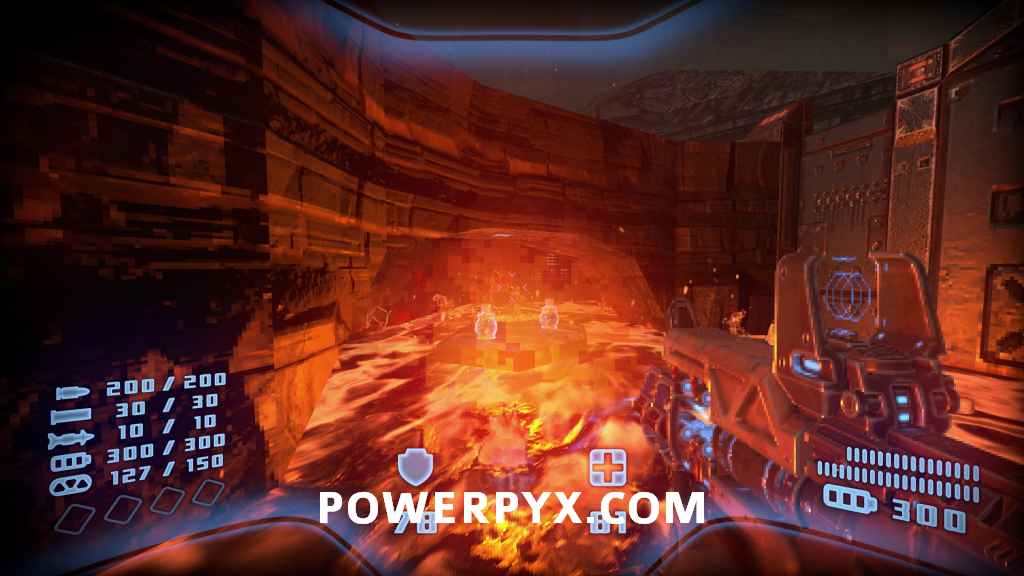
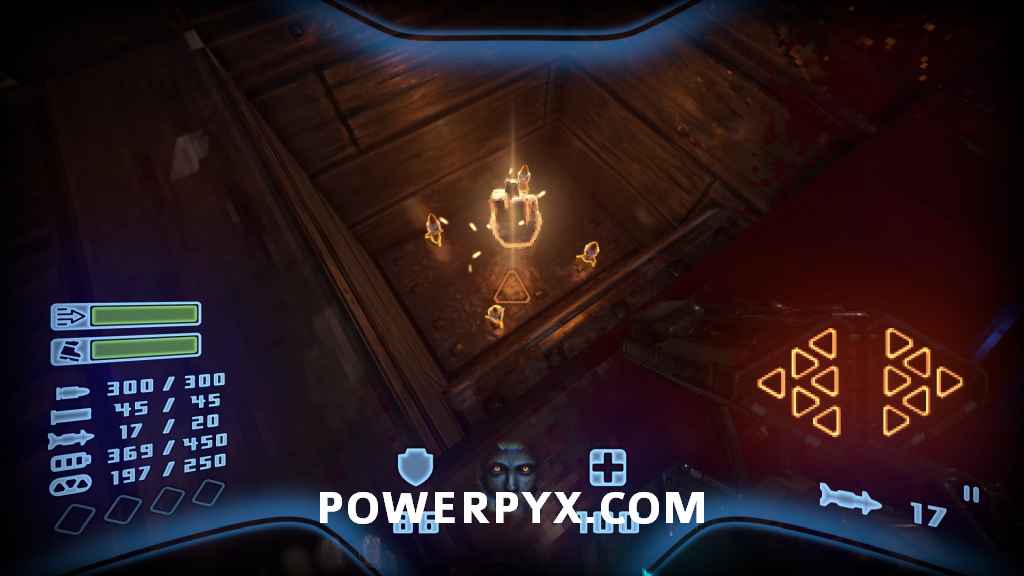
Secret #3
Once you arrive in the round room with lava and a central pillar, you will need to activate a rising platform. Once activated, jump on it and jump off to the platform on the left rather than the way forward. Follow it around to the secret.


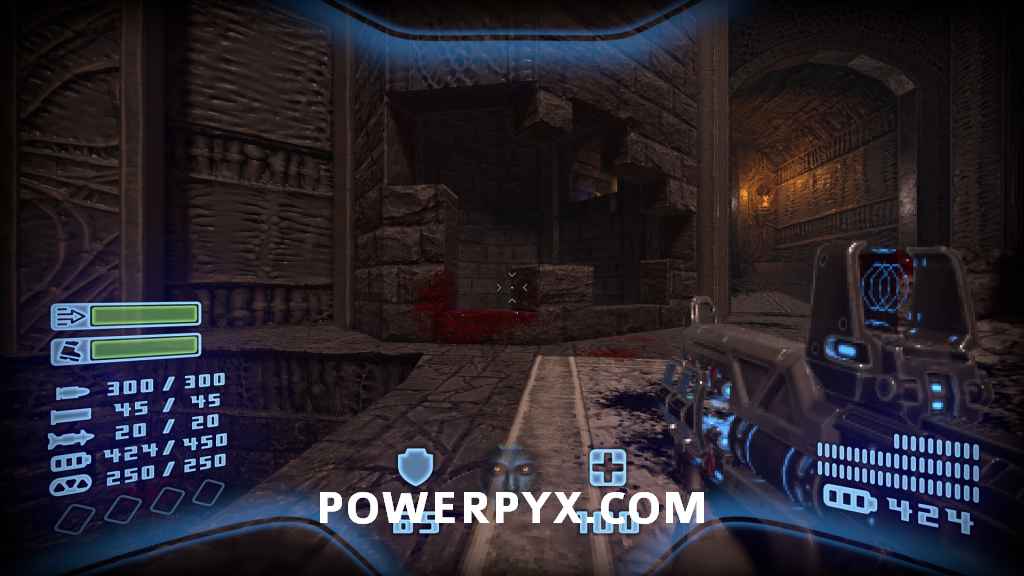
Secret #4
In the next area there will be another pillar with a button you can press on it, that reveals the secret.


Secret #5 + Automap
After acquiring the Yellow Key, proceed to the yellow button in the next area. Pressing it will activate some platforms that raise out of the lava. Jump onto them and then jump into an open vent. Follow it through for the automap and secret.


Secret #6
From where you grabbed the automap, jump onto the wall in front of you and follow it around for the secret.


Level 18 – Corruption
Secret #1
At the beginning of the level, jump onto the rocks on the right and follow it along to a tunnel that leads to the secret.

Secret #2
From the rocky area, there is a rocky pillar you can jump onto, then into an opening for the next secret.

Secret #3
Once in the next area, press the button to open the gate. Once the platform moves out from the building, head inside and check the nook in the corner.


Secret #4
In the centre of this area where the moving platform stops, there is an opening above on the wall. Shoot a grenade into it to hit a switch to open up this secret.


Secret #5
Once you arrive in the area with the large shield generator in the middle, head to the building on the right. There will be a grate on the side that you can break. Head inside to find this secret.


Automap
Head up onto the rocks to find this.

Secret #6
Right next to the Automap is a tunnel you can go inside. At the back will be some barrels, shoot them to break the wall and reveal the secret.
Level 19 – Trial: Grenade
Secret #1
At the beginning of the level with the first 3 targets, to your left in between the 2nd and 3rd target. Shoot this hidden target for the secret.

Secret #2
After going up some elevators, you will shoot a target to extend a bridge. Instead of crossing it, drop off to your left and you can enter where the bridge extended from for the secret.
Secret #3 + Automap
Head across the bridge and go up the stairs on the side. Shoot the targets along this path for the automap and the secret.


Secret #4
After swapping over to the Shredders, briefly shoot the target in front of you to create a gap, then drop off the side. Once below, shoot the 3 hidden targets for the secret.


Level 20 – Atonement
Secret #1
In the central room where you raise the data boards, head into the room at the back and interact with the button on the pillar. The secret will be revealed next to you.


Secret #2
Head down the left path and stand on the platform on the middle. Turn around and you will see a switch high up on the wall. Shoot it and the platform will raise, allowing you to jump to the secret.


Secret #3 + Automap
After doing both portals, you will return to the first room and go up a large elevator. Head out towards the bridge, then look up at the wall to your right. A switch will be on the wall near the ceiling, shoot it to extend a bridge that leads to the secret and automap.

Secret #4
Once you arrive in the Archives, head to the back of the room to find yet another switch high up on the wall. Shoot it to reveal a secret below you.


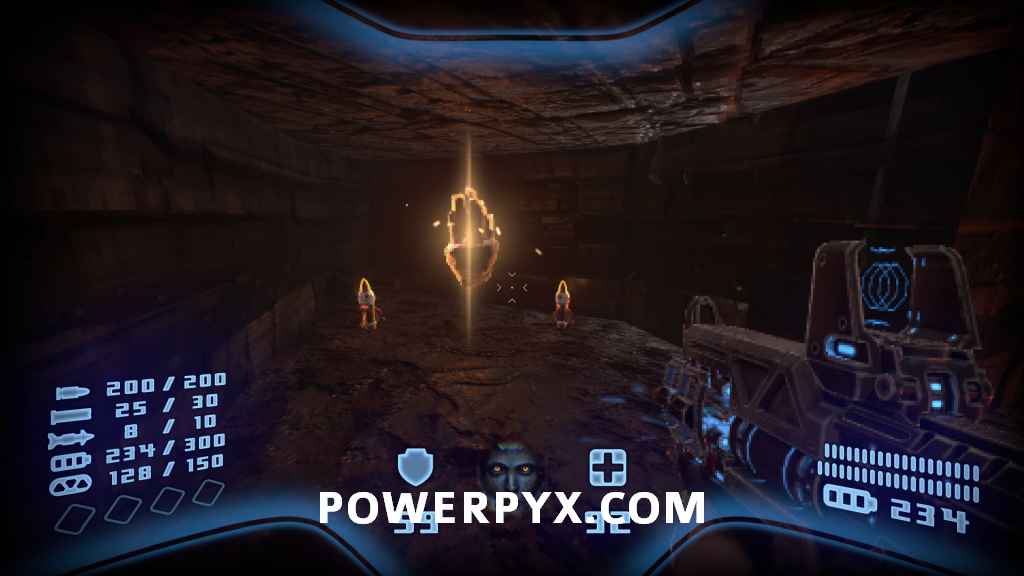
Level 21 – Progenitor
Secret #1
After the second portal, you will be a new room with a nexus point. Head up to the ledge with the nexus point and jump across to an opening with the secret.


Secret #2
After the pillar moves into the main room, you will be able to climb up onto the ledge and use the pillar as a stepping stone to cross the gap to the secret area. If you have double jump, you will be able to cross this gap immediately at the beginning of the level.


Secret #3
After going through the fourth portal, you will be atop a large crevasse. Head to the ledge and look down to see a health kit below. Drop down for the secret.


Secret #4
After returning to the main area again and lowering the sand further, new paths will open. When looking at the nexus point, head left to find a hidden passage.


Secret #5
This time, head right when looking at the nexus point to go down another path. Jump onto the platform to find this secret hidden inside.


Automap
Opposite the nexus point will be two paths. Go down the left one and the automap will be revealed when shooting the yellow crystal. If you are not standing on the platform when you shoot it, you will need double jump to reach it.


Level 22 – Hexarchy
Secret #1 + Automap
After interacting with the button and raising into the main arena, deal with the first wave of enemies. A group of platforms will raise in one section of the arena, climb up these and jump across to the wall to find a nook with the automap and secret.
Secret #2
After clearing the arena, head towards the end of the level. Instead of going in the portal, look right and jump across to the secret.


Level 23 – Trench
Secret #1
At the beginning of the level, jump onto the pillar to the left to reveal this secret.


Secret #2
Once inside the trench, head along the ledge to the right to find this secret around the corner.


Secret #3
After heading outside and dropping down to a new platform, head along to the second platform with the nexus point. Go behind it to the ledge and drop down to the protruding nook below.


Automap
As you continue up towards the elevator, this Automap will be on a ledge by an ore.


Secret #4
After going up the elevator into the tower and clearing the first room, head into the second room where you direct the laser. In the corner of the room is a red button you can press to reveal the secret.


Secret #5
In the next room, head up the ledge to the right and jump across to the ore for the secret.


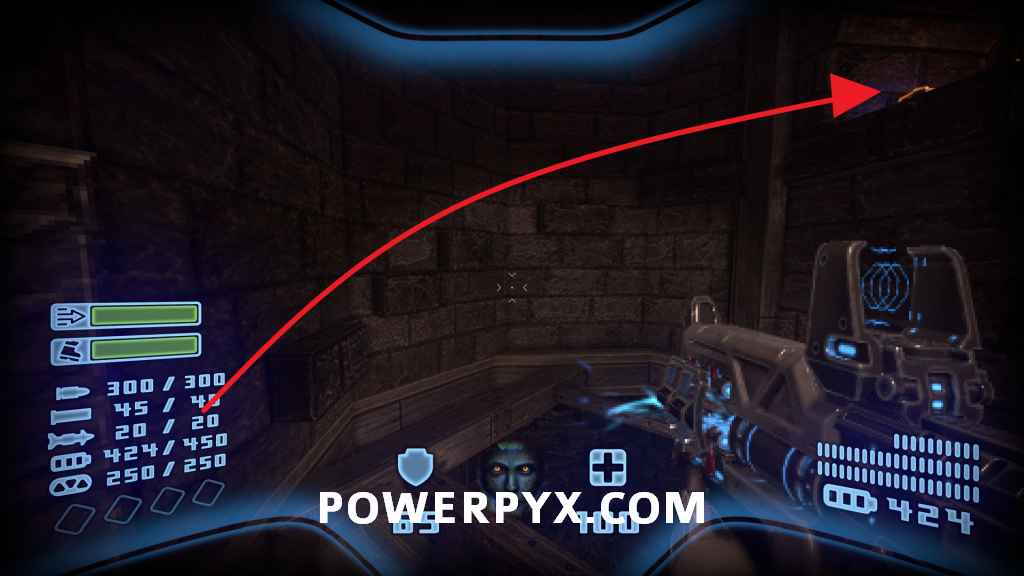
Level 24 – Space Station
Secret #1
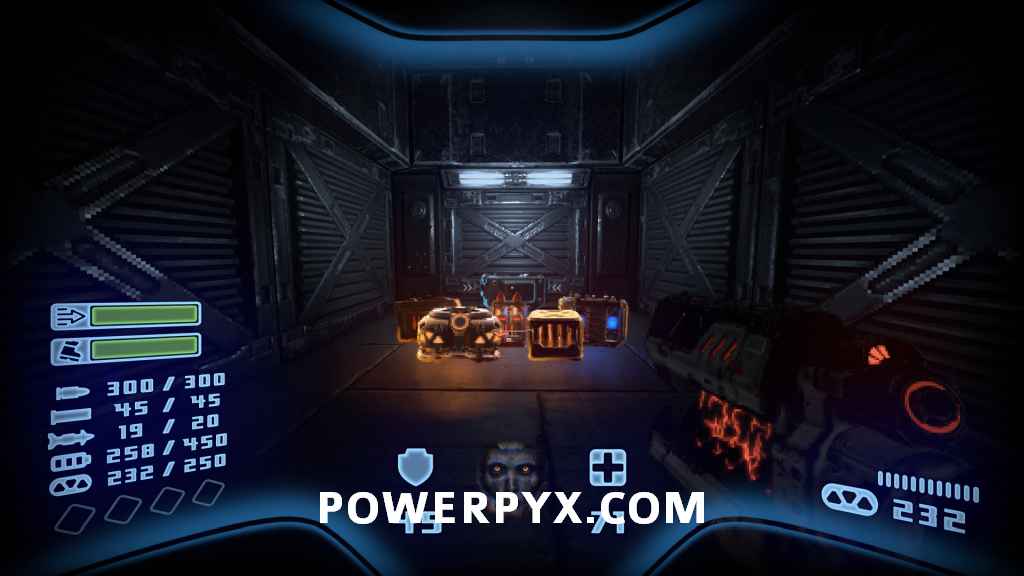
After ascending the elevator, jump onto the ledge and look down. You will see a hidden room in the wall below, jump down to it.
Secret #2
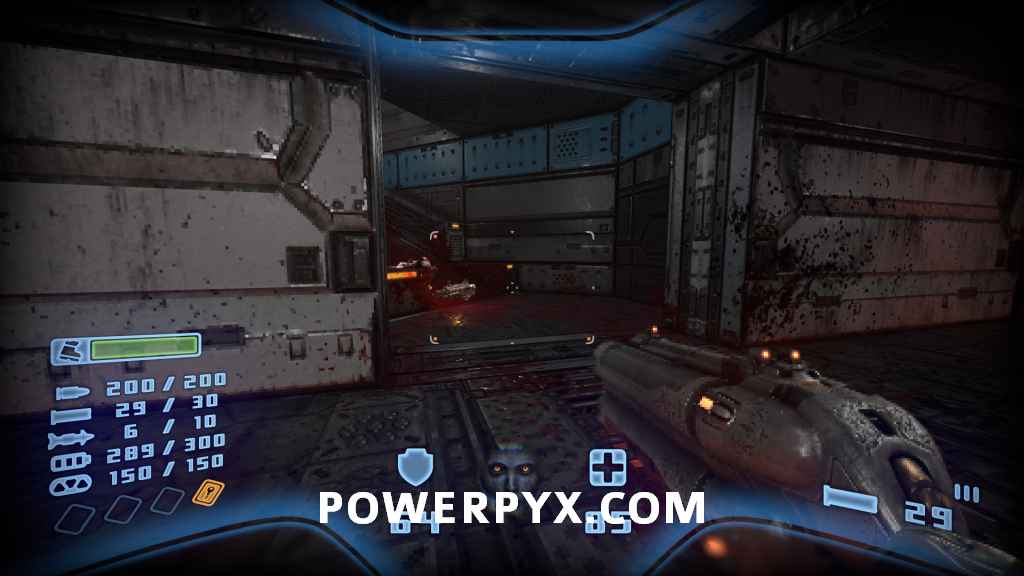
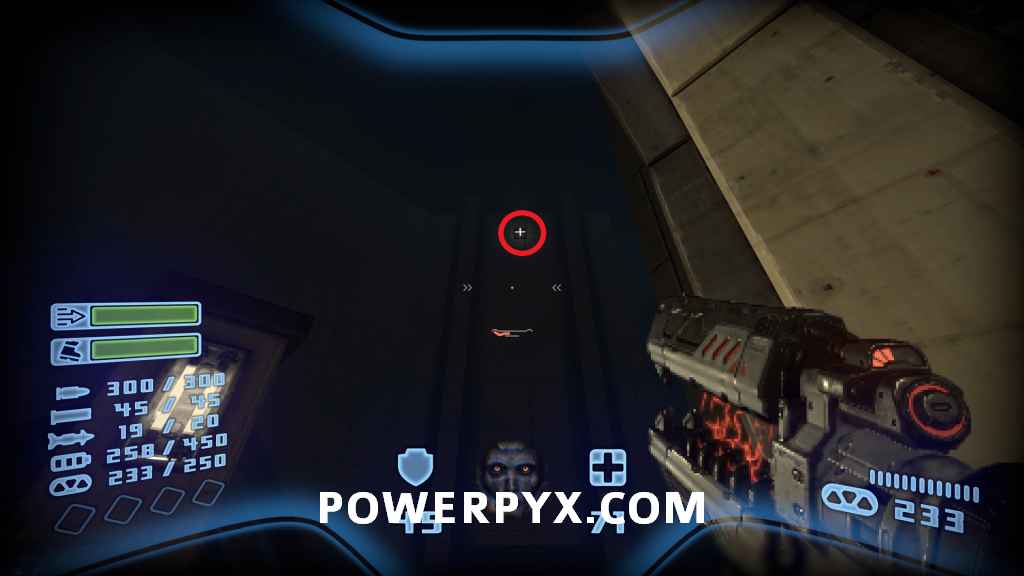
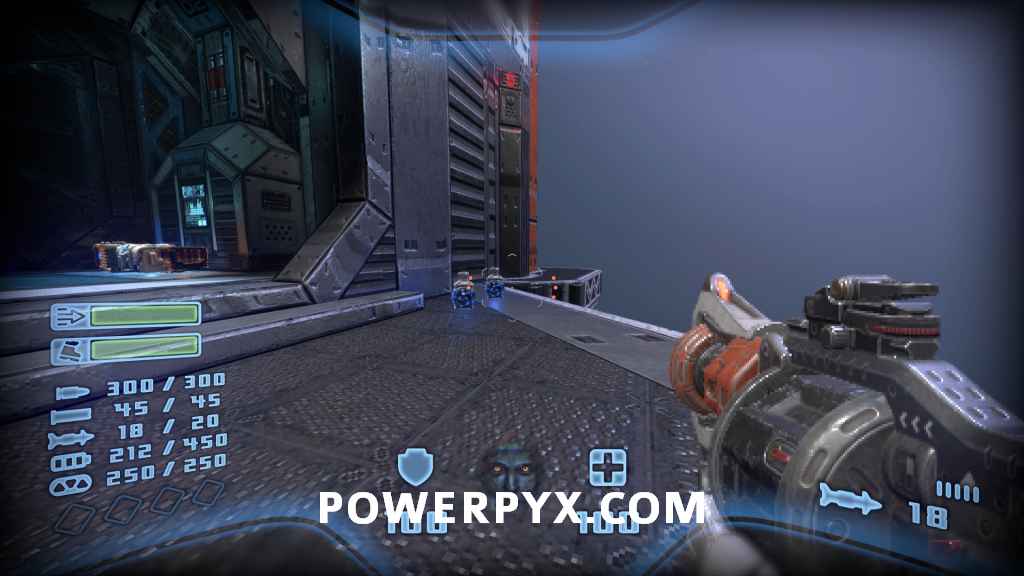
Once inside the space station, head upstairs to a room with a platform that takes you down to a hallway. Instead of going down, go to the end of that room to find a switch hiding amongst some blue screens. Press it to reveal the secret.


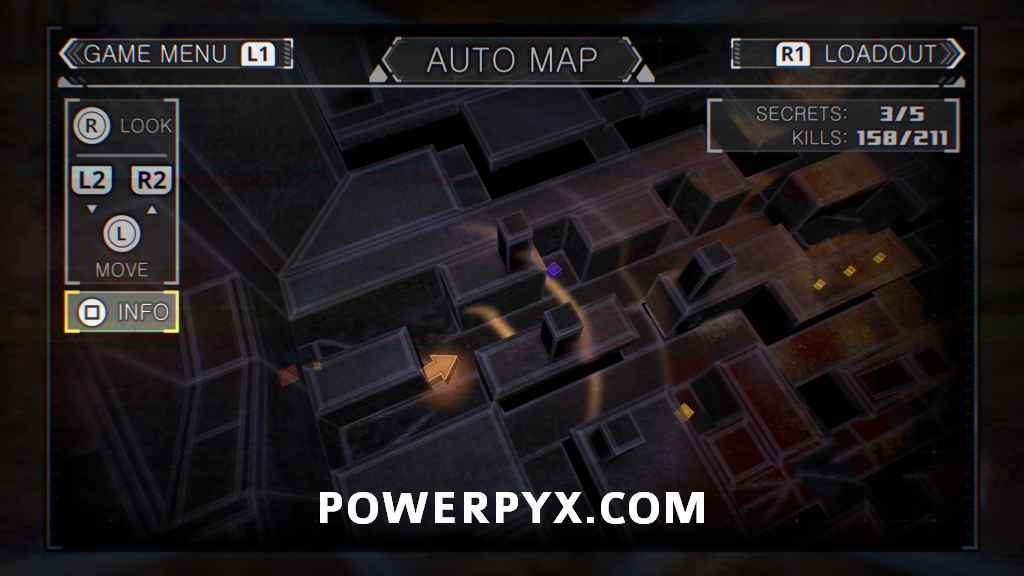
Automap
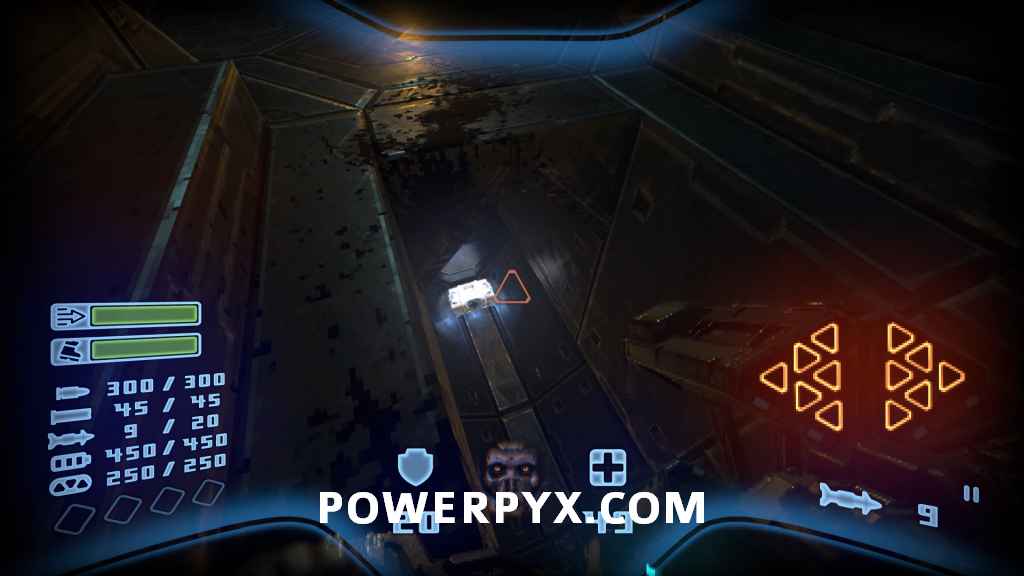
Once outside, you will need to re-enter the space station by dropping into a hole. Look down before dropping down to drop onto the automap.


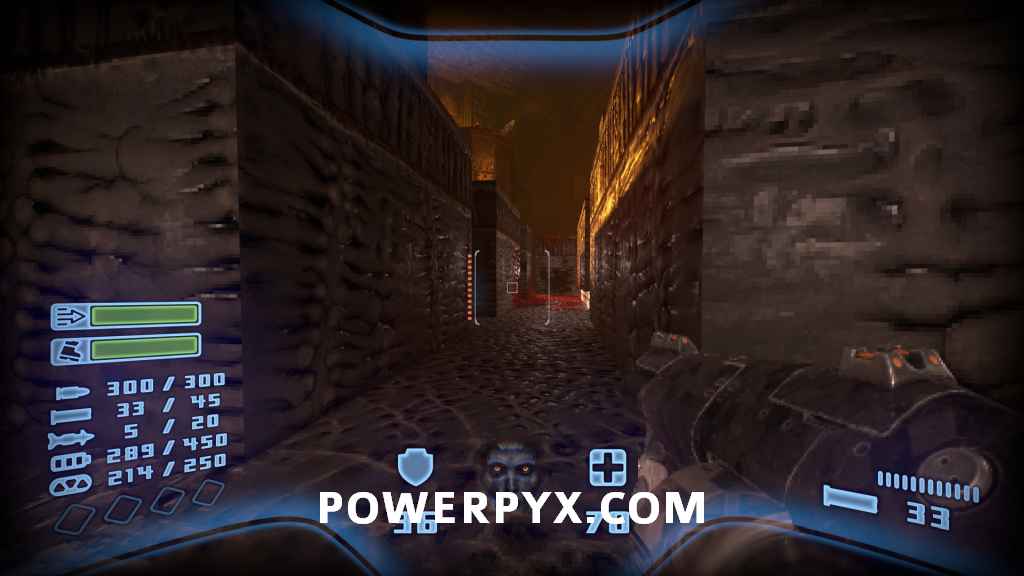
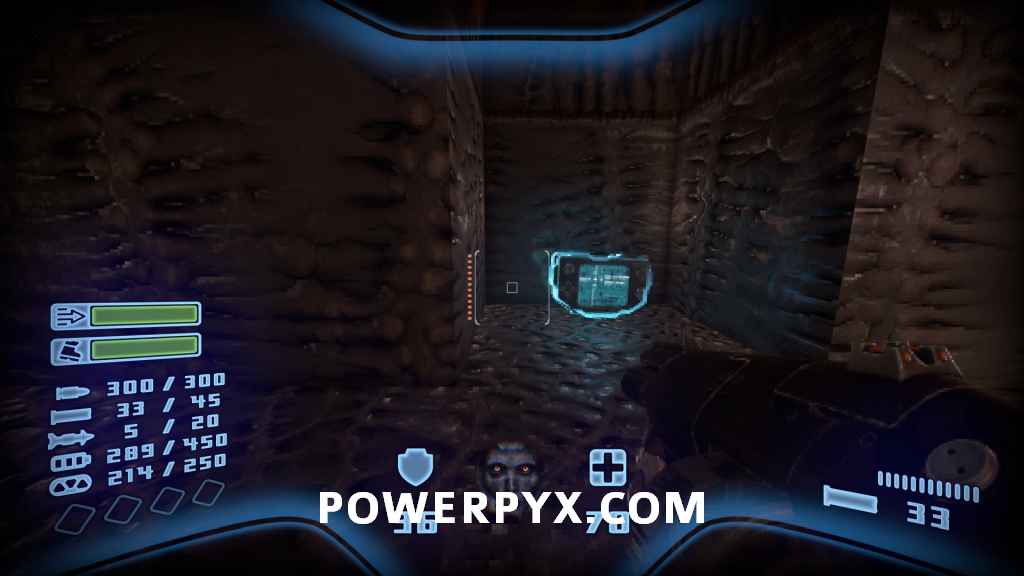
Secret #3
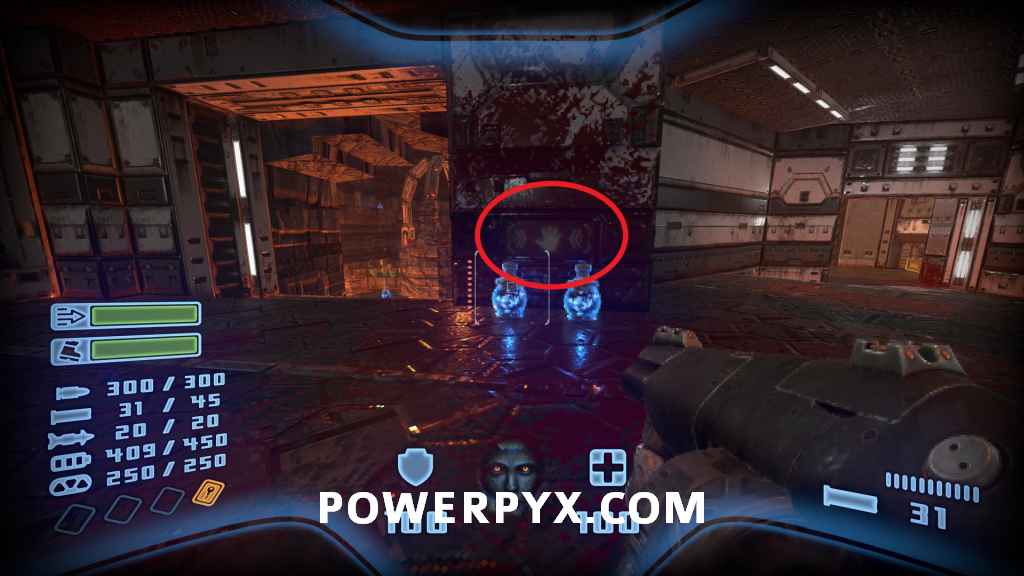
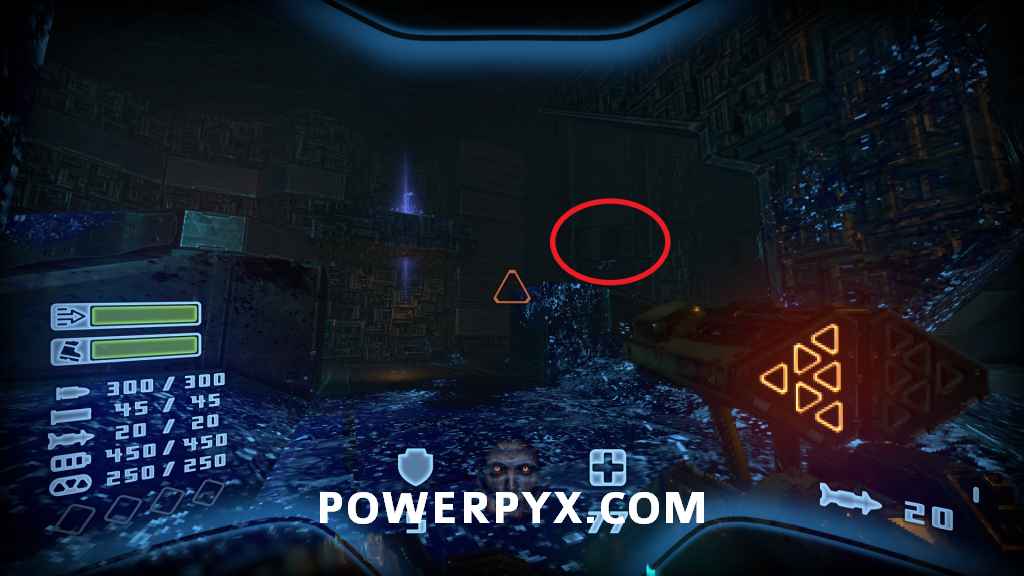
Once inside, pass through the ice section and go upstairs. There will be a switch protected by a glass door. Shoot a grenade into the gap above to open it.


Secret #4
At the other side of the room you will head outside again. Jump over to the platform with a switch, but don’t press it. Continue past it around the corner for the secret.


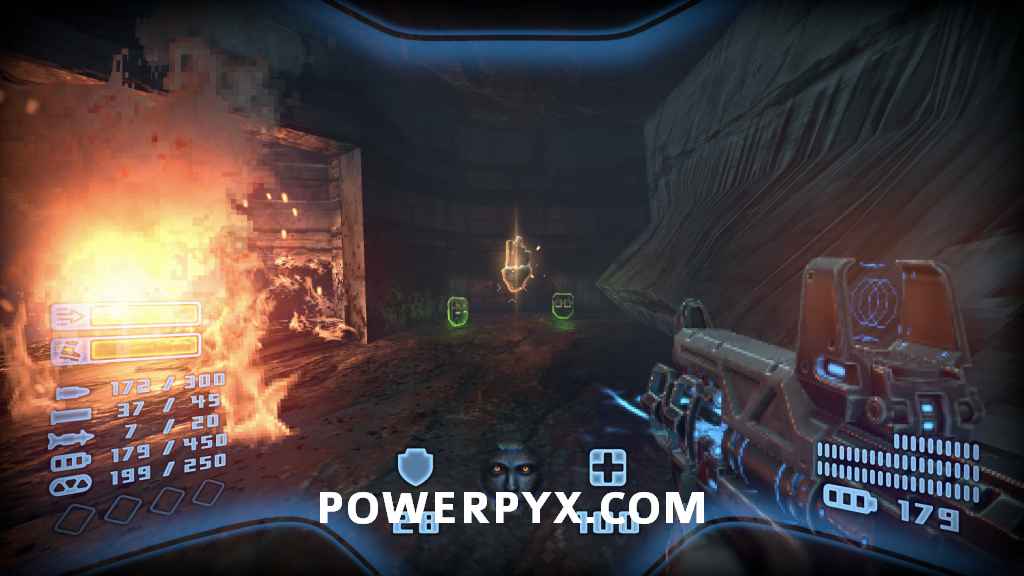
Level 25 – Aftermath
Secret #1
At the beginning of the level, head to the opposite end of the area and jump onto the ledge with the fire. Go behind it to find this secret.
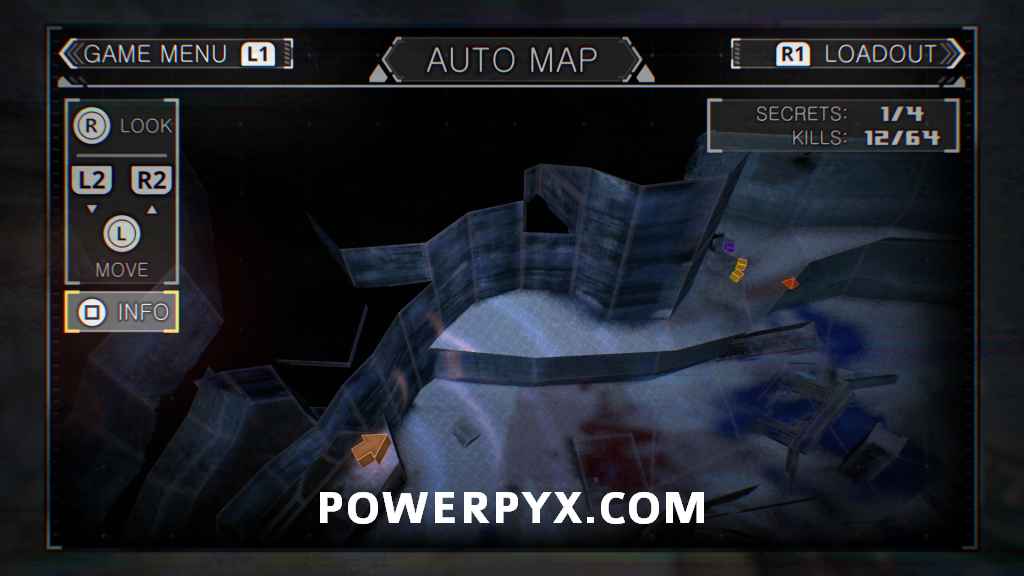
Automap
From the previous secret, jump across to the ledge and follow it around to find the automap in an open crate.


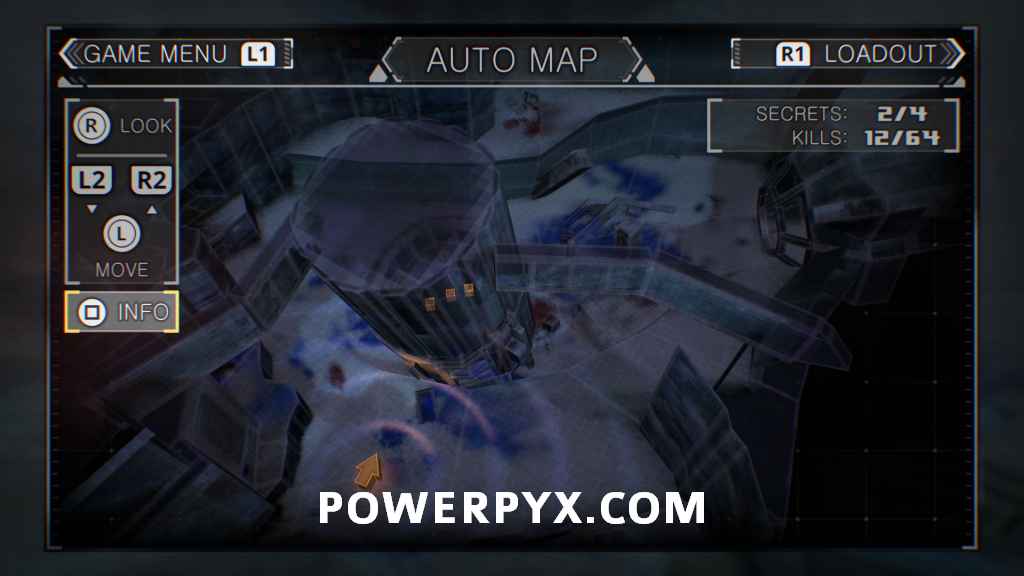
Secret #2
Head around the central pillar until you find an opening, then jump into it for the secret.

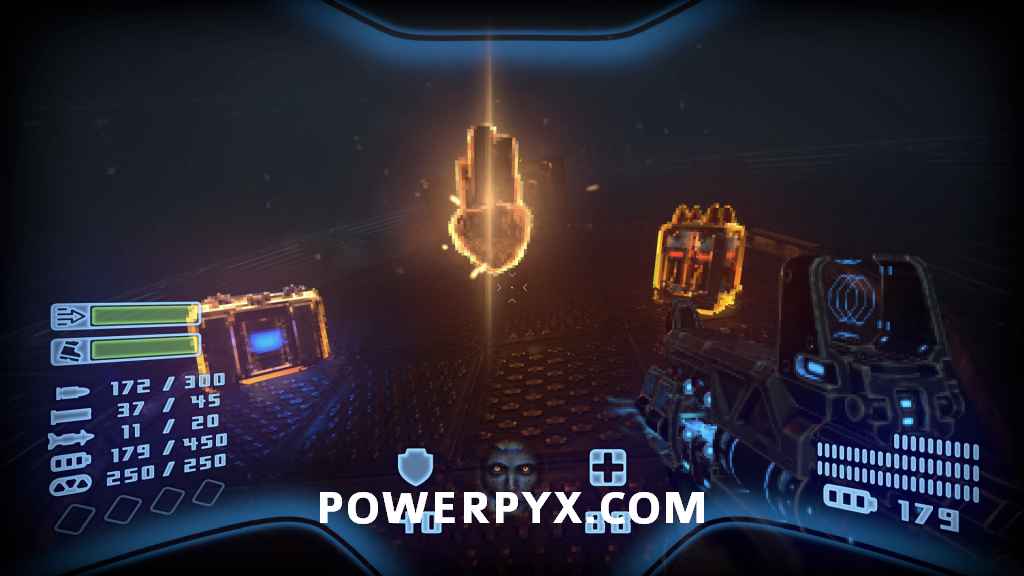
Secret #3
Instead of going down the main path, head into the building to the left of it to find the secret at the back.


Secret #4 – Requires Double Jump
At the end of the level, climb onto the ledge and double jump across to the opening for the last secret.


Level 26 – Frost
Secret #1
At the beginning of the level, walk to the ledge and jump across to the ledge on the left. The secret is in the corner.


Automap
Once inside the building, head into the hallway. The automap will be on a ledge, jump onto the middle section to reach it.

Secret #2
After getting the Chaos Caster, melt the ice blocking the hole in the ground. Drop down onto the ledge with the grate blocking a tunnel. Destroy it and head inside for the secret.

Secret #3
Once you are down in the Research area, in the room where Prodeus and Chaos enemies are infighting, jump up onto the platforms to your left to find the secret behind a pillar.


Secret #4
Continue forward to the next room and the secret can be seen above the doorway. Jump through the opening to reach it.


Level 27 – Gate to Chaos
Secret #1
After attempting to ring the bell and going through the gates that open, you will be in a room with a tunnel going through the middle. Head through the tunnel to find the secret.


Secret #2
As you progress forward, you will arrive in a courtyard area. You will head into a room with a red light in the back, this is a switch you can interact with. This will reveal the secret behind you.

Secret #3
At the top of the courtyard area, there will be a tower with a broken wall. Inside the tower are protruding bricks you can climb up to reach the secret.


Automap
Once you reach the labyrinth, follow it around to the left to find the Automap in a nook.
Secret #4
From the Automap, continue following the labyrinth around the left until you reach a corner with the secret.

Secret #5
After escaping the labyrinth and continuing forward, you will go up a ramp and some stairs. On your left with be a closed metal door. Interact with the door on the left side of it to open it up.
That’s all Secret Locations in Prodeus.
Leave a Reply