
Like a Dragon: Ishin! Trophy Roadmap
- Estimated trophy difficulty: 5/10 (almost entirely due to Buyo Dancing and Courtesan minigames)
- Approximate amount of time to platinum: 100 – 130+ – Total time can be heavily dependent on your RNG with getting some drops for the Smithing Completion
- Offline Trophies: 56 (1
 , 2
, 2 , 5
, 5 , 48
, 48 )
) - Online Trophies: 0
- Number of missable trophies: 0, Nothing Missable
- Glitched trophies: Nothing Yet
- Does difficulty affect trophies?: Must complete a playthrough on Legend difficulty (can be switched to Legend difficulty before the last combat section of the game)
- Minimum Playthroughs: 1 (Legend is unlocked from the start unlike prior games)
- PS4/PS5 Autopop & Save Transfer: Save Transfer: Yes from PS4 to PS5 / Autopop: Not for story trophies, some trophies pop after redoing certain actions, some need to be entirely redone or planned around with specific saves (see note below roadmap)
- PS4/PS5 Crossbuy: Yes
- Free-Roam / Level Select after Story?: Can continue playing in Premium Adventure after the story and clean up all remaining trophies
- Supports Manual Saves?: Over 20 manual save slots, along with 3 rotating autosave slots
- Release Date: February 17, 2023 (Digital Deluxe Edition), February 21, 2023 (Standard Edition)
 , 2
, 2 , 5
, 5 , 48
, 48 )
)Introduction
Welcome to the Like a Dragon: Ishin! Trophy Guide. This is a remake (mostly remaster) of Ryū ga Gotoku Ishin!, a previously Japan-only entry in the Yakuza/Like a Dragon series released as a launch title for the PS4. You play as Sakamoto Ryoma, a real historical figure from late 1800s Japan, but based visually on Kiryu from the main series. This applies to most characters you interact with as well, though recast with characters from the more recent games such as 0, 6, and LAD instead of 3, 4, and 5 like the original release. If you’ve played the games from the series prior to 6 then the trophy list will be very familiar, very much so if you played 0. At face value, it copies the trophy list entirely from the original release, but more specific requirements have been changed. There are a couple of removed substories, but then a handful of new ones. A number of the Completion List and Diligence Record requirements have been reduced by 10 – 50% making a lot of them less tedious, but then as a tradeoff Smithing has been significantly changed mostly for the worse, and there is now a much longer grind entirely due to Smithing and how expensive it now is. You can start on Legend from the start of the game, but then can just switch to it at the end to pop the trophy like you could in 6. Even with all the changes, the trophy list is still largely the same Yakuza/Like a Dragon fare from the games prior to 7: Complete 100% of the Completion List/Diligence Record which encompasses basically all requirements, complete (the end of) the game on Legend, and complete the Ultimate Challenge, which is a set of extra fights you access from the main menu after completing the game.
Step 1: Play Through the Story to Chapter 14 (Finale), Working on Side Content as you Go
You can start the game on whatever difficulty you want, Legend is unlocked from the start unlike prior games but you can just switch to it at the end for the trophy, so it isn’t required to play the whole game on it. You can do as much or as little side content as you want, but due to how a lot of the side requirements work you should try to do them as you go so you aren’t grinding a lot of tedious things later, such as pulling water from wells or items from pots. Nothing is missable though, and you don’t need to worry about missing anything as you can complete all main requirements in Premium Adventure. Some tips for what to do as you progress through the game:
- Always grab items from Pots, pull from Wells, and pray at Shrines when you come across them: These all have Diligence Record requirements but are limited on how often you can pull from them, so to save yourself tedium later make sure to interact with each item as you come across them until you have completed the Diligence requirement.
- Purchase the “Virtue Cultivation Level” upgrades from the Shrine before anything else: You are introduced to “Virtue” in Chapter 2, which functions basically as a separate currency/XP that you earn from various activities, purchasing things, or completing tasks in the Diligence Record. The “Virtue Cultivation Level” upgrades increase the amount of Virtue you gain from all sources by up to a total of 50% at the last level. You want to focus on purchasing these before anything else to maximize the amount of Virtue you earn over the course of the game.
- Save all of your money until Chapter 3, then use it to grind Chicken Race Betting: Chicken Races is still the fastest overall way to make money once you know how it works, and you can set yourself up for the majority of the game by grinding it a bit right away in Chapter 3. Check the description of the trophy Cocksure
 for an explanation of how to earn money through Chicken Races. You can then trade the tags at the Gambling Den for Platinum Plates, which can be sold at either Ebisu Pawn location. You can also trade the tags for the Golden Gun, which is an extremely overpowered gun for how early in the game you can get it, and can basically carry you until you actually work on Smithing grind late in the game.
Step 2: Complete the Game, Changing Difficulty to Legend Before the Final Combat Encounter
There are a couple of points in the final two Chapters where the game sort of implies a point of no return, but the main one to watch out for is in Chapter 14 (Finale) where you are meant to speak with Okita at the Sinsengumi Barracks. Up to that point, you can still travel around and purchase from shops and get prepared for the ending. This is also the last point in the game you can change the difficulty, as after this is one long combat section leading up to the end of the game. Make sure you’re fully stocked up on healing items and have some decent weapons and armor, then can change the difficulty to Legend and proceed through the end of the game. If you want you can also keep a manual save, complete the ending on a lower difficulty to check out the encounters, then reload your save and complete the end of the game on Legend.
Step 3: Ultimate Challenges
Ultimate Challenges are a set of extra challenges accessed from the main menu after completing the story for the first time. You play with set abilities. You can leave these for last if you want, but you get an item in the main game for completing them, so might as well do them first.
Step 4: 100% Cleanup
The longest part of the game is cleaning up the entire Diligence Record and Completion List. All other remaining facets of the game are covered in these two lists and are what cause the completion time to balloon so high, mostly due to Smithing as you need to create one of each item and place one of each seal, which requires a ton of grinding for materials and money.
Save Transfer and Autopop Information
Like Lost Judgment, Ishin includes the ability to load your PS4 saves in the PS5 version of the game. Unlike Lost Judgment though this doesn’t make for easy earning of trophies by transferring a 100% save. A number of the trophies seem to be set up to trigger only when the exact requirement is met, and won’t retrigger by repeating an action again later. This means that if you want to save transfer for the PS5 plat you need to either transfer as you’re working on the PS4 version before triggering requirements, keep a number of saves before various requirements, or redo a lot of the requirements in a new playthrough.
Requirements that need to be redone (either from scratch or with a save before the exact requirement is completed):
- Set foot in Tosa – Needs to be triggered in NG+/new playthrough
- Chapter/Story completion related trophies – Redoing the Finale on Legend should also trigger the other chapter-related trophies
- Complete every Ultimate Challenge – Need to complete the final one to count, redoing one if they are all marked completed doesn’t count
- 100% Completion List – Must perform the action that actually completes the 100%, will also trigger 50% trophy
- Complete your first bond – Must actually complete a bond (doesn’t need to be the first one in a playthrough)
- Eat at every restaurant – Doesn’t trigger by just eating at a restaurant again, need to eat at final one to trigger or do on a new save
- Complete 10/40/all substories – Requires completing that exact amount, completing all doesn’t trigger 10/40
- Limit Breaker – Must complete the fight to break the stat limit, also counts as training with each master
- All Revelations – Must complete the final Revelation
- Tengu Tamer – Must specifically complete Wanted Man mission 2
- Platonic Bliss – Must see one of the scenes for the first time (meaning rewatching after completing everything in Another Life doesn’t count)
- Paid off Haruka’s debt – Must pay off the final amount and see the scene after
- Place 5 bets on chicken races – Need to specifically trigger the 5th bet for the trophy, will not trigger if you’ve already earned the trophy on that save even if you bet 5 times
Requirements that pop from redoing specific actions on a 100% save:
- Total Virtue Earned – Triggers when earning Virtue
- Diligence Record – When checking the menu or earning Virtue
- Complete all Bonds – When interacting with any bond-related character
- Max Social Rank – When performing an action that could give rank (buying from a store)
- Unlock 10 abilities – When unlocking any ability (assuming you’ve not entirely maxed everything on your current save)
- Level 50 – When leveling again (also assuming you’re not entirely maxed out)
- Enhance Equipment 100 times – When enhancing any equipment
- Clear Battle Dungeons – Triggers when completing a Dungeon in each category, also triggers the trophy for 3 completions
- Gather 100 troopers – When gaining any new trooper
- Grow/Cook/Trade/Fish/Change Interior – When completing one of the actions again
- Play Every Minigame/Performing every Song/Dance – When playing a minigame and completing one of each song type again (All minigames may pop randomly when doing some other actions before this)
- Cleared each courtesan minigame – Need to redo the full set of 3 again specifically
Useful Tips, Tricks and Guides:
- Substories Guide
- Diligence Records
- Memoirs Locations
- Wanted Men Missions
- Amon Location & Boss Guide
- Fishing Guide
- Completion List Guide
- Smithing Guide
Like a Dragon: Ishin! Trophy Guide
 |
Bakumatsu Boss Collected all trophies. |
|
| Earn all other trophies in Like a Dragon: Ishin! to unlock Platinum (DLC not required). | ||
 |
Home, Sweet Home Set foot in Tosa. |
|
| Story-related, cannot be missed. This trophy is awarded right at the start of the game in Chapter 1, as soon as you gain control of Ryoma after the initial custcenes. | ||
 |
Losing a Brother Completed Chapter 2. |
|
| Story-related, cannot be missed. This trophy is awarded once you complete Chapter 2 of the story. | ||
 |
A Messy Investigation Completed Chapter 4. |
|
| Story-related, cannot be missed. This trophy is awarded once you complete Chapter 4 of the story. | ||
 |
That Was Close! Completed Chapter 6. |
|
| Story-related, cannot be missed. This trophy is awarded once you complete Chapter 6 of the story. | ||
 |
The Bottom Drops Out Completed Chapter 8. |
|
| Story-related, cannot be missed. This trophy is awarded once you complete Chapter 8 of the story. | ||
 |
Secrets Revealed Completed Chapter 10. |
|
| Story-related, cannot be missed. This trophy is awarded once you complete Chapter 10 of the story. | ||
 |
Cold Betrayal Completed Chapter 12. |
|
| Story-related, cannot be missed. This trophy is awarded once you complete Chapter 12 of the story. | ||
 |
Hero of a Nation Completed the final chapter. |
|
| Story-related, cannot be missed. This trophy is awarded once you complete Chapter 14 (Finale) of the story. | ||
 |
Legend of an Era Completed the game on Legend difficulty. |
|
This trophy is awarded for completing the game on Legend difficulty. Unlike prior games, Legend difficulty is available to select from the start. But like Yakuza 6, you can also earn the trophy just by changing to Legend difficulty right at the end of the game, only requiring you to complete the final combat section and final bosses on Legend. The “point of no return” in Chapter 14 (Finale) is when you are meant to speak with Okita at the Shinsengumi Barracks, letting him know you are ready to go to Tosa. After this you enter the final combat section of the game, leading to the ending. If you are aiming to just play the final section on Legend to earn this trophy, this is when you need to change it, as you can’t change the difficulty during combat sections. Legend isn’t particularly difficult in Ishin, but if you are just aiming to complete the ending of the game you do still need to be somewhat prepared. Enemies do a lot of damage, so you want to be set up with some decent equipment and a full inventory of healing items. Some general tips for how to be prepared:
|
||
 |
Ultimate Champion Completed every Ultimate Challenge. |
|
| Ultimate Challenge is an extra mode accessed from the main menu after you’ve completed the game. Like prior games, they are sets of challenges mostly based on combat, that you need to beat in specific ways. Most aren’t very hard, especially when you have access to all abilities as you can use either Gunman on normal enemies or Wild Dancer on bosses. Once you complete all challenges you can return to the main game and you’ll receive a letter at your house or at Teradaya, which allows you to claim a Phoenix Cannon from Bakumatsu Bob.
Combat Challenge 1 . Defeat all enemies – Just use Gunman style, stand in one spot, and shoot enemies as quickly as you can. Skill Challenge 1. Defeat all enemies with heat actions, each must be unique – You have Legendary Ryoma for this challenge, so just swap between styles. Remember you can trigger actions from things like grabs, so you have tons of options. Speed Challenge 1. Race to the Imperial Palace – You have 50 seconds, race to the north of the map. This one is straightforward, you just can’t sprint for very long, so make sure to stop sprinting so you don’t get winded. Ultimate Challenge 1. Defeat 2 bosses and 8 regular enemies – The two Bosses you have to defeat are the Masked Man and the Man in White. For the Masked Man use Wild Dancer, and just keep chaining the |
||
 |
Halfway There Brought the Completion List to 50%. |
|
| This trophy is awarded for achieving a completion of 50% on the Completion List. | ||
 |
Taskmaster Brought the Completion List to 100%. |
|
| This trophy is awarded for completion 100% of the Completion List. As with most Yakuza/Like a Dragon games, this trophy is the reason for the platinum time being so high. The Completion List is a series of tasks encompassing all aspects of the game outside of the story, requiring you to do everything related to minigames and side activities. In Ishin the Minigames aren’t the main issue like normal, though it has a couple frustrating ones in Buyo Dancing and the Courtesan Games. The biggest timesink is the Equipment Category, which requires you to craft every single weapon and armor item, along with placing every single possible seal in items. This takes a huge amount of grinding for materials and money, even more than the original game as smithing costs have inexplicably been increased by about 100x over the original costs, rendering the Smithing nearly pointless outside of the obligation to do it for completion.
You can check out the following pages for in-depth information on Completion List tasks: |
||
 |
Nominally Virtuous Earned at least 10,000 Virtue in total. |
|
| This trophy is awarded for earning a cumulative total of 10,000 Virtue. | ||
 |
Fairly Virtuous Earned at least 50,000 Virtue in total. |
|
| This trophy is awarded for earning a cumulative total of 50,000 Virtue. | ||
 |
Extraordinarily Virtuous Earned at least 100,000 Virtue in total. |
|
| This trophy is awarded for earning a cumulative total of 100,000 Virtue. | ||
 |
Divinely Virtuous Earned at least 300,000 Virtue in total. |
|
| This trophy is awarded for earning a cumulative total of 300,000 Virtue. You are introduced to Virtue early on in Chapter 2. This functions basically as a secondary currency/XP total that you earn from doing nearly anything in-game, from purchasing items to completing tasks in the Diligence Record which you are given at the same time.
You will earn this without trying while working on The Gods Hath Been Humbled |
||
 |
The Gods Smile Upon Thee Completed 5 tasks in the Diligence Records. |
|
| This trophy is awarded for completing any 5 tasks in the Diligence Record. | ||
 |
The Gods Rejoice at Thee Completed 20 tasks in the Diligence Records. |
|
| This trophy is awarded for completing any 20 tasks in the Diligence Record. | ||
 |
The Gods Sing Thy Praises Completed 50 tasks in the Diligence Records. |
|
| This trophy is awarded for completing any 50 tasks in the Diligence Record. | ||
 |
The Gods Hath Been Humbled Completed all tasks in the Diligence Records. |
|
This trophy is awarded for completing all tasks in the Diligence Record. The Diligence Record is effectively a second Completion List, which is mostly focused on interactions with people and Another Life as opposed to minigame and checklist-style requirements. The Diligence Record takes less time to complete, but has a number of tedious arbitrary requirements, though thankfully bunch have been reduced by 10 – 50% from the original game. You want to pay attention to a number of them and work on them the whole time you’re playing, as they are limited in how often they can be done, and would be extremely tedious if left till the end:
You can check out the following page for a list of all requirements and more in-depth explanations of how to complete them: Diligence Record Guide |
||
 |
Making a Difference Completed your first Bond. |
|
| This trophy is awarded for completing any Bond (Friendship). | ||
 |
Everybody Loves Ryoma Completed all Bonds. |
|
| This trophy is rewarded for completing all Bonds (Friendships). Bonds are tracked in the Diligence Record, split between normal Friendships and ones related to Shops. These are based on interaction with shops or specific people, raising through either purchasing/selling items, giving people items, playing minigames, or just talking to people. None of them are missable and can be completed after the story.
You can check out the following page for the location of and how to complete each Bond: Diligence Record Guide |
||
 |
Social Butterfly Reached max Social Rank in one of the locales. |
|
Social Rank is actually tracked as reputation level in game. This is based on your interactions with shops and people in each of the map areas and is raised by things like spending money at shops or playing minigames. You are required to reach max level in all locations for the Diligence Record, so will earn this while working on the trophy The Gods Hath Been Humbled  Diligence Record Guide Diligence Record Guide |
||
 |
I’ll Have One of Everything Ordered at least one item at every restaurant. |
|
This trophy is awarded for ordering at least one item from every restaurant in the game. You are required to order every item from every restaurant for the Completion List, so you will earn this trophy while working on Taskmaster  . .
|
||
 |
Kyo’s Little Helper Completed 10 Substories. |
|
| This trophy is awarded for completing any 10 Substories. | ||
 |
Saint of Kyo Completed 40 Substories. |
|
| This trophy is awarded for completing any 40 Substories. | ||
 |
Savior of Kyo Completed all Substories. |
|
| This trophy is awarded for completing all 72 Substories in the game. Substories function basically as side quests, involving doing tasks for different characters or functioning as introductions to different Bonds. More become available as you progress through the story, but none are missable and you can complete all of the substories after the story in Premium Adventure.
|
||
 |
Student Among Masters Trained with each master of combat. |
|
| This trophy is awarded for training with each of the combat masters at least once. These are specific characters that teach you new combat movies for each style. You are required to earn all moves for Taskmaster , so you will earn this eventually no matter what. Specifically for this trophy though all masters included in the Completion List aren’t required. William Bradley, Komaki, and Ginryu are for sure. Professor Shinbei might be, but you can earn the trophy after only interacting with him once which doesn’t check off any items in the Completion List. You aren’t required to have interacted with Scarecrow Chateau to earn this, though are required to eventually as it has other Completion List requirements. |
||
 |
You’ve Got Soul Unlocked 10 abilities with Soul Orbs. |
|
| This trophy is awarded when you unlock any 10 spots on the style skill trees using Training or Style Orbs. While not specifically unmissable, you are required you progress through the Skill Trees to unlock later abilities which are required for things like Heat Actions, so you will earn this eventually without trying. | ||
 |
On the Level Reached Level 50. |
|
| This trophy is awarded for raising Ryoma to Lv. 50. You gain experience from completing fights, which then increases your level over time. You are required to reach Lv. 99 for Limit Breaker , so you will earn this eventually while working on all other requirements. |
||
 |
Limit Breaker Broke Ryoma’s stats beyond their limits. |
|
| This trophy is awarded for reaching the normal level cap of Lv. 99, then “resetting” your level to Lv. 1, allowing you to earn Soul Orbs again. To do this you need to have reached the level cap, and have completed all training sessions with William Bradley, Komaki, and Ginryu. Once you have you can go back to Komaki’s Dojo and speak to him, then you will fight all 3 masters at once. Beat them all to reset your level and earn this trophy. | ||
 |
This is MY Ring! Won 10 arena battles. |
|
| The arena is located in Mukurogai, directly at the top of the west set of stairs. Inside it functions similarly to the arena in prior games: fight a series of enemies for rewards, which you can trade at the shop. Winning any 10 fights will award this trophy, even if it’s just repeating the first set of enemies twice. You are required to beat all enemies for Taskmaster as well as needing to purchase items from the shop, so you will earn this eventually while working on other requirements. |
||
 |
Revelation Reveler Attained all Revelations. |
|
| Revelations are basically unique ways that you obtain a total of 8 of the abilities, 2 for each style. You first obtain a “Book of Revelations” item, which includes a description of how to achieve the revelation, which requires you to repeat a specific action a certain number of times, triggering a heat action to appear. Once you successfully activate the heat action you “attain the revelation”, which then allows you to unlock the associated ability in the skill tree using soul orbs. Once you have attained all 8 revelations (not purchased the ability, just triggered the revelation) you will earn this trophy.
Brawler
Swordsman
Gunman
Wild Dancer
|
||
 |
Bring Down the Hammer Enhanced equipment 100 times. |
|
| This trophy is awarded for adding Seals to weapons or armor a total of 100 times. You are required to attach all 45 unique Seals for Taskmaster , so you will need to do this an extra 55 times to earn this trophy. You shouldn’t worry about doing this until you are actually working on the Smithing grind, as you should end up with a bunch of extra Seals from the associated grinding, so can save yourself time needlessly grinding this early. It is also a giant money sink, so if you aren’t finished the other Smithing requirements and want to earn this trophy, make a save beforehand and reload it after to not waste the money. |
||
 |
Showoff Defeated 100 enemies with Special Moves outside Ultimate Challenges. |
|
Special Moves are the actions that are bound to  which you learn in the first training sessions from Komaki, Ginryu, and William Bradley. Using any of these moves, you need to defeat a total of 100 enemies in the story. The move for Brawler that you can learn from Komaki is the earliest you can acquire but isn’t great for this as it only targets one enemy at a time. While specifically trying to earn this the moves for Gunslinger and Wild Dancer are much better, as they can hit multiple enemies at once within a single activation and bar of heat. There is no way to track this in-game since it isn’t required for any Diligence Record or Completion List item, so you will just need to keep it in mind to keep while playing until you earn the trophy. which you learn in the first training sessions from Komaki, Ginryu, and William Bradley. Using any of these moves, you need to defeat a total of 100 enemies in the story. The move for Brawler that you can learn from Komaki is the earliest you can acquire but isn’t great for this as it only targets one enemy at a time. While specifically trying to earn this the moves for Gunslinger and Wild Dancer are much better, as they can hit multiple enemies at once within a single activation and bar of heat. There is no way to track this in-game since it isn’t required for any Diligence Record or Completion List item, so you will just need to keep it in mind to keep while playing until you earn the trophy. |
||
 |
The Abyss Stares Back Entered a Battle Dungeon 3 times. |
|
| This trophy is actually for completing any Battle Dungeon 3 times, not just entering them. There are a total of 40 individual ones you need to complete not even considering grinding, so you will earn this while working on other trophies. | ||
 |
Bandit Rustler Cleared the Bandits’ Cave. |
|
| This trophy is awarded for clearing all 10 missions in the Bandits’ Cave battle dungeon. This is the intro set of battle dungeon missions, with the lowest-level enemies and nothing really out of the ordinary compared to normal open-world combat. | ||
 |
Bandit Wrangler Cleared the Bandits’ Mine. |
|
| This trophy is awarded for clearing all 10 missions in the Bandits’ Mine battle dungeon. This is the middle level of battle dungeon missions, and most enemies start having armor, meaning you need to engage in melee most of the time and not just shoot enemies. | ||
 |
Sanada Takedown Cleared the Sanada Stronghold. |
|
| This trophy is awarded for cleaning all 20 missions in the Sanada Stronghold battle dungeon. This includes all the highest levels of battle dungeon missions, with some of the highest-level enemies in the game. You will spend most of your time grinding materials for smithing. | ||
 |
Drop and Give Me 100 Gathered 100 troopers for the Third Division. |
|
| This trophy requires you to acquire a total of 100 unique troopers for the Third Division, not just 100 total. You can acquire troopers after Battle Dungeon missions, while fighting enemies in the street if they have the shiny red, gold, or silver hoods on their heads, or by using the Enlist option in the Battle Dungeon menu. When completing Battle Dungeons or fighting enemies in the street you should always agree to have the troopers join, because you don’t have a way of knowing right then if they’re actually new or not, and even if they’re repeat troopers they can be used multiple times or fused into others.
To check how many total you have gathered you can check the Trooper Registry option in the Battle Dungeon menu. There are a total of 400 in the game now, so you only need 1/4 of all potential troopers for this trophy. |
||
 |
Tengu Tamer Helped the Tachibanagumi bring the Tengu to justice. |
|
| This trophy is awarded for completing the second Wanted Men mission. These are a set of side missions you can start after Chapter 2 by running into the prompt for them on the second floor of Mukurogai, which involve hunting down groups of enemies based on a text description of their location. You are required to complete all of the missions for Taskmaster , so you will complete these while working on other requirements.
|
||
 |
An Honest Day’s Work Grew 10 different kinds of plants in the garden. |
|
| This trophy is awarded for growing any 10 different plants in your garden in the Another Life portion of the game. After being introduced to this in Chapter 4 you can then plant different plants to collect for your own usage or for completing orders. You start with some available, but you need to purchase the ability to plant other plats with Virtue. There are a total of 22 and you need to plant them all for Diligence Record and Completion Requirements, so you will earn this while working on other requirements. | ||
 |
Chef’s Special Cooked 7 different dishes. |
|
| This trophy is awarded for cooking any 7 different dishes in your kitchen in the Another Life portion of the game. You can cook different dishes with plants, fish, and some other unique items that can be purchased from different stores. There are a limited number of items that can be cooked to start, and to have more available you need to purchase the 3 Kitchen Upgrade entries using Virtue from a shrine. Once you do there are a total of 22 that you can cook, all of which need to be cooked at least once for Completion List requirements, so you will earn this while working on those.
|
||
 |
Side Hustler Fulfilled 10 trade orders at your second home. |
|
| This trophy is awarded for fulfilling any 10 trade orders in the Another Life portion of the game. Trade orders are basically just a cycling list of requests you can complete, asking for various items in exchange for money or other items. You trade things like plants, fish, cooked dishes, or even random things thing you can find or buy from stores. You are required to fulfill a total of 100 orders for Diligence Records requirements, as well as make a total of 100 Ryo cash for the Completion List, so you will earn this while working on those other requirements. | ||
 |
A Well-Rounded Cast Caught a total of 10 fish. |
|
| This trophy is awarded for catching a total of 10 fish. Fishing can be done by interacting with the river southeast of Teradaya, the man by the boat directly south of Teradaya, or the River on the east side of Mukurogai. You are required to catch a total of 100 fish for diligence Records requirements, as catch one of each of the 29 fish for the Completion List, so you will earn this while working on those other requirements. | ||
 |
Platonic Bliss Watched a Slice of Life event at your second home. |
|
| Slice of Life events are unique scenes that occur with Haruka in the Another Life portion of the game. You can see 3 different ones by interacting with the bath, tea set, and futon inside the house at varying levels of trust with Haruka. You are required to see all three for Diligence Record requirements, so you will earn this while working on those other requirements. | ||
 |
World’s Greatest Uncle Paid off Haruka’s debt in full. |
|
| Paying of Haruka’s debt is basically the storyline behind the Another Life section of the game. Ryoma agrees to pay off the 100 Ryo debt her family had on the house, in exchange for allowing him to live there and do various things at the house. You can’t actually do this right away, you need to be prompted to make each of the 20 Ryo payments first, then can meet the landlord at the Shrine in Fushimi.
To receive the prompt to make the debt payments, you need to reach certain cumulative totals of cash from trade orders, which are at 5, 10, 20, 30, and 40 ryo total trade. Once you make the final payment there will be an extra scene with Haruka and the Priest, then you’ll earn the trophy. You should have more than enough money to pay off the debt when required while working on all other requirements, but if you haven’t done so yet you can check out Cocksure |
||
 |
Now It Feels Like Home Changed the interior design of your second home. |
|
| To change the interior of your house, you first need to purchase one (or all) of the Interior options by exchanging Virtue at a Shrine. These options are at the bottom of the Second Home list, titled Newly Furnished Interior, Floral Dream Interior, and Golden Soiree Interior.
After purchasing one your home will automatically change to the new design, but to earn this trophy you need to manually change the look yourself. In your house go to the smaller box to the left of the cabinet where you complete orders. Here you can change the interior or what Haruka is wearing. Manually change the interior to any other option than the current one to earn the trophy. |
||
 |
The Man Who Does It All Played every minigame. |
|
| This trophy is awarded for playing every minigame, meaning both gambling and non-gambling games (so you will earn Easy Come, Easy Go before or at the same time). You are required to play and meet certain requirements for each game for Completion List requirements, so you will also earn this while working on all the requirements for Taskmaster . The original game seems to have required Woodcutting and Fishing to award this trophy even though they aren’t specifically listed as minigames, so if the trophy isn’t awarded after the specifically stated minigames are played, then make sure you’ve done Woodcutting and Fishing as well (need confirmation on whether they are required). All available minigames are listed below:
Non-Gambling
Gambling
|
||
 |
Easy Come, Easy Go Tried your hand at each type of gambling. |
|
| This trophy is awarded for playing each of the gambling minigames once. You will earn this while working on The Man Who Does It All , so you can check the above trophy for the list of games. Note that even though basically by definition Mahjong is a gambling game, it isn’t considered so for this trophy, only Chicken Races and the Gambling Den games. |
||
 |
Noodle-Slinger Supreme Made at least 10 ryo in sales at the Udon Shop. |
|
| This trophy is awarded for making a cumulative total of 10 Ryo while playing the Udon Shop minigame, located at Umai Udon in Fushimi. For the Completion List you are required to get Divine rank, which requires you to earn about 5 Ryo in one session, so if you manage to meet that early you can just keep playing the minigame until you earn this trophy, which unfortunately isn’t tracked anywhere in game. The easiest way to do the minigame is basically just to cheat. You can pause when all of the customer requests are on screen, which pauses the minigame and slightly blurs the screen, but the requests are still easily visible. Note down the current requests in some way, then unpause and quickly repeat the requests when needed. | ||
 |
Sing Your Heart Out Performed every song at Utamaruya. |
|
| This trophy is awarded for performing all 7 songs available at Utamaruya, the Karaoke location in this game, located at the very north end of Fushimi. You are required to get a minimum grade of “Preferred Performer” on all songs for Completion List requirements, so you will earn this while working on Taskmaster .
|
||
 |
Lord of the Dance Performed every dance at Nichibuza. |
|
| The trophy is awarded for performing all 3 songs available at Nichibuza, the Buyo Dance (fan dancing) location. Each song has 4 difficulties, but you only need to complete each song once regardless of difficulty for this trophy. You are required to get a minimum grade of “First Class” on all songs on all 4 difficulties for Completion List requirements, so you will earn this while working on Taskmaster .
|
||
 |
Cocksure Placed bets on 5 chicken races. |
|
| This trophy is awarded for placing bets on any 5 chicken races, located at the Chicken Racing den in Rakugai. For this trophy is doesn’t matter whether you win or lose, just that you place bets during 5 different races. Chicken Race betting is still the best way overall to make money in this version of the game until you are at the point of grinding the final Dungeon.
As of patch 1.03, there is a bug in the game that allows you to always win without actually spending any tags. Basically, you can place all of your bets, choose to back out of the race so that it refunds all your bet tags, then quickly choose “Start Race” before you’re kicked out of the menu, which then starts the race as if your bets had still been placed, even though all your tags were refunded. Once you get set up if you are quick enough you can bet on every single possible outcome, resulting in wins like the below screenshot.
This takes a bit to work up to because you need 50,000~ tags to bet on every possible betting spot, but working up you can just bet on all options in the Single, Quinella, and Double Exacta tabs as you earn more tags. The flow basically works as follows:
This method is effectively foolproof as long as you back out of the race, because if you don’t select Start Race quick enough you just have all your tags back. If you’re not sure that you’re quick enough make sure to leave yourself enough time to go back to the menu and back out of the race. Once you have enough tags you can then go to the Gambling Den nearby and trade your tags for items: Gold Plates to sell for cash and the Golden Gun to use as your weapon for most of the game. |
||
 |
Like a Dragon in Heaven Cleared each of the courtesan minigames. |
|
| This trophy is awarded for clearing each of the 3 courtesan minigames, located at Yamabuki in Gion, which you can first access in Chapter 4. These are a series of minigames based on your interactions with the courtesan Anna and are some of the most strange in the game. You are required to complete all 3 in one go the first time before you have access to all other difficulties, which are required to be completed for Taskmaster .
|
||
 combo on Ishikawa to stunlock him and build heat. Once you gain one bar of heat knock down another enemy with a charged
  in a combo, which allows you to do the heat action where you swing them around, hitting nearby enemies. Return to focusing on Ishikawa and repeat until the other enemies are all dealt with.
 combo to shoot a number of them. The most helpful heat action is when you are standing between two enemies and activate it to hit two at once. This does a large chunk to both armor and health.
 , then the
  then hit
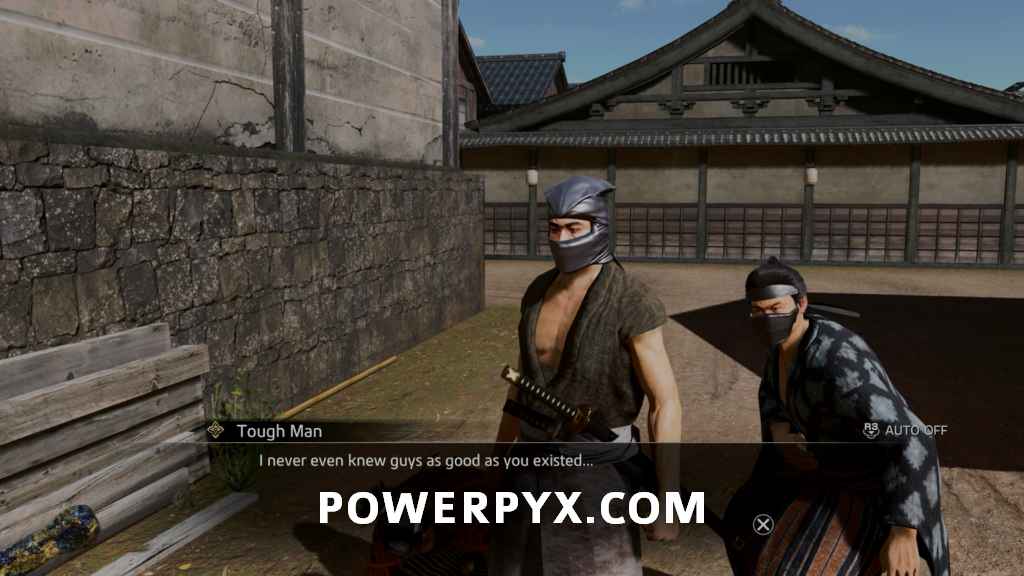
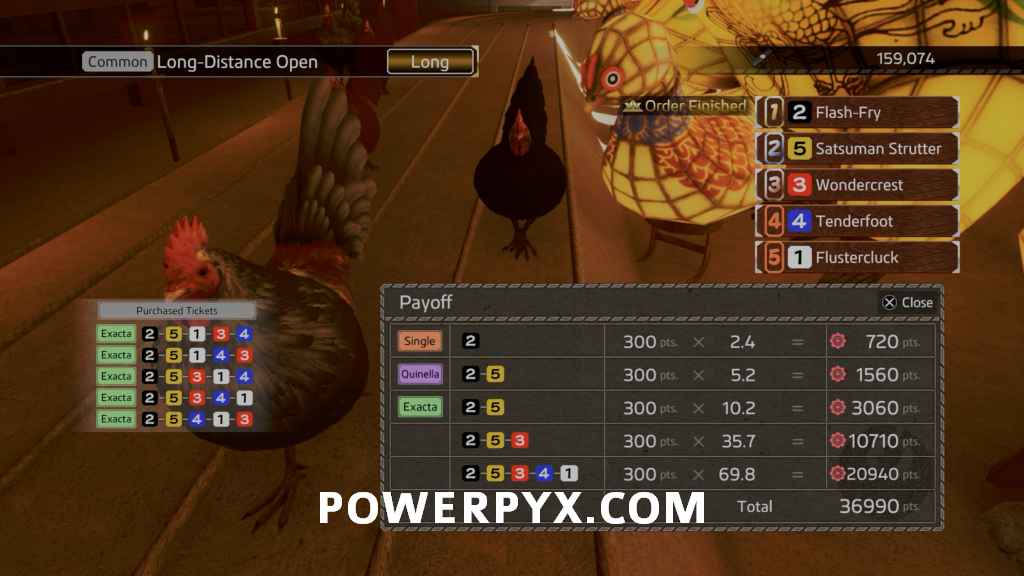
 to increase to the max bet of 300, then confirm the bet.
 , and when you get to do the Triple and Quituple Exacta you need to scroll down the list for all possible bets. If you’re quick you can choose every possible spot within the 120 seconds time limit, but if you’re not fast enough to do that you should just focus on the Quintuple Exacta list as it has the highest payout overall.
 twice and select Start Race. This should start the race before you are booted out of the Chicken Race menu, with all your tags refunded but the game still acting like you had placed your bets, resulting in your still winning after the end of the race.
 Special Thanks / Credits
Thanks to the following people for helping with info:
Igni = Various Info
Nikki_boagreis says
Thankfully nothing is missable and it has premium adventure for cleanup. Look’s like a straight forward trophy list.
Max says
Wanted to know which minigames you thought were the problem ones you mentioned in the difficulty?
Gage says
Buyo Dancing people will have issues with, though I think it’s less bad than the UI makes it look when you actually play it. The worst one is the third Courtesan minigame on third difficulty.
Leon says
A 5/10 doesn’t seem too bad so I’m happy that this will most likely be another RGG platinum in the bag. Unlike 0 which I gave up on after getting almost every other trophy.
andrewtabs says
“as smithing costs have inexplicably been increased by about 100x over the original costs”
this is probably because they sell materials for real money as DLC, they needed an in-game reason for people to buy it. one of the worst trends in gaming history
Gage says
Every Yakuza game does that, the amount you get from the DLC is never really enough to matter, it’s just some extra to start you out. The cost increase for smithing is barely offset by what you get with the DLC.
Bigpadre says
I just got to the chicken race. Thanks for your explanation. Trying to get a hang of it.
How much should we farm?
Are there any other ways to make money?
Gage says
For just normally playing through the game you can probably just do up to like 200K Tags because IIRC that’s enough to get the Golden Gun, Jelly Sword, then trade plates for about 500 Ryo. When you’re grinding Smithing Materials you get 20 Ryo per completion of the final dungeon, but with all the changes and how much extra Grinding there is Chicken Races is still probably going to be faster when your only aim is to make money.
D/O says
Is there still a new game plus like the other games? Alway like a full playthrough a legend as Yakuza games are always great to revisit
Gage says
There is, works like the newer games too and not the original, so you just start it from your Premium Adventure save instead of off a clear save.
Wccftech Kai says
Any idea what triggers the two new Substories? I thought it might be Memoirs since I only have around 80% or so but really don’t want to have to run all the way around town at all three times of day to find them all.
I’m missing three substories in Fushimi (the two new ones and the one where you run into people that switched their bags. That one never triggered for me behind Teradaya), a little bit of renown grinding for two of the districts, and then just the crafting nonsense in the completion list. At around 130 hours right now.
Gage says
You seem to need all of the Memoirs to trigger another of the new ones, they’re all on the ground aside from one you randomly get given by a dog at the house. I’ll have a map up for them, but might be another couple days. The bag switch substory seems to not trigger until after the other new ones unlike how it worked in the original.
jerry says
Hi Pyx thx for your guide,can I ask aboout how to farm all weapon and how to obtain seals? The cost is so high and have no idea to obtain seal unlike the original one you could just combine two different weapons to get one.
Gage says
We’re still working that out. Seemingly you either just need to get them from drops, or it was an oversight by the devs with the changes they made to smithing and needs to be fixed in an update. For farming money best method is just farming final dungeon over and over, because you can do it in about 40 seconds once you get set up.
jerry says
Thanks so much for the reply, could you share your set up on the last dungeon? Because it tooks me like 4- 5 mins to beat the last dungeon.
Dobo says
Hi, great guide, thanks
Do you know the requirements for unlocking the various scenes with Haruka in the house? I’ve unlocked three but I’m missing the “I’m listening” one. Already paid off her debt in full, now I’m worried I’ve missed it.
Thanks!
Gage says
You should just have to interact with each of the spots in the house if you’ve raised her trust level. I’m Listening is from sleeping on the futon in the corner.
Dobo says
Hey thanks for the reply. I actually sorted it. I think it might be dependent on either the time of day it is currently or perhaps you can’t view more than one of these scenes without progressing the main story, because as soon as I did the next main quest and tried again it worked.
Theo says
I can confirm that there is no auto pop for the trophies when you transfer the save PS4 to PS5
Harry says
Do you need to use ps4 version game’s in-game menu to upload the ps4 save to some sort of cloud service to be able to download it on ps5 version game? Or can you just simply load the ps4 version save directly from ps5 version game menu? (Without any in-game cloud upload-download process I mean)
Gage says
There’s an option on the main menu of the PS5 version to load a PS4 save, don’t need to do anything specific on the PS4 version.
Michael H says
How vital would you all say it is to grind the chicken races so early on in the game for money? Seems so tedious to start grinding during my first ever run of the game and chicken races are very in depth also, seems a better option to just play story for now and then just grind in premium adventure.
Gage says
I’m fairly certain I responded to you on PSNP, but it’s not really necessary if you don’t want to. The main purpose is just to basically not worry about money over the course of the story and so you can get the Golden Gun immediately. If you don’t want to do it immediately you will probably want to do it at some point just for the grinding related to relationships and substories, before the point you’re just grinding the final dungeon for smithing.
Saleh says
I Played both PS4 and PS5 versions, and I can confirm there is Save Transfer from PS4 to PS5, story-related trophies ( including beating the game) don’t auto pop and have to be earned again. Other trophies like earning 300.000 Virtue unlock as soon as you earn 1 Virtue on PS5
PowerPyx says
Thanks, added!
In theory can transfer from PS4 to PS5 before every story trophy to pop those but would be a bit annoying to do.
Saleh says
Yeah, same thing with Lost Judgment. I guess next Like A dragon games will be the same
Misanthrope says
Does the “craft all weapons” include the golden gun from casino?
Gage says
No, the handful of unique weapons that can’t be crafted don’t count for completion, as the requirement is actually smithing the weapon yourself.
Porlogs says
The “point of no return” in Finale is when you have to speak to Okita after fighting every Shinsemgumi, not when speaking to Okami in Teradaya that was mentioned in guide.
I hope my comment will help improving the guide
Gage says
The prior one doesn’t matter for the specific case of wanting to buy things and switch difficulty, which is why it’s brought up. The prior point only matters if you want to do all substories before the end of the story, which there isn’t a need for in this version of the game.
deathbunny says
I read this game has NG+ similar to the more modern RGG games.
So worst case scenario if they patch the Legend difficulty trick/exploit, will you just need to rush the story on NG+?
Gage says
Yes, you can start NG+ off any Premium Adventure save, so would just be like the other new ones where you complete everything and then rush an NG+ playthrough. I highly doubt they’ll do anything to change that though since they didn’t in 6 and they have the extra DLC difficulty which you can pick from the start.
Adrian Gomez says
I have a question not related to this game. Are you gonna do Octopath Traveler 2?
PowerPyx says
Currently nothing planned for it. Too many games overlapping right now. Will have to skip it unfortunately.
Ischinger says
I just want to thank you for the time and effort you put into making such a detailed guide to follow. I hope you will make one for Wo Long: Fallen Dynasty next week.
PowerPyx says
Wo Long guide / wiki will be available at launch
improlight says
Is there any point of using wheel of fortune? Does it have some exclusive materials for crafring?
Gage says
AFAIK in the original version of the game you needed to use it to get the sword from the second wheel, but in this version it’s added to one of the stores, so you don’t really need to use it. You can blow through tickets pretty quick on the second wheel though once you get the option to use 10 at a time, so it’s alright to spend them when you have a bunch.
zzarGrazz says
What’s the best dungeon for materials and what is the fastest way to beat the final dungeon? Which troops load out would be the fastest? And which equipment is the best?
ZexionPonty92 says
Hi, I wanted to share a little trick for the Chicken Betting minigame to make profit 100% of the times.
Basically you can bet in all the voices in the dividend list, if you are fast enough, and then select leave race.
Then you will have few seconds (the time where the game refunds your bets) to go up in the menu and press Start Race: the race will start, all your bets will be placed, but the amount of token is NOT subtracted to your inventory. With this method you cannot lose tokens.
Gage says
Thank you for posting about this! I was able to confirm how it works and will update the guide. It looks like in one of the updates they fixed it so you can bet on every possible option, whereas before it limited you.
ssguiss says
Hi! Wanted to say thanks for the guide, as I’m currently going for the plat (or trying to) and it’s been helping me a lot. On this regard, have you got any idea when the completion and smithing guides are going to be available?
Also wanted to share my contribute with a little trick regarding the Legend difficulty cheese you mentioned, in case you find it relevant enough to be updated on the guide: you still have to change into legend before the point of no return, but now you’re going to take advantage of the automatic feature of the game of switching to easy everytime you die twice to the same encounter; when you say ‘yes’ when the game asks you if you want it to change to easy, it only changes temporarily – and this ‘temporary’ is until that very fight is over. All you’ll have to do is each time a new encounter starts, you die twice, accept changing the game to easy, kill the boss and the next time a cutscene triggers it’ll automatically switch to the difficulty you originally started the encounter – Legend. This way you can go through the entire dungeon on easy, keep your entire inventory of healing items to fight only Takechi himself on Legend (which, if you ask me, is not the hardest encounter).
Kindly waiting for an answer!
Gage says
Completion List guide is up now, Smithing is going to be a bit still. I will be adding in that info about Legend difficulty switching. I ran into that while playing but didn’t want to touch it because it was before we had confirmed whether switching to Legend at the end even counted.
Lavalamp says
Appreciate the guide. Major props to whoever is powering through creating the Equipment guide, that thing seems like a hassle and a half. It’s the last bit I’m at for the trophy and it’ll take so long on it’s own. Loading up a bunch of podcasts and hoping I can power through it by week’s end, if RNG is kind.
Phillip says
I’m at the last story mission on legend. When I get killed by a boss a couple of times, the screen asks if I should switch it to easy mode temporarily. Would it void the legend trophy if I beat that boss on easy and the rest on legend?
Kakate says
Any update on the blacksmith guide? It’s one of the last things I need to do but I don’t want to waste materials.
Gage says
Guide is up now!
Clogeta says
Ultimate Trophy wont pop for me after moving to ps5. I got all of them but that one to even after I beat every single on of the challenges again. Also the courtesan minigame trophy will trigger if you do the full course.
Vicky says
Does anyone else have a problem with getting the Showoff trophy? Been counting enemies i have defeated using R2 moves (specifically mostly the gun one) and I’m far beyond 200 now, yet no trophy.
Yashide says
Currently farming dragon fangs, and I still don’t understand how seals work (I don’t understand why they changed this from the original game …) I’m really waiting for this part of the guide now ?
Gage says
Guide is up now!
Leon says
There was a 1.05 patch update earlier that fixed the chicken racing bug so if you select “Exit Chicken Race”, it immediately leaves the menu back to the receptionist.
Mo says
Legend difficulty trophy didn’t pop for me switched difficulty in chapter 14 right before heading back to tosa this was on version 1.05 as well as chicken races can’t back out right before to keep tags I’m not sure if patched can anyone confirm?
Nelo says
A lot of the trophies were bugged for me. Wouldn’t recommend goin for the platinum.