
The staple fishing minigame returns in Like a Dragon: Ishin! If you played Yakuza 0 then this will be very familiar, as it is effectively the same as in that game. You’re required to catch one of every type of fish for Taskmaster  , along with an extra bunch of Tuna, one of them being “big”, and a total of 100 fish for Diligence Record completion. The fish can then be used in cooking and for completing orders in Another Life.
Getting Started with Fishing
Before doing anything fishing, you should purchase all of the fishing rod upgrades from the Virtue Exchange, which are under the fishing heading. These just give you the better rods, and after purchasing the first 4 your can then purchase Peerless Pole Expertise, which is the best rod for both Sea and River fishing and is seemingly required to catch certain fish, so you might as well just use it the entire time and make your life easier. It costs a total of 7800 Virtue for all of the Rod upgrades, not very much in the long run. The descriptions of fish locations will assume that you’re using the Peerless Pole at all times and won’t specifically call out minimum rod requirements for each fish.
Bait is also useful. In general what it does is causes the fish to appear in the water, instead of being hidden. For example, Tuna won’t have a silhouette appear unless you use bait, but can still be caught without it in a specific spot. You can purchase Quality Bait (the second level, more than good enough) at Ichikura General Goods in Fushimi.
Fish silhouettes can appear in 4 different types, with some variation in size depending on how big the fish actually is. They are referred to as follows in the guide:
Normal:
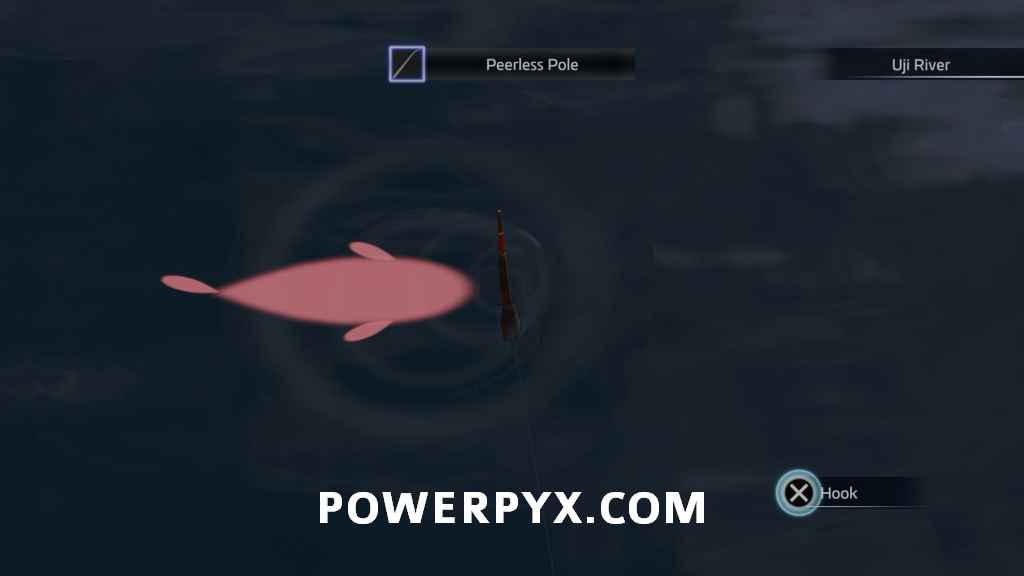
Triangle:

Long:

Blob:

The catching mechanic itself is very simplistic. When a silhouette goes red like in the above images it means a fish it looking at the hook, then you have to wait for it to bite. Watch the bobber in the water, and when the red part goes below the water line the controller will rumble and you press  to catch the fish. Sometimes the visual line is hard to see, so it’s easier to just judge from the controller rumble.
Fish List:
Below is the list of all fish in the order they are in the completion list with the location they can be found for easy comparison. For more specific info you can check below the list for info by fishing spot.
- Crucian Carp – Uji River, Kamo River
- Carp – Uji River
- Nishikigoi – Uji River
- Ghost Koi – Uji River
- Electric Catfish – Uji River
- Salmon – Uji River, Kamo River
- Stringfish – Kamo River
- Rainbow Trout – Uji River
- Softshell Turtle – Uji River
- Freshwater Eel – Kamo River
- Sweetfish – Kamo River
- Crawfish – Uji River, Kamo River
- Marlin – East Coast
- Bluefin Tuna – Bluefin Tuna
- Squid – Fishing Banks
- Righteye Flounder – East Coast
- Sea Bream – Fishing Banks
- Scorpionfish – Fishing Banks
- Thread-Sail Filefish – Fishing Banks, East Coast
- Tiger Prawn – Fishing Banks
- Conger Eel – East Coast
- Goby – Fishing Banks
- Great White Shark – East Coast
- Oarfish – East Coast
- Spider Crab – East Coast
- Common Octopus – Fishing Banks
- Porcupinefish – Fishing Banks
- Japanese Puffer – Fishing Banks
- Whitebait – Fishing Banks, East Coast
Uji River (Fushimi):
Crucian Carp: small or medium Triangle, bottom half of the screen
Carp: medium Normal, bottom half of the screen
Nishikigoi: medium Normal, close left side of screen
Ghost Koi: medium Normal, doesn’t appear without bait but you can potentially catch it while trying to catch other fish around the middle of the screen.
Electric Catfish: medium Normal, around the middle of the screen
Salmon: medium Normal, one of the fish that can be spotted swimming quickly across the middle area of the screen, easier to spot with Bait active.
Rainbow Trout: medium Normal, another that can be spotted swimming across the middle of the screen.
Softshell Turtle: very small Blob, very close to the bottom of the screen.
Crawfish: very small Blob, very close to the bottom of the screen
Fishing Banks (Sea Fishing):
Both Sea Fishing Spots are accessed by speaking with the fisherman on the dock south of Teradaya.
Squid: large Blob, visible stationary around the rock in the center of the screen
Sea Bream: medium Triangle, swimming back and forth along the top half of the screen
Scorpionfish: large Blob, one of the moving ones in the lower half of the screen
Thread-Sail Filefish: medium Triangle, bottom half of the screen
Tiger Prawn: large Blob, lower half of the screen
Goby: Long, close to the rocks at the bottom of the screen
Common Octopus: large Blob, easily caught by just casting right near the rock in the middle of the screen, even with no silhouette visible
Porcupine Fish: large Blob, top half of the screen. Can be hard to find, but can be caught eventually if you try just tossing your hook near the top edge of the area
Japanese Puffer: large Blob, bottom half of the screen close to the rocks, easier to find with bait
Whitebait: medium Normal, swimming around the bottom half of the screen. The actual visual in the water is the same size as things like the Carp, but when caught is actually tiny
East Coast (Sea Fishing):
Marlin: huge Normal, swims back and forth right near the very edge of the area (red line at the top)
Bluefin Tuna: huge Normal, swimming back and forth along the top half of the screen, much easier with bait. Note that you need to catch a total of 10 of these, along with a “big” one for Diligence Record completion. A “big” tuna is one that is above an arbitrary size when it is gold rank. While trying to catch one, catch a tuna and if it isn’t gold rank then leave and come back to the fishing area. With the Tuna when you catch one the rank it is will be the same rank of all the ones you catch in that fishing session, so you need to catch a gold one, then keep catching them in that session until you get a “big” one.
Righteye Flounder: medium Triangle, around the center of the screen
Thread-Sail Filefish: medium Triangle, swimming quickly around the bottom half of the screen
Conger Eel: Long, stationery on the bottom half of the screen
Great White Shark: huge Normal, swimming back and forth the entire center of the screen
Oarfish: huge Long, stationary near the top of the area. Recommend using bait for this one as it can’t be seen without and just sits in one spot
Spider Crab: large Blob, stationary on the bottom half of the screen. Can be annoying to catch around the other fish swimming around
Whitebait: medium Normal, swimming around the bottom half of the screen. The actual visual in the water is the same size as things like the Carp, but when caught is actually tiny
Kamo River (Mukurogai):
Crucian Carp: small or medium Triangle, bottom half of the screen
Electric Catfish: medium Normal, around the middle of the screen
Stringfish: large Normal, swimming back and forth along the top edge of the area. Can be very hard to spot without bait
Salmon: medium Normal, swimming back and forth in the top half of the screen
Rainbow Trout: medium Normal, swimming back and forth along the bottom of the screen
Freshwater Eel: Long, stationery in the middle of the screen
Sweetfish: medium Normal, around the middle of the screen
Crawfish: very small Blob, bottom half of the screen
That’s all the fish and how to catch them in Like A Dragon: Ishin!
Related Like a Dragon: Ishin Guides:
- Substories Guide
- Diligence Records
- Memoirs Locations
- Wanted Men Missions
- Amon Location & Boss Guide
- Fishing Guide
- Completion List Guide
- Smithing Guide
Leave a Reply