
Monstropolis contains 3 Collectible Locations in Kingdom Hearts 3 (3 Lucky Emblems). This walkthrough will guide you to all the collectibles in Monstropolis World. Nothing is missable, everything can be collected after the story.
- Treasures: 22
- Lucky Emblems: 11
- Classic Kingdom Games: 2
They are numbered by their in-game gummi phone order so if you’re missing just one specific collectible you can look up the number in your gummi phone and find it quickly in the guide.
Text by bosssnake & Video by PowerPyx
Lobby & Offices
- Treasure #1 – Map, Monsters, Inc.: Follow the hallway from the starting area until the dead end to find this chest.
- Treasure #2 – Hi-Potion: Immediately after leaving the save room, turn left and run to the dead end. Behind some tanks is this chest.
Laugh Floor
- Treasure #4 – Refocuser: Follow the hall from the save point into the warehouse with a bunch of desks and doors. Run to the back of the warehouse and head left to find this chest.
- Lucky Emblem #1: From the previous chest, count six desks in the direction of the entrance. On a clipboard is this emblem.

- Lucky Emblem #2: Near the entrance to the warehouse is an inflated clown. Smack it a few times to find this emblem on the floor beneath it.

- Treasure #3 – Technician’s Ring+: In the entrance to the warehouse is a reception desk. Jump into the little window to find the chest behind the desk.

Upper Level
- Lucky Emblem #3: After riding the three rails, there is a door to your left that leads to the Lower Level. Go right down a short hallway to a dead end. This Lucky Emblem is on the wall. This can also be reached by using the red door at the beginning of the Lower Level.

- Treasure #8 – Thunder Cufflink (This one cannot be found until after completing this world’s story): Right next to the previous Lucky Emblem is an elevator door. Just inside there is this chest.
- Lucky Emblem #4: This one requires only a little backtracking. After riding the three rails in the Upper Level, you will find yourself in the Lower Level. Turn around to see a wall of doors. Go to the far left to find a wood door with decals on it. Enter it. Now, behind you is a short path leading to a banana on a crown. On the far wall behind that is this Lucky Emblem, drawn in the wall with doors.

- Treasure #5 – Fencer’s Earring: This chest is in the same area as the previous Lucky Emblem. From the emblem, turn around and run straight to the wall in the next area to find this chest.


Lower Level
- Treasure #6 – Star Shield+: From the beginning of the Lower Level, head forward and climb the blue storage units on the right to find this chest.
Ground Floor
- Treasure #9 – Map, The Factory: This chest is straight ahead of you just before the staircase.
- Treasure #11 – Damascus: From the previous treasure, climb the stairs to the first assembly line. Follow the line until it curves to the right. Continue going straight to find this chest behind a big, gray crate.
- Lucky Emblem #5: Head down the hall and pass through the assembly room, avoiding lasers along the way. Once you’re in the next hallway, go down two flights of stairs to find this Lucky Emblem under a pair of windows.

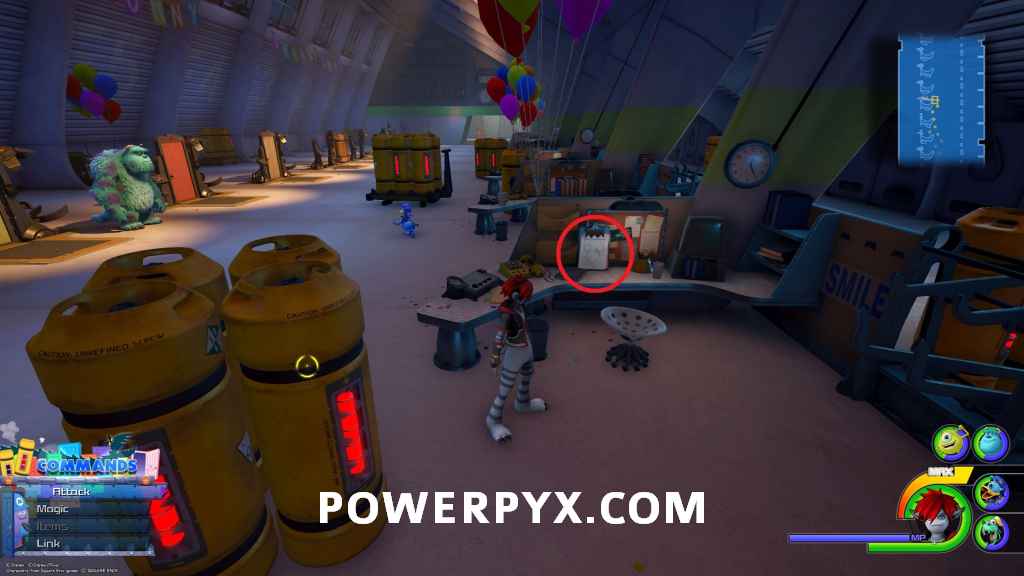
- Lucky Emblem #6: Proceed to the next room with the save point. As you walk in, look to the left to see paint drops on the floor. A pink pattern of Micky is the next Lucky Emblem.

- Treasure #12 – Umbrella Rosette: Right by this save point is a short stack of boxes. The chest is on top of them.


Second Floor
- Treasure #13 – Hi-Potion: From the Ground Floor save point, jump on the elevator and follow the first assembly line until you find an arrow on the wall to go right. Go left to find this chest behind a short crate.
- Lucky Emblem #7: From the previous treasure, continue up the second assembly line until you come across a staircase. There’s a path to the left but it will be locked when you first go there. Beat the Monstropolis world and the path to the left will open (replay this world). Just inside that opening to the right is this Lucky Emblem, perched alongside the foggy opening.

- Treasure #10 – Classic Kingdom Game – How to Play Golf: From the Ground Floor save point, jump on the elevator and follow the winding path until you come across a staircase. There’s a path to the left but it will be locked when you first go there. Beat the Monstropolis world and the path to the left will open (replay this world). Follow this new path and drop down into this area to find this chest.
- Treasure #14 – Valor Ring: Head through the second assembly line. Keep going until you reach a storage room just before entering the next zone; there is an event here. A stack of boxes stands right next to the entrance to the next zone. Climb them and find this chest between two boxes.

Power Plant
- Treasure #15 – Firefighter Rosette: In the same room as the save point, sitting in front of a wall of blue boxes right next to the Moogle Shop.
- Lucky Emblem #8: In the Power Plant save room near the desk. It’s on the inner side of the file cabinet.


Accessway
- Treasure #16 – Fira Bangle: From the Power Plant save point, head down the corridor and go outside. Follow the staircase down into an open area where you fight a bunch of Unversed and Heartless. Most of the field is covered in fire. Use Water spells to douse the fires. One specific fire in the southwest of the map has this chest behind it.
- Lucky Emblem #9: After the previous fight, head down the next bricked corridor until you find a small office with a path that leads outside. Step just outside and turn around to see this Lucky Emblem above the door frame.

- Treasure #22 – Hi-Refocuser: In the little office by the previous Lucky Emblem is a chest by the doorway.
- Treasure #17 – Damascus: The path past the office is completely linear, taking you across a scaffold path. After running up a wall, grind up a pipe to the next level of scaffolding. Immediately turn right and, before going up the stairs to the right, go straight to the chest at the end of the path.

Tank Yard
- Treasure #19 – Classic Kingdom Game – Mickey’s Circus: After jumping off the top of the scaffolding, you land at the save point for the Tank Yard. In the middle of the room inside a crate is this chest. If you attacked when prompted, it should be accessible. If not, take the nearby crane back up and try again.

- Treasure #18 – Ether: This is found in the Tank Yard save point room. Find a stack of blue crates next to a hanging blue tarp. Climb the crates to find the chest at the top of the tarp.
- Lucky Emblem #10: This emblem is in the Tank Yard save room as well. Climb a stack of blue boxes on the northeast side of the room and then jump onto a platform. Look southward to see the end of three pipes come together to make this Lucky Emblem.


Vault Passage
- Treasure #20 – Mega-Ether: There is a series of stairs just before the long, green passageway. Underneath one of the stairs, next to a big gas tank, is this chest.
- Treasure #21 – Megalixer (This one cannot be accessed until after completing this world’s story): This is near the same series of stairs as Treasure #20 in a little nook that was once filled with fire. In that nook is this chest.
- Lucky Emblem #11 (This cannot be found until after completing this world’s story): Backtrack from the Door Vault save room into the Vault Passage. Climb the stairs in front of you and look over the side to see an oil stain shaped as this Lucky Emblem.


Door Vault
- Treasure #7 – Hi-Potion: In the save point room for the Door Vault, search behind a short, gray crate for this chest.
That’s 100% of the collectibles you can find in Monstropolis world of Kingdom Hearts III.
For more Collectible Guides, check out the complete Kingdom Hearts 3 Collectibles Guide.
« PrevKingdom Hearts 3 Kingdom of Corona Collectible Locations (Treasures & Lucky Emblems)Next »Kingdom Hearts 3 Arendelle Collectible Locations (Treasures & Lucky Emblems)
Jacob says
hey guys you have trasures #13 and #7 mixed up. Also, on your description for chest #7 (as you guys have it down) you have the direction for the arrow/crate backwards (ie. the arrow is pointing to the right and the chest is on the left). nbd just thought you should know. great guide
PowerPyx says
Looking into it now!
PowerPyx says
Update: You were correct on all counts. Thanks so much for leaving a comment about this and helping to make the guide better
#7 and #13 were both a Hi-Potion which is why they were mixed up. It’s fixed now (including the directions on the first Hi-Potion treasure).
Jordan says
Also as a correction on Treasure #10 you do not need to complete the level to find it. The path to the left is open with some electrified machines you must avoid and a machine at the end to smash and disable them. I got this while playing through the story.
James says
This is true I just did it myself, the same is true for Lucky Emblem #7.
David C Pruitt says
Um for lucky emblem 7 I can’t seem to find the area even after I beat monster story
Snow says
I had trouble with this one too, but I’ve found it now. Don’t go up the second assembly line, this was the mistake I think. Go back, all the way to the top of the first, under the bridge thing, through a gate and the stairs are there – follow the hallway and you will find it. During the story there were electrified claws there you had to run around.
Azley says
Small correction: Treasure #10 – Classic Kingdom Game – How to Play Golf can be obtained during the story. I just progress through the world, not having completed it and this path was open for me, I could evade those machines, drop down and get the chest.
Welp – maybe I have a glitch though and that’s why it is ^^”
Kurt Luchner says
Nope, you’re correct, emblem 7 and chest 10 are collectable during the story mission
Nathaniel says
This may have been fixed in an update, but treasure #8 can be obtained after the world’s story is finished.
PowerPyx says
It always could be obtained after the world’s story… even says so in the guide
ReggieBunny says
Slight correction. The section that says “Ground Floor” starting with treasure #9 should say “Basement”. I just ran around the entirety of the ground floor looking for these treasures and then found the save point in the basement and it all made sense then.