
Horizon Forbidden West (HZFW) has 6 Tallneck Locations. Finding all Tallnecks unlocks the All Tallnecks Overriden trophy. They are basically the viewpoints in the game that reveal all other map icons in their area.
None of the Tallnecks are missable. You can still find all of them after the story. Only 5 Tallnecks are marked on the map. The 6th Tallneck is hidden inside the IOTA Cauldron, you will get it automatically when completing this Cauldron. The 5th Tallneck “The Shining Wastes” in the middle of the map is automatically overriden at the end of the story. You can’t reach it any earlier, it’s story exclusive. The remaining 4 Tallnecks can be reached at any time after unlocking the Glider in Main Quest 4: The Embassy.
Below is the location for each Tallneck and a Walkthrough Solution how to override it.
- Tallneck: Cinnabar Sands
- Tallneck: The Stillsands
- Tallneck: The Stand of the Sentinels
- Tallneck: Landfall
- Tallneck: The Shining Wastes
- Tallneck: Salt Bite
Tallneck #1: Cinnabar Sands
Location:

Walkthrough:
1. Start by shooting the red lock on the yellow ladder behind the satellite dish structure. This will lower the ladder so you can climb up.


2. Climb up the ladders to the top. On top you find another ladder, climb down the ladder (press  when standing at the ledge), then climb all the way to the right to a power cell. Take it out.


3. Take the cell to the generator underneath the satellite dish. Insert it.

4. Climb back up the first ladder where you shot the lock earlier and interact with the console there. It’s now active thanks to the power cell.

5. Take the path left of the console, climb around and pull yourself up to the platform above.


6. Shoot the clamps holding the satellite dish. You can scan (  ) to highlight them in yellow. Then the dish will get raised and you can climb up the ladder to the top.


7. From the top you can glide to the top of the Tallneck. The glider is automatically unlocked from Main Quest 4: The Embassy, use it by holding in midair. Jump off where the below image shows. When you land on the tallneck you can override it from the top of its head.


Tallneck #2: The Stillsands
Location:

Walkthrough:
1. Start by interacting with the destroyed machine in the middle of the area where the Tallneck walks in circles. After finding the Tallneck you can also track “The Stillsands” quest under Quests > Tallnecks, which will show you waypoints to make this easier to locate (also see map marker below).


2. Scan ( ) the area to see a purple glow over objects you can search. Interact with the 2 dead people to the right of the machine and the metal object behind it.


3. Follow the tracks to the ballista to the right. Now scan the tallneck, you will see some blue/yellow highlighted weakpoints on its side. You must shoot these with the ballista to attach the weight to the tallneck. The overall goal here is to repeat this across 3 ballistas to attach 3 weights, which will make the tallneck fall down so you can override it.


4. From the first ballista, turn around and head to the edge of the camp directly opposite of the 1st ballista. There you’ll find the 2nd ballista, shoot the Tallneck with it again and watch that the weight gets attached correctly. Some machines will also spawn now, feel free to take them out first so you can proceed without distraction.


5. Now head east to the edge of the map where the mountainside is, there you can climb the rocks to reach the 3rd ballista. Some more machines are here, but you can either run past them and try to not get hit or destroy them first. Same thing again, shoot Tallneck with Ballista. If you shot it correctly with all 3 ballistas it will now fall down.


6. Simply run up to its head to override it and you’re done.

Tallneck #3: The Stand of the Sentinels
Location:

Walkthrough:
1. Before you start, it’s a good idea to defeat all Stalkers in the area first, otherwise they will try to snipe you while climbing which would only make you fall down. Also, throughout this tallneck climb there are many ladders you can drop down, which creates a shortcut to get back up quickly if you fall down anywhere. The starting location for this climbing path is in the middle of the search area, see the exact point in the map image below. From there you can jump over to the wooden pathways.

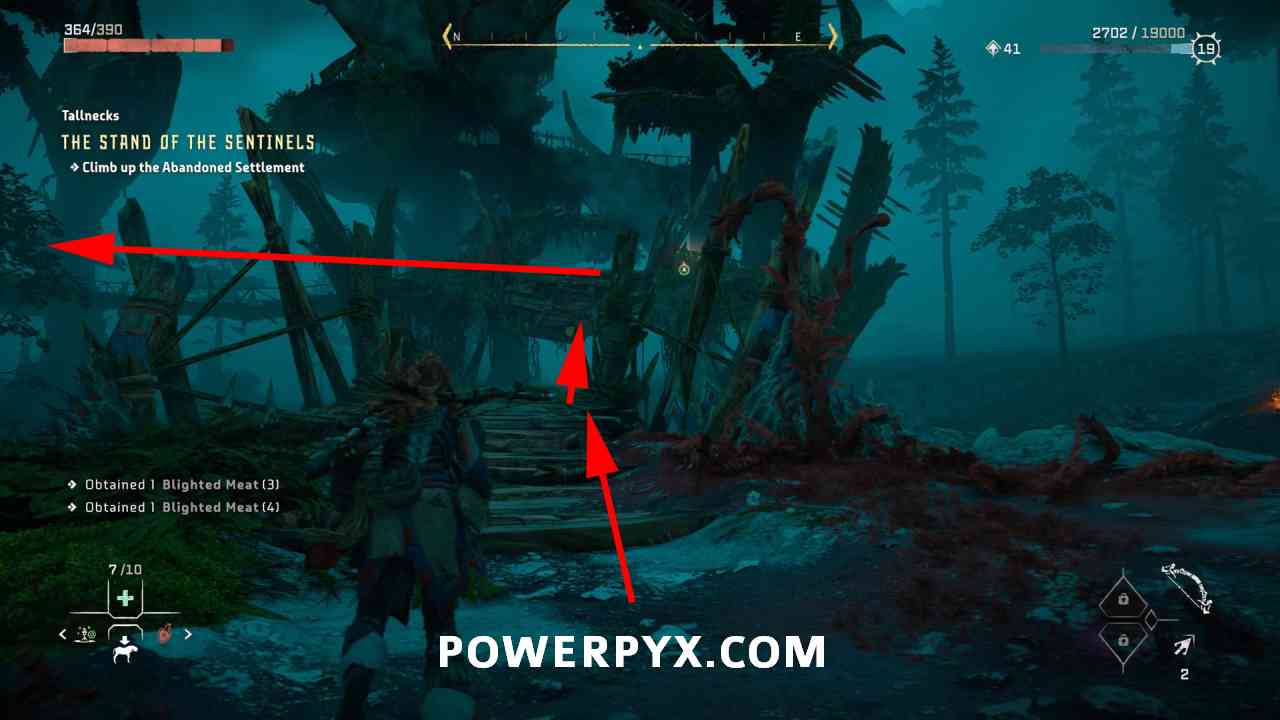
2. Turn left and follow the path, you’ll come to a point where you see some yellow ledges to hold on to in the distance. You must use the glider in midair to fly over to them. Then climb left onto the rope.


3. Climb up the rope and press  to jump backwards, then keep climbing up.


4. At the top turn left, go across the yellow ropes, then wait for the Tallneck to circle around. Depending on where it is on its route, it can take a minute for it to arrive. When the tallneck is there, jump on the yellow ledges on its back. Then ride with it for a few seconds and jump over to the wooden platforms on the other side. You can’t climb to the top of the Tallneck just yet, we must get further up the platforms first.


5. Follow the path to the left of the tallneck all the way to the end (don’t forget to drop down the ladder at the end for a shortcut in case you fall down).


6. Then use  to jump over to the next platform to the right. There are some enemies here, it’s best to clear them out first. They use some explosive fire balls that will likely knock you back down to the ground, but if you used the ladder shortcut you can quickly climb back up. Once the enemies are cleared out, shoot the red lock on the ladder that leads to the platform above. If you’re really quick you could even run past the enemies without fighting them and go straight for the ladder (worth a try if you’re underleveled and have trouble defeating these machines).


7. After climbing up the ladder, slide down the rope from the top of the platform. From where you land, climb up the structure directly in front of you. Once you’re at the top, just wait for the Tallneck to circle around. You can jump onto it from here. Jump to the yellow ledges around its head, then climb up the ledges to its head.


Tallneck #4: Landfall
Location:

Walkthrough:
1. Start by diving underwater and scan for the purple points on the Tallneck. Examine those spots to reveal the Tallneck is missing 2 parts that we must find to repair it.

2. Swim back up, then head to the platform in the direction the Tallneck is facing.

3. From this platform, shoot the red lock on the yellow ladder. Then push the box into the water.


4. Go over to the building with the yellow ladder, through the cracked wall. Stand at the cracked wall and use your pullcaster (  +
+  >
>  ) to pull the box towards you. Now you can stand on the box and from there jump the yellow ladder and climb up.


5. Go across the yellow rope, then take the path to the right of the rope. Keep following the path to the right and you’ll come to 1 flying machine and its “nest” made of scrap. Search the scrap pile for the 1st Tallneck part.


6. You can see another building in the water, see image below where the red arrow is pointing. This building is where you must go.

7. Inside this building, press to pull yourself up (see the grappling point circled red below). On the rooftop you find another “bird’s nest”, search the pile of scrap for the 2nd Tallneck part. That’s both parts found.


8. Head back to the Tallneck, install both parts on the power cells on its back, underwater. This will reactive the Tallneck and it will start walking towards some sunken ruins, and it will circle around them. Follow the Tallneck to those Ruins.

9. At the Ruins where the Tallneck walks towards, dive underwater and find cracks in the walls to dive inside the ruins. Then dive up inside the ruins to find stairs you can climb to the rooftops.


10. There’s a roof between the sunken ruins that you can jump to with , this allows you to quickly navigate to the ruins closest to where the Tallneck is walking. Just wait for the Tallneck to come by and jump onto the yellow ledges on its back, climb up to its head from there to override it.


Tallneck #5: The Shining Wastes
Location:

Walkthrough:
This Tallneck is automatically overriden as part of Main Quest 16: The Wings of the Ten (near the end of the story). During this main quest you will fly to the Tallneck’s head and the story forces you to override it. There is no way to get to it any sooner than this, must advance the story. Before then the Tallneck will show a “lock icon” next to it on the map. So just play the story and you’ll get this automatically.

Tallneck #6: Salt Bite
Location: Inside IOTA Cauldron
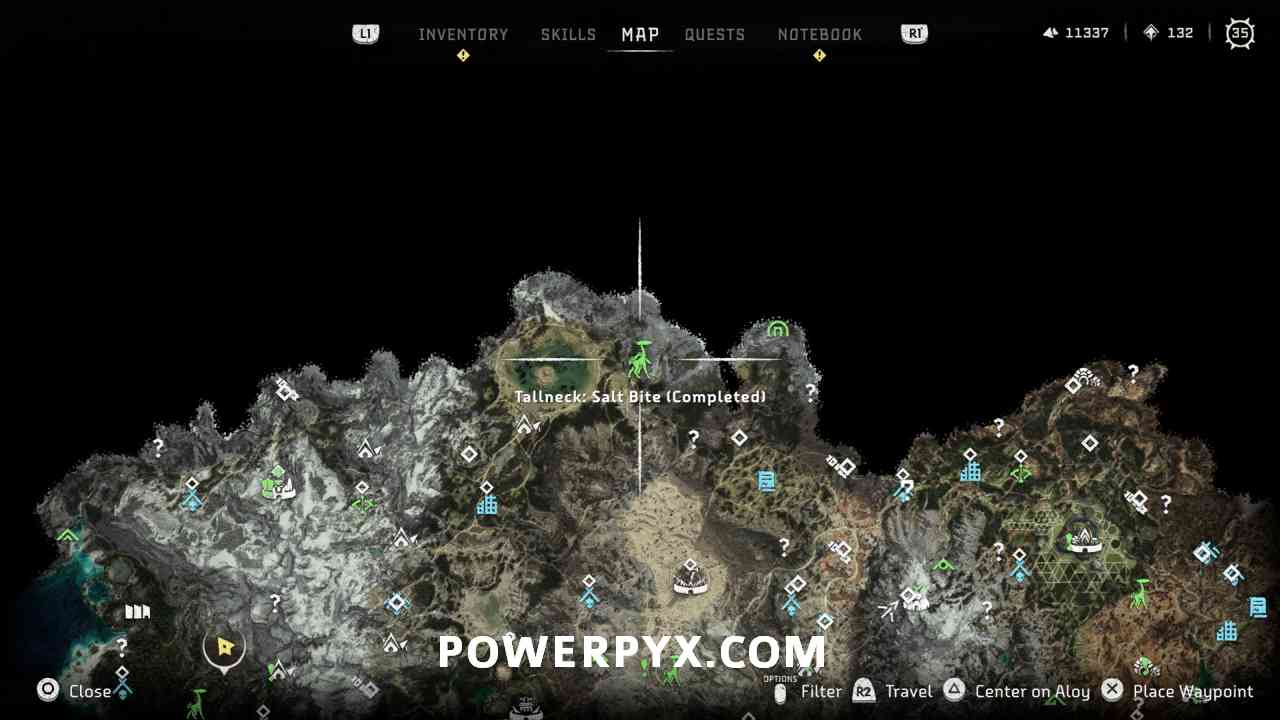
Walkthrough:
The IOTA Cauldron Tallneck is not marked on the map. It’s the secret “missing” 6th Tallneck. Simply complete the IOTA Cauldron, repairing the Tallneck is the main objective to finish this Cauldron so you can’t miss it and it happens automatically. The entrance to IOTA Cauldron is shown below, you must enter through a crack in the mountain walls.


At the end of the Cauldron you repair the Tallneck and automatically override it. Then the  All Tallnecks Overriden trophy will unlock.

That’s all of the Tallnecks in Horizon 2 Forbidden West. After finding all 6 of them you will earn the All Tallnecks Overriden trophy.
LilyPearls says
For the tallneck at The Stillsands, I brought the tallneck down with the ballistics I then did the override and the map was unfogged. The tallneck turned green but the quest did not get marked as complete in my log and it still says “go to the tallneck”. Is this a bug? If I want to platinum the game will I need to start over?
Hafxrx says
Same with me, did you get the platinum?
Loly says
I finished 5 of the Tallnecks but in the Game Completion they write 4