GTA 3 Definitive Edition has 100 Hidden Packages to be collected throughout the map. This guide shows where to find them all (updated for GTA 3 Trilogy Remaster on PS5, Xbox Series X, PC). Hidden Packages are your traditional open world collectible. They are often hidden in obscure locations or hard to reach areas. Collecting all 100 Hidden Packages is required for the Liberty City Secrets trophy / achievement, as well as progress towards 100% completion. While collecting these, it is advised to save regularly due to the game’s tendency to crash. Collected packages will not save if it does crash, as the game will only autosave upon starting or ending any named mission.
Every 10 packages you collect will unlock a weapon/item at your safehouses:
- 10 Hidden Packages – Pistol
- 20 Hidden Packages – Uzi
- 30 Hidden Packages – Grenades
- 40 Hidden Packages – Shotgun
- 50 Hidden Packages – Armor
- 60 Hidden Packages – Molotov Cocktails
- 70 Hidden Packages – AK-47
- 80 Hidden Packages – Sniper Rifle
- 90 Hidden Packages – M-16
- 100 Hidden Packages – Rocket Launcher and $1,000,000
Hidden Packages Map
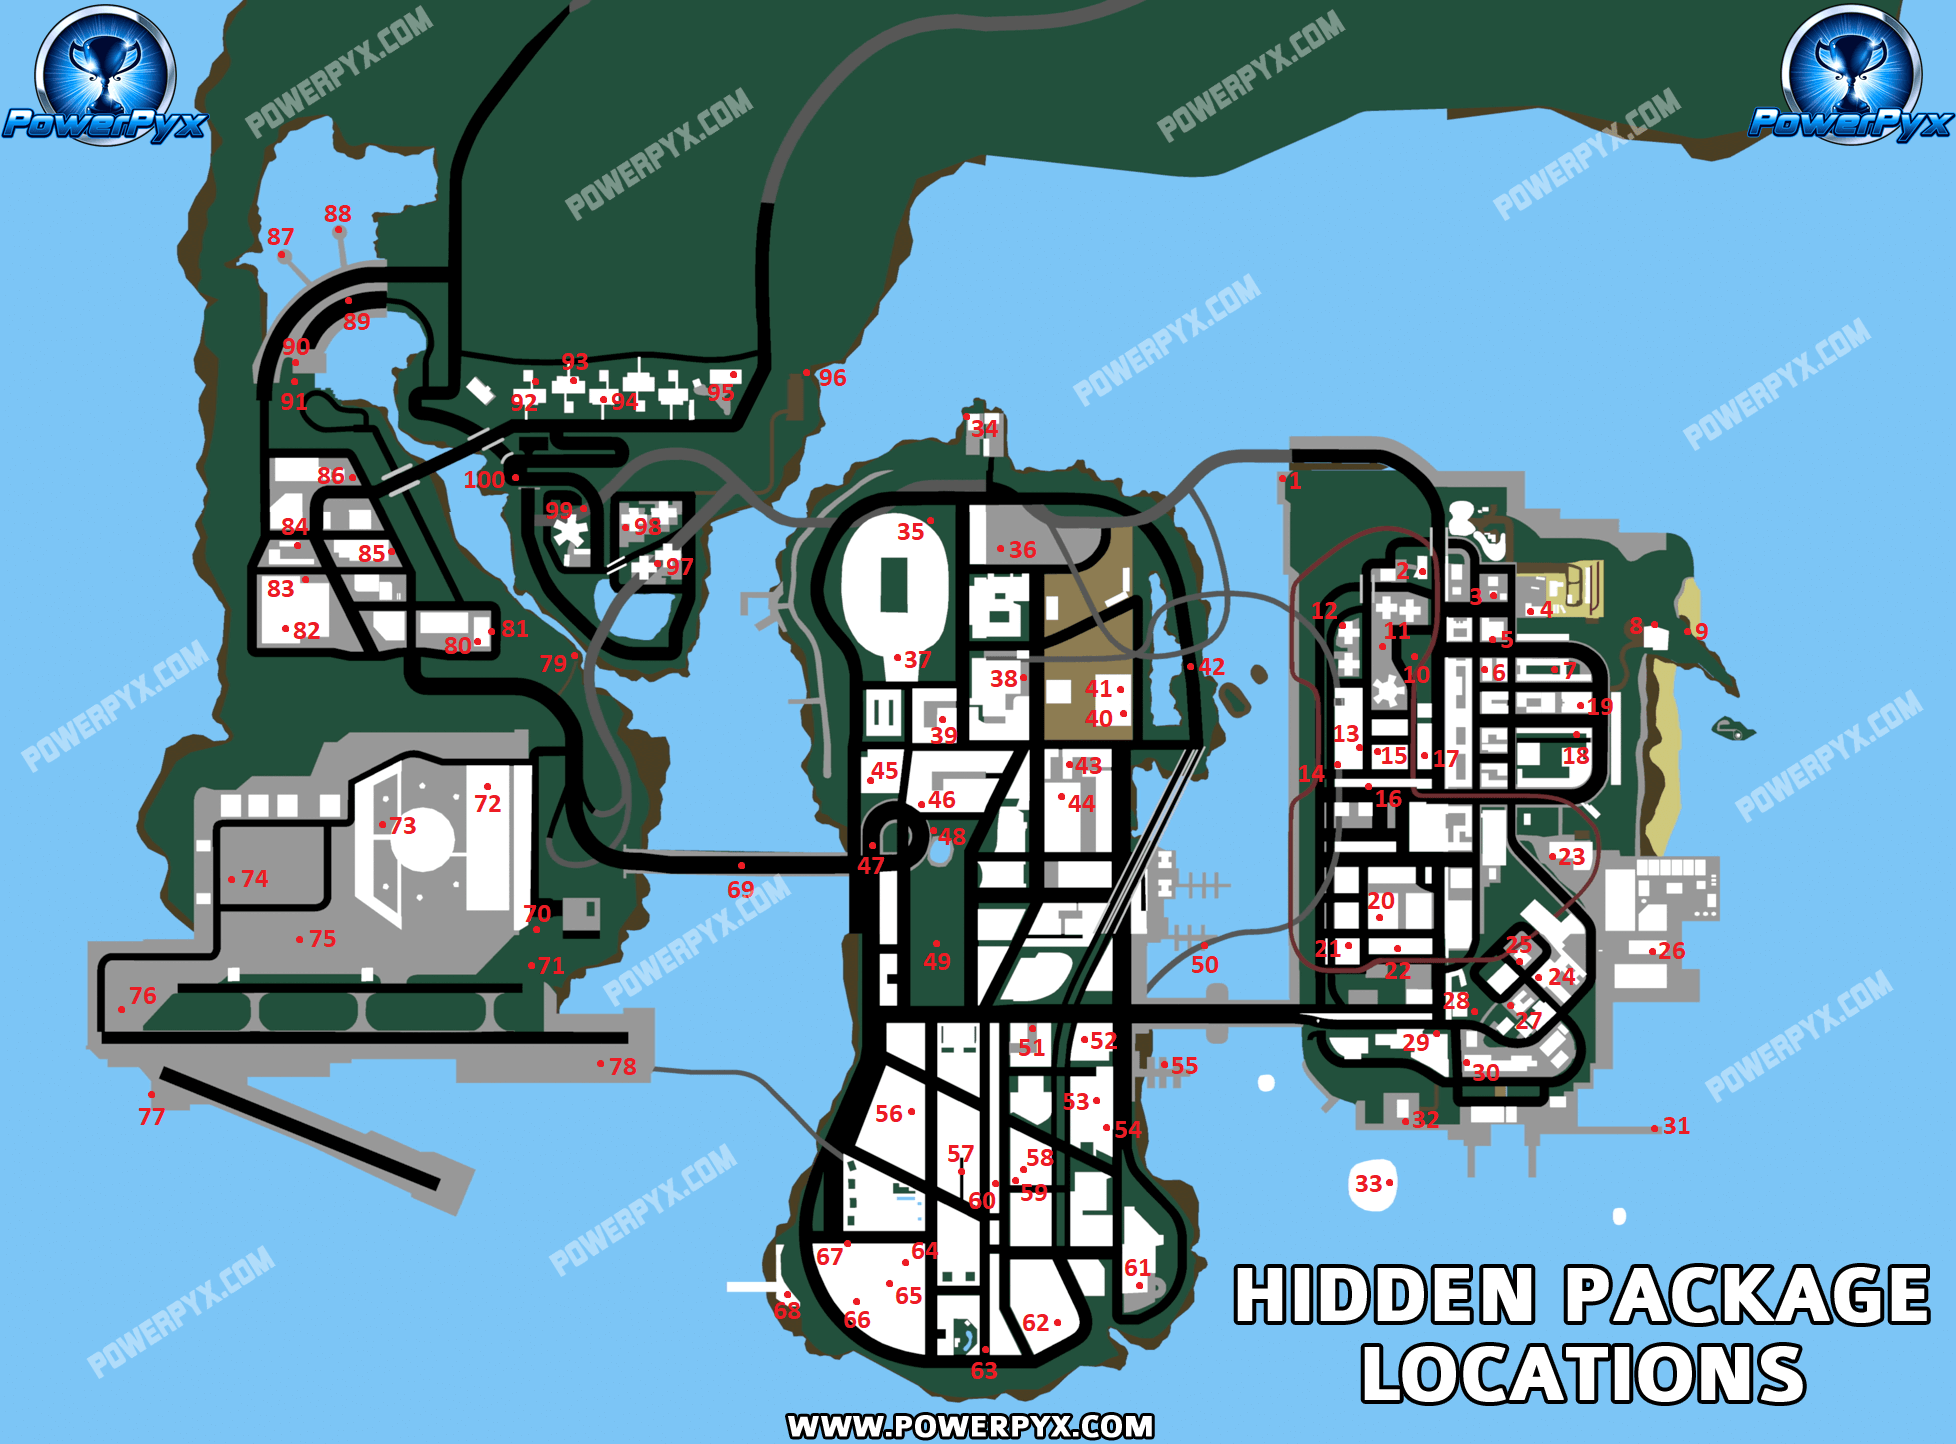
The red dots and numbers on the map below mark the locations.
Portland
Hidden Package 1
Found in the far northwest of the map, sitting at the end of the path that runs along the water.
Hidden Package 2
Located on the rooftop of Head Radio Station. In order to get onto the roof, you must get onto the train tracks via the nearest staircase and walk along the tracks to the roof, then jump over to it.
Hidden Package 3
Located at the AMCO Petrol Station, on the roof of the of the building. In order to get on top, you will need to jump onto the wall at a low point and walk around the wall until you can drop down.
Hidden Package 4
Located inside Easy Credit Autos, in the same spot that the Patriot can spawn. Break the glass to get it.
Hidden Package 5
Located inside the alleyway on the block directly south of the petrol station.
Hidden Package 6
Another block south from #5, in the window of the wrecked building.
Hidden Package 7
In the northeast block of Saint Mark’s, there is a sloped roof you can walk on. Drop off it to find a hidden package directly below on the grass.
Hidden Package 8
Located along the balcony behind Salvatore’s Mansion.
Hidden Package 9
Further behind Salvatore’s Mansion, drop down below the arched rock to find it on a hill.
Hidden Package 10
Located in the middle of the park in Hepburn Heights.
Hidden Package 11
Located in the ring of trees directly behind the ringing pay phone.
Hidden Package 12
Behind the northernmost building of the apartment block on the west.
Hidden Package 13
Located on the roof of Luigi’s Bar, accessed via stairs down the alleyway.
Hidden Package 14
From the roof of Luigi’s Bar, turn around jump onto the roof of the adjacent building. The package is sitting on the edge of the roof.
Hidden Package 15
Located on the rooftop of the building east of Luigi’s Bar, accessible via stairs in the alleyway.
Hidden Package 16
Not accessible until Staunton Island is open. Located downstairs in the subway, next to the toilets.
Hidden Package 17
Located inside the empty building directly across from Ammu-Nation, break the glass to get in.
Hidden Package 18
Back over in Saint Mark’s, up near the top of the long alleyway. Head in to the left near the top to find the package and an Uzi.
Hidden Package 19
Back north where 8-Ball’s shop is, there is an abandoned tunnel slightly east of it. Head halfway into the tunnel to find the package amongst some homeless people.
Hidden Package 20
Located in the walk-only area of Chinatown, down one of the alleyways.
Hidden Package 21
Located on the rooftop of the southeastern Chinatown building, accessible via stairs in the alleyway.
Hidden Package 22
South of #20 and East of #21, in an alleyway.
Hidden Package 23
Located on the rooftop of the Supa Save supermarket in Portland View. In order to access the rooftop you will need to take the stairs up to the train tracks and then jump onto the roof.
Hidden Package 24
Located on the rooftop of the building directly east of Joey’s Garage. The rooftop can be accessed either by parking a tall vehicle nearby and climbing up, or by getting on the train track, standing on the support beam and jumping over.
Hidden Package 25
Located behind the building in the Bitchin’ Dog Food factory.
Hidden Package 26
Located inside Portland Docks, on the rooftop of the middle warehouse. Can be accessed by climbing the stairs of the southern building to the roof and jumping across.
Hidden Package 27
Located behind the fence directly opposite Joey’s Garage.
Hidden Package 28
Inside the wall of the building southwest of Joey’s Garage.
Hidden Package 29
Located behind the wall directly south of the Callahan Bridge entrace. Can either jump over it from the bridge or access the block from the south and walk around.
Hidden Package 30
Located on the rooftop of the Saw Mill. In order to get within the walls of the Saw Mill you can jump on the wall of the Bus Depot next to it and hop over. Once inside, get onto the rooftops of the Saw Mill via the large pile of saw dust, and cross the rooftops to the package.
Hidden Package 31
At the end of the eastern pier of Atlantic Quays, behind a box.
Hidden Package 32
Located inside the Triad’s Fish Factory. In order to open the gate you will need either a Triad Fish Van or a Trashmaster.
Hidden Package 33
Located on a rock south of Portland. Requires a boat to reach, so must have access to Staunton Island before you can get it.
Staunton Island
Hidden Package 34
Located at the back of Phil’s Army Surplus, at the northernmost point of Staunton Island.
Hidden Package 35
Hiding behind the Rockstar billboards by the stadium.
Hidden Package 36
Located on the lower rooftop of the hospital by the ambulances. Use an ambulance as a staircase to get onto the roof and grab it.
Hidden Package 37
Located up the stairs at the front of the stadium.
Hidden Package 38
Located behind the Liberty University campus building on the eastern side.
Hidden Package 39
Located inside a garage in the Cartel Compound. A Cartel Cruiser is required to open the gates.
Hidden Package 40
On the bottom floor of the construction site, next to a foundation pillar.
Hidden Package 41
Upstairs in the northern part of the construction site.
Hidden Package 42
Located on top of the arched beams of the bridge east of the construction site.
Hidden Package 43
Located inside one of the open garages of the alleyway with Pay’N’Spray.
Hidden Package 44
On the first floor of the multistorey carpark, in a corner.
Hidden Package 45
Located in an alleyway one block west of your safehouse.
Hidden Package 46
Located on the rooftop of the building on the corner of your safehouse block. In order to get onto the roof you must go up the spiral ramp and drop off.
Hidden Package 47
Underneath the spiral, accessible via the underpass beneath.
Hidden Package 48
Inside the basketball court in the north of Belleville Park.
Hidden Package 49
Located under the small bridge in the middle of Belleville Park.
Hidden Package 50
On the east side of Staunton Island, on the pier south of Asuka’s condo.
Hidden Package 51
Down the alleyway east from TW@ Cafe.
Hidden Package 52
One block east of #51, up the stairs of the museum at the entrance.
Hidden Package 53
In the back carpark of the police station, requires a police car to open the gate.
Hidden Package 54
In the alleyway directly east of the police station.
Hidden Package 55
Located on the southernmost pier to the east.
Hidden Package 56
Located beside the church to west in Bedford Point.
Hidden Package 57
Located in the alleyway next to the dojo, one block east of the church.
Hidden Package 58
Another block east from the dojo is an AMCO building. Head into the underground carpark to find a package by the elevator.
Hidden Package 59
Head up the stairs in the southwest corner of the AMCO building and go all the way to the rooftop to find a package by the edge.
Hidden Package 60
Located across the road from the AMCO building, in the building with glass windows and a staircase. Break the glass and go upstairs.
Hidden Package 61
Located on the rooftop of Kenji’s Casino, by the helipad.
Hidden Package 62
Located in the sunken area southwest of Kenji’s Casino, behind a sculpture.
Hidden Package 63
On the footbridge going across the road to the west of the sculpture.
Hidden Package 64
Located in the underground carpark in Bedford Point, accessible via the northern road of the southwestern block.
Hidden Package 65
Climb the stairs outside the underground carpark to get on the roof where the package is.
Hidden Package 66
Located in the regular outdoor carpark, next to some dumpsters.
Hidden Package 67
Located in a nook slightly west of the main entrance to the carpark.
Hidden Package 68
Located on the pier in the southwestern corner of Staunton Island, behind some rocks.
Shoreside Vale
Hidden Package 69
Located halfway across the bridge between Staunton Island and Shoreside Vale. The middle section of this bridge will raise and lower, get onto the section and let the bridge raise up, then jump onto the barrier to grab the package.
Hidden Package 70
Located in front of the Francis International Airport terminal, behind the Lips 106 billboard.
Hidden Package 71
Located inside the subway. Head up the stairs east of the terminal to get inside the subway, then cross to the other side and down the stairs to find the package.
Hidden Package 72
Next to the Fire Truck opposite the airport carpark.
Hidden Package 73
Head through the open fence next to the Fire Truck and run around the terminal to the west to find the package.
Hidden Package 74
Inside the airport next to the hangars, underneath the wing of a plane.
Hidden Package 75
Southwest from #74, under the tail of another plane.
Hidden Package 76
Located on the helipad in the southwest of the airport.
Hidden Package 77
Located down the ramp south of the helipad, by the water.
Hidden Package 78
Located at the far end of the main runway, down another ramp.
Hidden Package 79
North of the main road from the airport is a dirt track leading to a wooden ramp. The package is underneath the ramp.
Hidden Package 80
Located on the rooftop of Turtle Head Fishing Company in Pike Creek, head up the stairs and jump across.
Hidden Package 81
Behind the eastern wall of the same building.
Hidden Package 82
In the rear carpark behind the hospital, next to a dumpster.
Hidden Package 83
On a container north of the hospital. In order to get it you must drop off the road onto the container.
Hidden Package 84
Located on top of the garage behind the police station, north of the hospital.
Hidden Package 85
Located to the east of the pharmaceutical building, behind a fence with an opening at the end.
Hidden Package 86
Located behind the Import/Export Garage, accessible by going over the ramp in the lot in the northwest to drop behind the fence.
Hidden Package 87
Located behind the western dome of the dam.
Hidden Package 88
Located behind the eastern dome of the dam.
Hidden Package 89
Down in the lower section of the dam, go up the first set of stairs on your right to find a package.
Hidden Package 90
Located on top of the dam building at the end of the lower damn section, go up the stairs to reach it.
Hidden Package 91
Located on the grass in front of the dam, simply drop off the roof to find it.
Hidden Package 92
Located in the backyard of the first mansion in Cedar Grove.
Hidden Package 93
Located on the back porch of the second mansion in Cedar Grove.
Hidden Package 94
Located on the front porch of the third mansion in Cedar Grove.
Hidden Package 95
Located in the empty pool at the Cartel Mansion. A Cartel Cruiser is required to gain access to the mansion.
Hidden Package 96
In the corner of the picnic area northeast of Wichita Gardens.
Hidden Package 97
Located between the two southern apartment building in Wichita Gardens.
Hidden Package 98
Located in front of the entrance to the northwestern apartment building in Wichita Gardens.
Hidden Package 99
Next to the TOYZ Van behind your safehouse.
Hidden Package 100
Located inside the tunnel that goes underneath the winding road, on the footpath.
That’s all of the Hidden Packages in GTA III Trilogy Definitive Edition. For all other Collectibles, see the GTA III 100% Completion Guide & Checklist.





















tyger says
#75 is more to the west on the map
Dean Halligan says
Got everyone. This is absolutely precise we’re the hidden packages are. Thank you. Brilliant. Ps4