The Word of Fate is the ninth main quest (path) in God of War Ragnarok. This walkthrough will guide you through all objectives of The Word of Fate Main Quest (Path).
Requirement: Complete Into the Fire
Reward: 4500 Kratos XP, 4500 Freya XP
Quest Info: We seek the Norns. I will have answers from the Fates of the realms.
Objectives:
- Travel to Midgard
- Find the wolves at the kennel
- Open the gate
- Follow the wolves to the Norns
- Continue tracking the Norns
- Return to the wolves and continue tracking the Norns
- Find the Norns at the Well of Urd
- Leave the Norns
- Return to Sindri’s when ready
- Travel to Svartalfheim
Travel to Midgard
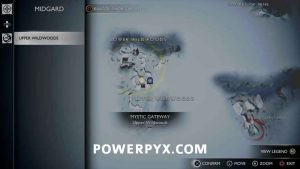
When the quest starts, you can head outside Sindri’s to get going. On the way, the Dwarves will return the Guardian Shield to you on your way out, which you can swap back to if you prefer it over the other shields. Interact with the gateway and head to Midgard, where the only option you’ll have to select at the start is Upper Wildwoods at the house.
Find the wolves at the kennel
At the house, head out front to find the wolves waiting in their kennels.
Open the gate
After the wolves are hooked up, head over and interact with the gate to let the sled out of the yard.
NOTE: If you’re not playing on the current patch it is possible for the sled to bug out and get moved back inside the gate. If this occurs you can progress by just following the path to the lake on foot, and it will eventually spawn the wolves near you.
Follow the wolves to the Norns
Head down the path on the wolves, and you’ll eventually reach the Lake of Nine, entirely frozen over. While on the lake the wolves will point their heads toward where you’re supposed to go, so you can follow them to your destination. Or check the below map and go to the spot on the far east side.
 |
 |
Follow the path after climbing the ledge until you reach an area where a bunch of Raiders and an Ogre will appear. You’ll need to deal with all the enemies here before you can continue.
When they’re all dealt with, walk over and interact with the pile of rocks in the middle of the area. You obtain a broken sword hilt, which you can then use on the round gravestone you might have seen in prior areas for a series of boss fights (Ragnarok’s equivalent of the series of Valkyrie fights).
Follow the path ahead for a Materials Chest where you can obtain 2 x Dwarven Steel, then direct Freya to interact with the wall where you’ll find a dead end.
Continue tracking the Norns
Follow the path back over to the wolves. If you take a quick detour up the path to the right you can find a hidden area called The Eternal Campfire. Pick up the book off the ground on the cliff to start the Favor Across the Realms.
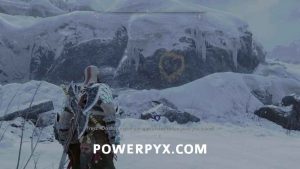
This favor requires you to find 4 ingredients in the different realms to make a soup. Head back towards the wolves and you can find the first on the left, sitting near the painted yellow heart on the wall (if you remember spotting these in other areas, this is how you find the ingredients).
Hop back on the sled, and follow the wolves all the way to the southwest corner of the lake for the next location to search.
 |
 |
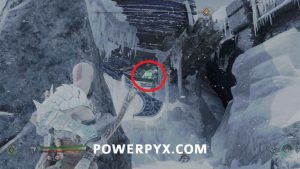
Hop over the first ledge towards this area, then turn left and look in the underside of the ship sitting above to find a Raven.
Head over to where Freya is waiting to inspect the wall and find another dead end.
Return to the wolves and continue tracking the Norns
When you try to leave the area you’ll be attacked by some more Raiders, along with a Frost Gradungr. Make sure to use your Blades to remove its shield to take it down quicker.
Before continuing your search, you can climb up the nearby chain to reach the area above. There is a shop here you can use, along with a side area you can go into for the Favor “Sigrun’s Curse”.
Head back and jump on the wolves once more. This time you’re going to be following the wolves straight north to the third and final spot to search.
 |
 |
Start making your way into the area and climb the first wall. There’s a Nornir Chest on the lowest level here, but you can leave it for when you’re coming back out to save a bit of backtracking.
At the top, interact with the ice wall to break your way through.
In the next area, you’ll be attacked by more Raiders. These ones will start using a move where they power themself up by drinking a liquid, you can prevent this by hitting them with a shield bash when the two blue rings appear on them.
After they’re dealt with, start climbing up the next wall. The Legendary Chest you can spot through the cracks you can also grab on the way out to save a bit of time. When the path splits, keeping climbing right to the top (going left is how you get back down later).
At the top, you can immediately turn to the right to spot another Raven.
Deal with the raiders in the area, then you can grab the nearby Materials Chest which contains 2 x Dwarven Steel. You can then walk to the back wall where Freya is to find a path through.
Find the Norns at the Well of Urd
Make your way into the cave and drop to the lower level. Take a look at the wall on the right side for some brambles you can burn to reveal a new grapple path.
On the next platform, you’ll run into your first Traveller. These enemies have very heavy armor just like the last game, so won’t stagger from any of your attacks until you can break any of it near the end of their health bar. Avoid their slow attacks and attack in the gaps when possible. After you deal with it make sure to grab the Materials Chest before continuing where you can obtain 2 x Stonewood.
Keep following the path ahead and more enemies will be dropped on you throughout this forest area, none actually as tough as the Traveller. After crossing the bridge and dealing with the enemies in the next lower area make sure to grab the Materials Chest before going by, which contains another 2 x Stonewood.
Keep following the path to run into one more enemy for the area, a Hel-Revenant. These enemies will dodge your normal attacks, so you need to hit them with arrows first to temporarily stun them so you can deal more damage. After it’s dealt with climb the wall ahead.
Frost Phantom
In the next area, you’ll fight your first Phantom. These enemies cannot be hurt normally with direct attacks, first you must fill its stagger bar and then destroy its 2 totems around the area. To stagger it you must hit the runic orb at the centre of the Phantom, and due to the nature of the boss the best way to do this is by throwing your Leviathan Axe. Occasionally the runic orb will flash, and if you hit it while this is happening it will be stunned, allowing you to run in and attack it for more damage. Freya’s arrows will do a decent chunk of damage during this, so be sure to use them with  . None of the Phantom’s attacks are particularly dangerous, as you can simply dodge them all while throwing your axe.
When it is staggered, you will need to destroy the pillars. There are two in the area and glow purple when they are vulnerable. After they are all destroyed, stagger the Phantom one more time and finish it off with  . Make sure to pick up the items it drops to obtain a Chaos Flame (Blades Upgrade) and a Jewel of Yggdrasil (Amulet Upgrade).
Head past the rock on the west side of the area to continue. Climb the cliffs, then before heading into the cave there is another Materials Chest you can open which contains 2 x Stonewood.
Climb down the path into the cave, then interact with the door.
This next section is basically some cutscenes with combat while they are occurring. You’ll be attacked by enemies and need to interact with certain things, but they’re all obvious. Keep fighting the enemies in each wave until this section is complete and you’ll be back in front of the now-open door.
Follow Freya into the area ahead, then interact with the animal she goes near. After a scene, you’ll be in front of some golden strands which you need to interact with to progress. After those scenes are complete, interact with the animal again to return to where you were before.
Leave the Norns
You’re dropped off on the other side of the area but just follow the path ahead. Watch after dropping down from the ledge for a spot you can jump to on the right where there is a Materials Chest containing 2 x Dwarven Steel.
Follow the path and climb up to the next level. Before going through the ceiling you can break through above the torch, you can drop into a hole on the right for another Materials Chest containing 2 x Honed Metal.
You’ll now be back in the room where you burned the brambles to climb up to where you fought the Traveller. Follow the path back out of the cave and start climbing down the cliff. This time you do want to follow the path leading to the ledge on the left.
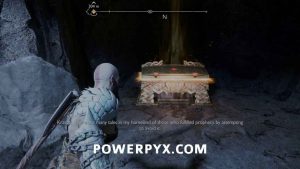
On this platform, look over the ledge where you can spot a breakable wall. Break through it to find the Legendary Chest you may have spotted on the way up, which contains the Rond of Purification (Shield Attachment).
 |
 |
Grapple back to the prior spot and you can use the zipline to head back to the lower area.
Drop down to the lower level, and you’ll be back where you used your axe to break through the ice earlier. You can now light the braziers for the Nornir Chest on your way out. On this first level look to the southeast where you can find the first brazier on the cliffside.
Drop down one level, then you can light the second brazier on the left.
Finally drop down to ground level, where you can find the Nornir Chest in the corner on the left, and the final brazier on the cliff just to the right.
Return to Sindri’s when ready
Head back to the wolves, then you can head back to Sindri’s when you want to progress the story. There is a lot of side content around the lake so you can explore if you feel like it, or just head straight back. The nearest gateway is right beside the shop you’ll come to heading out towards the lake from the Well of Urd.
Outside Sindri’s, you can head over and speak with Ratatosk. He tasks you with capturing Nidhogg’s babies using the trap he provides you, starting the Favor “The Lost Lindwyrms” (make sure to actually pick up the trap off the table before leaving).
When you’re ready to continue, head inside and interact with the Dwarves over at their shop.
Travel to Svartalfheim
Head over to the Mystic Gateway for some more scenes. After some help from Brok, you’ll head to a new area in Svartalfheim from where you have been before, starting the next story quest.
This finishes The Word of Fate in God of War Ragnarok.
Up Next: Forging Destiny
For all other quests refer to the God of War Ragnarok Walkthrough.









Leave a Reply