
God of War Ragnarok has 80 Lore Locations. Finding all Lore is required for 100% completion but is not directly tied to any trophies. For trophy purposes the Lore doesn’t matter and can be skipped.
The Lore comes in different forms:
- Lore Markers – look like big stone tablets
- Rune Reads – blue letters on walls
- Lore Scrolls – you pick them up from the ground similar to artifacts
- Pages – a few special ones, they look like Lore Scrolls
None of the Lore is missable. You can still get all of it after the story in free-roam. This walkthrough is intended for use after the story! During the story you will be missing abilities to reach some places, but you gradually gain access to all abilities from story progress. Then after the story you have access to everything and can go back everywhere.
For more Collectible Categories see » God of War Ragnarok Collectible Guide. The Lore is also included in the guides by region.
Overview:
Svartalfheim
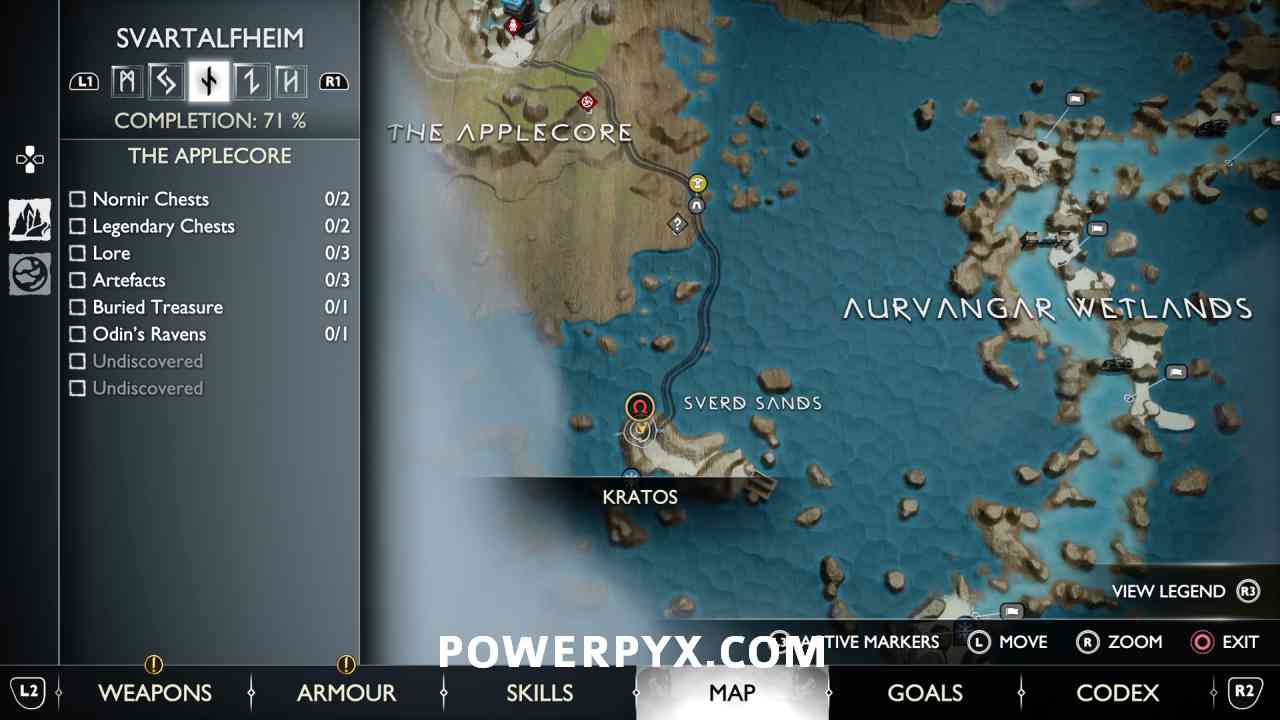
#1 – Aurvangar Wetlands (Lore Marker – Unsafe Roads)
Keep driving north in your boat until you reach the point shown in the location image below. There’s an opening on the left side of the river where you can press  to drive under it, this leads to a hidden side area. After docking your boat at the beach, climb up the wall on the left and turn right. Drop down at the end of the path (there’s only one way, not the path where you came from). After dropping down, on the left is a stone tablet with blue glowing text on it, interact with it for the Lore.


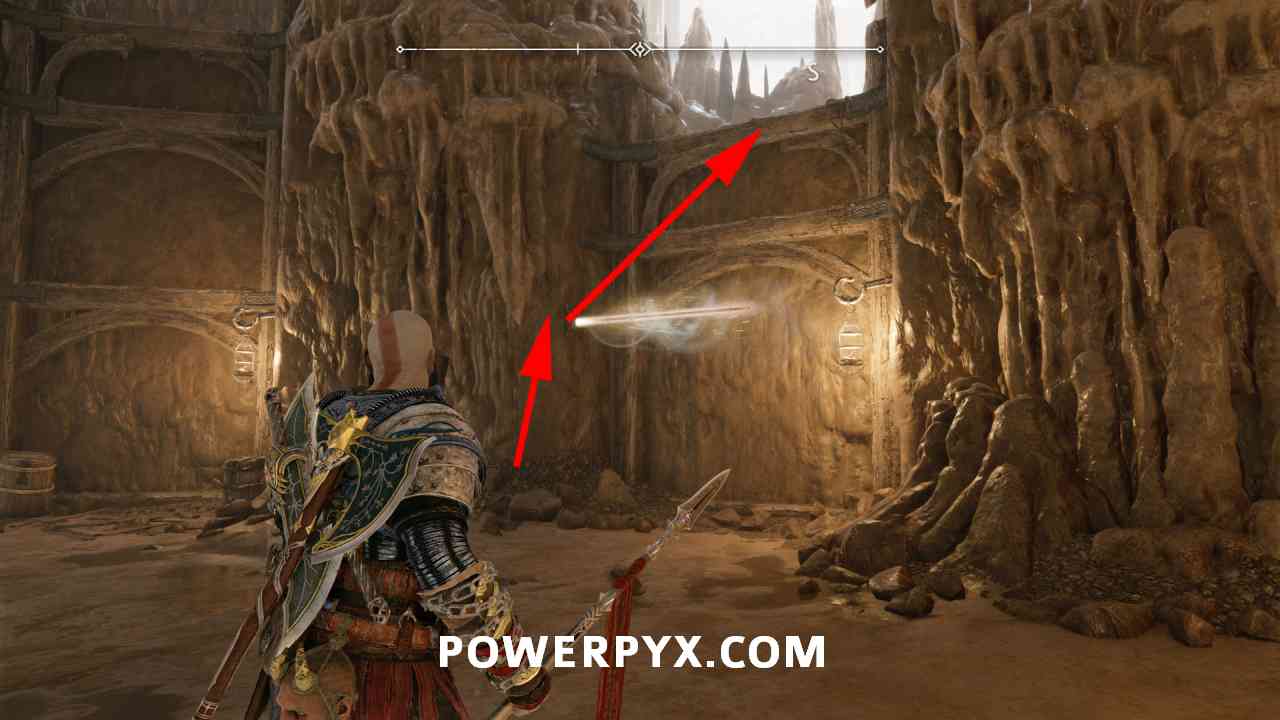
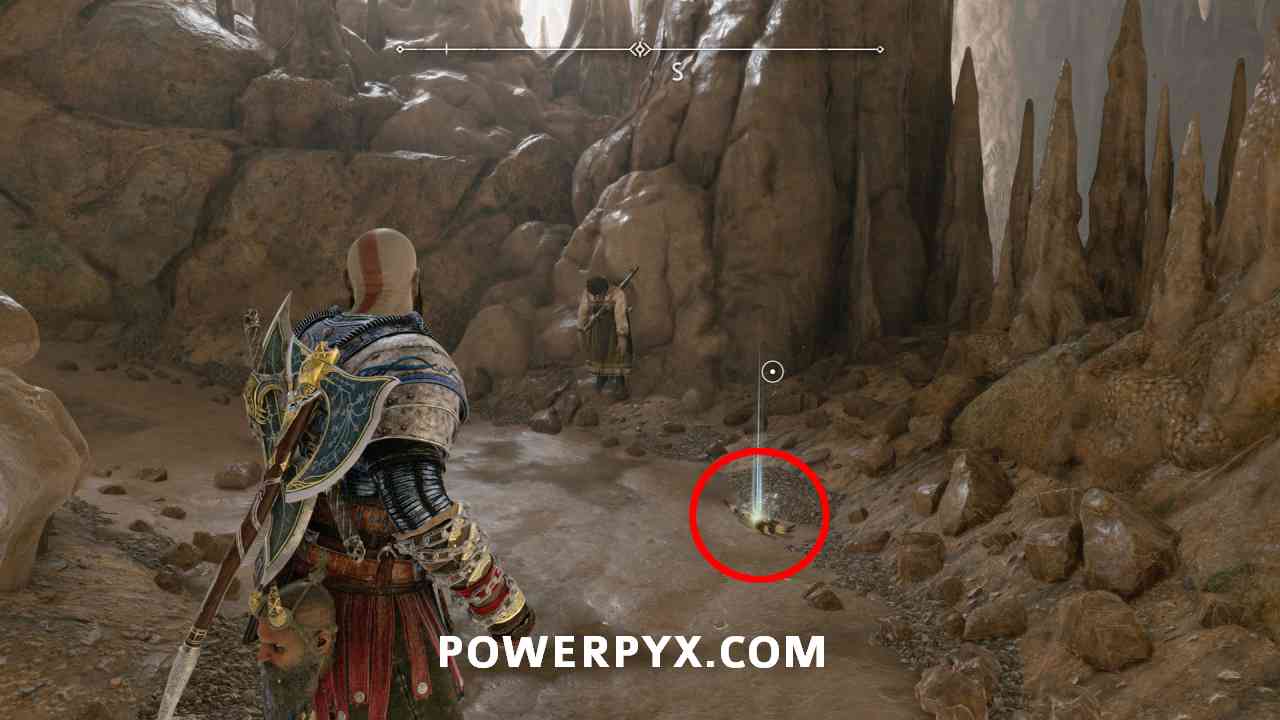
#2 – The Applecore (Treasure Map – Demise of Dagestr)
After entering The Applecore via the elevator from Sverd Sands, walk down the tunnel until you see a wall on the right with wind coming out of it (there should be 2 ghost-type enemies in this area too). Throw a spear at the wind in the wall, then you can climb up to find the lore on the ground. The spear is an automatic story unlock.
#3 – The Applecore (Lore Marker – Cooperation)
Progress through to the spiral area in the middle and head all the way down. Destroy the wooden barricade at the end of the path to see it.


#4 – The Applecore (Rune Read – The Vault)
Turn around and jump over the river (simply sprint towards it and you will automatically jump). Follow the linear path behind until you get to the water wheel puzzle. Freeze the water with your axe so that it flows into the lower waterway, then the grappling hook in the middle unlocks and you can use it to swing over. After this turn left, you can shoot a green arrow at the wall to reveal blue lore letters on the wall. This is just next to the blacksmith shop (basically where you first entered The Applecore during the story). Odds are you already got this one during the story.


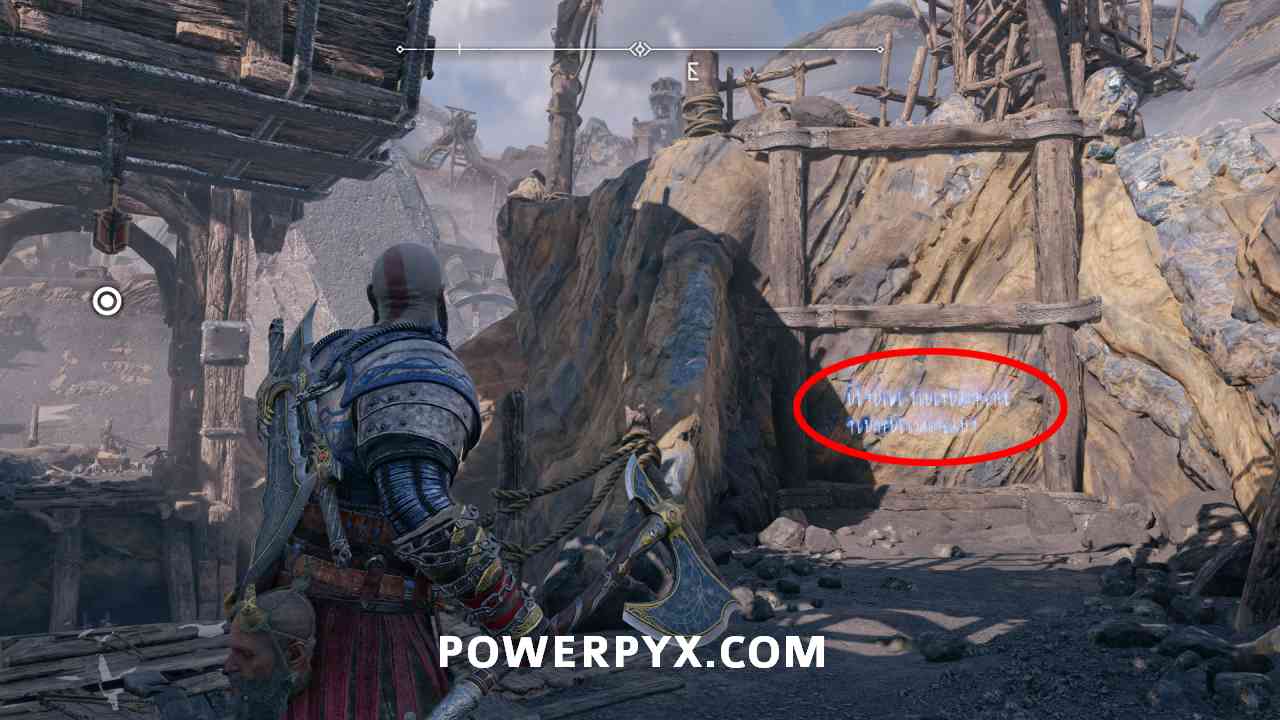
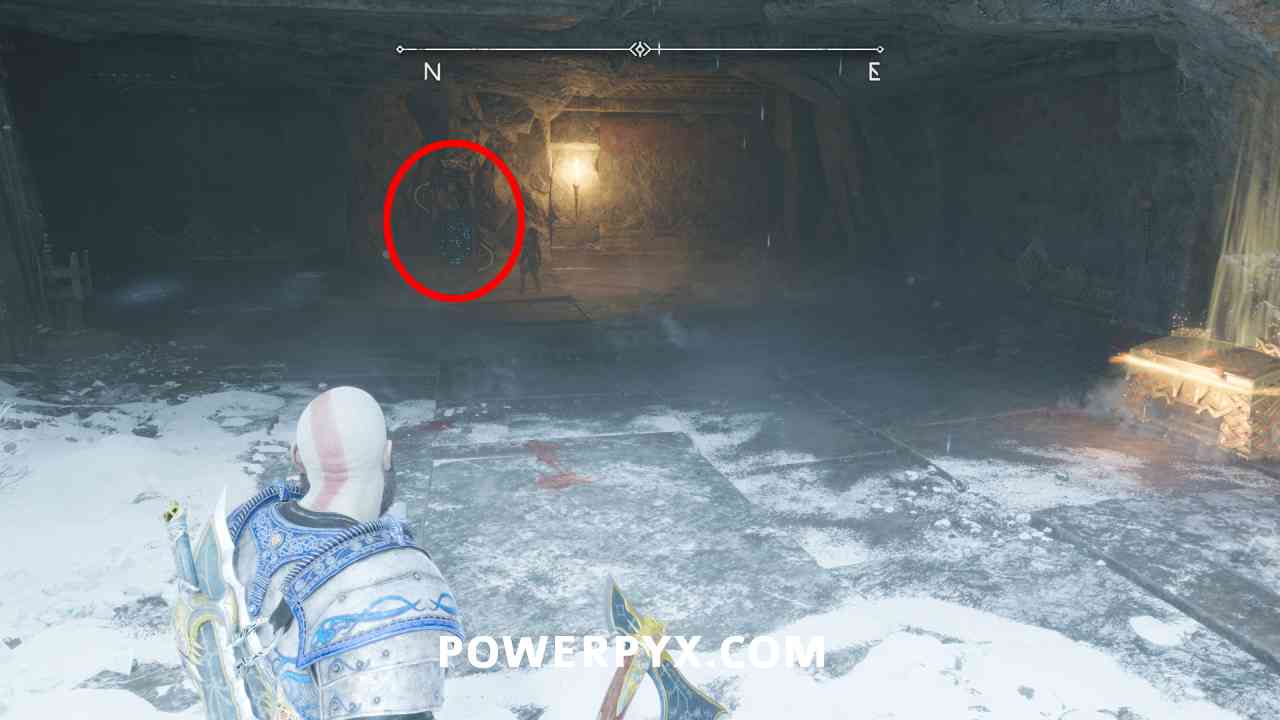
#5 – Jarsmida Pitmines (Rune Read – The Pit-Mine)
Drop down to the left of the crane and you can throw your spear at a wall with wind coming out of it. This creates a path to jump over. Cross and drop down next to the Nornir Chest, on the wall.

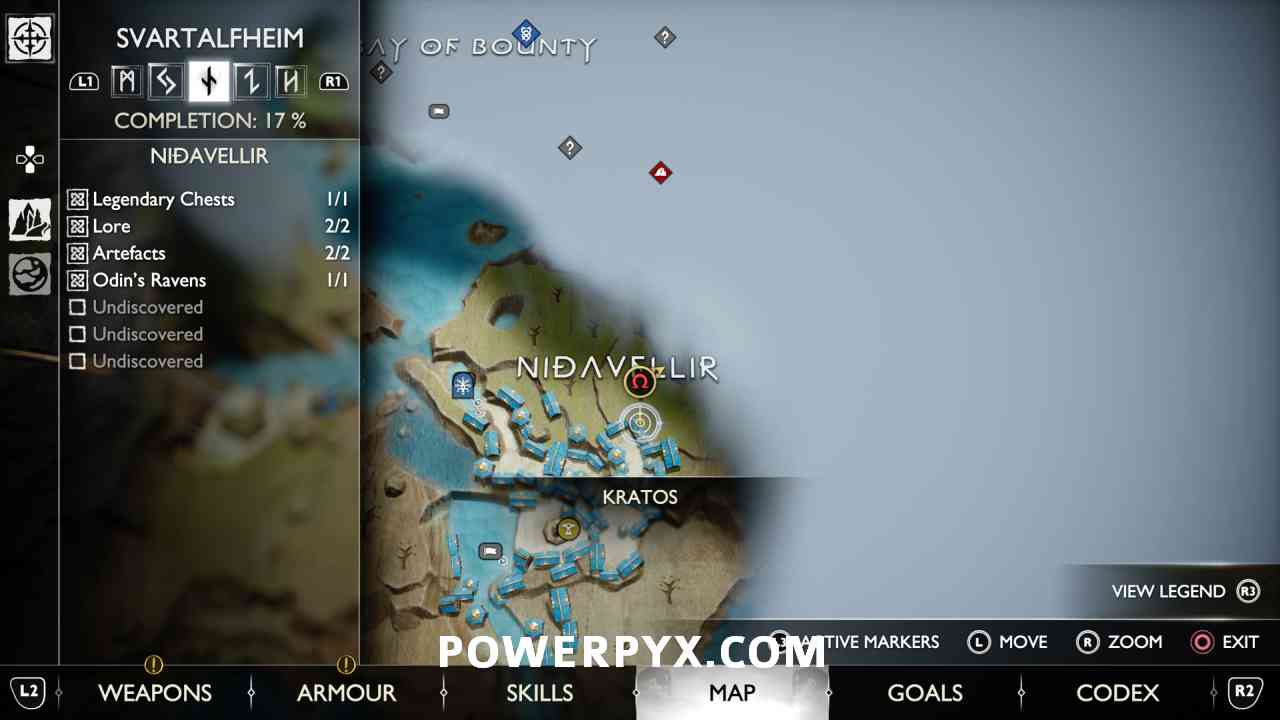
#6 – Nidavellir (Scroll – Shopping List)
Just before the smithing shop, you can find a golden lore scroll on the ground. In the middle of the market square, just a few steps away from the smith.


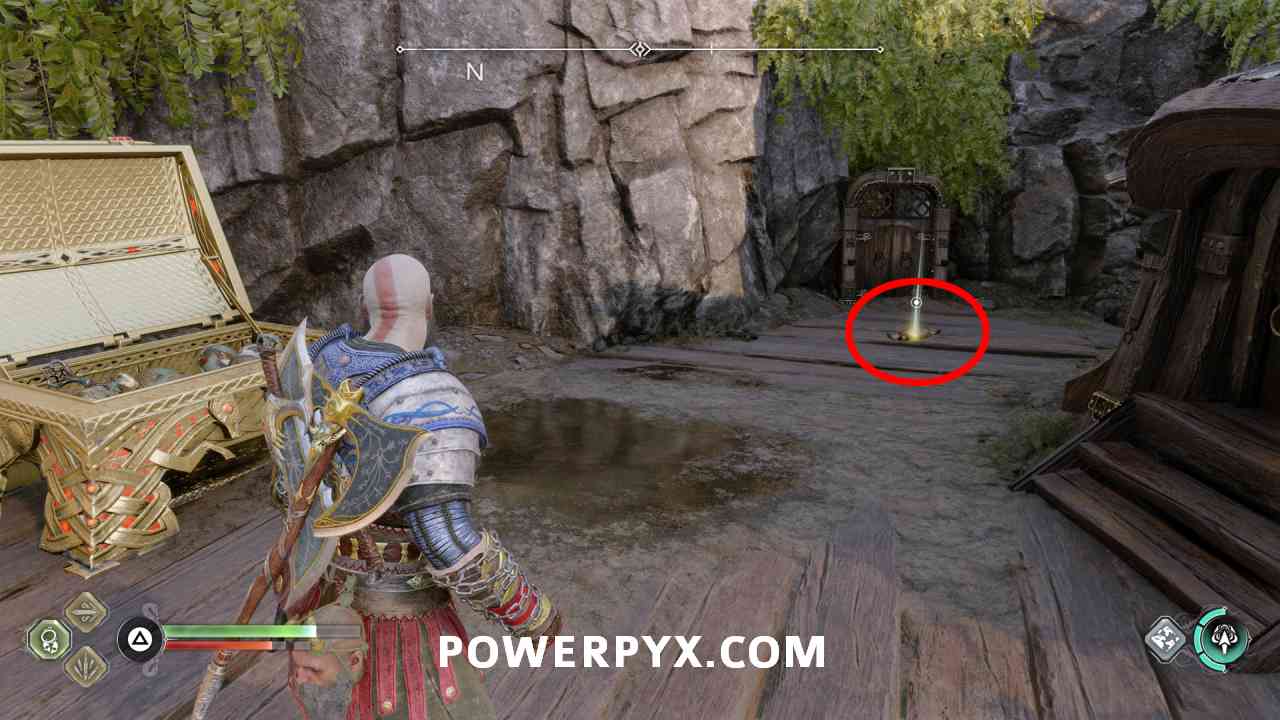
#7 – Nidavellir (Treasure Map – Mining Glory)
At the top area of the town, there is some gas/wind coming out of a wooden pillar. You need the Spear weapon for this one (unlocked during Main Mission 10: Forging Destiny). Throw the spear at the wind in the pillar, this creates a path to climb up. Sitting right next to the Legendary Chest, look for a green-glowing scroll on the floor.
#8 – The Forge (Scroll – Dear Overseer)
From the area where you fight the Dreki in the story, squeeze through the rocks at the other end of the area. Then go right and climb the first wall on the right with white markings on it. This leads to a little dwarven hut, a lore scroll sits on the ground in front of it.


#9 – The Forge (Rune Read – The Forge)
Same area as the previous Lore Scroll, at the gate on the left. Check the blue letters on the wall.


#10 – Althjof’s Rig (Rune Read – The Squasher)
Found at the bottom of the area after smashing through the ground. From the beginning, turn right and press to pull down an elevator with your blades. Then interact with the wheel on the right to lower a grappling point, bring it just one level above the bottom (not to the very bottom). This allows you to step on the platform you lowered and swing over. Then use the fire of your blades  +
+  to blow up the red barrel, climb up at the end of the floor, open the gate upstairs, drop down and blow up another red barrel, then in the back left corner you can climb up (the white climbing-path signs on the wood show the way). After climbing up you can smash through the floor with , this brings you downstairs. Immediately after smashing through the floor check the left side for blue letters on the wall, that’s the lore.


#11 – Althjof’s Rig (Scroll – Passion)
From the mining rig turn around and look left. You can shoot green arrows at the vases with +  . Then you can climb around the wall behind the vases (there are white icons on the wall to indicate the climbing path). Jump over to the golden chain, slide down the chain, use the wheel once more to raise the grappling point to the very top. Climb back up the same golden chain, now you can use the grappling hook to jump over, in midair press to smash through the wall. The lore scroll is on the floor here.


#12 – Modvitnir’s Rig (Lore Marker – Warning)
After climbing the wall, turn right and press to use the grappling hook. Then immediately drop down on the right side to find a Lore Marker.


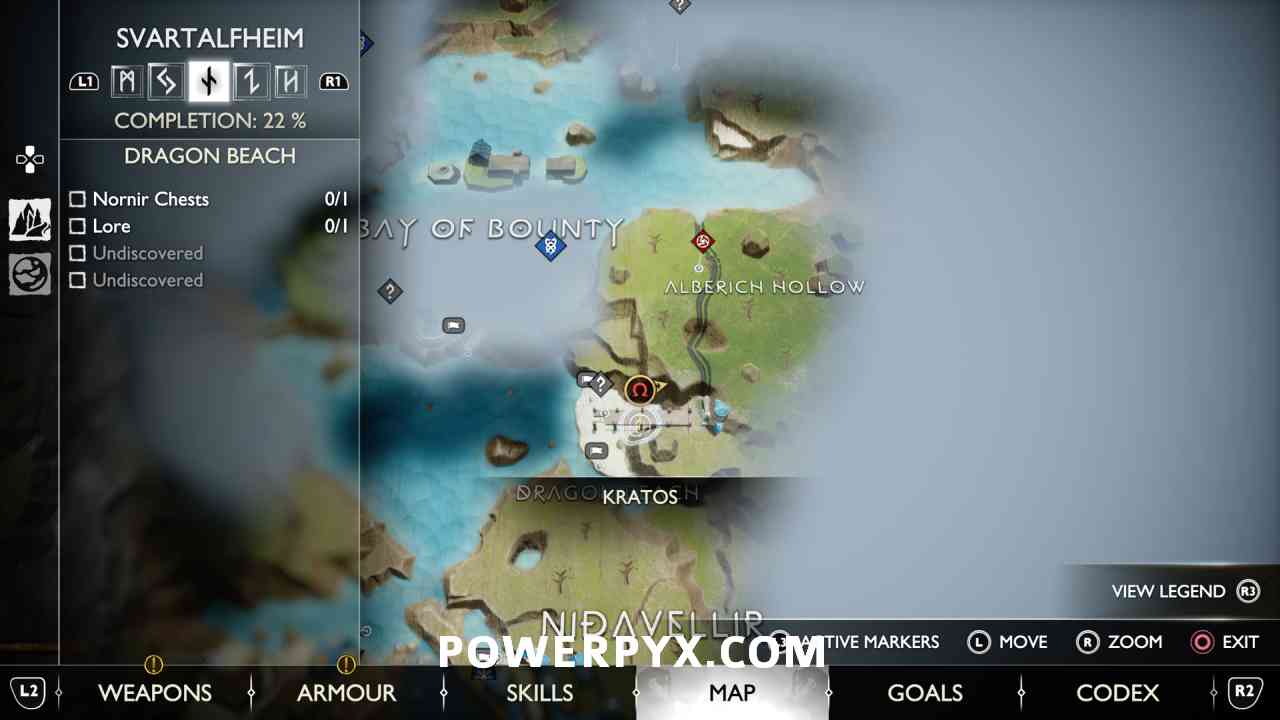
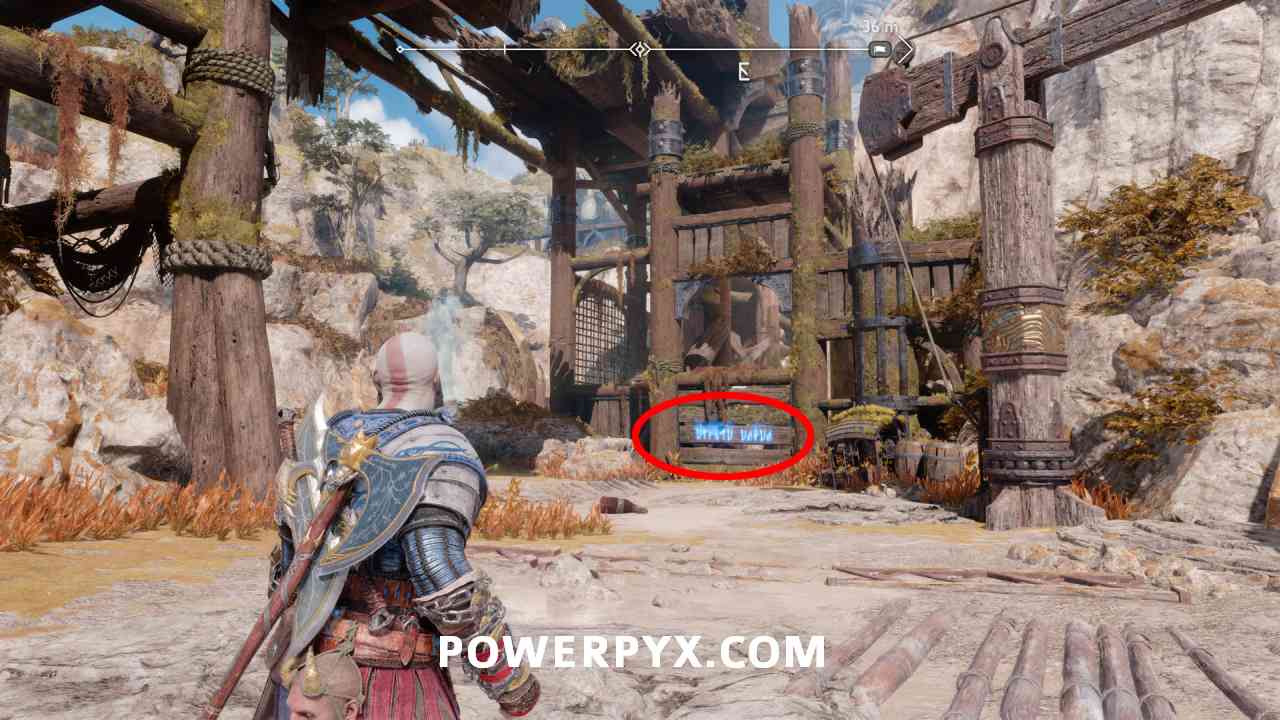
#13 – Dragon Beach (Rune Read – Don’t Breath)
In the middle of the beach, check the blue glowing glyphs under the wooden bridge.
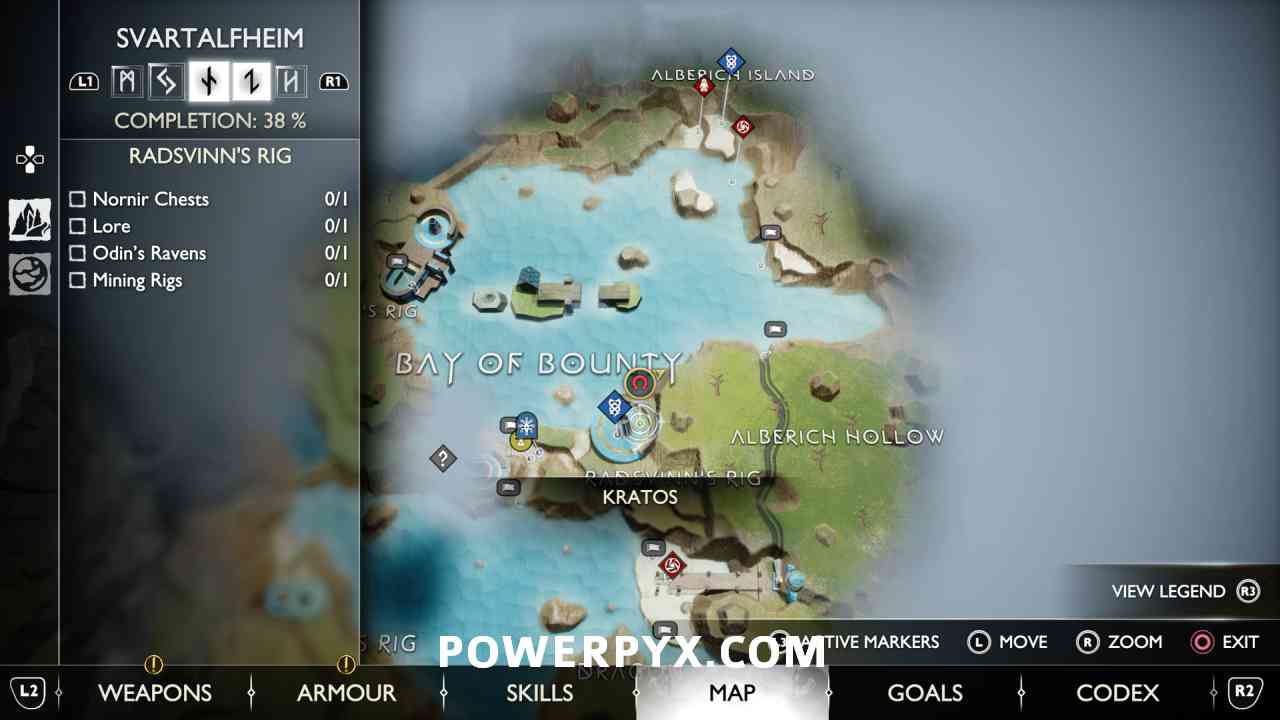
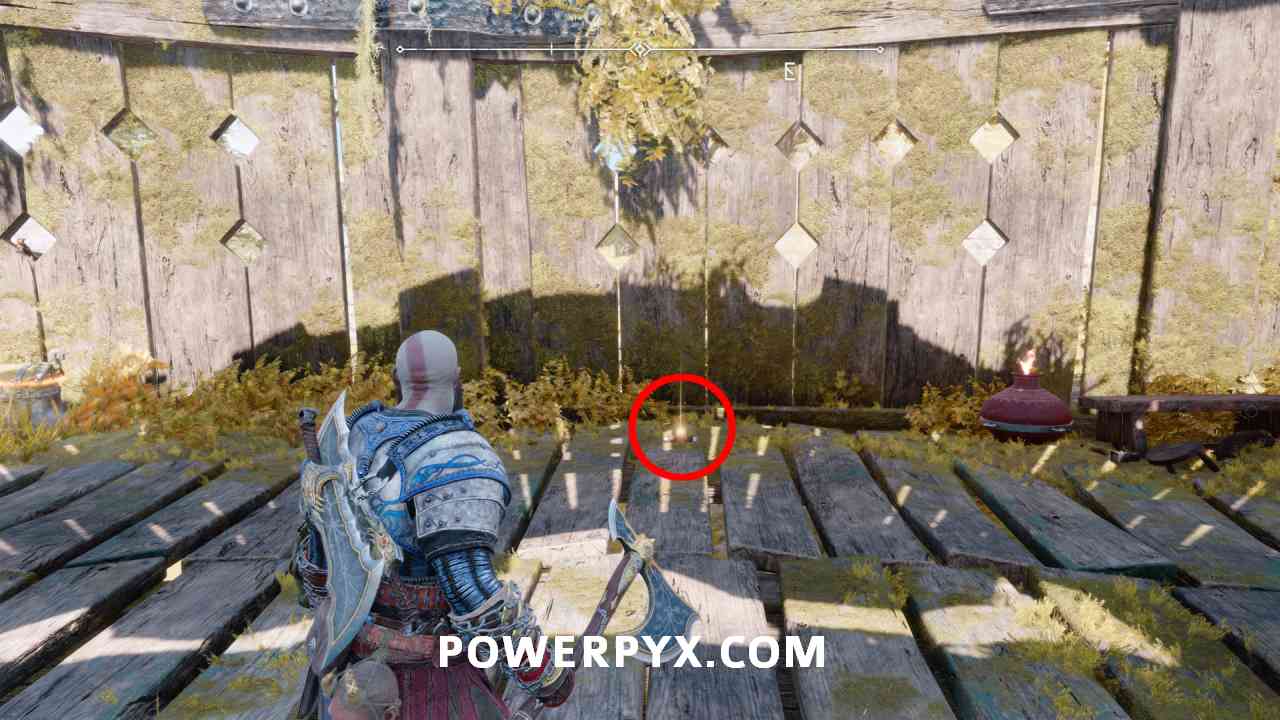
#14 – Radsvinn’s Rig (Scroll – Climbing the Ladder)
Straight behind the mining rig at the end of the area (to the right of the two kegs you shot for one of the Nornir Chest seals).
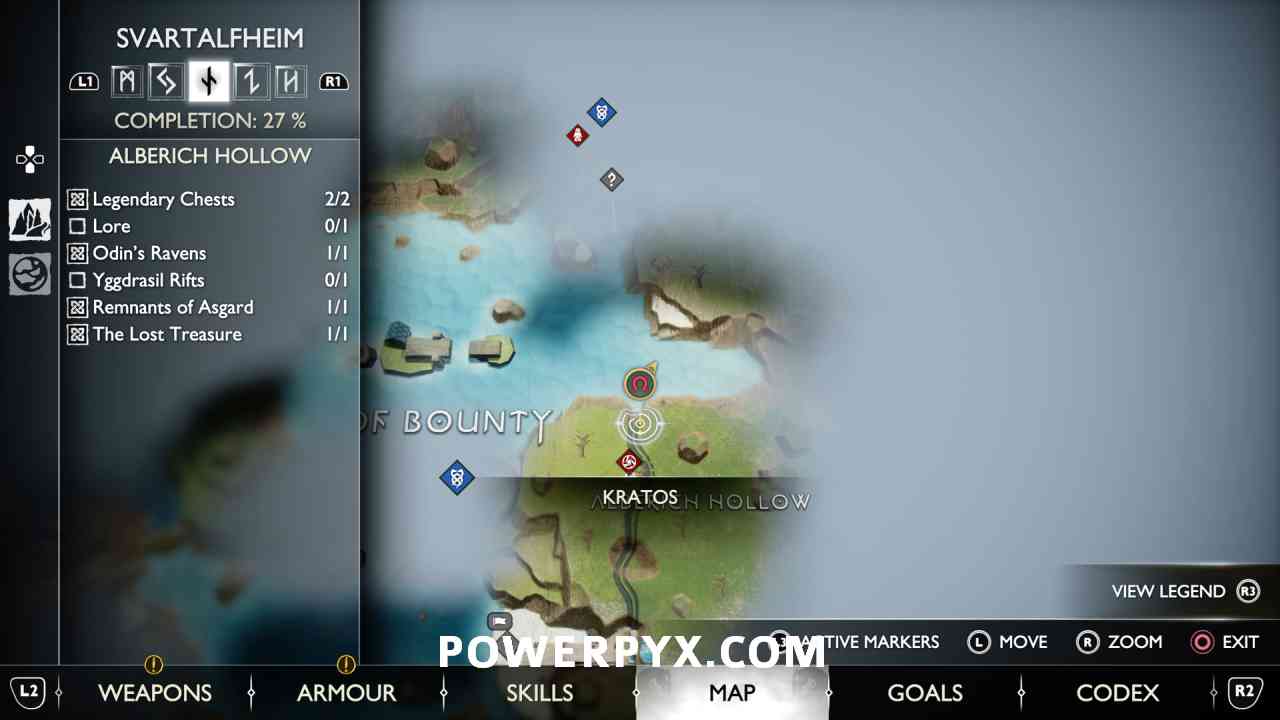
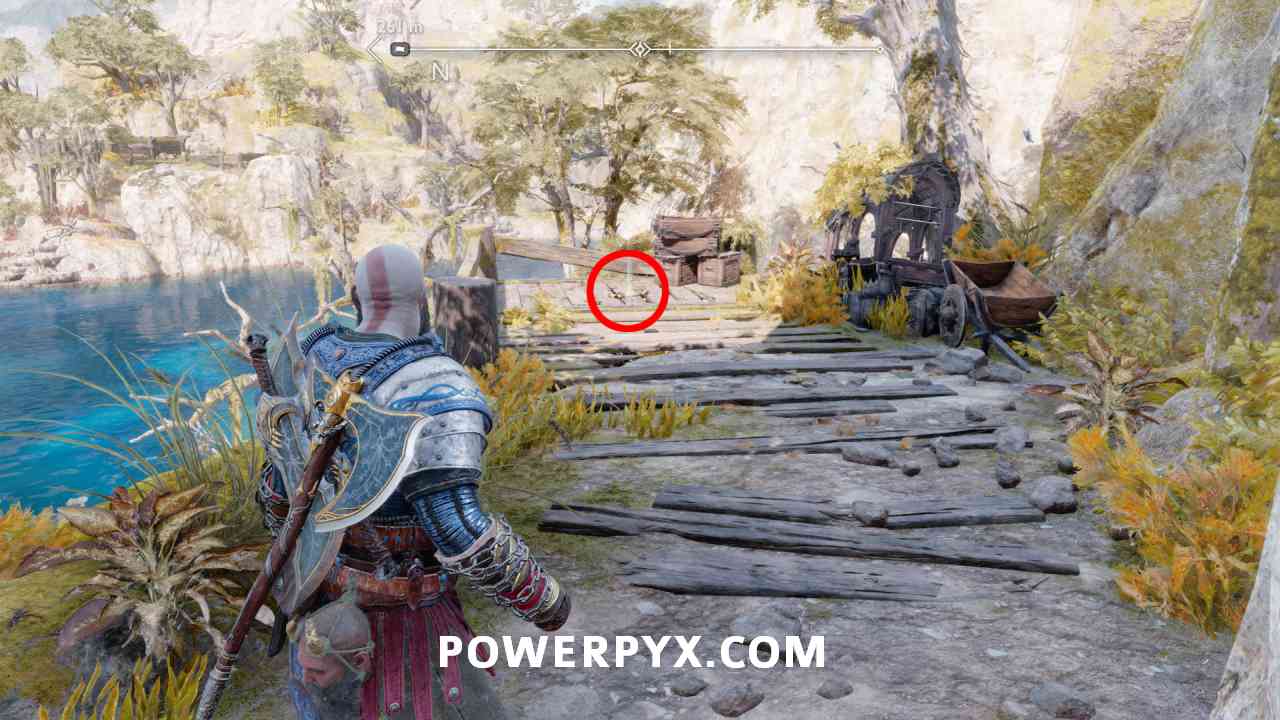
#15 – Alberich Hollow (Treasure Map – Fruits of Industry)
At the end of Alberich Hollow, to the right of the Legendary Chest. Still in the upper area, before sliding down the golden chain.
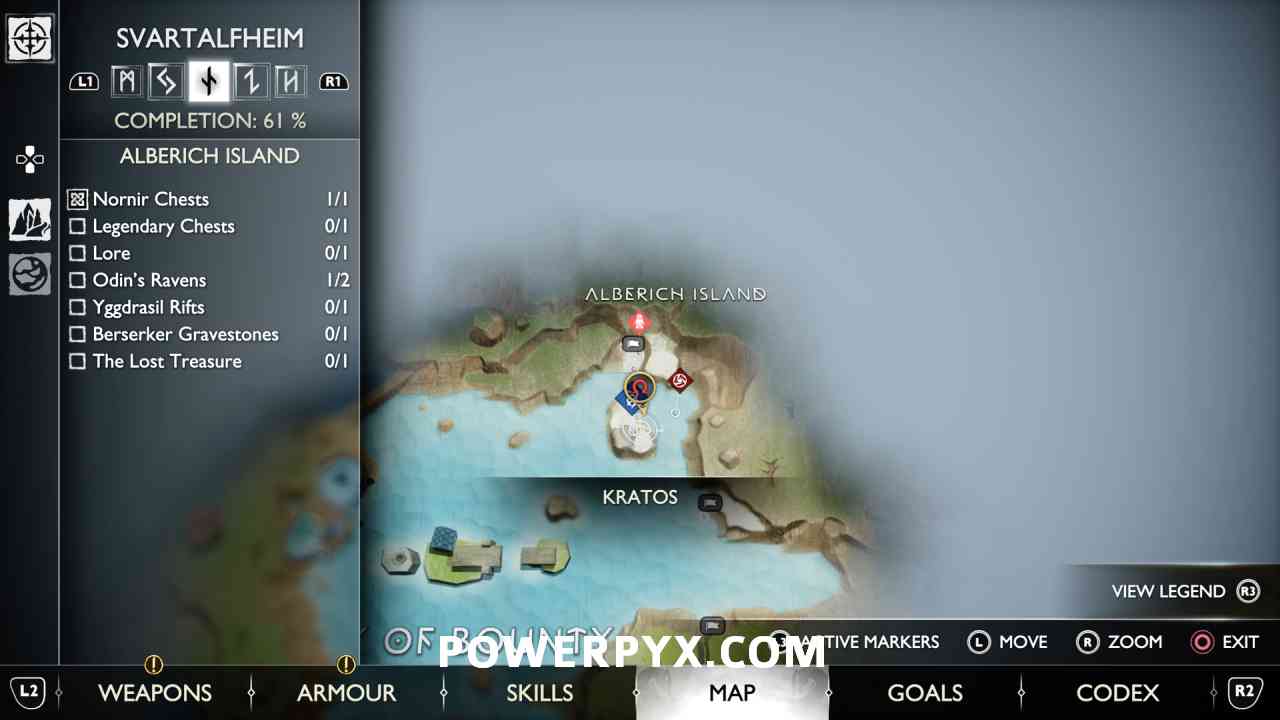
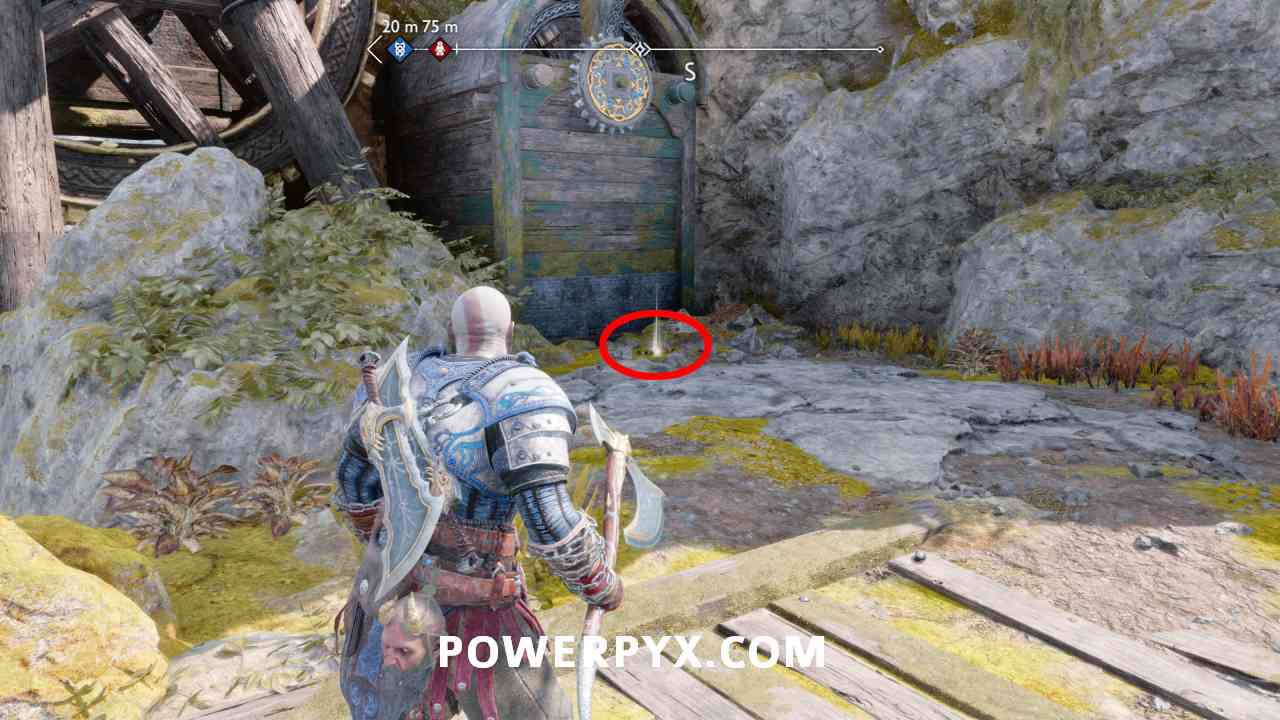
#16 – Alberich Island (Treasure Map – Washed Ashore)
From the middle platform use the grappling hook to swing across to the second island. After landing, turn left to find this treasure map scroll on the ground.
#17 – Lyngbakr Island (Lore Marker – Regarding the Removal of Resources)
After going to Lyngbakr Island and then summoning the Lyngbakr at The Watchtower, you can fully explore the island. Lyngbakr Island requires you to cut 3 chains and throw your axe at the locks at the fins of the Lyngbakr. While going through the quest you can also grab the collectibles along the way. After destroying the first lock, continue on the only path forward, after climbing a golden chain turn right to see it.


Midgard
#18 – The Oarsmen (Lore Marker – An Accursed Name / The Death of Helgi)
After pulling the chain, go downstairs. To the left of the Legendary Chest.

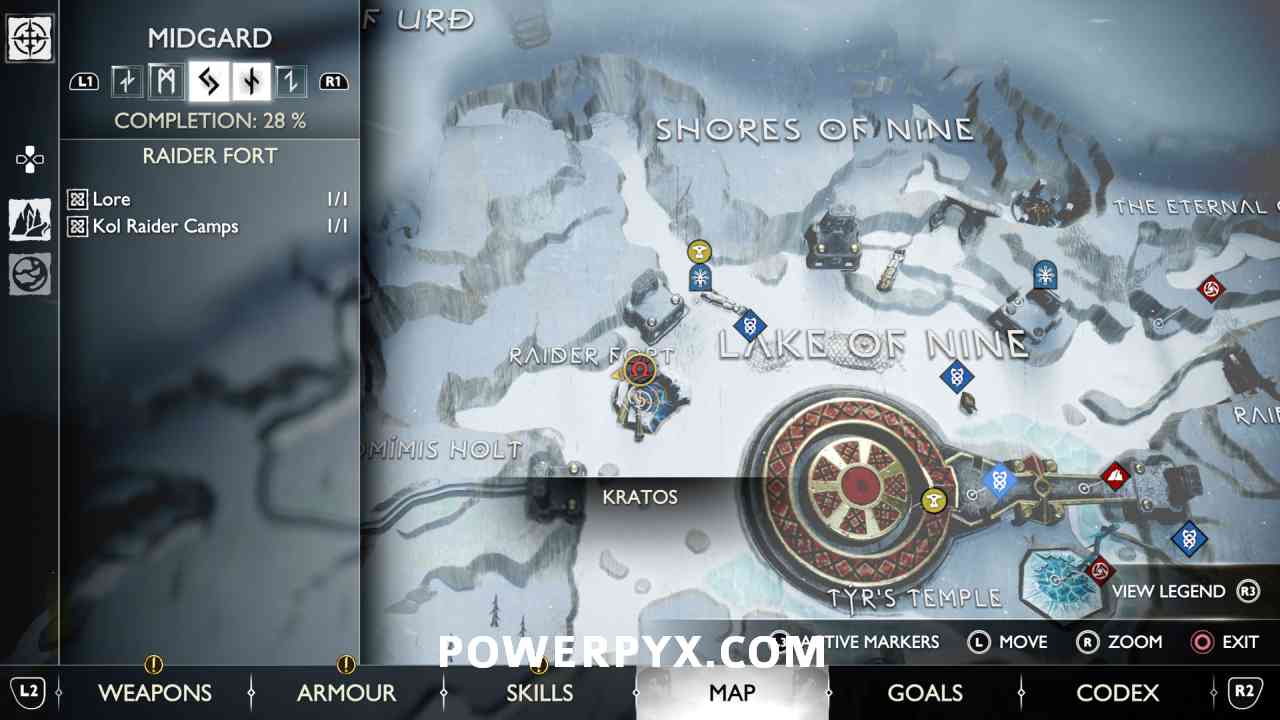
#19 – Raider Fort (Treasure Map – Viking’s Gift)
At the end of the Raider Fort, on the ground in the snow.
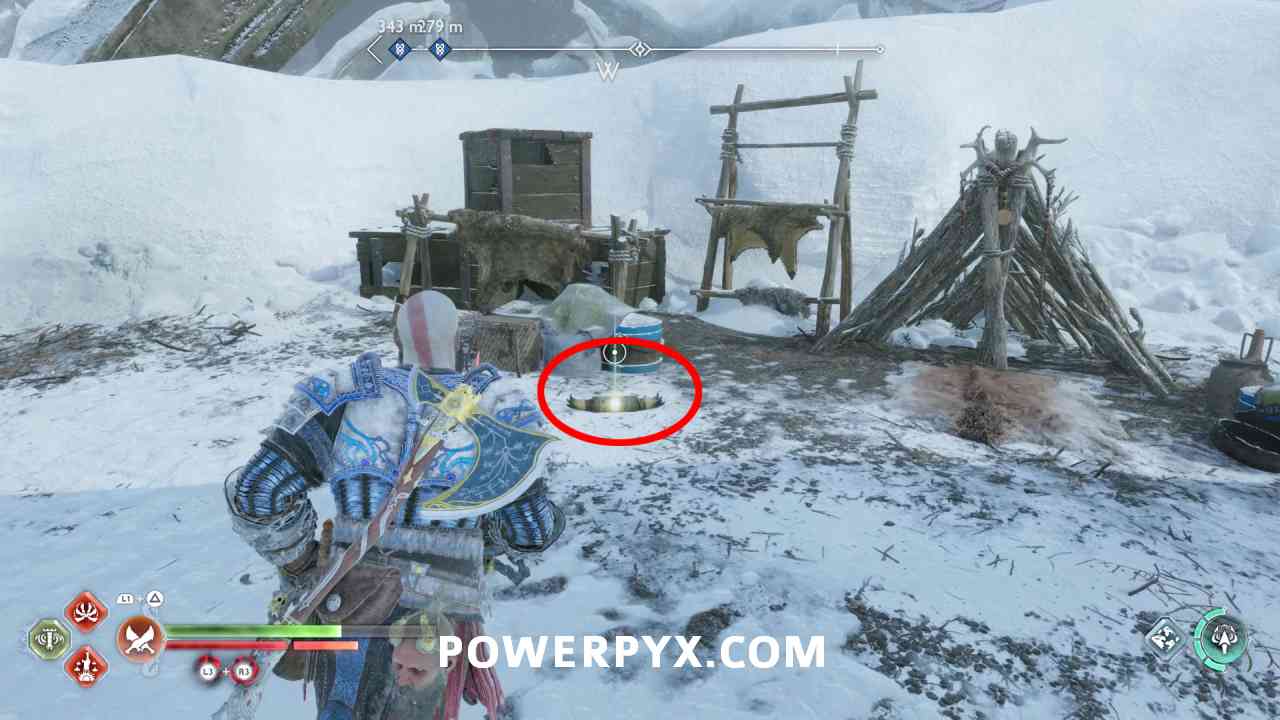
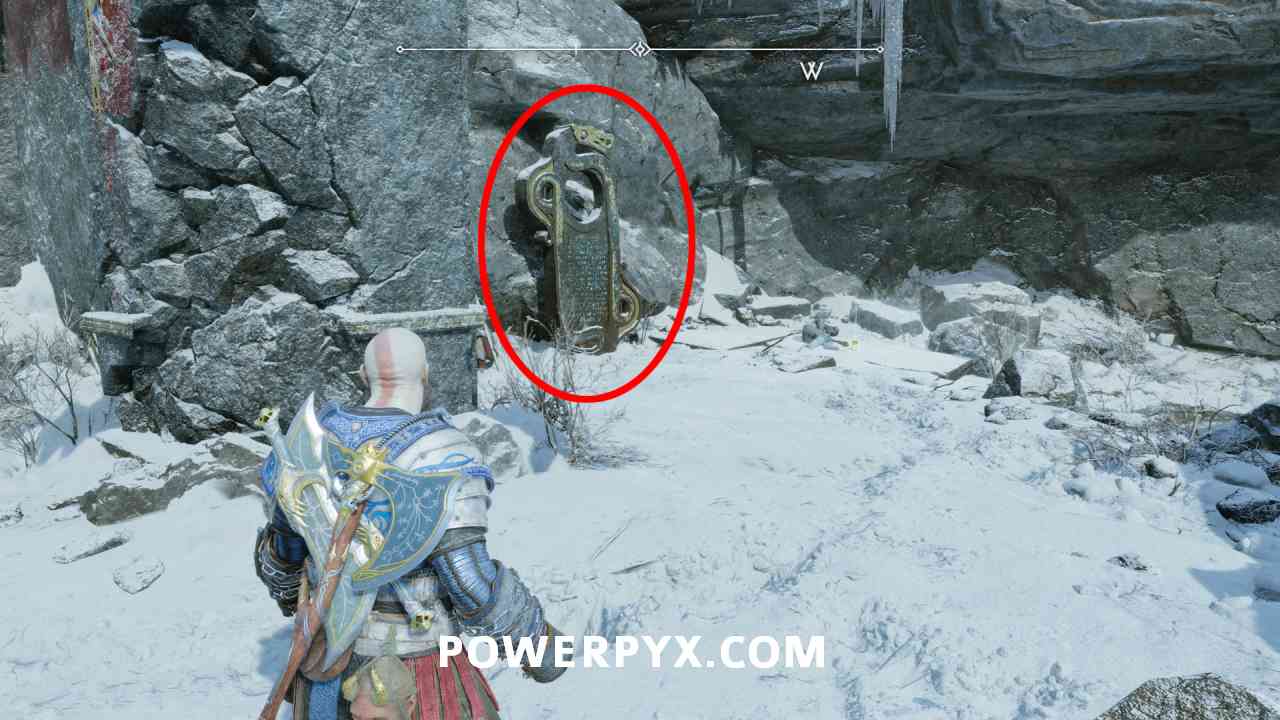
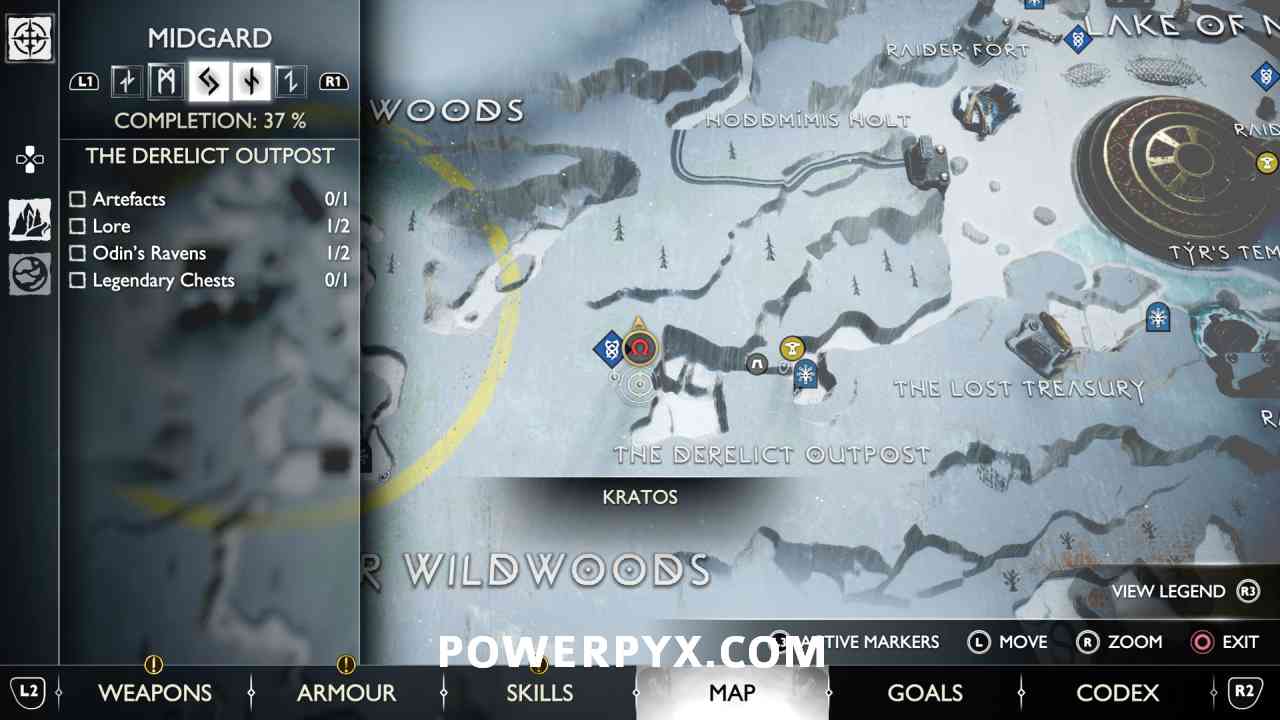
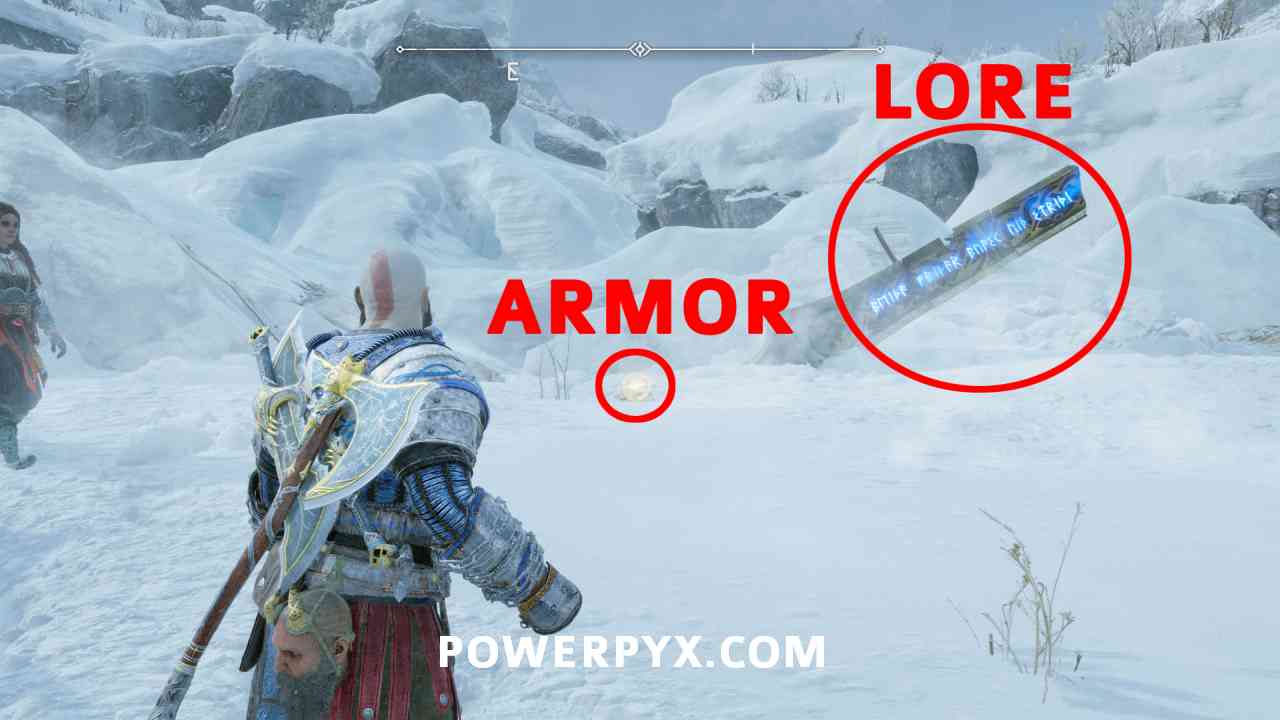
#20 – The Derelict Outpost (Lore Marker – Blodugr Steinn)
From the Mystic Gateway, climb up the golden Chain. Go past the blacksmith and use the 2 grappling hooks to swing across. There will be a stone with little green phantom enemies coming out of it. Behind the stone on the left is the Lore collectible. Still before using the 3rd grappling hook.

#21 – The Derelict Outpost (Lore Marker – An Accursed Name / The Death of Helgi)
After using the 5th grappling hook to swing across, there will be a Lore Marker and Legendary Chest in front of you in plain sight, impossible to not see it.

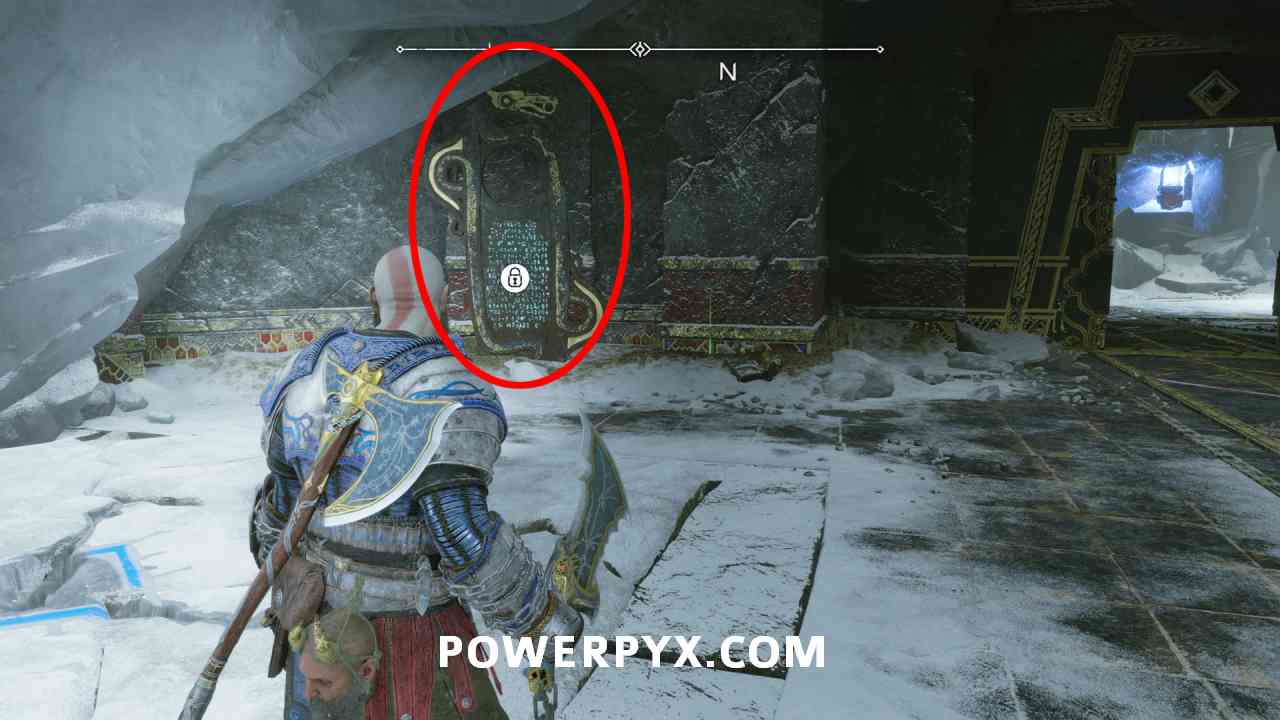
#22 – The Lost Treasury (Lore Marker – Love’s End)
Inside the Lost Treasury. This requires the full Fjortlund Vault Key follow the guides for these regions first, they contain the key pieces: The Oarsmen Collectibles + The Derelict Outpost Collectibles. After grabbing the 2 key pieces from those regions you can open the door here in The Lost Treasury. Behind the door defeat the enemies, then the Lore Marker is on the right. It’s the last objective to complete Favor: Sigrun’s Curse. Interacting with the Lore Marker automatically completes the Favor.

#23 – The Lost Treasury (Sword Hilt – give to blacksmith)
In the same room as the Lore, climb up the golden chain, turn around and smash through the floor. There will be a golden scroll on the floor that counts as a Lore collectible.

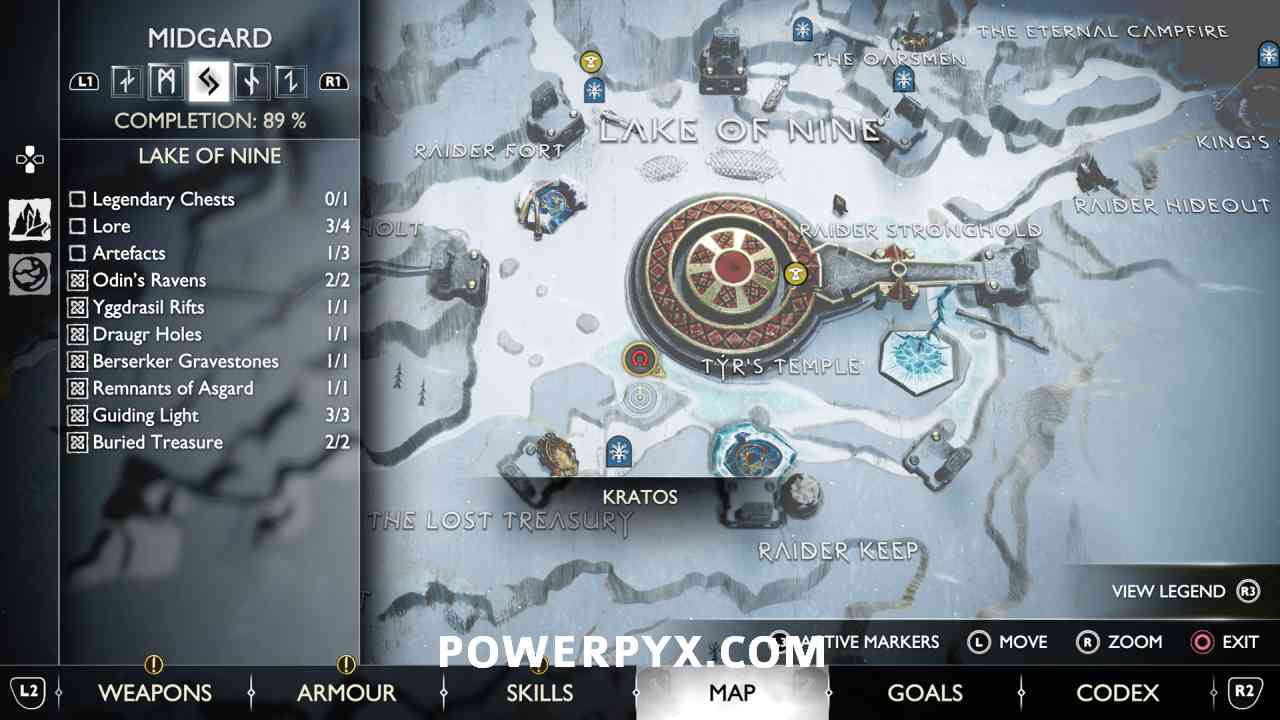
#24 – Lake of Nine (Rune Read – Tyr’s Left Bracer)
From the Mystic Gateway around the corner.


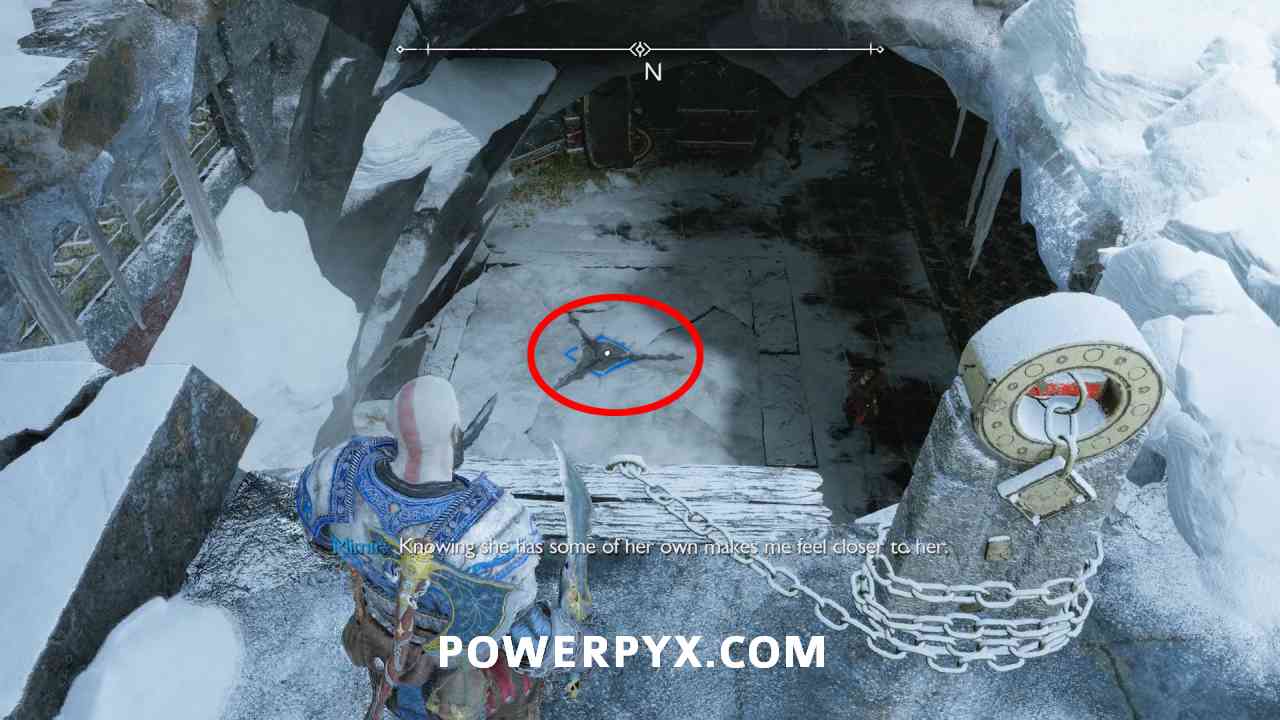
#25 – Lake of Nine (Rune Read – Tyr’s Helmet)
In the frozen lake under the big golden helmet with smoke coming out of it
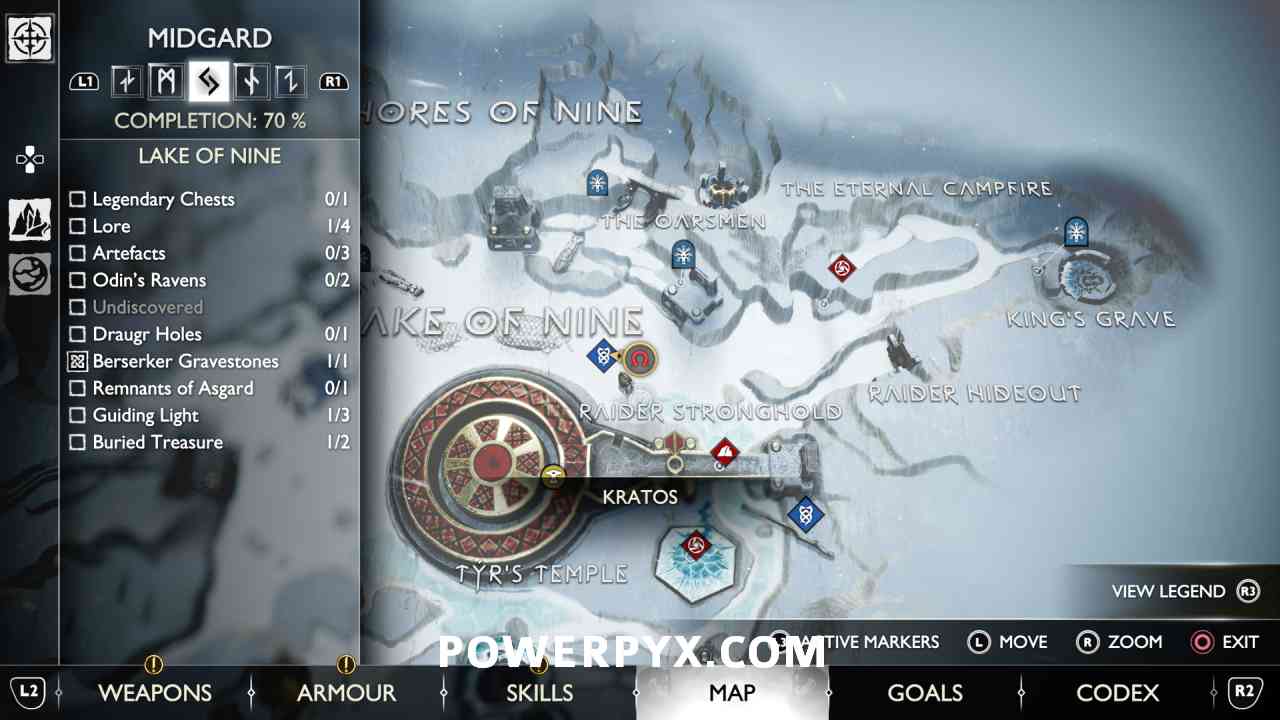

#26 – Lake of Nine (Rune Read – Tyr’s Spear)
In south-west section of the lake, just past the Tyr’s temple bridge

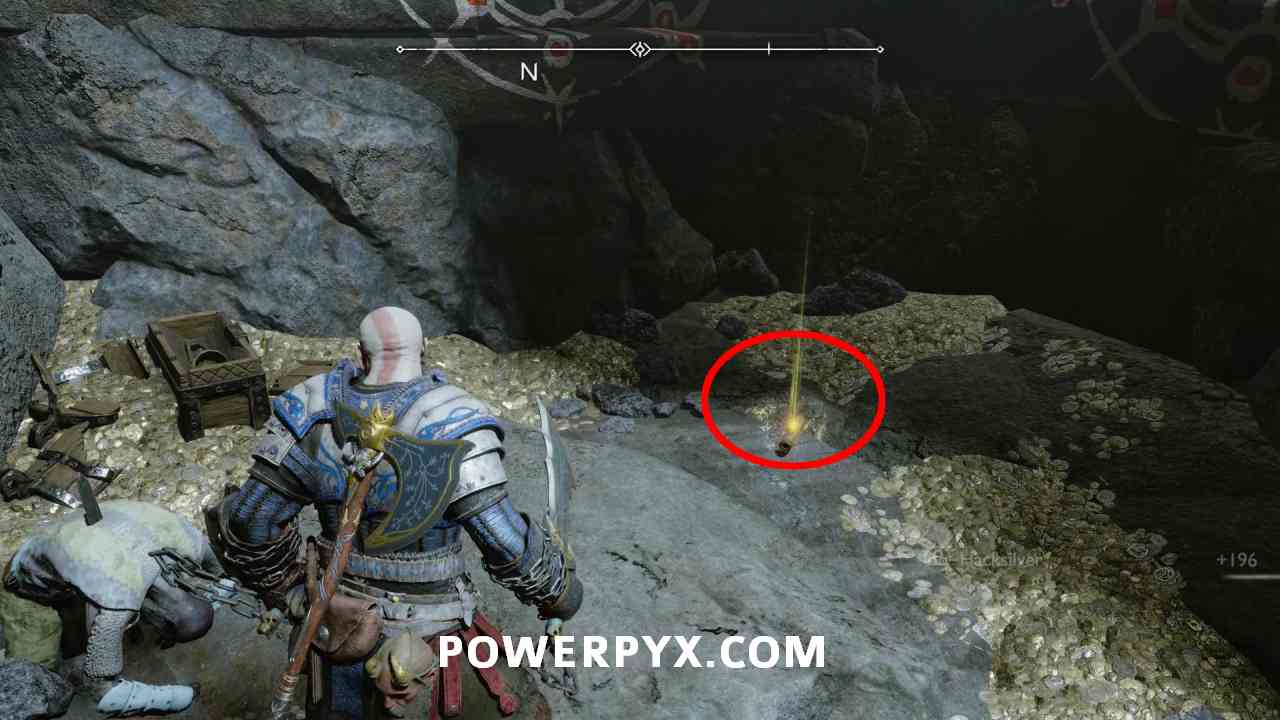
#27 – Lake of Nine (Scroll – Receipt of Purchase)
South-west of Tyr’s Temple, behind a yellow glowing piece of ice that you can blow up with the spear.


Alfheim
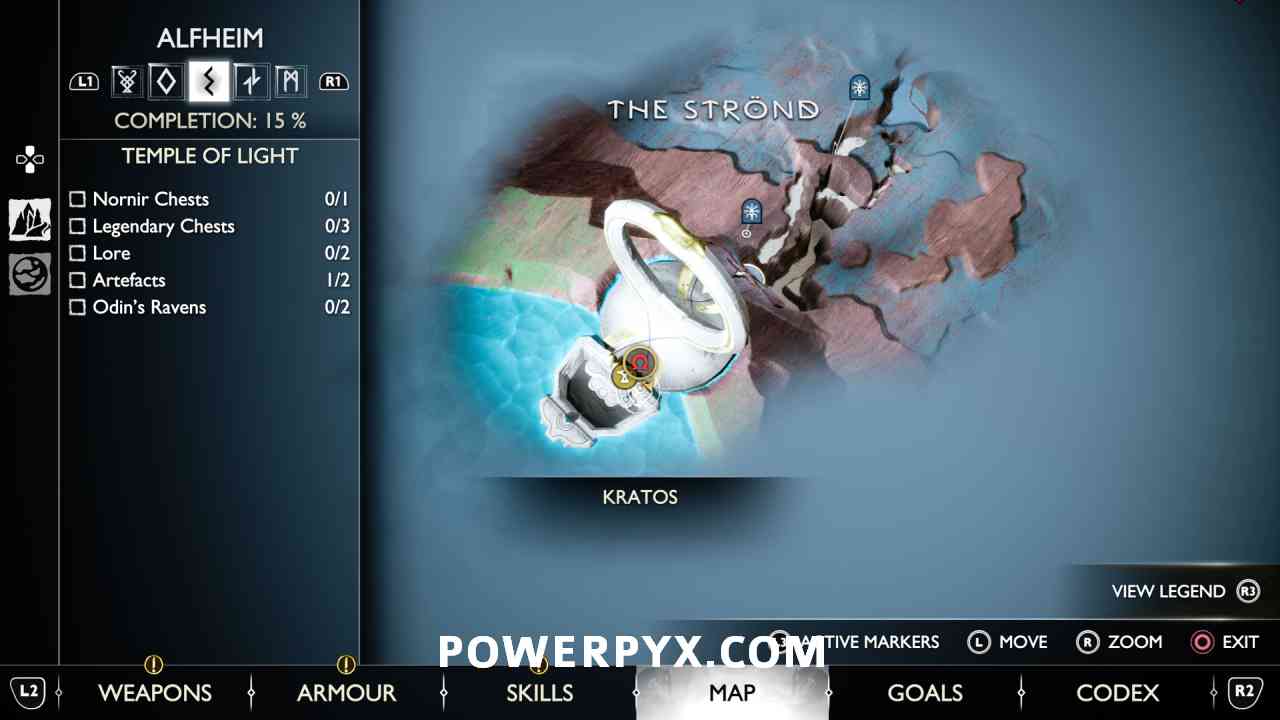
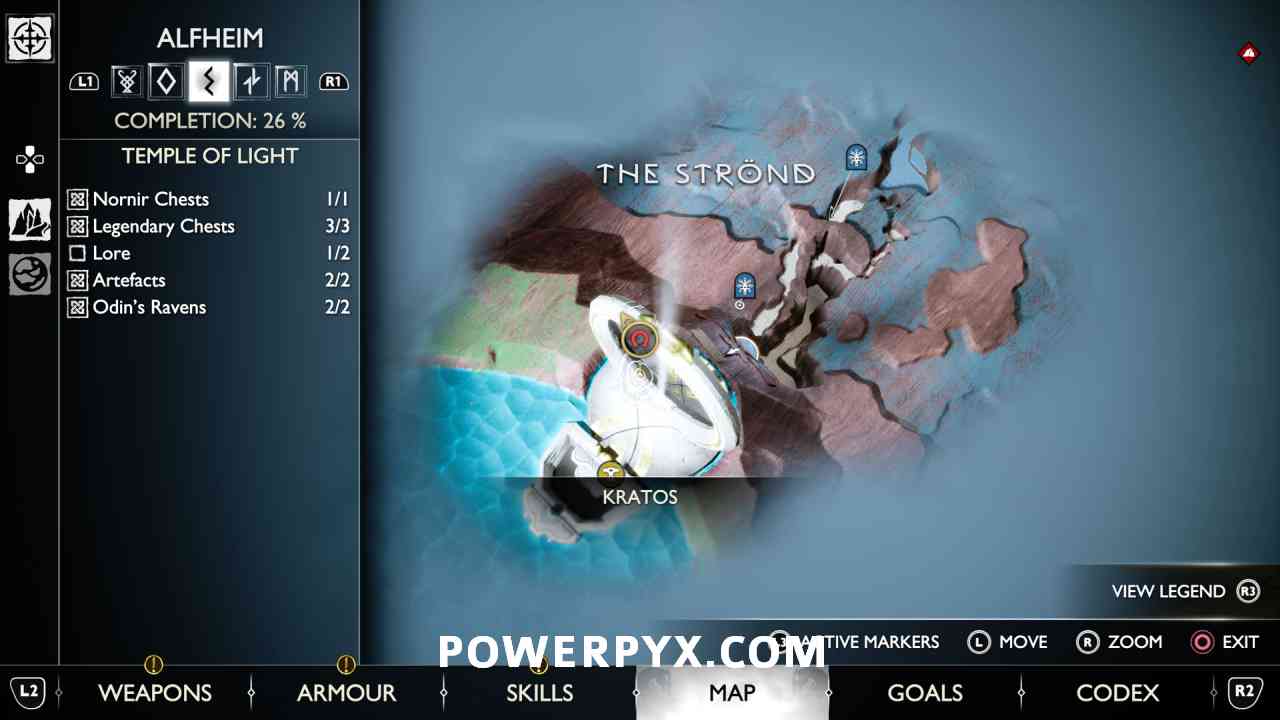
#28 – The Strond (Rune Read – Broken History)
In front of Mystic Gateway.


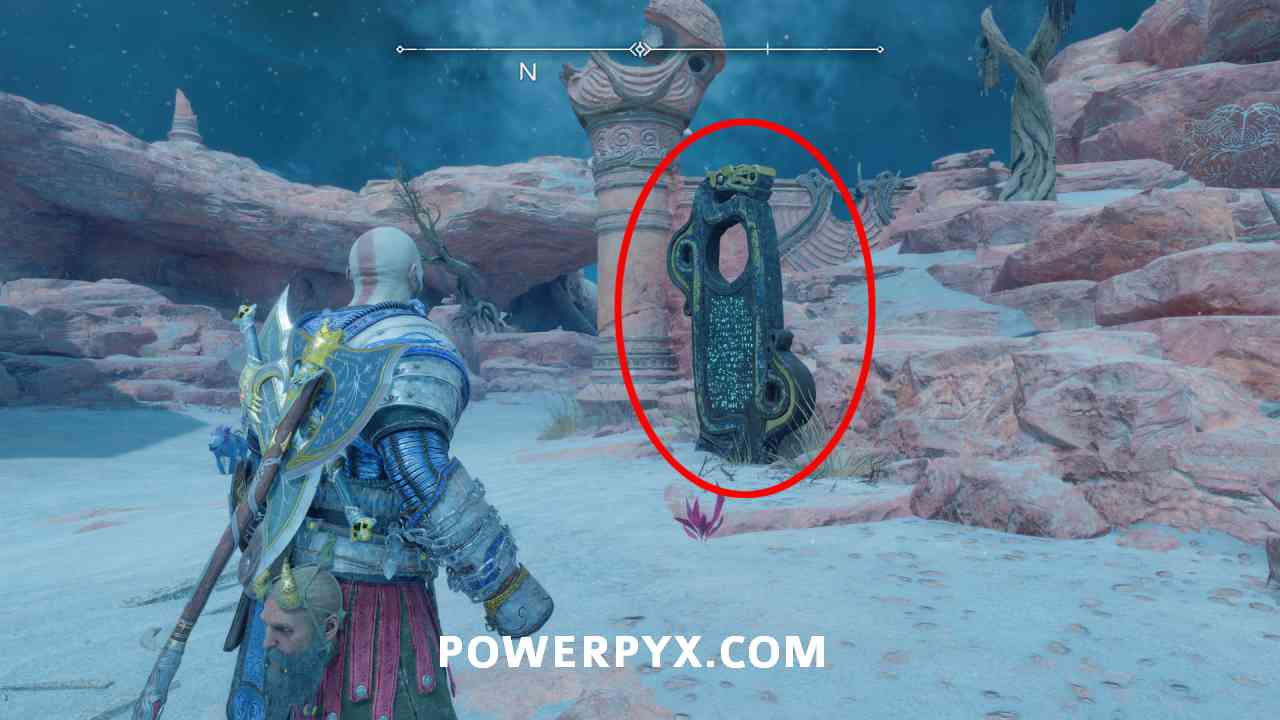
#29 – The Strond (Lore Marker – The Living Desert)
Go up the path to the left of the lore, then drop down at the end for a Lore Marker.


#30 – Temple of Light (Scroll – The Bifrost Bridge)
Go through the temple until you must use two grappling points to jump across a gap, then you reach a spiral staircase going up (it’s the only way forward, can’t miss it). Halfway up the spiral staircase you can drop down the left. In that area you find 3 collectibles. The first is the lore scroll in the left corner (glows golden).

#31 – Temple of Light (Rune Read – Limitless)
After pushing open 2 gates you briefly come outside, then you go back into the temple. On the right you can shoot a sonic arrow at what looks like a golden spear of a statue. This will reveal a grappling point, use it to swing across, then turn right for the Lore.


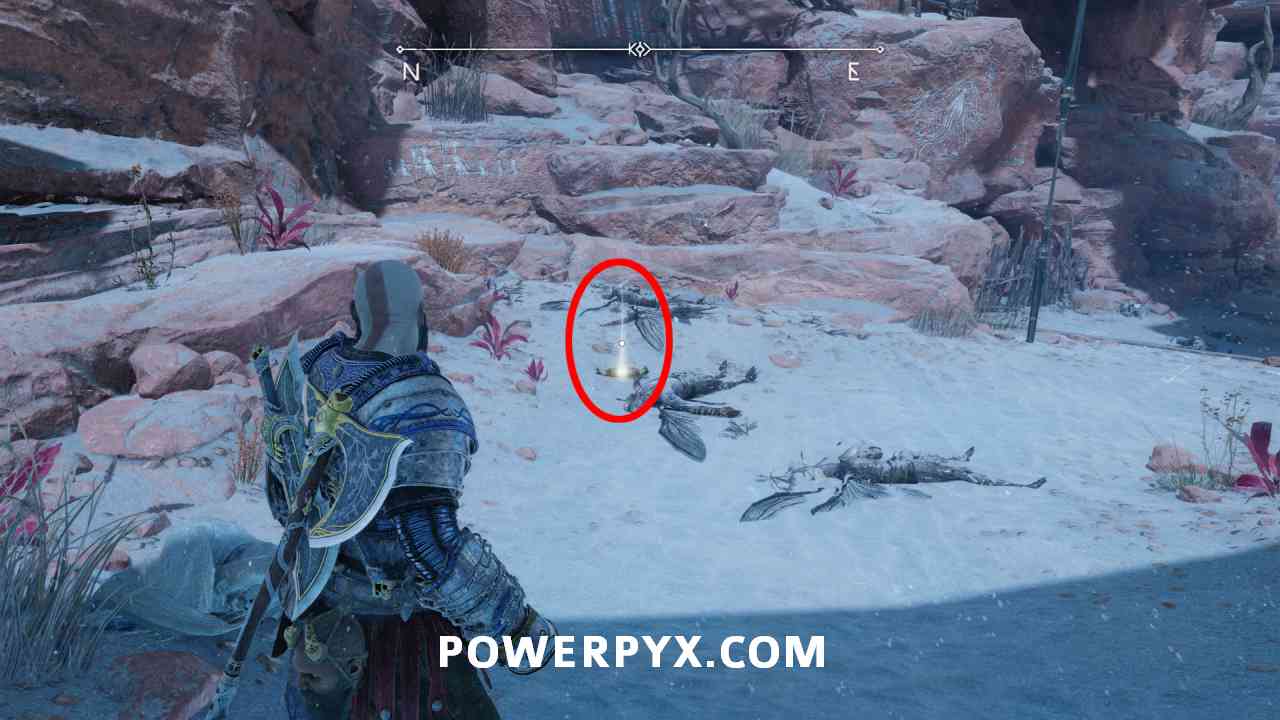
#32 – The Canyons (Treasure Map – Vulture’s Gold)
After arriving at “The Strönd” Mystic Gateway, take the path to the left. A lore scroll is in plain sight on that path, easy to see. It also unlocks the Vulture’s Gold treasure hunt.

#33 – The Canyons (Lore Marker – U-natur-liker)
Next to the blacksmith’s shop and mystic gateway.

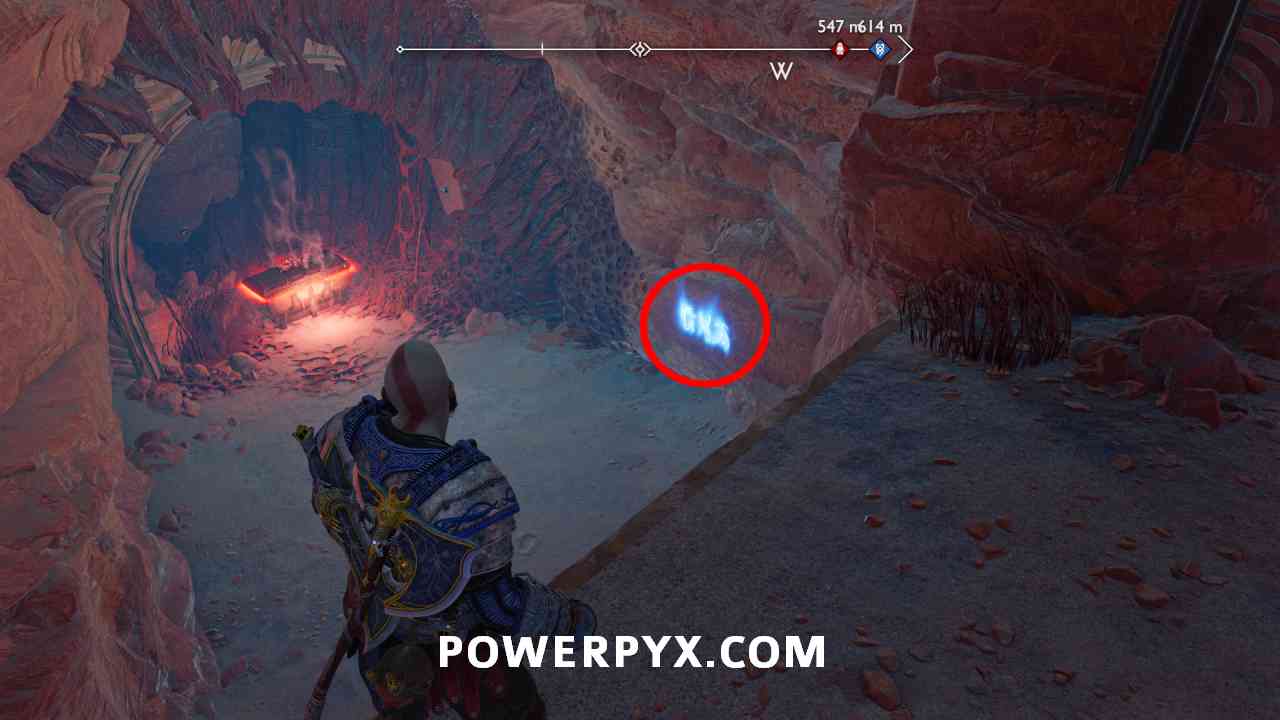
#34 – The Below (Rune Read – Patience)
‘The Below’ is reached by going through Alfheim > The Strönd > The Canyons > The Barrens > The Below. As soon as you enter the Barrens you get a Favor “Secret of the Sands“, which will lead you underground into a cave ‘The Below’. The region has a linear path with only 3 collectibles. The first is the Lore, it’s after shooter 3 red sacks with the axe, in a room with a Dark Elves encounter, you can climb the wall and throw your axe at the red sacks to reveal a resource chest and the Lore.


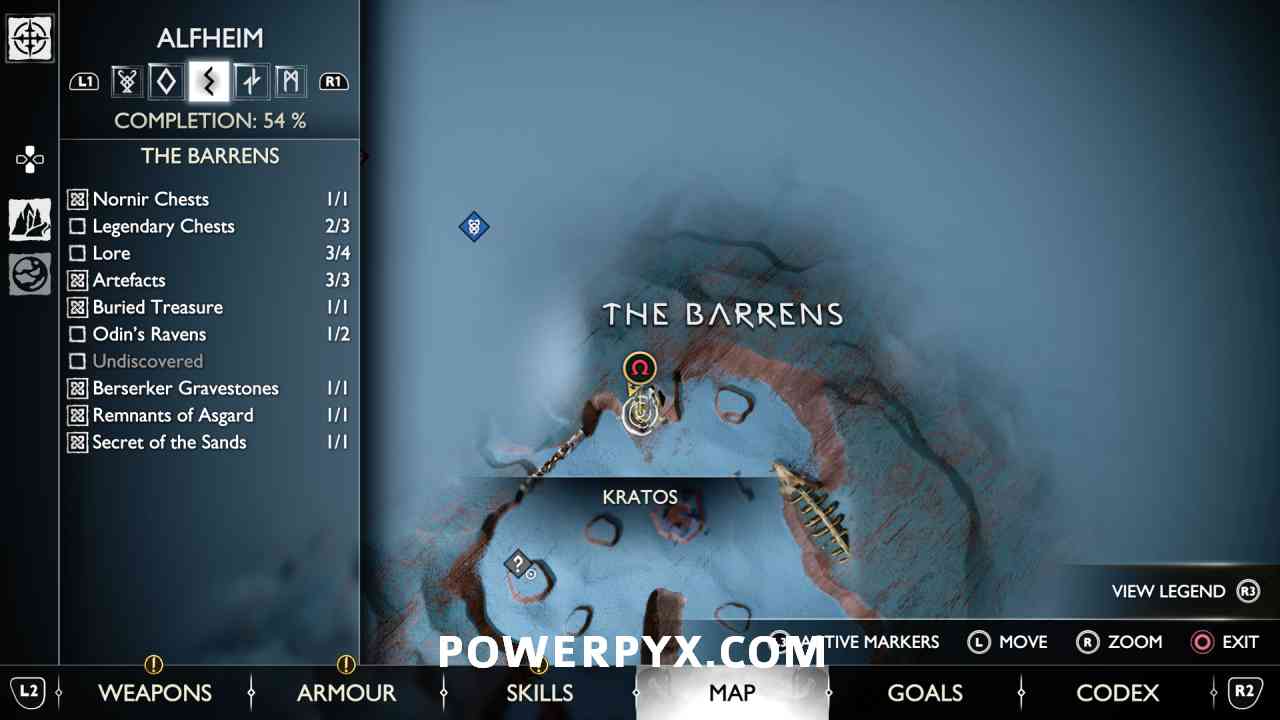
#35 – The Barrens (Lore Marker – Gulon Cull)
In the east of the region, behind the Berserker Gravestone.

#36 – The Barrens (Lore Marker – The Desert of Our Ignorance)
Inside the dragon skull in the north-east of the region. A Lore Marker, Artifact, and Legendary Chest are in here.


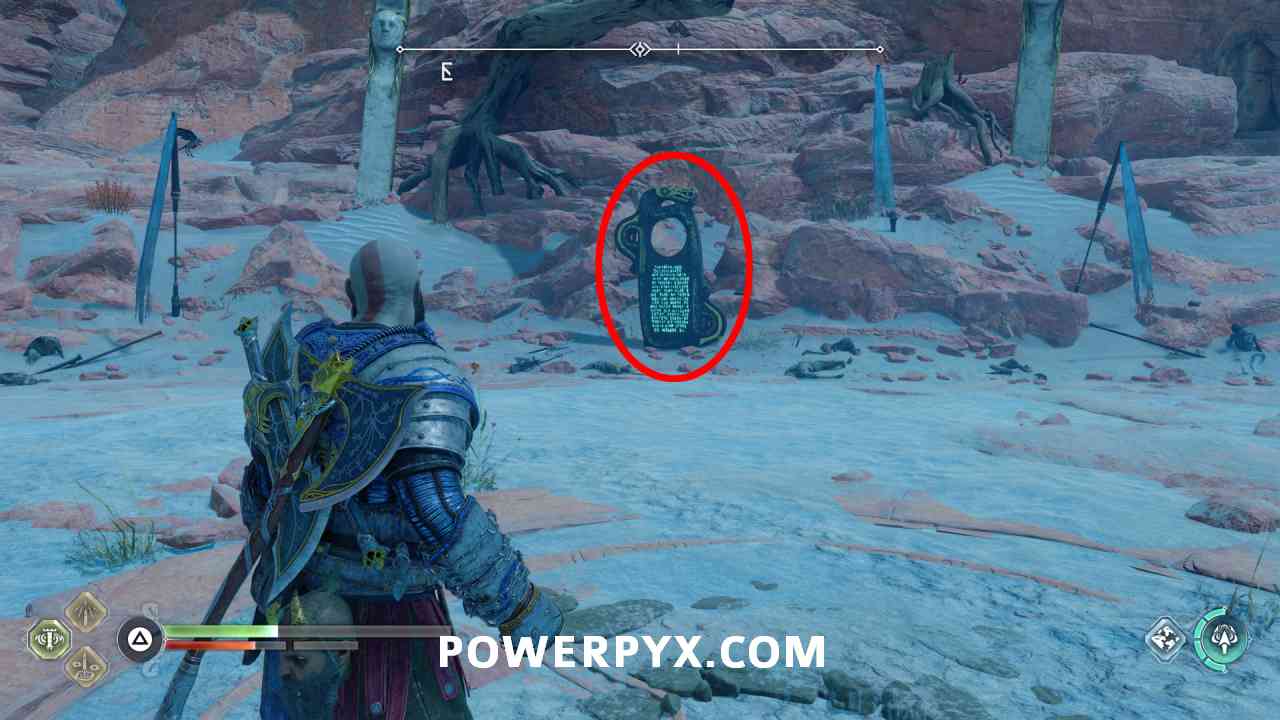
#37 – The Barrens (Lore Marker – The Tower’s Purpose)
At a little tower building in the north-west of the region.


#38 – The Barrens (The Lost Pages)
Same place as the previous lore, under the tower. Has a Lore Scroll, Legendary Chest, Raven all in same spot.

#39 – The Burrows (Rune Read – Sacrifice)
In the second room with enemies of this area, on the left wall, check for the blue glowing letters.
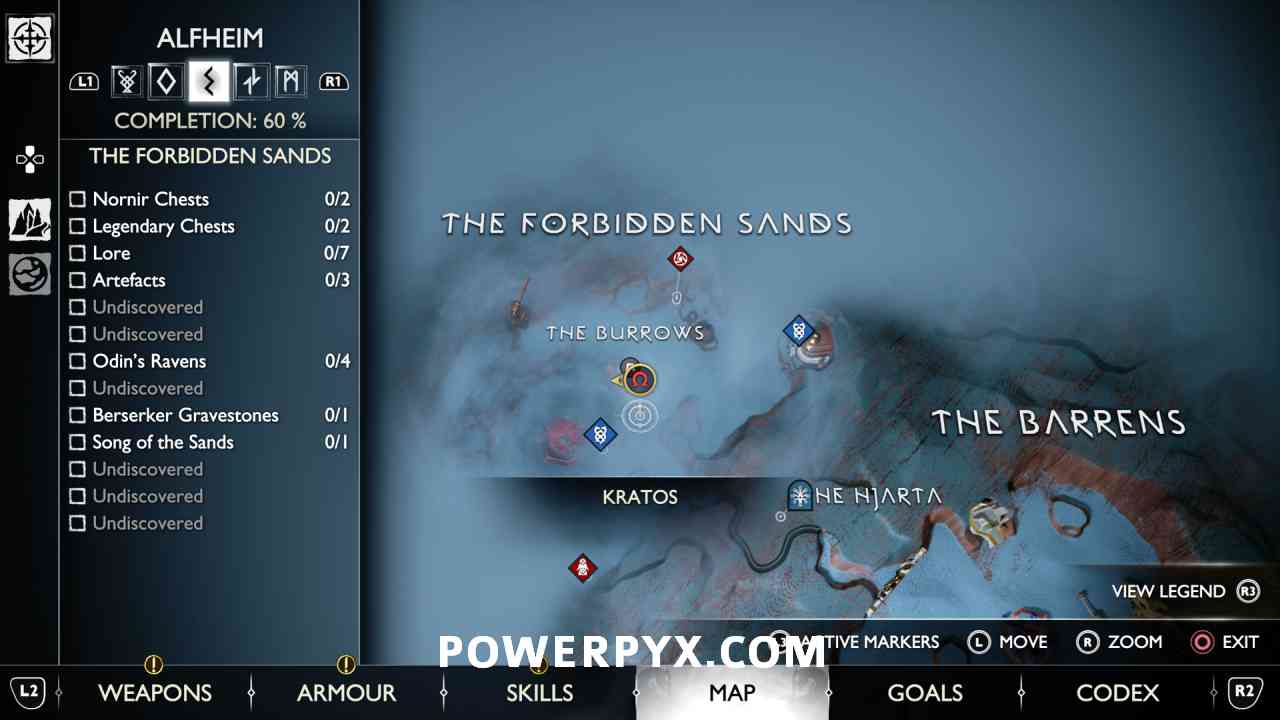

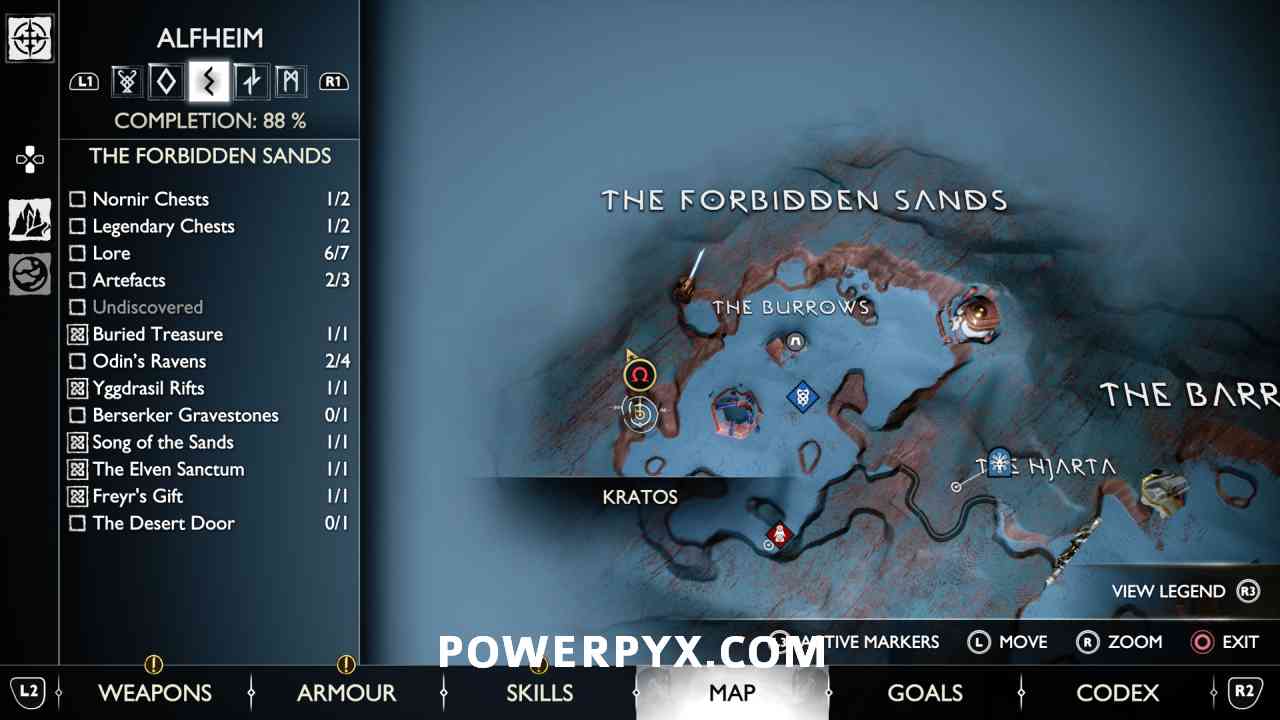
#40 – The Forbidden Sands (Lore Marker – Rules of the Sanctum)
Inside the Elven Sanctum, ground level.


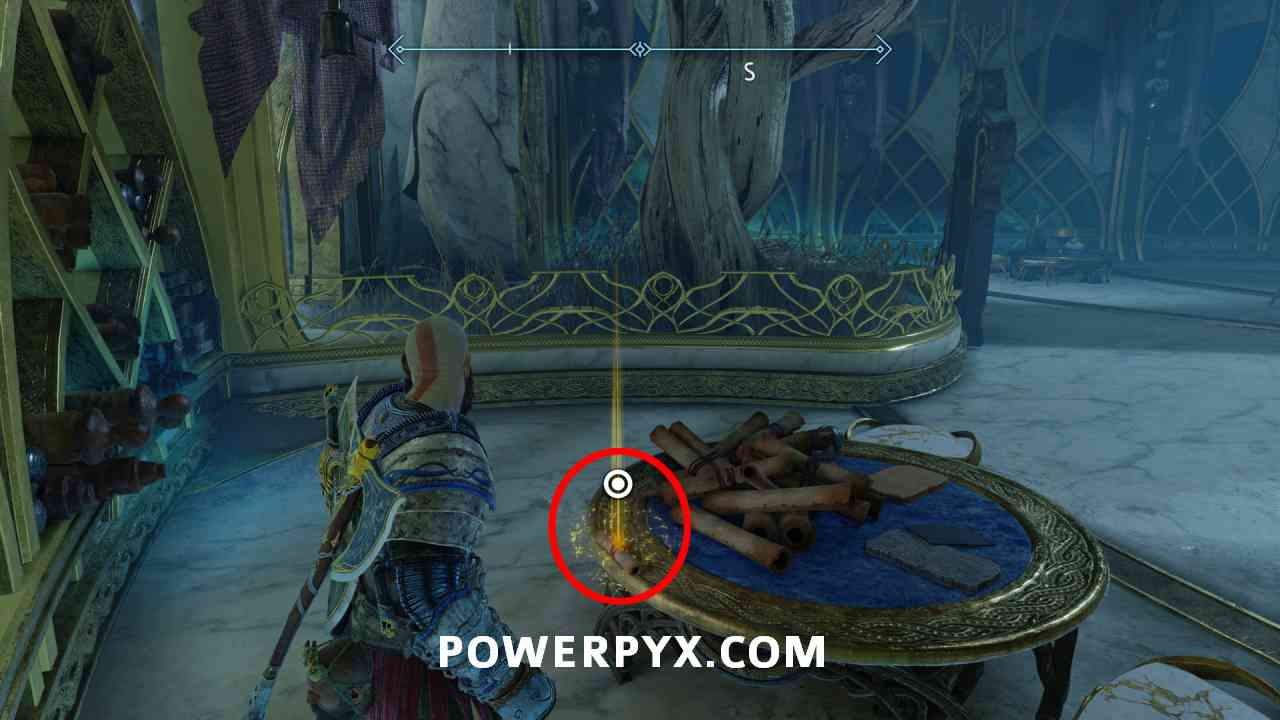
#41 – The Forbidden Sands (Scroll – An Examination of Temporal Significance)
Inside the Elven Sanctum, ground level.

#42 – The Forbidden Sands (The Lost Pages)
Inside the Elven Sanctum, ground level.
#43 – The Forbidden Sands (Treasure Map – Forgotten Tower)
Inside the Elven Sanctum, upstairs.

#44 – The Forbidden Sands (Lore Marker – The Arbiters of Knowledge)
Inside the Elven Sanctum, upstairs.

#45 – The Forbidden Sands (Lore Marker – The Enlightened One)
After finishing “Favor: Freyr’s Gift” and this Lore Marker will turn on, it’s in the same place where the favor finishes, basically the reward for it.


#46 – The Forbidden Sands (Lore Marker – Bjarg Stormr)
In the south-west of the region, climb up to a platform with a Troll.

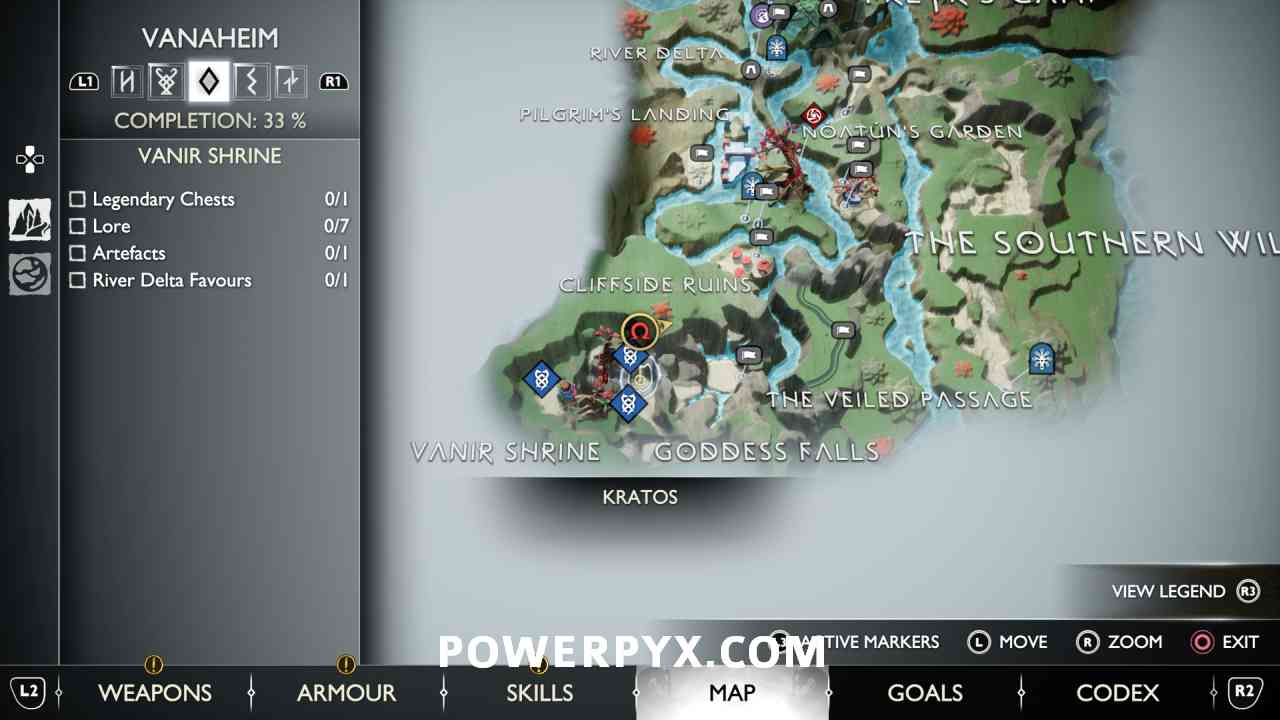
Vanaheim
#47 – Freyr’s Camp (Scroll – Freyr’s Lament)
Across from the blacksmith in the tent.


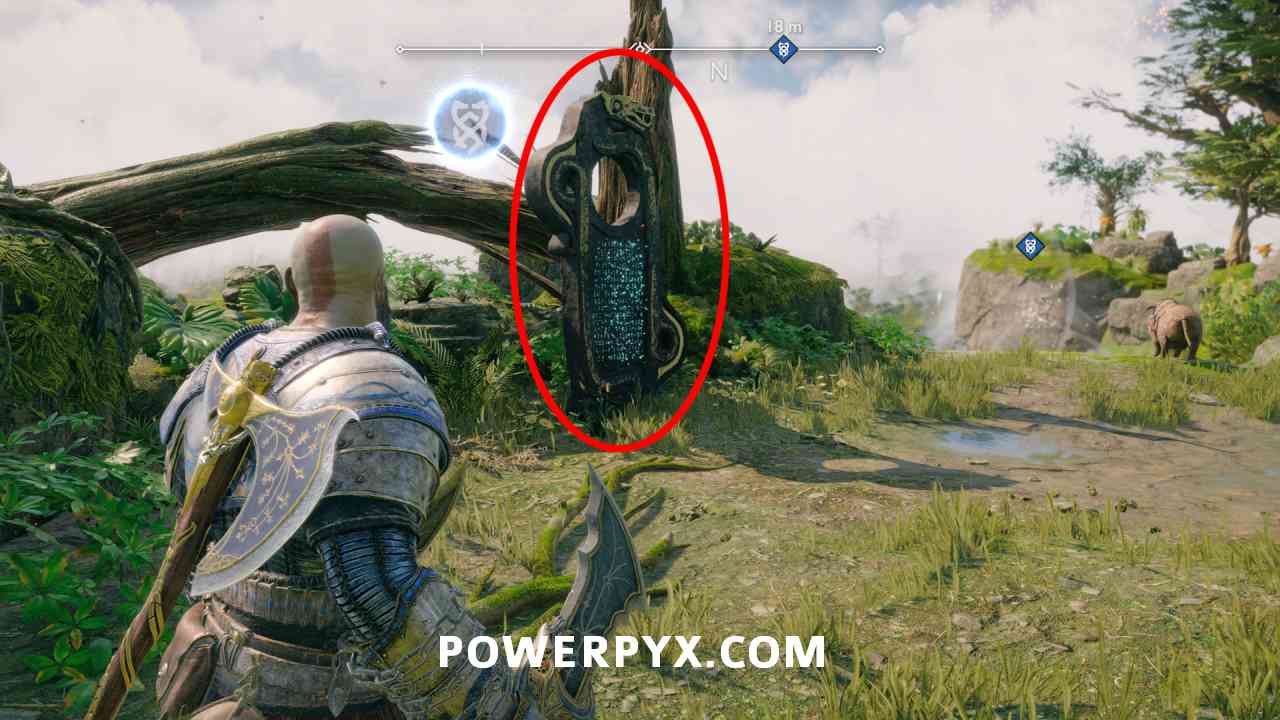
#48 – Freyr’s Camp (Rune Read – Vanaheim Lullaby)
Across from the blacksmith go behind the tree, check the blue letters between the two boats by the pond.


#49 – Eastern Barri Woods (Scroll – The Aesir Promise)
Go up the little side path with stairs, check for a lore scroll on the ground.


#50 – Eastern Barri Woods (Rune Read – Verdant)
From a Nornir Chest, go back down the stairs, turn left and follow the path. You then need to climb along a wall, follow the path on the right and freeze the 2 poison plants with your axe, in the next building is the Lore.


#51 – The Abandoned Village (Rune Read – Prayer to Freya)
Enter the area from Eastern Barri Woods. After collecting the lore at the end of Eastern Barri Woods, drop down the wall and swing across the water. Follow the path until you have to slide down a rope, then enter the next pavilion on the left. Use the spear to swing across, follow the climbing section and go through a cave. When you reach a turnable crane swing across using Chaos Blades, then the Lore is on the left wall (blue letters).


#52 – The Abandoned Village (Scroll – Chores)
After a long rope slide across the water, throw a spear on the left wall, swing across, go right. In this area you find the Lore scroll on the left, on the floor.


#53 – Pilgrim’s Landing (Lore Marker – Dead on Arrival)
From the shore, climb up to the bridge and shoot a purple arrow at the fire near the vines, this causes an explosion and burns the vines, then throw the axe at the locks to make the bridge drop down. Go across the bridge and on the left you find the Lore Marker.


#54 – Noatun’s Garden (Lore Marker – Gölrab of the Ashes and Frost)
In front of the door in the middle of the area, across from the questgiver ghost.


#55 – Noatun’s Garden (Lore Marker – Garden’s Progress)
On the right side of the area, climb up the wall next to the Artifact, there’s a Lore Marker on top of the ruins.


#56 – Noatun’s Garden (Treasure Map – Under the Rainbow)
On the left side of the area, in the corner in the grass, look for a lore scroll on the ground. It’s at the edge of the area.


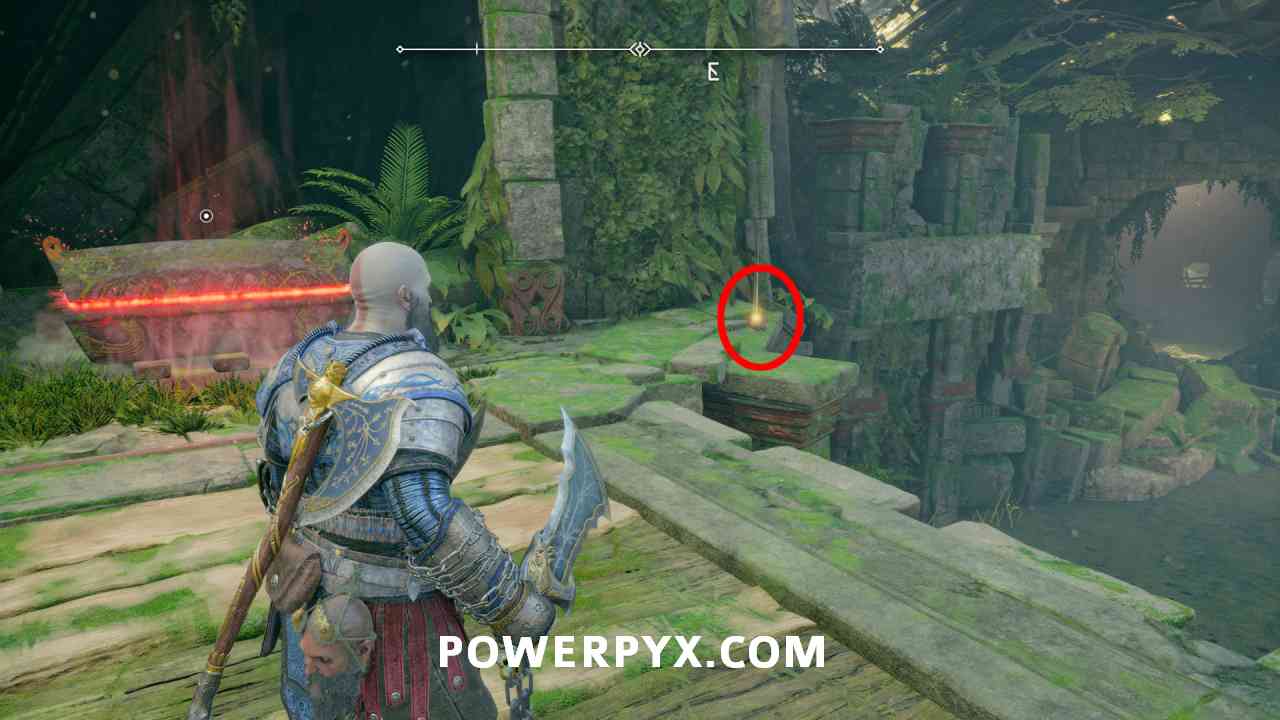
#57 – Cliffside Ruins (Lore Marker – Historian)
After accepting the favor from the ghost, climb up the left wall, jump across the platforms again where you hit one of the Nornir symbols. There’s a gold chain hanging from the cliffs but it’s blocked by vines. From the platform you must place 3 purple runic arrows on the cliffs and attack with your Chaos Blades to cause a chain reaction, which will drop the gold chain. Climb up and use your Chisel on the altar to get rid of the rocks blocking the river. Get back in your boat and row it south. After passing the point where the rocks blocked the river you must turn left to enter another region “The Veiled Passage”. Go through this region, killng all enemies along the way to complete the favor. After passing through the region you’ll end up on the other side of Cliffside Ruins, you find the Lore Marker there. Where you must lower a chain bridge.


#58 – The Veiled Passage (Lore Marker – Seidr Sacrifice)
Land on the second beach. Left of the red chest, destroy the wooden wall, also destroy the poisonous explosive flowers. Climb up and turn right to see the Lore Marker.
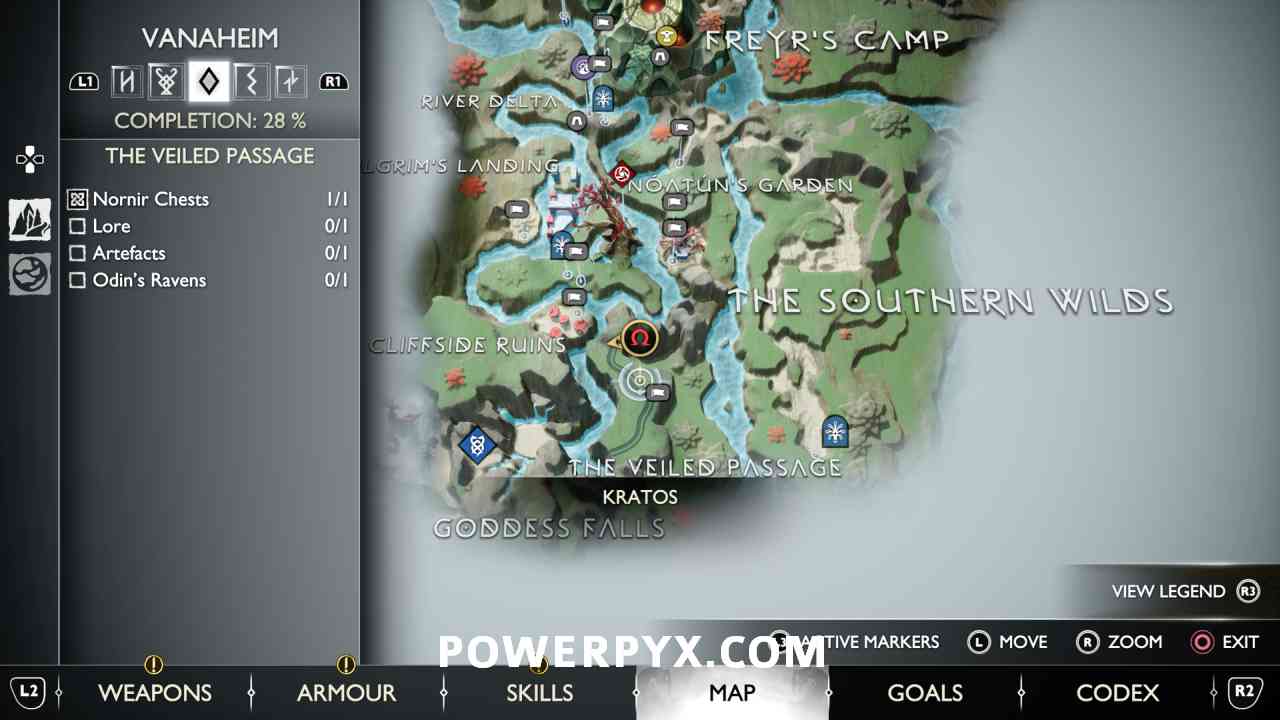

#59 – Goddess Falls (Lore Marker – Anything I Can Do)
From the beach climb up the wall and it will be in the little tunnel in front of you. There are 2 explosive poisonous plants in here, clear them out first to avoid taking damage.


#60 – Vanir Shrine (Lore Marker – The Feast)
After entering the area it’s on the right. In front of a drawbridge you must unlock.


#61 – Vanir Shrine (Treasure Map – The Giant’s Toes)
To the right of the previous Lore Marker (right corner of the area).

#62 – Vanir Shrine (Lore Marker – The Auburn Crown)
You must lower the drawbridge on the right of the area, near the lore marker. To do this, place purple runic arrows on the wall and attack them with Chaos Blades to burn the vines. Then throw your axe at the two locks on the bridge. After passing the bridge, in the next area is the Lore Marker.


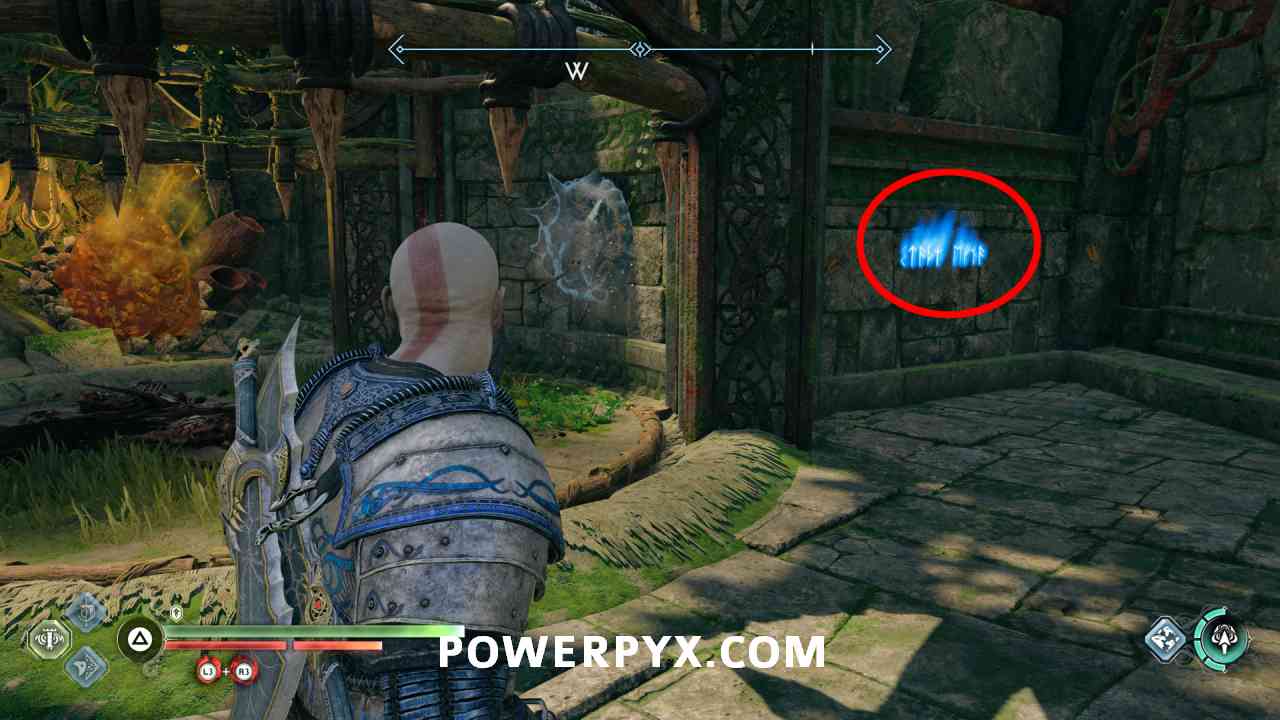
#63 – Vanir Shrine (Rune Read – Traitor)
After getting Freya’s Belonging, use the Chisel on the altar on the right. Then climb back down to the main area. Now go to the gate on the left of where you first entered the area. You must light the two braziers above the gate at the same time. First clear the vines below the left brazier. Then shoot 3 purple runic arrows between the two braziers and attack them with your Chaos Blades, this will light both braziers simultaneously. After this gate, the lore is on the right. Look for blue letters on a wall. You must clear out the enemy hear first, to do this burn the vines on the left to go up the path and defeat the small monsters that buffs the other enemy.


#64 – Vanir Shrine (Lore Marker – The Blessing of Two)
From the last lore follow the path up, then the Lore Marker is on the left.


#65 – Vanir Shrine (Scroll – Abandoned)
To the left of Freya’s Belonging, let Freya open the green vines with her magic, then use the Altar behind it. Now go back to the middle area and interact with the yellow letters are the broken bridge (press when looking at the letters). This will repair the bridge. After crossing the bridge pick up the scroll on the right.


#66 – Vanir Shrine (Lore Marker – The Ceremony)
Go to the door at the end of the bridge. After the cutscene the lore marker will be in front of you to your right.


#67 – River Delta (Lore Maker – Living Masterpiece)
To the right of the Mystic Gateway.


#68 – River Delta (Scroll – Nonviolence)
Row your boat through the roots of the big tree in the middle of the Delta. You can dock your boat at a beach inside the big tree (when rowing near it, it gets marked by a grey boat dock icon on the map). Head up to the bridge, next to the Red Chest.

#69 – Western Barri Woods (Lore Marker – Harmony)
At the Chalice where you can change the time of day from night to day (marked by purple icon on map), you must make it daytime and continue on the big tree roots to the west, the Lore Marker is on that path. Actually the same place as the last objective for “Favor: Scent of Survival“, you can combine the two.

#70 – The Jungle (Lore Marker – Unforgiven)
Follow the waypoint for Favor: Return of the River. After using an elevator it will be at a wall, before blowing up a wall with the spear (some enemies spawn in this area too).


#71 – The Jungle (Rune Read – City of Possibility)
Cross the bridge where the Ogres are found (must be daytime to swing across, change time at Celestial Altar). Follow the path behind the stag until you reach the dragon’s den. Drop down the hole. Throw the axe at the spinning object here to lift the gate around the hole. On the wall next to where you threw the axe to lift the gate where you dropped down the hole. Before going outside.

#72 – The Sinkholes (Lore Marker – Everything Ends)
From the Sinkholes Entrance Mystic Gateway, swing across. There you find the Lore Marker, on the right wall.


#73 – The Plains (Treasure Map – A Scar is Born)
On a small island next to an Yggdrasil Rift.

#74 – The Plains (Lore Marker – Stupidity)
In the area where you defeat the Dreki dragon, lift the gate and go through the tunnel, then go to the nearest boat dock. Row the boat back to where you entered the Dreki boss area, but this time climb up the left wall with a red chest on it, from that red chest use the rope to slide to the hill on the right. There’s a lore marker up there.


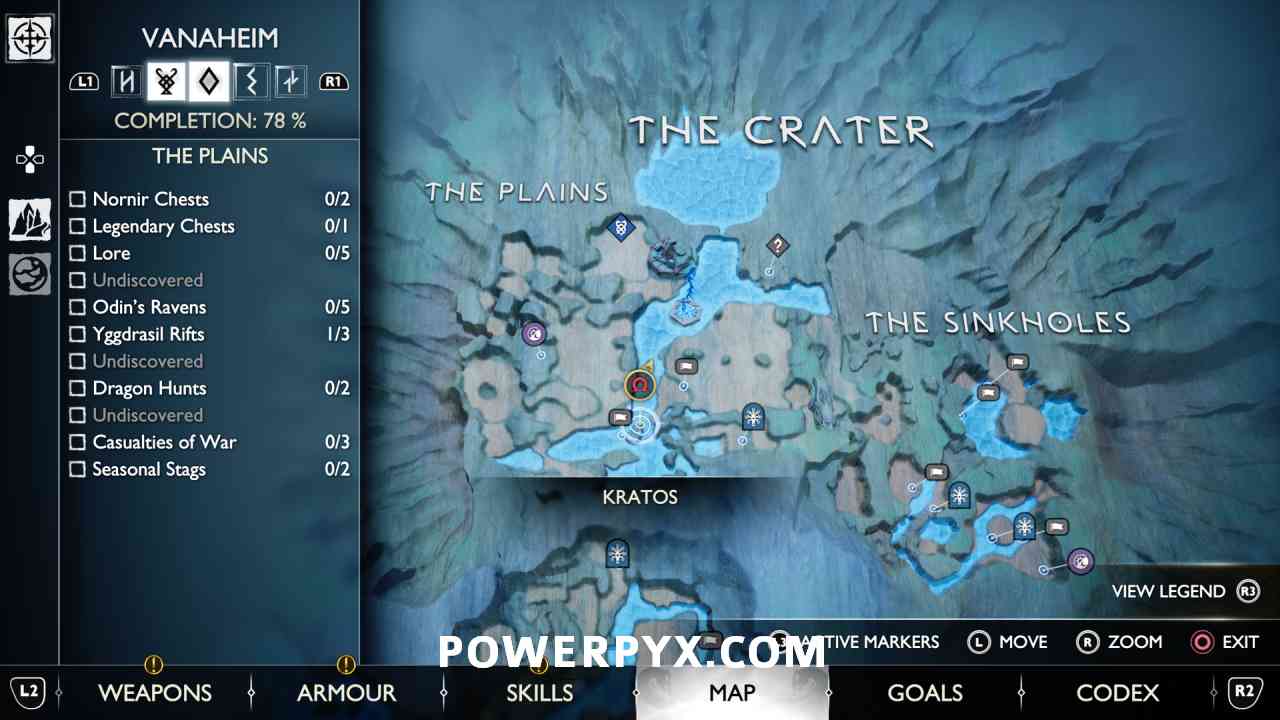
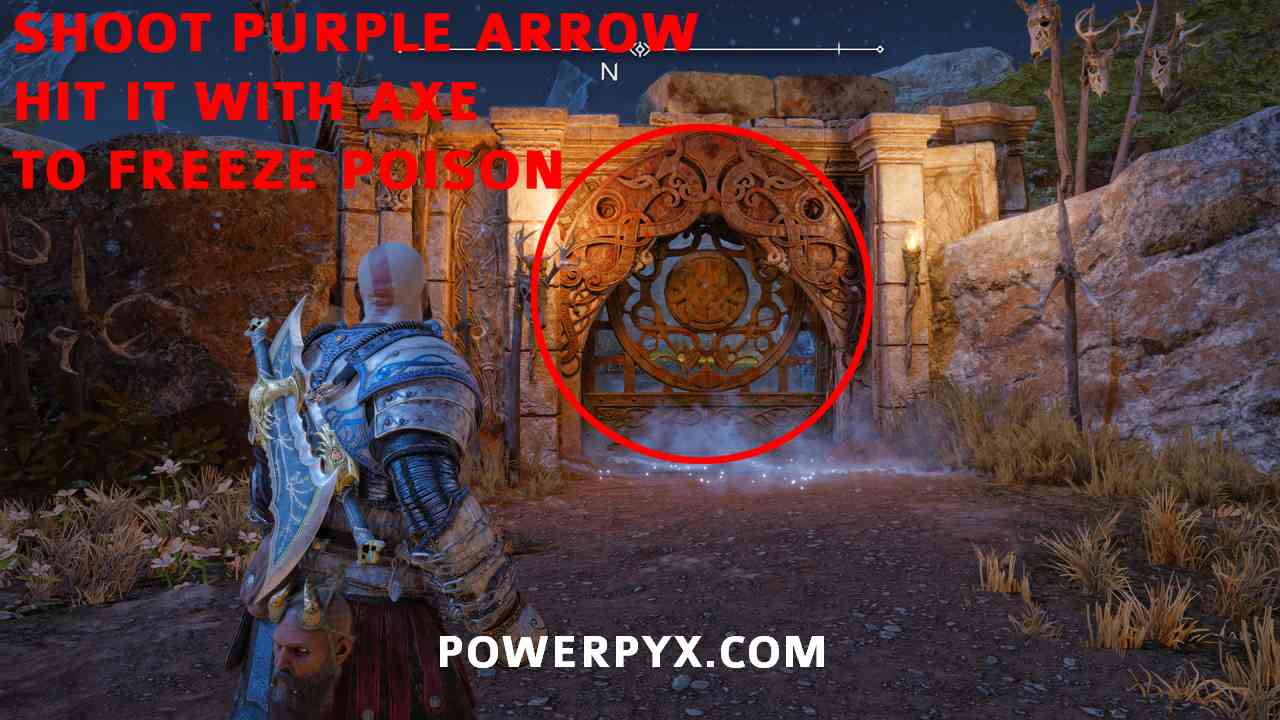
#75 – The Plains (Lore Marker – Apology)
In the north-west of the region (don’t go through the main gate in the middle, take the path left of it). After dropping down, there’s a locked gate on the right with poison mist behind it. Shoot purple runic arrows near the gate, then hit them with the axe to cause a chain reaction that freezes the poison totem. You can shoot 3 arrows in one spot to increase the radius. After going through the gate the lore is on the left.


#76 – The Plains (Lore Marker – Seidr)
Near the Eastern Plains Celestial Altar, from the blacksmith shop go upstairs to find the Lore Marker.


#77 – The Plains (The Lost Pages)
Get back on the boat, row south into The Jungle region. Near the Jungle Entrance Mystic Gateway you can pull the chain of a gate to open it. Follow the path behind that gate until you reach a hidden sub-area called “The Wishing Well”. Even though it’s accessed from The Jungle it actually counts towards The Plains region. Climb up the path and through the opening on the left (top of the area), it’s there in the corridor that leads to a golden chain.


Muspelheim
#78 – Burning Cliffs (Rune Read – Valhalla Rises)
Check the blue letters on the wall, on the way to Surtr’s Forge.

Helheim
#79 – Helgrind (Lore Marker – Hraesvelgr)
After the story you can travel back to “Hel’s Perch” mystic gateway. In front of the mystic gateway you can either go left or right. Two collectibles are on the left path and two on the right path. We will take the left path first. After climbing up follow the wall on the left, the lore marker is there.

#80 – Helgrind (Rune Read – Prayer to Hraesvelgr)
Take the right path when there’s a split, look down on the right and you will already see this lore rune, glowing blue. You can climb down on the right side to reach it.


Niflheim
- No Lore in this Realm
Jotunheim
- No Lore in this Realm
That’s all of the Lore Locations in GOW Ragnarok.
For more Collectible Categories see » God of War Ragnarok Collectible Guide.
Leave a Reply