
Inside the Mountain is the 5th story main quest in God of War (2018, PS4). This walkthrough will guide you through all objectives of the Inside the Mountain Main Quest.
Inside the Mountain triggers automatically after completing The Light of Alfheim.
Ascend the Mountain
As soon as you have dispelled the Black Breath, you will receive this objective. You will have to climb up to the cave mouth to continue, so look to the left of the stairs to see carvings on the ground and cliff-face that indicate that you can jump across.
 |
Shimmy left and up, following the carvings. At the top of the path, climb up and dispel more black breath as you walk into the cave “mouth”. Go through the door at the back of the cave, and up the stairs beyond. At the top of the stairs is a sand bowl next to a lever, and two crystal sockets. The one on the left is empty, while the one on the right already has a crystal in it. Calling on Atreus to shoot it will reveal partial runes on the floor below you, and pulling on the lever will cause segments of the floor to come together. Without a second crystal though, the runes will be incomplete and Atreus will not be able to read them.
 |
 |
Go down the path to the north, and you’ll encounter some Draugr. Once they are defeated, look up at the ceiling just inside the door and you’ll see a damaged bridge above you with another light crystal hanging off the edge of it. Throw the Leviathan Axe at the bridge to destroy it and cause the crystal to drop. Pick it up and carry it back to the main room, slotting the crystal in the empty socket.
 |
 |
Get Atreus to light both crystals and the runes will be revealed on the floor. Then, pull back on the lever to cause the segments to come together so Atreus can read them. He will use the sand bowl, causing the statue on the other side of the room to activate and reveal a door on the south side of the room.
Traverse the Caves
Enter the newly revealed door, and have Atreus light the crystal that can be seen in the darkness. Drop down into the pit ahead, and go through the tunnel to the west having Atreus create light as you go. At the end of the path, duck down into a low tunnel which will open onto a stairway. Going up the stairs to the east will get you a chest to open, but to proceed you have to go straight ahead to the south-east, and lift a large boulder out of the way. Once on the opposite side, you’ll fight several Nightmares and a Revenant hurling poison. Have Atreus take out all the Nightmares with arrows as fast as you can, then use the normal arrow stun / axe combination to kill the Revenant. Follow the path to the southeast, and climb up the small cliff there. You will encounter a few Draugr (including a Heavy), and several statues. Continue to the east, following the path as it winds around, lighting crystal sconces along the way. Eventually your path will again lead to a low tunnel to crawl through. The tunnel will be full of bones and corpses, and you will have to smash through a wooden barricade at the end to reach the platform with the giant deer-headed statue. Open the door to the north-east to continue.
Inside will be a Fire Draugr that will attack immediately. Continue up the path to the east, fighting additional Fire Draugr along the way. At the end of the path, climb up the east wall, reading the rune on your way up. At the top, jump to the platform to the south and follow the path around. Continue towards the waypoint, until you reach a large wooden door at the top of a stone staircase. Use the lever to the left of the door to open it, and proceed onward into the Heart of the Mountain area.
Ascend the Cave Shaft
In this large chamber will be a lot of items, enemies and paths. You’ll cross over your path a couple times through this room, so be careful not to get disoriented. On the south side of the chamber next to a giant claw, climb some rickety wooden stairs to a platform with a crank wheel at the top. Interact with the wheel, and you’ll see a short cutscene where Atreus will touch something he shouldn’t. The claw will shoot up to the ceiling, and the counterweight will crash to the ground. Attempting to crank the wheel will be futile until you free the counterweight from the rubble dislodged in the fall. Some more Fire Draugr will appear, opening a new pathway.
 |
 |
Free the Chain
Kill them all then go through the hole in the wall they came from. Inside you’ll find Brok, hammering away. Very convenient. Follow the path around to the north, leaping across a gap in the floor. On the other side, you’ll find a hallway that is completely blocked by spikes. Look up and to the north wall to see a set of panels attached to a gear. Hitting the left side with the axe will cause the spikes to retract into the walls for a short time. Keep spinning the panel until it stops, then run through the spiked passage quickly.
 |
 |
Don’t worry that there are several layers of spikes, and that the back sets haven’t completely retracted yet. They will retract slowly and you don’t want to wait for them to finish, or you won’t have time to move through the whole corridor. The panel will slowly turn in the opposite direction causing the spikes to push inward again. Just keep moving down the path and you’ll be fine. Once through, there’ll be another hinged wall with spikes. Throw your axe at the upper right corner of the wall to cause it to swing open.
 |
 |
In this area, kill some Fire Draugr hiding among the statues. To the west of the entrance to this room you’ll find a large wooden platform that you can push. You’ll want to push it towards the south, but before you can move it very far you’ll notice that its still attached to a cart by a rope attached to a wooden target. Destroy the target and sever the rope to proceed. Continue pushing to the south until Atreus tells you that it’s in position. This should be just before the cart is touching the gate ahead, so that the platform lines up with the handhold above to the west. Climb up the platform, and onto the ledge. To the west you’ll see a passage lit by a torch on the floor. Smash the wooden barricade and follow this path until it curves east, and you have to lift a large stone out of the way to proceed.
 |
 |
On the other side, you’ll find yourself back in the main room on a wooden platform next to the gate. Straight ahead of you, you’ll find a chain that will raise the gate. Pull it until its all the way up, then raise the door to the north to go back to the room above the sliding platform. Drop back down to the ground, and push the platform to the south, through the now open gate, until it lines up with the raised area to the east.
 |
 |
Climb onto the platform and jump across. Follow the path till the end, then lift the rock off of the rope connected to the counterweight.
 |
 |
Find a Way to Ascend
Climb down to the ground and start to go back to the crank wheel. Before you can however, a huge troll will climb out of the hole in the middle of the room and attack you. This will be an ice troll, so it will take a long time to wear them down using the Leviathan Axe. Keep throwing your axe at its head, using the heavy throw, and roll out of the way of his ice stomps. Note however, that in addition to the elemental effect that travels straight out from him in a line, there are also two other effects that travel out at an angle to the left and right, so be careful when dodging that you don’t accidentally run into the secondary blasts. During the fight, you’ll also be attacked by a steady stream of Fire Draugr that will divert your attention but will also provide life crystals when killed, so be aware of your surroundings. Once the troll is down to its last bit of life, you can perform a stun finisher using R3 to kill him.
 |
 |
With that obstacle removed, there’s one last thing you have to do. Go back to the movable wooden platform and keep pushing it to the south until it won’t go any further. Then go back to the crank wheel on the south side of the room and give it a spin until the claw comes down and grabs the wooden platform. Throw your axe into the gears to the right of the wheel to freeze it in place, climb upon the newly clamped wooden platform, then recall your axe to get your journey underway.
 |
 |
The platform will not rise all the way to the top, but close. Jump off the platform and you’ll get a short cinematic as Atreus figures out the strange lanterns you’ve seen littered throughout the caverns.
Reach the Summit
Continue up the curved pathway to the east, and you’ll see jets of fire that periodically shoot across the ramp. You can’t freeze them with your axe, so time your approach so you don’t get charred. Just past that will be a set of three fire jets next to a jump. Move to the edge and jump the second the last jet stops firing.
 |
 |
In the next section, things start to get tricky. The jets are now on a rotating pillar, meaning that you have to stay in motion and move through the area avoiding debris. When you’re about halfway across, you’ll be attacked with ranged attacks by Draugr standing on platforms. Luckily, moving to the right away from the rotating pillar, you can find some cover from the fire behind some tall stones. Throw your axe at the Draugr to kill it before proceeding. There will be a second one behind the first, so be prepared. Continue following the fire to the right until you eventually find a crank wheel that you can turn to lower the flaming pillar into the ground, stopping the jets. Careful of your timing though, you are still vulnerable to the jets while using the wheel if you don’t time it right.
 |
 |
Continue along the path to the north-west until you find a large counterweight on another mining platform. Smash the wooden cart in front of it to reveal a push bar, then push the stone off the edge. You will begin to rise. Move over to the other counterweight, and push that one off the platform too. You will continue to rise for a while until you hit the wall, and a number of Draugr will jump down onto the platform. Defeat them quickly, because more are on the way. If you manage to kick them off the platform, it will count as “killing” them, so don’t be afraid to give them the old Spartan boot. Eventually the platform will become stuck, and you will have to push off of the wall next to the platform to continue. Move to the highest part of the platform and move just to the left of the wooden pillar to get an interact prompt. Once you’re in position, hammer the button to free yourself and the platform will begin to rise again.
 |
 |
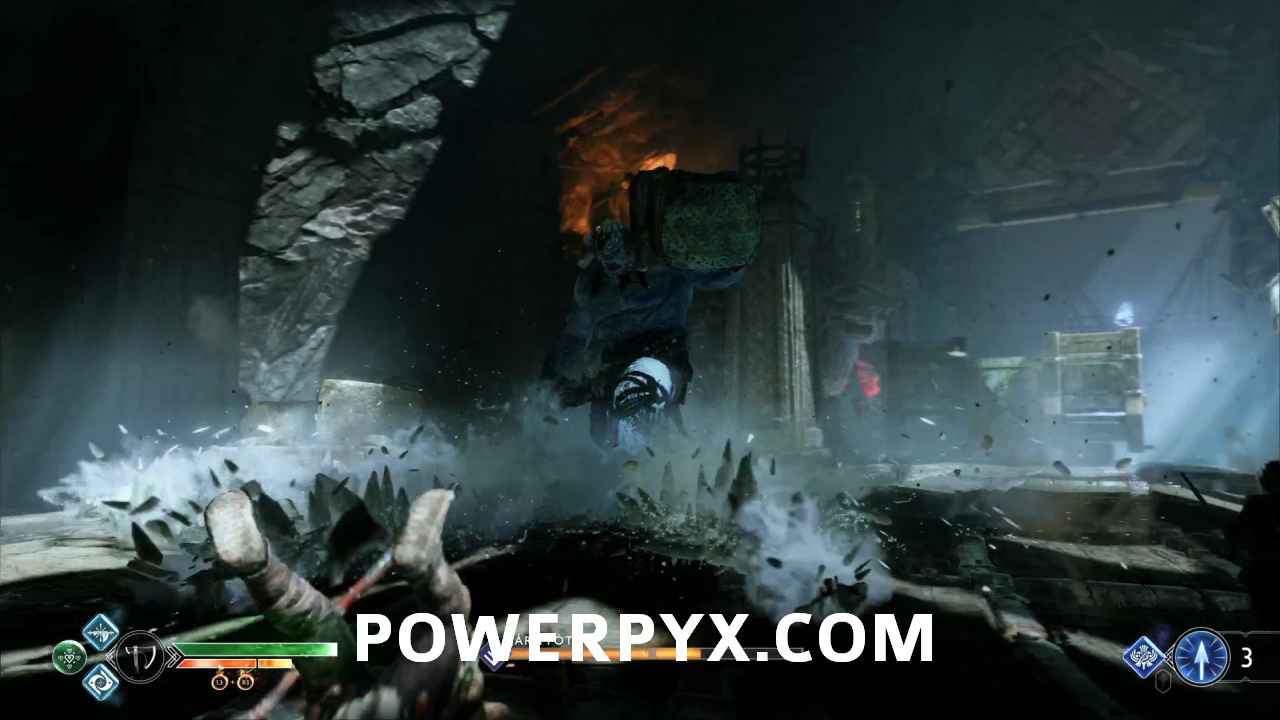
More enemies will drop onto the rising platform, culminating with a large ogre which throws off the balance of the platform and again gets it stuck in the wall. If you manage to stun the ogre, its easy enough to ride it and use it to smash anything else unfortunate enough to be in the area. Watch out for additional ranged Draugr on ledges along the side of the area. After everything is dead, you will have to free yourself from the wall again before the platform will continue. Just as you think your troubles are behind you, your rise will be interrupted by a surprising boss fight, Hræzlyr the Dragon! Hræzlyr will use its claw to hold onto the platform, while its other one will try to slash at you. Keep attacking the claw that is holding onto the platform, and watch out for Hræzlyr’s other attack, a powerful bite. Once you’ve done enough damage to the hand, you’ll get an in-fight cinematic, and then the platform will become stuck again. Get unstuck quickly, then watch another long and chaotic cinematic that deposits you in a new cavern just below the summit.
You’ll get a tutorial on Shatter Crystals now, the red electrified crystals that will allow you to blow through the World Tree Sap obstacles throughout the game. You will still need electricity to detonate them though, so luckily Hræzlyr has left a residual charge throughout this area. Continue to follow the path, destroying sap obstacles as you go. When you emerge from the tunnel, you’ll run right into a boss fight with Hræzlyr who is now attempting to eat Sindri! When Atreus goes to the right, turn to your left and run up the path until you get a prompt to jump across onto its back.
 |
 |
A cinematic will play as Kratos fights the dragon, until eventually you find yourself inside the dragon’s mouth! Press R1 and R2 to chop at the dragon’s mouth until eventually you manage to jump free. At that point you will be on the ground on your own, and have to defeat Hræzlyr!
Hræzlyr begins with his lightning breath, shooting up in the sky and causing a series of area of effect blasts on the battlefield. The attacks are preceded by a sparking around the area just before it discharges violently and causing damage, giving you time to roll out of the way. Maintain your distance, because Hræzlyr will also sometimes inhale and try to suck you in with its powerful lungs. Around the edges of the area are a number of Shatter Crystals that you can pick up and carry. Grab one and toss it into Hræzlyr’s mouth as it begins its breath attack to cause a large explosion. This has three important results. Hræzlyr’s lightning breath attack will be interrupted, the dragon will be stunned causing its head to drop to the platform, and a chunk of its thick armor will be blown off its face.
 |
 |
This last point is key, because only attacks on this weak point are going to cause any significant damage to the dragon. Hack at this weak spot quickly as many times as you can before the dragon shakes off its stun, and roll back out of the way before you are injured by its thrashing head as it wakes. When you can see its eye looking at you, that’s your cue to get the heck out of there!
 |
 |
Once you’ve done enough damage, it will change position, possibly crushing you as it moves across the platform. In its new location, it begins to claw at you and do ground stomps which do area affect damage. Use your shield to block the shockwave or roll out of the way of a claw attack. In this new position, the dragon’s breath weapon is no longer an area affect but a straight line of death that it carves across the stone towards you. Unsurprisingly, your shield is useless to block this attack, so roll out of the way. When Hræzlyr breathes in to begin this line attack, again throw a Shatter Crystal at its head to cause an explosion (careful not to pick one up if you are in danger of being hit by the dragon’s lightning breath, or it will detonate in your hand, causing even more damage!)
 |
 |
Eventually it will change position again, returning to the physical attacks, with sweeping claw attacks and stomp waves. After a stomp attack, you will have a couple of seconds to move in and hack its claws safely before it pulls them back. If you follow and continue to attack its claws, Hræzlyr will also do a bite attack that is hard to avoid, so it isn’t recommended. The dragon will eventually return to its lightning breath attack, allowing you to continue to stun it using Shatter Crystals and pressing the attack.
 |
 |
When Hræzlyr is below half health, He will attack the platform Atreus is on, causing a crane claw to hang over the dragon’s head. The dragon’s attacks will intensify, breathing lightning in a much larger area as well as doing stomp attacks. Continue to use the Shatter Crystals to damage and stun the dragon, hacking at the weak points on its head until its down below 20% of its life. At this point, you will get a prompt to call to Atreus to drop the crane and a QTE will take place to finish off the dragon. Look out below! You now have access to shock arrows, which will make clearing World Tree Sap much easier.
 |
 |
After that huge dragon fight, you’re still not at the summit. So go west into the only tunnel you still have access to anymore. Follow the path, and climb up the wall at the end, and witness a Nightmare Parasite possess a Stalker. The possessed Stalker does a lot more damage, and constantly regenerates, which is why I stress killing every Nightmare you see with Atreus’s arrows as quickly as possible at the start of the fight just in case any of them are Nightmare Parasites. After both are dead, approach the crank wheel on the side of the room and crank it up until it is level with the stone block lodged in the sap to its left. Command Atreus to shoot the Shatter Crystal with a shock arrow, freeing the stone block in the resulting explosion. A few Nightmares will attack at this point. Destroy them then climb up the block, then the wall behind it to reach a passage above. Follow the tunnel, shooting light arrows at the crystals so you can see what you’re doing. You will be attacked by some Frost Draugr and a Nightmare. Use hand to hand attacks on the Frost Draugr instead of the Leviathan Axe for best results.
Climb the stone at the end of the passage, then follow the path until you run into three more Frost Draugr that appear to be performing some kind of ritual. Beware of the Frost Draugr with the large mace, as it has an unblockable attack that does a great deal of damage. Once they are dead, look to the south and see that the raised ramp above you is caught in the sap of the World Tree. Throw a Shatter Crystal at the sap, then detonate it with the shock arrows. The ramp will drop slightly, only to get caught on a second set of sap. Repeat the process to bring the ramp down to your level. Climb up the ramp, and fight some more Frost Draugr and Nightmares. Once they are defeated, follow the tunnel out of the room to the west, and climbing up the wooden panels at the end. Open the door at the top, and your goal will be in sight.
 |
 |
Moving across the narrow bridge of mountain and snow, you will be attacked by several Frost Draugr. You don’t have much room to maneuver, so fight defensively using your shield and unarmed attacks. Keep pressing forward until you reach the summit. At the stone structure at the end, look to your right to find a marked crack in the wall that you can climb. Follow the path of cracks, ledges and tree roots, moving up and to the right as you eavesdrop on a conversation between the Stranger and two other men. You will have to climb down and around to the right, before you will eventually find a way up to the top of the summit. Watch the cinematic at the end, and the Inside the Mountain Story Quest will be complete.
 |
 |
Next Up: A New Destination
For more Walkthroughs, check out the complete God of War 2018 Story Walkthrough.
Leave a Reply