Final Fantasy VII Rebirth has 49 Weapons. Finding all Weapon Locations and mastering all weapon abilities is needed for the Well-Rounded trophy. They are collectibles found in purple chests or bought from weapon vendors.
None of the Weapons are missable. After the story you unlock Chapter Select to go back everywhere. Anything in the open world is still accessible at the start of Chapter 13 via Chapter Select. Missed weapons from linear story sections can still be bought from merchants but they are expensive. Most of them are on the main path in plain sight and would be hard to miss.
To master all weapon abilities you will need to get the yellow checkmark on every weapon in the equipment menu. Go to Materia & Equipment Menu > select a Character > select a Weapon > when scrolling over the weapon it will show a blue text “Ability” in the middle of the screen, below the weapon’s stats. On the right side will be the Ability Info box with a yellow text “Proficiency Bonus”. Equip the weapon, during battle use the weapon ability from the Command Menu to fulfill the requirement listed under “Proficiency Bonus”. These can be farmed in VR Missions and in the Musclehead Colosseum.
Weapons List:
- Buster Sword (Cloud) – Focused Thrust – Starting Weapon
- Sleek Saber (Cloud) – Firebolt Blade – Found in Chapter 2
- Rune Blade (Cloud) – Disorder – Found in Chapter 4
- Umbral Blade (Cloud) – Prime Mode – Found in Chapter 8
- Crystal Sword (Cloud) – Infinity’s End – Found in Chapter 9
- Igneous Saber (Cloud) – Blade Burst – Found in Chapter 11
- Slipstream Saber (Cloud) – Counterstance – Found in Chapter 13
- Leather Gloves (Tifa) – Divekick – Starting Weapon
- Sylph Gloves (Tifa) – Reverse Gale – Found in Chapter 3
- Kaiser Knuckles (Tifa) – Overpower – Found in Chapter 5
- Dragon Claws (Tifa) – Starshower – Found in Chapter 8, from Desert Rush minigame
- Tiger Fangs (Tifa) – Chi Trap – Found in Chapter 9
- Crystal Gloves (Tifa) – Unfettered Fury – Found in Chapter 11
- Járngreipr (Tifa) – True Strike – Found in Chapter 13
- Mythril Collar (Red XIII) – Stardust Ray – Starting Weapon
- Renegade’s Collar (Red XIII) – Crescent Claw – Found in Chapter 3
- Silver Collar (Red XIII) – Chilling Roar – Found in Chapter 6
- Amethyst Collar (Red XIII) – Supernal Fervor – Found in Chapter 7
- Golden Collar (Red XIII) – Watcher’s Respite – Found in Chapter 9
- Mystic Collar (Red XIII) – Watcher’s Spirit – Found in Chapter 10
- Brisingamen (Red XIII) – Reaper Touch – Found in Chapter 13
- Gatling Gun (Barret) – Focused Shot – Starting Weapon
- Hi-Caliber Rifle (Barret) – Bonus Round – Found in Chapter 2
- Barrage Blaster (Barret) – Lifesaver – Found in Chapter 7
- Vulcan Cannon (Barret) – Charging Uppercut – Found in Chapter 8
- Fafnir Rifle (Barret) – Point Blank – Chapter 9, Reward from Side Quest: The Pursuit of Perfection
- Calamitous Bazooka (Barret) – Smackdown – Found in Chapter 10
- Battle Cry (Barret) – Turbulent Spirit – Found in Chapter 13
- Guard Stick (Aerith) – Arcane Ward – Starting Weapon
- Timeless Rod (Aerith) – Chrono Aegis – Found in Chapter 2
- Empress’s Scepter (Aerith) – Radiant Ward – Found in Chapter 4
- Wizard’s Rod (Aerith) – Lustrous Shield – Found in Chapter 7
- Ceremonial Staff (Aerith) – ATB Ward – Found in Chapter 10
- Plumose Rod (Aerith) – Ray of Judgement – Chapter 12, finish Side Quest: Lament of the Damned, then complete all Shinra Combat Simulator Challenges
- Gambanteinn (Aerith) – Noble Sacrifice – Found in Chapter 13
- 4-Point Shuriken (Yuffie) – Elemental Ninjutsu – Starting Weapon in Chapter 7
- Savage Dagger (Yuffie) – Blindside – Starting Weapon in Chapter 7
- Twin Viper (Yuffie) – Windstorm – Found in Chapter 7
- Bird of Prey (Yuffie) – Doppelganger – Found in Chapter 9
- Crescent Sickle (Yuffie) – Shooting Star – Chapter 10, from Side Quest: Bonds of Trust Chocobo No. 1 Training Course
- Crystalline Cross (Yuffie) – Banishment – Found in Chapter 12
- Fuma Shuriken (Yuffie) – Purification – Found in Chapter 13
- Yellow Megaphone (Cait Sith) – Roll o’ the Dice – Starting Weapon in Chapter 9
- Iron Megaphone (Cait Sith) – Fortune Telling – Starting Weapon in Chapter 9
- Red Megaphone (Cait Sith) – Moogle Kaboom – Found in Chapter 9
- Resounding Megaphone (Cait Sith) – Moogle Mine – Found in Chapter 9
- Crystal Megaphone (Cait Sith) – Moogle Magic – Found in Chapter 10
- Golden Megaphone (Cait Sith) – Moogle Knuckle – Found in Chapter 11
- Gjallarhorn (Cait Sith) – Lady Luck – Side Quest: Esoteric Secrets of the Elders – Turn in 45 Chocograss at Tack Shop
Weapon Locations
Weapon #1: Buster Sword (Cloud) / Ability: Focused Thrust
Starting Weapon for Cloud.
Weapon #2: Leather Gloves (Tifa) / Ability: Divekick
Starting Weapon for Tifa.
Weapon #3: Mythril Collar (Red XIII) / Ability: Stardust Ray
Starting Weapon for Red XIII.
Weapon #4: Gatling Gun (Barret) / Ability: Focused Shot
Starting Weapon for Barret.
Weapon #5: Guard Stick (Aerith) / Ability: Arcane Ward
Starting Weapon for Aerith.
Weapon #6: Sleek Saber (Cloud) / Ability: Firebolt Blade
Chapter 2 / Objective: Abandoned Dock / Area: Abandoned Dock – After you exit Kalm and enter the open world, advance to the next objective to visit Oliver’s Farm. Then you get the objective to visit the Abandoned Dock. Go to the blue main quest marker at the Abandoned Dock and you’ll see this purple chest in plain sight. You practically can’t miss this as it’s directly in front of the main story objective.
Weapon #7: Timeless Rod (Aerith) / Ability: Chrono Aegis
Chapter 2 / Objective: Shopkeeper Chloe / Area: Bill’s Ranch – Purple chest located directly right of Chloe’s shop desk. You have to talk to Chloe as part of the story.
Weapon #8: Hi-Caliber Rifle (Barret) / Ability: Bonus Round
Chapter 2 / Objective: Through the Swamplands / Area: Swamp area – After unlocking the chocobo from the story, you can now use the chocobo to swim through the swamp in the south of the map. When you see a cutscene while swimming through the swamp, this purple box will be on the island in front of you.
Weapon #9: Sylph Gloves (Tifa) / Ability: Reverse Gale
Chapter 3 / Objective: Where They Lead / Area: Tunnel No. 1 – After meeting the shadowy figure in a black robe, go forward and climb down to the area where two crystalline crab enemies are. In that area you find this purple box next the ladder.
Weapon #10: Renegade’s Collar (Red XIII) / Ability: Crescent Claw
Chapter 3 / Objective: Escape the Depths / Area: Subterranean Terrace – After a cutscene where you fall down into a crystal cave, you will get split up from the rest of your party and play as Barret/Red XIII. This is right in front of you when you take control of Barret.
Weapon #11: Empress’s Scepter (Aerith) / Ability: Radiant Ward
Chapter 4 / Objective: Respite – After entering the Inn and booking rooms for your team (story-related and unmissable), your teammates will enter the various bedrooms in the inn. Enter Aerith’s Room on the right to find this. You will be locked into the Inn during this story section so it will be obvious when you get there (it’s after defeating Terror of the Deep boss at the port).
Weapon #12: Rune Blade (Cloud) / Ability: Disorder
Chapter 4 / Objective: Hue and Cry / Area: Starboard Connecting Passage – Much later into Chapter 4, after you finished the Junon Parade minigame and recruited the Infantry Troopers. After the parade, as soon as you have control of Cloud, this will be in front of you next to a vending machine and a bench.
Weapon #13: Kaiser Knuckles (Tifa) / Ability: Overpower
Chapter 5 / Objective: In His Footsteps / Area: 1st Freight Room – After the Queen’s Blood Tournament, and after fighting the first enemies in the chapter, you will enter the cargo hold area. After the first fight in Cargo Hold this purple box will be in front of you.
Weapon #14: Silver Collar (Red XIII) / Ability: Chilling Roar
Chapter 6 – Objective: Run Wild – Place 1st in Run Wild’s Free-For-All Challenge. You will automatically participate in this as part of main objective “Run Wild”, while playing as Tifa/Aerith.
Weapon #15: 4-Point Shuriken (Yuffie) / Ability: Elemental Ninjutsu
Starting Weapon for Yuffie in Chapter 7.
Weapon #16: Savage Dagger (Yuffie) / Ability: Blindside
Starting Weapon for Yuffie in Chapter 7.
Weapon #17: Wizard’s Rod (Aerith) / Ability: Lustrous Shield
Chapter 7 / Objective: Split Up / Area: Ascent – Follow the main objectives until you enter Mt. Corel. Early into Mt. Corel, after the cutscene where half your party scouts ahead and you’re walking with Aerith, this will be in a purple box just to the left of a rest bench & shop.
Weapon #18: Twin Viper (Yuffie) / Ability: Windstorm
Chapter 7 / Objective: Reach the Control Panel / Area: Preparation Plant 1F – When playing as Yuffie and when the story forces you to use the grappling hook for the first time, this weapon box will be right next to the switch that you have to activate (main objective). In plain sight next to the main objective, basically can’t miss it.
Weapon #19: Barrage Blaster (Barret) / Ability: Lifesaver
Chapter 7 / Objective: Continue Your Search / Area: Railway Control Tower 1F – After going downstairs and fighting two Cockatrice, take the right path to spot this on the edge of a cliff. It’s in the area where you are supposed to turn on the power. If you already turned on the power, grab it before using the yellow/red poles to get upstairs.
Weapon #20: Amethyst Collar (Red XIII) / Ability: Supernal Fervor
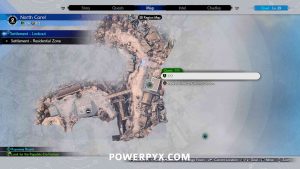
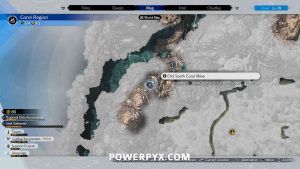
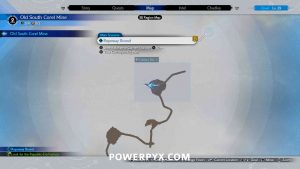
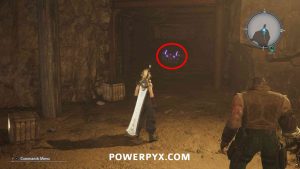
Chapter 7 / Side Quest: Of Robed Men and Ransoms – Inside the Old South Corel Mine, directly on your right as you enter. You will have to progress into Side Quest: Of Robed Men and Ransoms to access this (the door to the mine is closed until you accept the quest). The 1st image below shows the quest starting point. The 2nd image shows the mine entrance, the 3rd/4th show the location inside the mine. When you follow the quest objectives it will be in plain sight as you enter the mine for the first time, straight ahead.
Weapon #21: Umbral Blade (Cloud) / Ability: Prime Mode
Chapter 8 / Objective: Meeting Your Mount / Area: Solemnitude Manor 1F – Complete the main objectives in Gold Saucer until you reach “The Dust Bowl” (Corel Prison area). Immediately when you enter The Dustbowl (Prison) for the first time this will be down the stairs in front of you. It’s in plain sight when following Garth on the main story path, you practically can’t miss it.
Weapon #22: Dragon Claws (Tifa) / Ability: Starshower
Chapter 8 / Score 42000 Points at Desert Rush in the Dustbowl. This is one of the minigames that awards you Sylkis Greens, the food you need to gather for your Chocobo Piko as part of the main story.
Weapon #23: Vulcan Cannon (Barret) / Ability: Charging Uppercut
Chapter 8 / Objective: Prisoner / Area: Scrapyard – After you finished the Chocobo Race (story related), keep following the main objectives. You’ll have to follow a bird through a rocky desert, then you get a cutscene with a tornado. After the cutscene, this chest will be straight in front of you, on your main path in plain sight.
Weapon #24: Yellow Megaphone (Cait Sith) / Ability: Roll o’ the Dice
Starting Weapon for Cait Sith in Chapter 9.
Weapon #25: Iron Megaphone (Cait Sith) / Ability: Fortune Telling
Starting Weapon for Cait Sith in Chapter 9.
Weapon #26: Bird of Prey (Yuffie) / Ability: Doppelganger
Chapter 9 / Objective: The Village of Gongaga / Area: Felicia Commons – After reaching Gongaga Village (story-related). This is inside the Gongaga Inn where Yuffie is located, there is a purple box in the corner.
Weapon #27: Red Megaphone (Cait Sith)
Chapter 9 / Objective: The Village of Gongaga / Area: Gongaga Village – Go to the bridge in the south of Gongaga Village. Then look down at the water to see the purple chest in a cave. You must jump down the cliff to the left of it to land in the water, then swim to the little cave where the chest is. One of the best hidden weapons in the game as it’s not directly on the story path.
Weapon #28: Crystal Sword (Cloud) / Ability: Infinity’s End
Chapter 9 / Objective: The Shadows Beckon / Area: Gongaga Reactor – Inside the Reactor (story area). As soon as you go downstairs into the Freight Corridor of the reactor, in the back room before you squeeze through a door.
Weapon #29: Golden Collar (Red XIII) / Ability: Watcher’s Respite
Chapter 9 / Objective: Water Level / Area: Coolant Control Room – Inside the Reactor (story area). You will need to pull a cart to be able to free a power cable, pull it all the way and climb up to access a vent that leads to the weapon.
Weapon #30: Tiger Fangs (Tifa) / Ability: Chi Trap
Chapter 9 / Objective: Rescue Effort / Area: Output Regulation B1 – Inside the Reactor (story area). When you reach a flooded room that you must grapple out of to advance, after grappling upstairs turn around to see this chest behind you. Then grapple to the beams on the side of the room to reach it. This one isn’t directly in your path and out of sight so it’s easy to overlook.
Weapon #31: Fafnir Rifle (Barret) / Ability: Point Blank
Chapter 9 / Reward from Side Quest: The Pursuit of Perfection in Gongaga region.
Weapon #32: Resounding Megaphone (Cait Sith)
Chapter 9 / Objective: Telephone Booth / Area: Gongaga Airstrip – at the main objective at Gongaga Airstrip (very end of Chapter 9). After entering the Airstrip, you will see a Phone Booth that is marked as a main objective. Before interacting with the Phone Booth, check the area directly behind the Phone Booth to find this purple chest.
Weapon #33: Crescent Sickle (Yuffie) / Ability: Shooting Star
Chapter 10 / Side Quest: Bonds of Trust – Score 3600 Points on Glide de Chocobo Training Course No. 1 (must start Side Quest: Bonds of Trust to access). If you don’t reach the highscore during the quest you can still retry it after the quest.
Weapon #34: Crystal Megaphone (Cait Sith) / Ability: Moogle Magic
Chapter 10 / Objective: Higher Learning / Location: Cosmo Observatory – After finishing the main objectives inside the Observatory, when you go back outside you will automatically be greeted by a man. This starts the Discovery “Parting Gfit”. Follow the man to the storeroom entrance, to the right of the Observatory main entrance. Go inside the storeroom and you’ll find the purple weapon chest at the bottom floor.
Weapon #35: Mystic Collar (Red XIII) / Ability: Watcher’s Spirit
Chapter 10 / Objective: The First Trial / Area: Cave of the Gi > Chamber of Folly > Hall of Diversion – When you need to collect artifacts around the statue room and bring them to Bugenhagen, one of them will be this materia, on the right side up the wall.
Weapon #36: Calamitous Bazooka (Barret) / Ability: Smackdown
Chapter 10 / Objective: To Thine Own Self Be True / Area: Cave of Gi > Chamber of Sacrifice > Gate of Anger – After leaving the room with 4 altars through the opened gate, advance through the next room until you reach another closed gate. Directly across from this gate drop onto the lower platform for this weapon.
Weapon #37: Ceremonial Staff (Aerith) / Ability: ATB Ward
Chapter 10 / Objective: An Unquenchable Thirst / Area: Village of the Gi > Outcasts’ Shore – On the shore when you arrive at the Village of the Gi, immediately after a cutscene, next to the rest spot.
Weapon #38: Crystal Gloves (Tifa) / Ability: Unfettered Fury
Chapter 11 / Objective: The Rebuilt Bridge / To the Reactor / Area: Garm Pass – After leaving Nibel to go to the Reactor, go over the first bridge and this purple chest will be on the main path, just before walking over the second bridge.
Weapon #39: Igneous Saber (Cloud) / Ability: Blade Burst
Chapter 11 / Objective: To the Reactor / Area: Northern Ridge 160 m – When you reach the large climbing wall with paths up the right or left side, take either path and then drop midway onto the metal structure to find this chest.
Weapon #40: Golden Megaphone (Cait Sith) / Ability: Moogle Knuckle
Chapter 11 / Objective: Buds Behind Bars / Area: Mako Research Facility – Section W – When you are given the tutorial on throwing boxes while playing as Cait Sith in the old manor, use the same technique to open the other door in the room to reach this chest. Press  to call the moogle,
  to lift boxes and
 to throw.
Weapon #41: Gjallarhorn (Cait Sith) / Ability: Lady Luck
Chapter 11 / Side Quest: Esoteric Secrets of the Elders – Turn in 45 Chocograss at the Tack Shop (can still collect them after the side quest, they are found above water by using the chocobo which you get during this side quest).
Weapon #42: Crystalline Cross (Yuffie) / Ability: Banishment
Chapter 12 / Objective: Hightailing It / Area: Park – 1F > Utilidor – When chasing Cait through the employee corridor in the Gold Saucer (main objective), this will be by the exit stairs. It’s in plain sight on the main story path, practically can’t miss it.
Weapon #43: Plumose Rod (Aerith) / Ability: Ray of Judgement
Chapter 12 / Side Quest: Lament of the Damned – In Hojo’s Secret Lab (Nibel) after completing all combat simulations at the Shinra Combat Simulator. Must finish Side Quest: Lament of the Damned to access this in Nibel region. A fast travel point will let you get back there immediately. After you cleared all challenges in the Shinra Combat Simulator a door opens up with a purple chest that contains this.
Weapon #44: Slipstream Saber (Cloud) / Ability: Counterstance
Chapter 13 / Objective: Into the Labyrinth / Area: Labyrinth Ceiling – In Chapter 13 you’ll first need to drive to the very north of Meridian Ocean area to find the next main objective, which leads to the entrance of a temple. Keep following the main objectives until you interact with the first stone that changes gravity in the environment (can’t miss it, story part). Then continue until you climb a vine wall and this will be in front of you.
Weapon: #45 Járngreipr (Tifa) / Ability: True Strike
Chapter 13 / Objective: Divergent Paths / Area: Corridor of Currents – After getting split from half your team, continue forward and this will be in the same room as some stairs leading down.
Weapon #46: Gambanteinn (Aerith) / Ability: Noble Sacrifice
Chapter 13 / Objective: Keep Trying / Area: Order’s Altar – After learning to use the lifestream to move objects as Aerith, after using the lifestream 3 times you will head downstairs and this will be at the bottom of the stairs.
Weapon #47: Battle Cry (Barret) / Ability: Turbulent Spirit
Chapter 13 / Objective: Crossing the Rapids / Area: Corridor of Catastrophe – After pushing a box into the Rapids and watching some shinra troopers across a gap, in the building next to you.
Weapon #48: Brisingamen (Red XIII) / Ability: Reaper Touch
Chapter 13 / Objective: The Hunt Begins Anew / Practice Makes Perfect / Area: Salvation’s Altar – Go into the left room for this weapon.
Weapon #49: Fuma Shuriken (Yuffie) / Ability: Purification
Chapter 13 / Objective: The Materia Awaits / Area: Shrine of Ambition – After completing the trials (backflashes with each character), continue forward and go down the stairs. This be right in front of you on the main path before you continue down the hallway.
That’s all 49 Weapons and their Abilities in Final Fantasy 7 Rebirth. After beating the story you will unlock Chapter Select. If you missed any weapon you can either buy it from a weapon vendor or grab it via Chapter Select from the purple chests. To clean up any remaining collectibles and side activities it’s best to replay from Chapter 13 via Chapter Select because you have access to the full open world at that point.
For more guides check out Final Fantasy VII Rebirth Wiki.


Leave a Reply