
Public Enemy is the 24th chapter in Detroit Become Human. This walkthrough will guide you through all the choices of the Public Enemy level for 100% completion.
Triggers automatically after completing The Stratford Tower Chapter.
Flowchart (100%):
Here’s a quick overview of the 100% complete flowchart for Public Enemy.

Checkpoint: Fall in the Zen Garden
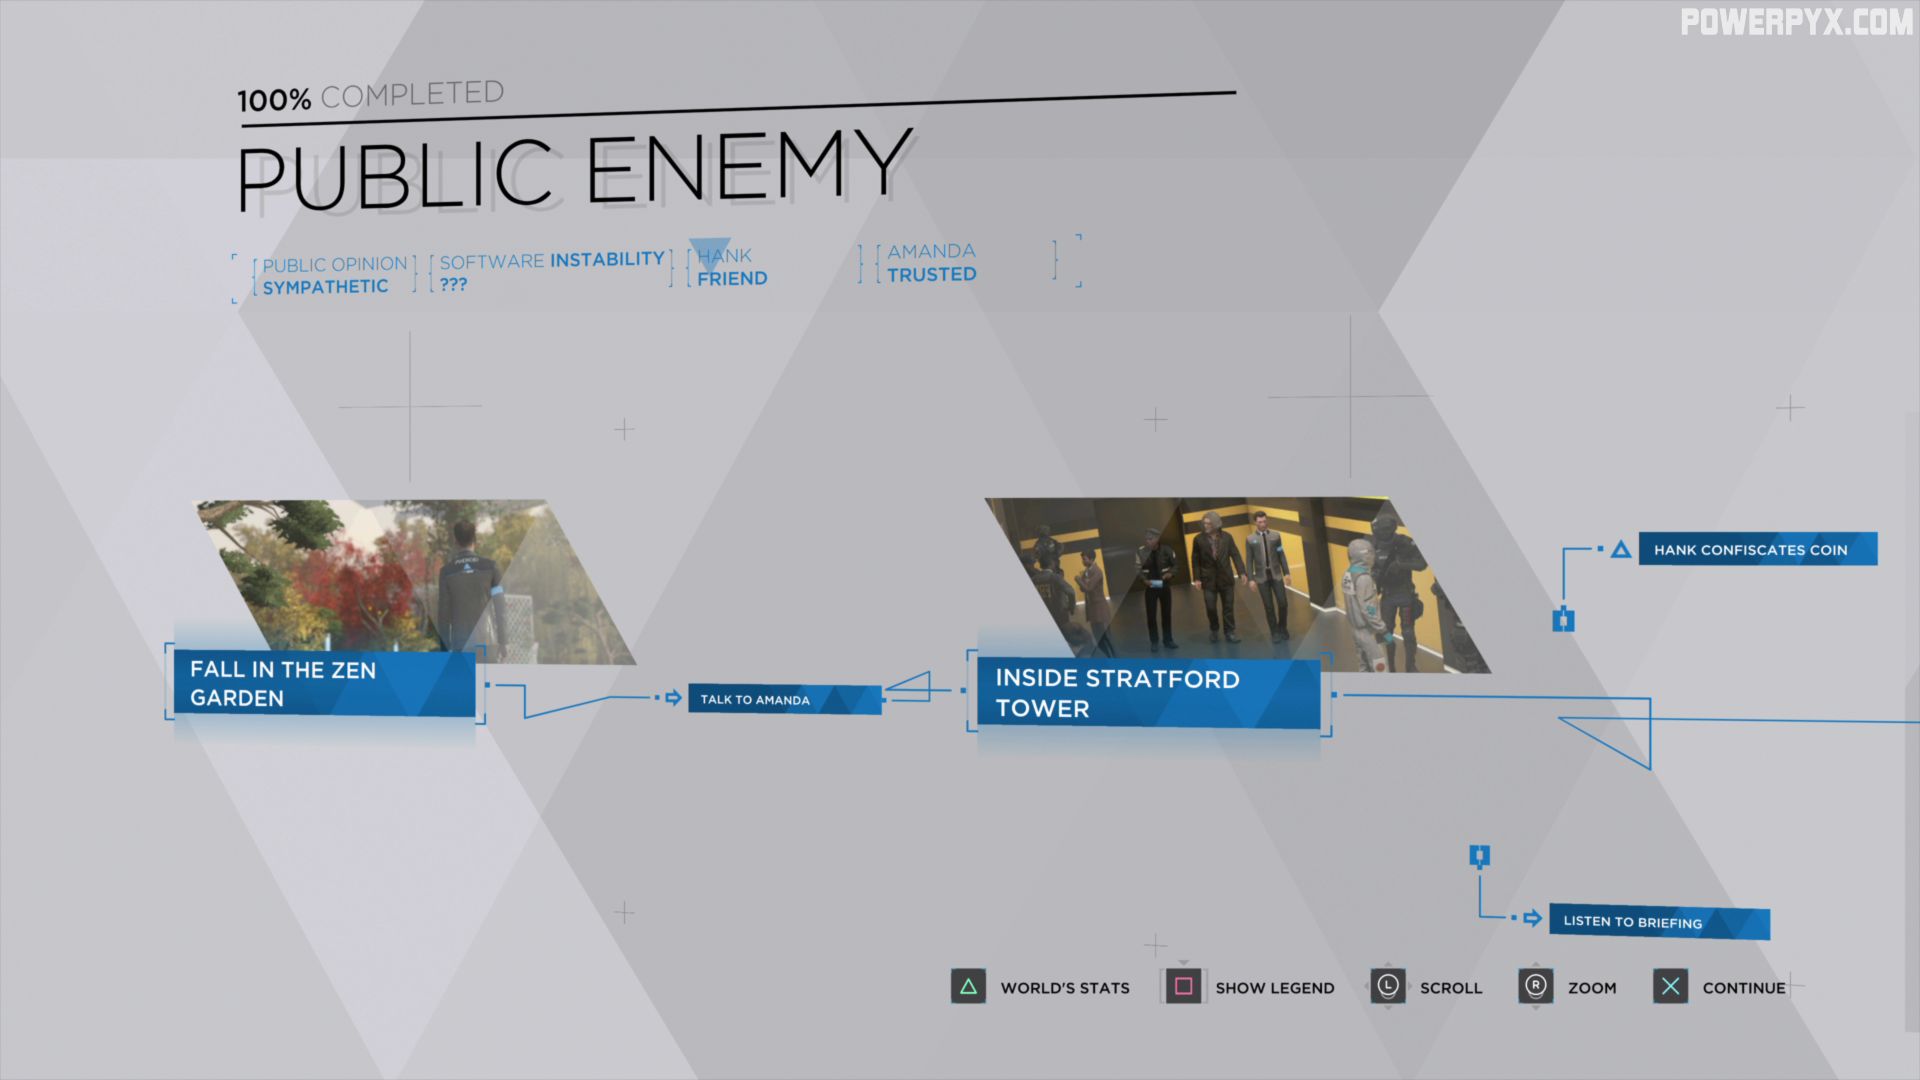
Find Amanda:
- Talk to Amanda: Go to the center of the area, where Amanda waits in a boat.
- Amanda asks what you have learned:
- HANK: No Effect
- EDEN CLUB: If you have eliminated the Tracis at the Eden Club Amanda▲, if not Amanda▼
- Amanda thinks you seem lost:
- SINCERE: [Unlocked by being friends with Hank] Amanda▼
- DETERMINED: Amanda▲
- COLD: Software Instability▼Amanda▲
- TROUBLED: Software Instability▲ Amanda▼
- If you didn’t kill the Tracis at the Eden Club, she asks why:
- TOO FAR: Amanda▼
- NO USE: No effect
- TRUTH: Amanda▼ ▼ ▼
- Amanda threatens replacement:
- CONFLICTED: Software Instability▲
- CONFIDENT: Amanda▲
- INDIFFERENT: Amanda▲ ▲ ▲ Software Instability▼
- Amanda asks what you have learned:
Checkpoint: Inside Stratford Tower
Immediately at the start of this level, if Hank is a Friend:
- Hank Confiscates Coin: Hank grabs Connor’s fidget coin and tucks it in his pocket. If you watch carefully, you might catch him playing with it later in the level, trying to learn some of Connor’s tricks.
- Listen to Briefing: As you enter the 79th floor, Chris will meet you at the elevator. When prompted, hold
 until Chris is done talking to unlock this node.
Investigate Corridors:
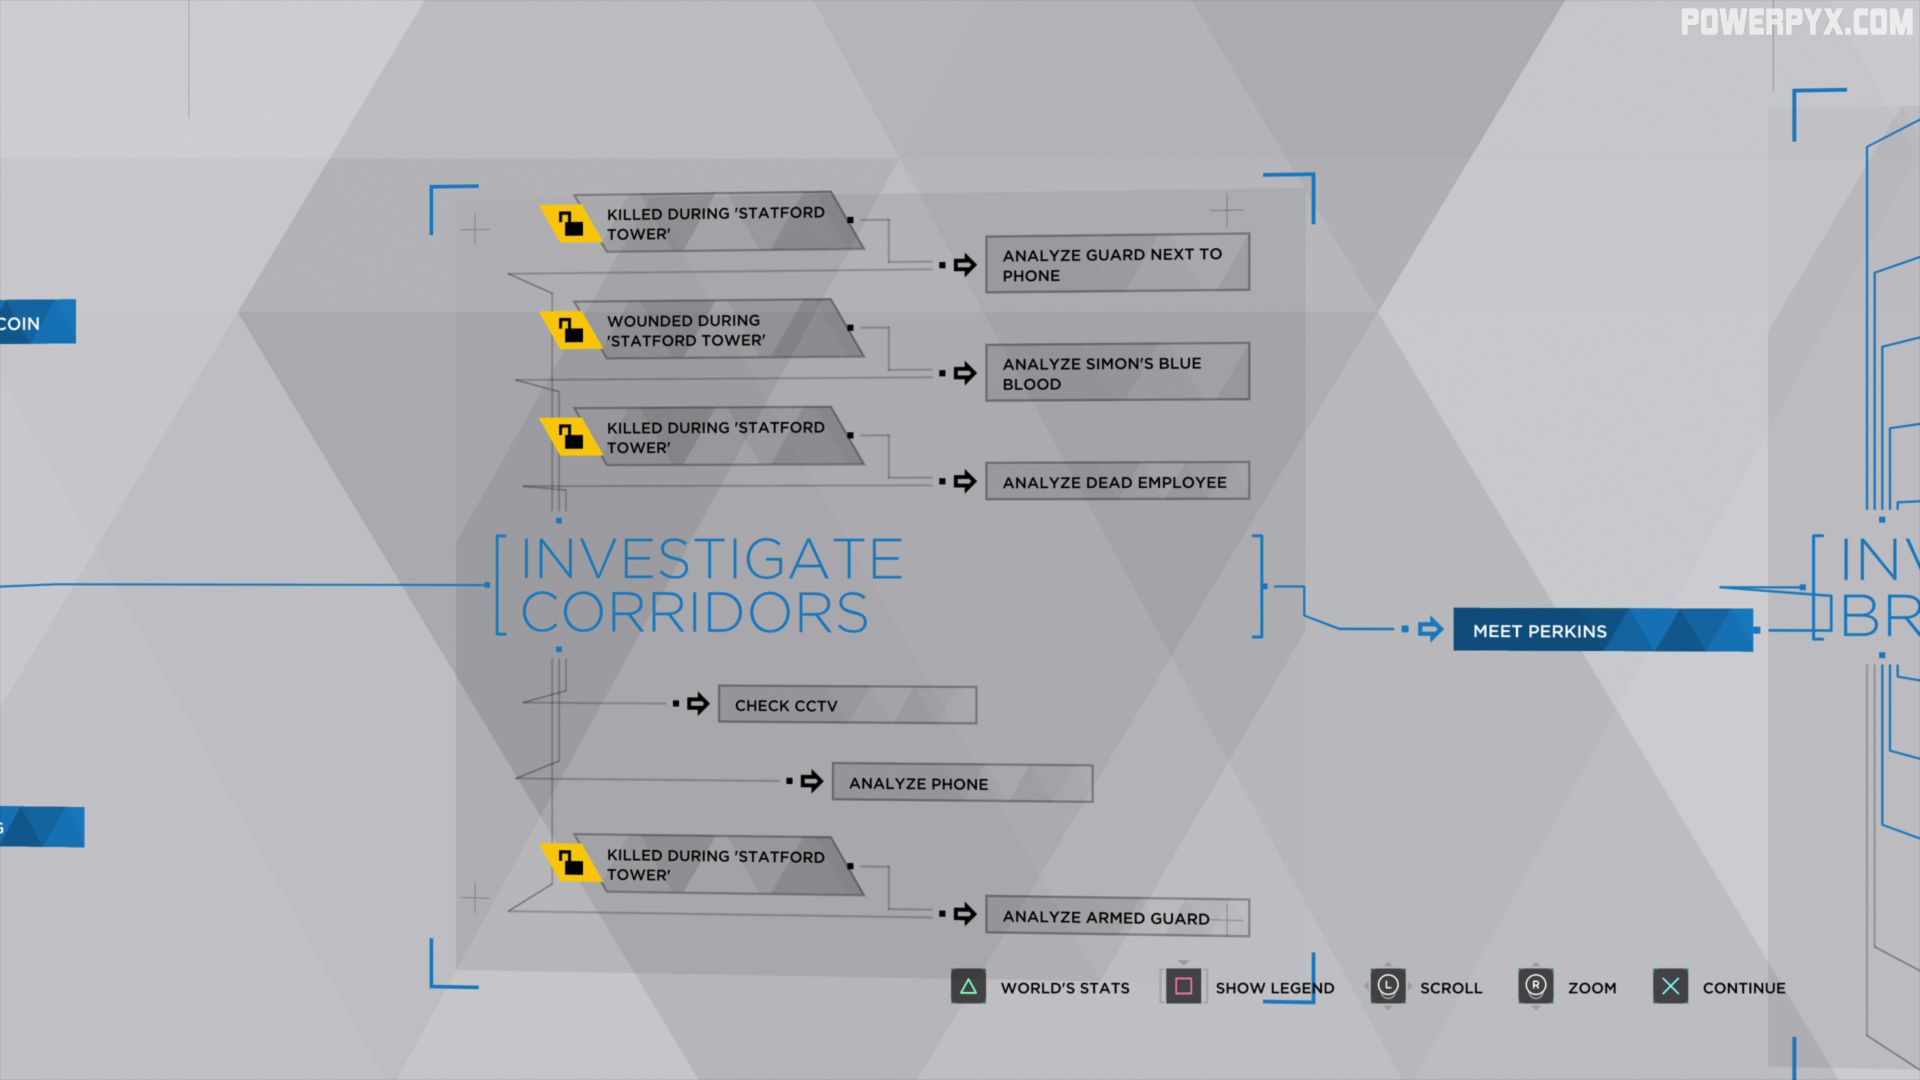
Once Chris has briefed you, go back into the corridor you just walked through.
- Killed During ‘Statford Tower’: [CROSS CHAPTER IMPACT] unlocked if you had killed the guard using the phone in The Statford Tower.
- Analyze Guard Next to Phone: Approach the guard’s body and analyze it.
- Wounded During ‘Statford Tower’: [CROSS CHAPTER IMPACT] unlocked if Simon had been shot by the guard in The Statford Tower.
- Analyze Simon’s Blue Blood: Approach the pool of blue blood on the floor where Simon fell.
- Killed During ‘Statford Tower’: [CROSS CHAPTER IMPACT] unlocked if you had killed the fleeing employee in the hallway outside the broadcast room in The Statford Tower.
- Analyze Dead Employee: Analyze the employee’s body in the corridor outside the broadcast room.
- Check CCTV: Notice the CCTV camera above the door to the broadcast room.
- Analyze Phone: If the guard with the phone was kicked by North during The Statford Tower, the phone will be on the ground behind the counter.
- Killed During ‘Statford Tower’: [CROSS CHAPTER IMPACT] unlocked if you had killed the armed guard in The Statford Tower before he shot Simon.
- Analyze Armed Guard: Approach the guard’s body behind the desk and analyze it.
- Meet Perkins: Special Agent Perkins of the FBI will be a constant pain in your ass. You will meet him as soon as you enter the broadcast room. Enjoy.
Investigate Broadcast Room:

- Saved During ‘The Hostage’: [CROSS CHAPTER IMPACT] unlocked if you used your tie as a tourniquet to save the cop’s life all the way back in the first level, The Hostage, he is here by the door.
- Meet Cop From Hostage Situation: He thanks you for saving his life, and Connor feels good about what he’s done.
- Attacked by SWAT During ‘Statford Tower’: [CROSS CHAPTER IMPACT] unlocked if an employee triggers an alarm that summoned SWAT during The Statford Tower.
- Analyze Corridor Bullet Holes: Analyze the bullet holes right next to the entrance to the broadcast room.
- Analyze Roof Access Bullet Holes: Analyze the bullet holes just to the left of the door that leads to the roof stairs.
- Analyze Screen Bullet Holes: Analyze the bullet holes in the screen on the far side of the broadcast room.
- Analyze Blue Blood on Wall: If Simon was shot by SWAT, but you helped him to the roof in The Statford Tower, analyze the blue blood stain on the wall.
- Analyze Cap: On the floor near the console in the middle of the room.
- Watch Video: Near the left side of the wall console, interact with the panel to play the video and identify Markus by his serial number.
- Check Camera: Watch the CCTV footage of the hallway outside the broadcast room
- Died in Broadcast During ‘Statford Tower’: [CROSS CHAPTER IMPACT] unlocked if you left Simon instead of helping him to the roof, and he was killed by SWAT.
- Analyze Destroyed Android: Analyze Simon’s body on the far side of the broadcast room.
- Wounded During ‘Statford Tower’: [CROSS CHAPTER IMPACT] unlocked if Simon was wounded during The Statford Tower.
- Analyze Blue Blood on Console: When prompted, press on the console near the giant screen to analyze Simon’s blood.
- Analyze Blue Blood on Console: When prompted, press
Between the entrance and the stairs to the roof, will be a doorway that leads to a tiny break room and kitchen:

- Enter the Kitchen: There are three androids here and a collectible magazine to read.
- Read “Bleeding Blue”: On one of the lunch tables as you walk in. Be sure to read it before you start interrogating the androids.
- Read “Clean Food Craze”: On one of the lunch tables as you walk in. Be sure to read it before you start interrogating the androids.
- Interrogate Androids: You will ask a number of increasingly accusatory questions of the three identical androids. You will only be able to uncover a deviant in their midst after you watch the CCTV footage in the broadcast room. As you ask questions, look for the one who occasionally looks at you out of the corner of their eye rather than straight ahead like the other two do. Eventually as its agitation builds it will also grit its teeth slightly and sometimes turn its head to look at you, making it even more obvious. (So far, it has always the one on the left)
- Deviant Not Found: Eventually you’ll be given the options of BLUFF, TORTURE, VIOLENCE, or PROBE MEMORY that you can use on a specific android. If somehow you haven’t identified the correct android after all this time, you’ll conclude that there isn’t a deviant among them and give up.
- Find Deviant: Using BLUFF, TORTURE, VIOLENCE, or PROBE MEMORY will cause the deviant to attack you.
- Deviant Attacks: It will pin your hand to the counter with a knife, and steal a critical component from your body, leaving you only 1:45 to put it back in your chest.
- Remove Knife: Look to your left and pull the knife out of your hand.
- Recover Biocomponent: Crawl over to the biocomponent by succeeding at QTEs before 1:45 is up.
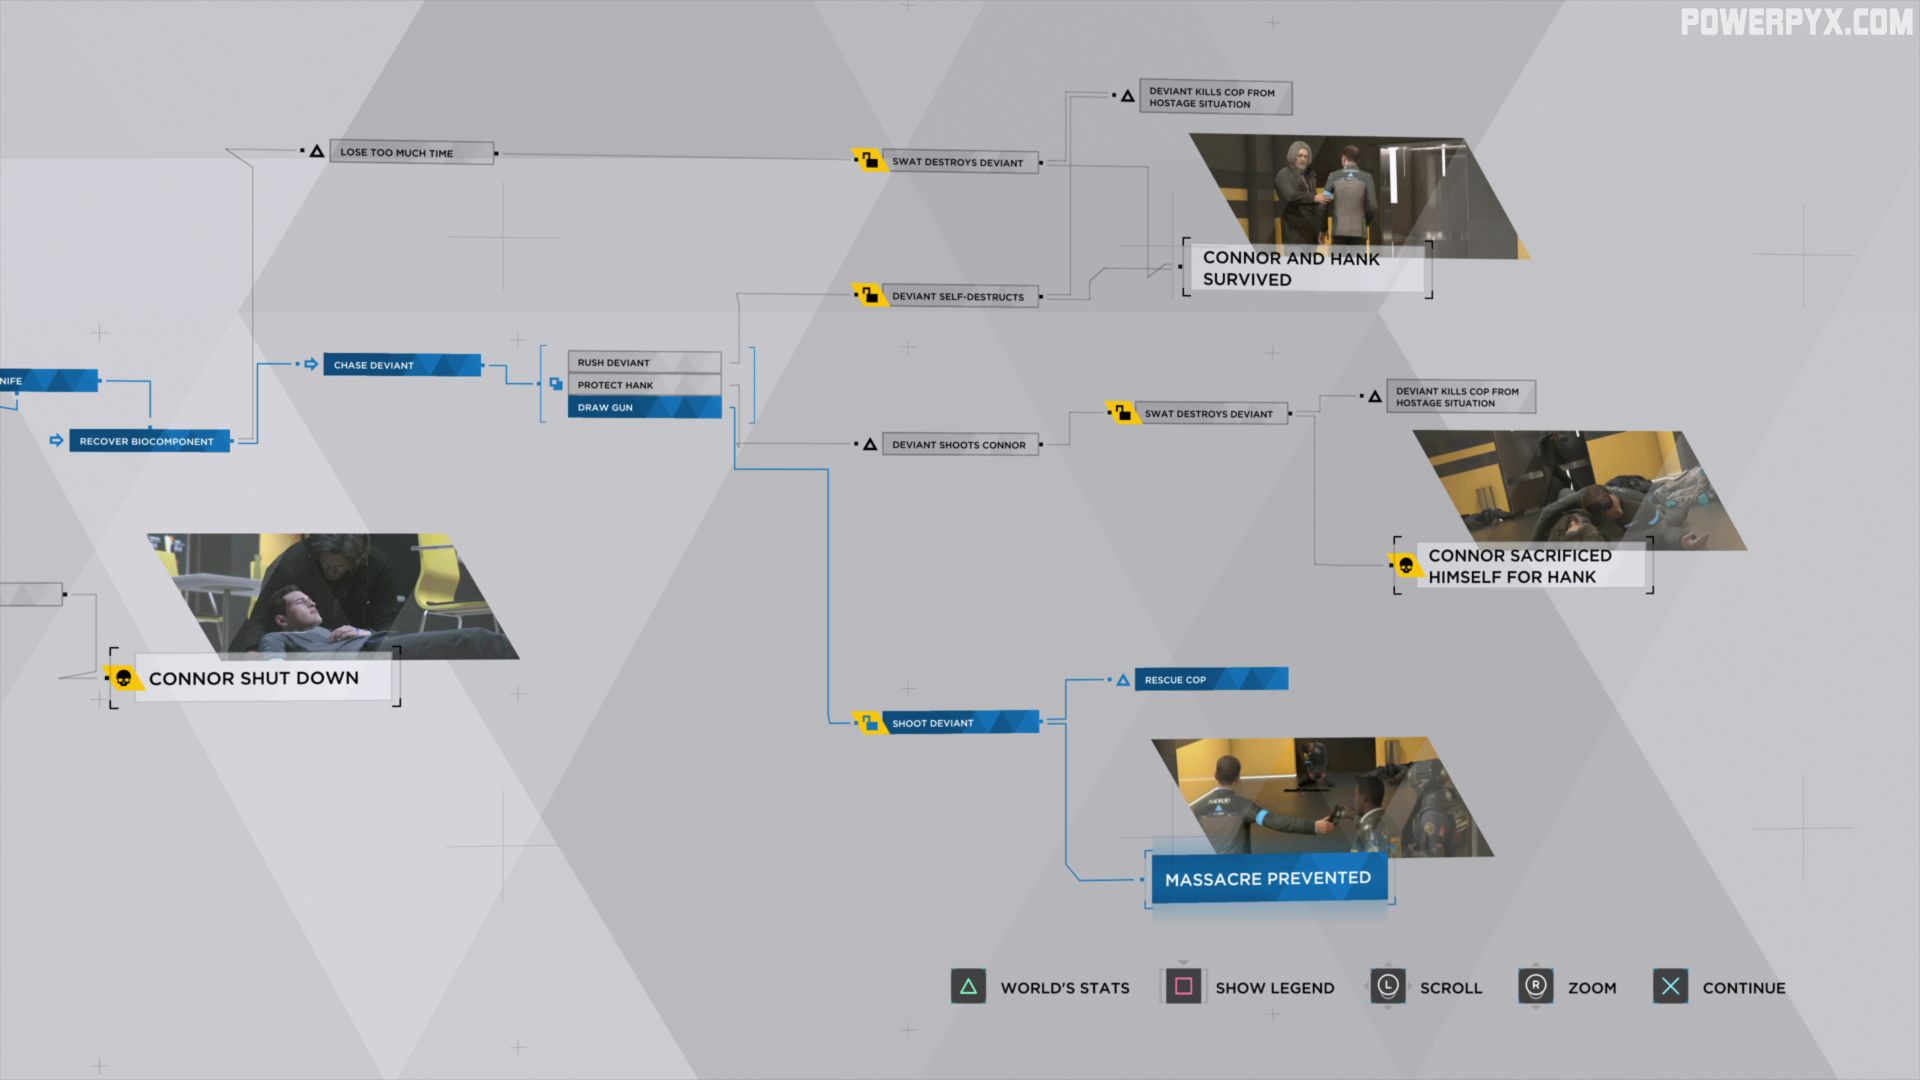
- Lose Too Much Time: If you don’t chase it immediately, events will play out without you.
- SWAT Destroys Deviant: [CROSS CHAPTER IMPACT]
- Deviant Kills Cop From Hostage Situation: Well, you bought him a little more time at least. Public Opinion▼
- Connor and Hank Survived: Public Opinion▼ Software Instability▲ ▲ ▲
- Chase Deviant: You will catch up with him in the corridor, and have one of three options to bring this chapter to a close:
- Rush Deviant: Look straight ahead to see the option to “Attack”. You will rush the deviant, but several cops will die.
- Deviant Self-Destructs: After killing several people in the hallway, he puts the gun under his own chin and pulls the trigger.
- Deviant Kills Cop From Hostage Situation: This guy is not having a good day. Public Opinion▼
- Connor and Hank Survived: Thank goodness for small mercies? Software Instability▲ ▲ ▲
- Protect Hank: Look to the left, to see the option to “Save Hank”. You will shield Hank with your own body and throw him to the ground.
- Deviant Shoots Connor: Maybe you should start wearing a vest.
- SWAT Destroys Deviant: [CROSS CHAPTER IMPACT]
- Deviant Kills Cop From Hostage Situation: Seriously, is he three days from retirement or something? Public Opinion▼
- Connor Sacrificed Himself for Hank: Hank▲ ▲ ▲ Software Instability▼
- Draw Gun: Look to the right, to see the option “Take Gun”.
- Shoot Deviant: Connor will grab the gun and shoot the deviant before any innocent lives are lost.
- Rescue Cop: This guy had better be naming his next kid ‘Connor’.
- Massacre Prevented: Hank▲ ▲ ▲
- Shoot Deviant: Connor will grab the gun and shoot the deviant before any innocent lives are lost.
- Rush Deviant: Look straight ahead to see the option to “Attack”. You will rush the deviant, but several cops will die.
- Lose Too Much Time: If you don’t chase it immediately, events will play out without you.
- Out of Time: If you don’t recover your biocomponent before time is up, the deviant will get away and you will die.
- Connor Shut Down: [CROSS CHAPTER IMPACT] Hank▼ Software Instability▼
Go up the stairs on the far side of the broadcast room to have a look at the roof:
- Go to Rooftop
Investigate Rooftop:
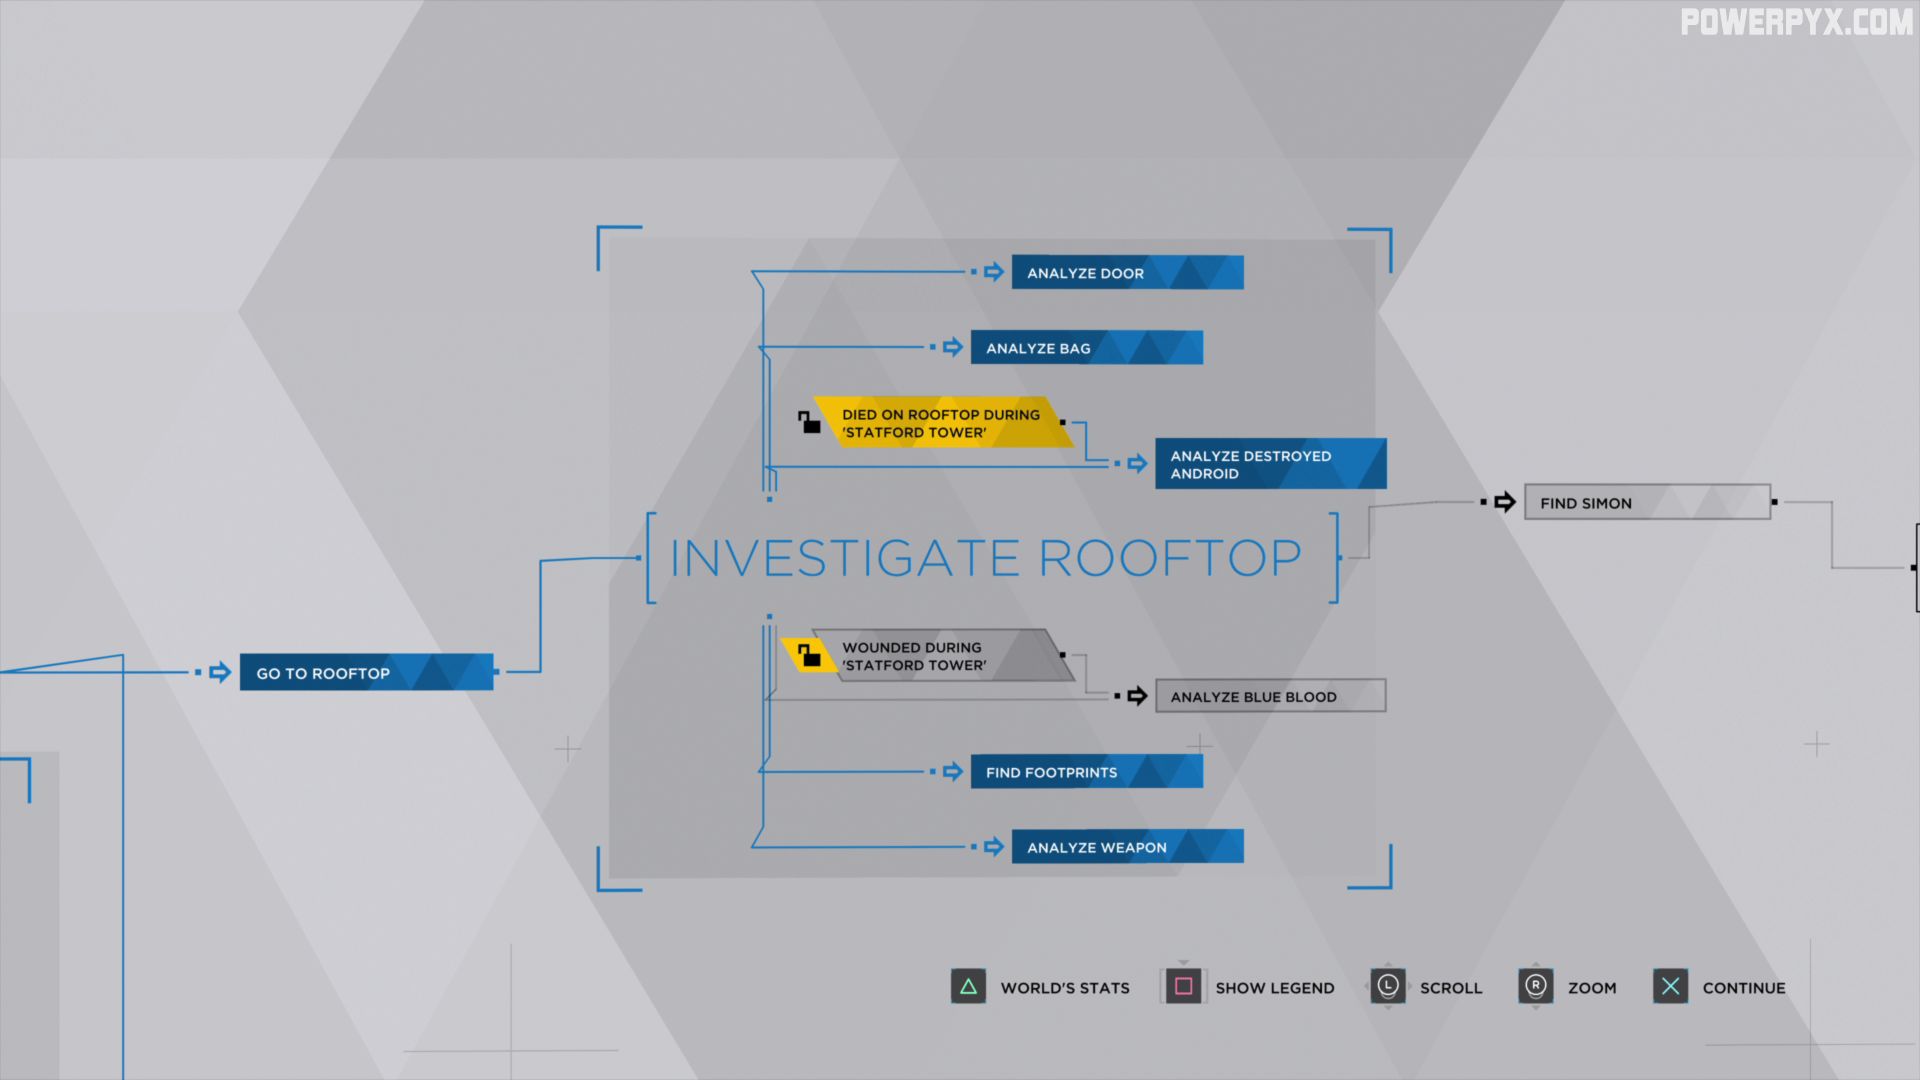
- Analyze Door: As soon as you’re on the roof, turn around and have a look at the door you just came through.
- Analyze Bag: Straight ahead of you will be the bag the deviants used to carry their parachutes.
- Died on Rooftop During ‘Statford Tower’: [CROSS CHAPTER IMPACT] unlocked if you helped Simon to the roof, but decided to shoot him rather than risk him being captured during The Statford Tower.
- Analyze Destroyed Android: Examine Simon’s body.
- Wounded During ‘Statford Tower’: [CROSS CHAPTER IMPACT] unlocked if Simon was wounded during The Statford Tower.
- Analyze Blue Blood: Once again perform an analysis on Simon’s blood stains.
- Find Footprints: Past the bag, examine the trail of footprints leading to the edge of the roof.
- Analyze Weapon: On the right hand side of the area, near the bag, will be two guns that were abandoned by the deviants while they were putting on parachutes.
Follow the blood trail to find a compartment on the far left side of the rooftop.

- Find Simon: Open the door and you’ll be shot. Hank will pull you to safety and Simon will be under heavy fire from FBI and SWAT.
- Rush Deviant: The only way to get any information out of Simon is to capture him before he gets himself killed.
- Shot by Simon: Bullets will be flying in both directions, and if you don’t succeed at several QTEs in a row, you’ll get shot.
- Simon is Destroyed by SWAT: [CROSS CHAPTER IMPACT] Your sacrifice is in vain, and Simon is terminated.
- Connor Died Running Toward Simon: [CROSS CHAPTER IMPACT] Time to polish up your replacement. Software Instability▼
- Simon is Destroyed by SWAT: [CROSS CHAPTER IMPACT] Your sacrifice is in vain, and Simon is terminated.
- Reach Simon: Successfully dodge all the bullets and you’ll reach Simon and probe his mind.
- Flash From Simon’s Memory: [CROSS CHAPTER IMPACT] You’ll catch a glimpse of Jericho in Simon’s mind… Software Instability▲ ▲ ▲
- Simon Self Destructs: [CROSS CHAPTER IMPACT] …right before he blows his brains out.
- Connor Was Traumatized: Connor felt Simon die. It will take a while for him to work through that feeling.
- Simon Self Destructs: [CROSS CHAPTER IMPACT] …right before he blows his brains out.
- Flash From Simon’s Memory: [CROSS CHAPTER IMPACT] You’ll catch a glimpse of Jericho in Simon’s mind… Software Instability▲ ▲ ▲
- Shot by Simon: Bullets will be flying in both directions, and if you don’t succeed at several QTEs in a row, you’ll get shot.
- Stay in Cover: Stay out of the line of fire.
- Simon is Destroyed by SWAT: [CROSS CHAPTER IMPACT] Simon is gunned down.
- Hank and Connor Survived Unscathed
- Simon is Destroyed by SWAT: [CROSS CHAPTER IMPACT] Simon is gunned down.
- Rush Deviant: The only way to get any information out of Simon is to capture him before he gets himself killed.
If you have completed all the objectives (listen to briefing, inspect the broadcast room, and inspect the roof), and have not triggered one of the possible endings to the chapter, walk up to Hank while he’s idling and talk to him:
- Decide to Leave: When Hanks you if you want to go, say yes.
- Connor and Hank Left the Crime Scene
All done! This concludes the Public Enemy chapter.
Up Next: Midnight Train
For more Walkthroughs, check out the complete Detroit Become Human Walkthrough.
Rayex says
How can i trigger “Deviant Kills Cop From Hostage Situation”?
Rayex says
oh.. dont tell me its the cop from first mission…
Rookie2171 says
In the broadcast room, how do I trigger “wounded during statford tower > analyse blue blood on console”?
Which actions in Statford Tower mission must be done to get the above mentioned data?
I tried getting Simon to be wounded after SWAT arrive, Simon to be wounded along the corridor by assault and shooting the guard operator. Am I missing something?
Kiara says
If you go back to Stratford tower and choose to attack the security guards, shoot the one on the left who is going for the phone and Simon will get shot by the one on the right with the gun. Or you can still choose to ruse the security but instead of drawing your gun, just wait for them to get suspicious and North will jump in to help but Simon will still get shot. Then as Connor you can analyse Simon’s blue blood.
Hope this helped : )
Zee says
Might want to add that if you decide to interrogate the androids before checking the roof then the chapter will end after that sequence. Putting it that scene first in the guide made me miss that whole section :/
j says
this happened to me too! i was expecting the rooftop scene to kick off after the interrogation, which actually does happen in the youtube videos i watched too. it goes right to the rooftop but it skipped that whole section for me
Hirokohime says
Same here. I actually checked the order here bc i thought it might happen
Eric says
There is a bug i cant look at the phone
Arnold says
You need to shoot the armed guard in the Stratford Tower Chapter. That is when North knocks out the guard on the phone for you to be able to check it.
DepresyjnaPanda says
I’m 100% that I saved the cop but he is not doing anything
zakuro says
Same!!!! Do I gotta “probe his memory”?!?!
Dimitra Stark says
First of all, BLESS this guide. The second time I played the game I used the hell out of it and I just have to say I laughed so much with your comments about the cop from he hostage situation here, like I literally laughed out loud several times while reading them at 6am that day and I’m still laughing now that I’m seeing them again. I just had to say thanks for that too!!
igirlgeek says
In Stratford Tower, I got the Group Escaped ending, so Simon wasn’t injured at all throughout the play through. But in Public Enemy, I can see bullet holes and traces of Simon’s blue blood in the Broadcast Room, and I found Simon on the roof, which makes no sense!
Connor says
Did you play them both without skipping Public Enemy’s first checkpoint?
Marcus says
I saved the cop but I can’t talk to him.,…
Jayden1092 says
If you save him he talks to you automatically
Bkw says
Should point out there is a branching path in this mission where you can only do one or the offer; enter the rooftop to play out the scenario with Simon, or interrogate the androids to play out the scenario with the deviant, I had to replay mission to do the rooftop (though ultimately went with the deviant path as felt the other would lead to a worse ending)
SydThaKyd says
This is a really old comment but yeah. I’m replaying now & I found the deviant in the kitchen and it self destructed and then it just went on to the next chapter w Kara.
Chris says
For some reason I can’t get the “Decide to Leave” option to unlock, even after investigating the Broadcast Room and The Roof. The game actually has ticked off the investigate broadcast room option, even though I have done everything. I notice that the option for the “Saved Cop in The Hostage” is locked for me, meaning that I didn’t save him in the first chapter. Does that mean that I don’t have the option to leave with Hank when I’m done investigating?
I have to save the cop so that option unlocks, and then I will get the option to leave when I’m done investigating the broadcast room?
Chris says
The game has NOT ticked off the option to investigate the broadcast room, even after I did everything *
Chris says
Okay, so something I discovered just now that you haven’t mentioned:
If you don’t find the deviant in the kitchen after interrogating them, the game cuts to Connor going to Hank and saying he wants to go. 🙂
Keheck says
I have left Simon behind on the roof in “Stradford Tower”, does that mean I can’t get the “Decide to Leave” ending? Roof’s not getting ticked off or crossed out…
Keheck says
Nevermind it was because he blocked the roof door I think
Jamteacups says
I just got the “decide to leave” completed. I got all the evidence on the broadcast room and then went to the kitchen to interrogate the androids. I failed to find the devient and Conner decides that there’s no deviant among them and leaves back into the broadcast room then tells hank that he wants to leave.
I hope this helps!
criesingucci says
If you go to the rooftop at all you will NOT be given a choice in how to respond to the deviant android. If you want options you must examine your clues and go straight to the kitchen to question the androids.
Richard James Burgess III says
You can go back through the door anytime after analyzing it.
SymphonicSweet says
If you save the cop in the Hostage mission and succeed, Connor remembers him. However, if you save the cop but die stopping Daniel, Connor doesn’t remember him, and their dialogue is completely different. It doesn’t change anything, but I thought it was cool and didn’t see it mentioned.
Phil says
But Connors upload their memory before dying, so I don’t get why he doesn’t remember the cop
Foukas says
Yeah, if Hank shot Connor at the bridge, Connor later mentions that every time he’s destroyed, he loses a bit of his memory and makes his job more difficult. I guess he forgets about the guard he saved. Makes sense.
SweKiwi says
But as someone else mentioned here, if you’d like to be able for Simon to survive and get back to Jericho, leave the roof alone and do the kitchen and spot the deviant first. Then you won’t even have to go up to the roof. Especially since youllenever spot the deviant if you to the roof.
Summer says
If you “Draw Gun” and shoot the deviant from the kitchen, will he still be in the evidence room in ‘Last Chance, Connor’? This is the way I want to do it, but I’m worried it won’t help me in the evidence room later on
MikeinCT says
Yes. That’s the way I just did it.
Kai says
I cannot find the phone even after I got North to kick the cop when he was calling???? I re-played Stratford Tower a few times to get the option for Connor to analyze the phone, but it still isn’t there. How do I fix this?
Tyger says
Is there anyway someone can post the flowchart of the deviants in the kitchen please as there seems to be alot to unlock thank you
TjGonz says
Look at his eye and body movements for human like behavior.
d8h says
can someone help me, i have been trying to get the ‘Analyse phone’ option for a while now but it doesnt seem to work, i have tried killed the guard in the previous chapter and sparing him but neither option is working
Edd says
Yeah same here
GY says
I think you’ll have to make sure it is North who kicks the guard with the phone so it flips out of his hands. Then you should be able to go behind desk and analyze it.
Ari says
I opened the door after I analyzed it on the roof and now Hank is blocking the door and I can’t get back up there. Did I just screw myself or is there a way I can get back up to the roof??
Richard James Burgess III says
He’ll eventually move. I had the same thing happen.
Sir Rusty says
At the top of the guide when talking to Amanda there is an option to be sincere, where it says (unlocked if friends with hank) on my current play through I am friends with hank but the option was not available.
FallenAngel says
I’ve got the same problem
Hirokohime says
To have the cop remembering u, do i have to play the whole game from the hostage without letting Connor die, is that it?
marvelfandomonium says
If Connor dies in The Hostage, he will not remember the officer. Also, there is no prompt to speak to him, but a mini cutscene plays when you walk away from him.
Javichi says
I saved the officer but he doesn’t talk to me in this chapter :/ I even tried re doing the hostage chapter and save him again, but it didn’t work, I don’t know what’s wrong!
Lisa says
For the paths involving the swat team (2 of) and the deviant self destructing- what choices do you have to have made earlier in game to progress with these?
Connor 6 says
Hank and Connor Decide to leave. This option saves the kitchen deviant and Simon isn’t found hiding. Investigate video room (all bullet holes if not turning blue/cleared). Go to kitchen, do NOT pick guy on far left/moves head and eyes and focus on wrong one instead, so deviant not detected. Go to roof. I only looked at the bag and the railing they jumped from, then went back downstairs to video room. Hank should block the stairs to roof now. Leave video room (I walked back to elevator) then reenter video room. Hank should have moved. Approach him and it should show a prompt to leave, choose yes.
Richard James Burgess III says
You can skip the kitchen altogether aside from filling the flow chart.
Lenka says
oh my god, thank you! I couldn’t get it unlocked
alyssa says
“this guy had better be naming his next kid connor” lmaooo
PutzkiXD says
There is something I didn’t quite understand. at the previous chapter I didn’t leave Simon on the roof, so I went to the kitchen – found the deviant – shot it, but then the mission ended. wasn’t I supposed to check the roof too? Do I need to do it before the deviant stuff?
ArthuzinDK says
I saved the cop, he talked to me but I can’t have him killed. I’m trying to complete flowchart as much as I can without playing a previous chapter but he doesn’t go to the corridor to be killed. Am I doing something wrong? I’m only checking CCTV footage and interrogating the androids to be fast