
Crisis Core -Final Fantasy VII- Reunion Trophy Roadmap
- Estimated trophy difficulty: 5.5/10
- Approximate amount of time to platinum: 40-50 Hours
- Offline Trophies: 51 (1
 , 3
, 3 , 5
, 5 , 42
, 42 )
) - Online Trophies: 0
- Hardest Trophies: Divine Rule Broken, Mission Completionist, Shinra’s Squats Champion
- Number of missable trophies: All of them, except automatic story trophies for finishing each chapter. There is No Chapter Select, that’s why everything is missable.
- Glitched trophies: 0
- Does difficulty affect trophies?: Yes, must beat game on Hard, but you can play through it on Normal and change to Hard before endboss to pop SOLDIER of Legend.
- Minimum Playthroughs: 1 on Normal (change to Hard difficulty before Endboss to pop Hard Mode trophy, no need for extra playthrough on Hard)
- PS4/PS5 Autopop & Save Transfer: Yes, there is Save Transfer but only from PS4 to PS5 (not from PS5 to PS4). It autopops all Trophies instantly. You can copy the Platinum Save File from PS4 to PS5 via USB or PS+ Cloud. In the PS5 version click “Convert Save Data” and confirm, after a few seconds it shows “Data conversion complete”, then it autopops all trophies directly in the Title Screen.
- PS4/PS5 Crossbuy: Yes, game is PS4+PS5 Crossbuy
- Free-Roam / Chapter Select after Story?: No. There is no Free Roam and no Chapter Select. Everything is missable. But you can keep a Manual Save after each Chapter (10 Chapters total and 30 Manual Save Slots).
- Release Date: December 13, 2022
 , 3
, 3 , 5
, 5 , 42
, 42 )
)Introduction
Welcome to the Crisis Core -Final Fantasy VII- Reunion Trophy Guide! This is a Remaster / Remake of the 2007 PSP (PlayStation Portable) game titled “Crisis Core: Final Fantasy VII”. 15 years later, the “Reunion” version brings the game to modern day consoles and PC. The content is the same as the original PSP version, it’s mainly a graphical update and trophies have been added. Everything except automatic story trophies is missable due to there not being Chapter Select. The game consists of a main story of 10 Chapters (takes around 20 hours going for 100%) and 300 Side Missions (around 30 hours). The missions are pretty short, you just need to find and kill a marked enemy. Missions can be played from any Save Point in the game. It’s best to focus on the story first because you will gradually gain access to new gameplay mechanics. The game uses a “lottery” system called “DMW” to grant you random buffs during battle. You increase DMW completion by seeing flashback images during combat, but this is random and will happen naturally over time. You can already work on Missions during the story if you like but many don’t unlock until later. There is also New Game+ but your Mission Progress doesn’t carry over, hence you must do all Missions in one playthrough.
Step 1: Normal Difficulty Playthrough – Follow Collectible Guide for All Missables [20 Hours]
Simply follow the Collectible Locations Guide. It includes all Collectibles, all Trophies, and everything missable in chronological order. Do this playthrough on Normal Difficulty. There are only two difficulties: Normal and Hard. There’s no need to do a Hard playthrough, you can simply switch the difficulty from Normal to Hard before the final boss to pop the trophy for beating the game on Hard.
Keep a Manual Save from the start of each chapter. There is no Chapter Select but after each Chapter the game asks if you want to create a Manual Save. There are 10 chapters and 30 save slots total. Reserve Save Slots 21-30 for the “Chapter Completed” Saves, don’t overwrite them. Cycle through Save Slots 1-20 to save at every Checkpoint, if you missed something by accident or failed a trophy you always have a save nearby.
EVERYTHING IS MISSABLE – ESPECIALLY SOME MISSIONS:
Everything is missable due to there not being a Chapter Select. Special attention needs to be paid to accepting all missable missions before the Point of No Return in Chapter 7, but this is highlighted in Red color in the Collectible Guide when you get there (end of Chapter 7). Because Mission Progress doesn’t carry over to New Game+, if you forget to accept one you’d be locked out of 100% Mission completion for this playthrough and need to redo all 300 missions from scratch.
You will get all missable Missions as part of the Collectible Locations Guide.
Step 2: 100% DMW Progress [Few Hours, Luck-Based]
Reload the last manual save before the Endboss to continue with your cleanup (don’t enter New Game+).
Refer to 100% DMW Guide for unlocking your remaining DMW Images and the best farming methods for 100% completion. Getting 100% DMW Progress unlocks the Genji Equipment “Genji Armor” which increases your Health limit to 99,999 and permanently buffs you with beneficial Endure and Regen status effects. This is one of the best must-have items and makes 100% Mission Completion easier. You can simply farm the DMW progress overnight or while afk for a few hours in Mission 1-1-1 while having Fraerie Ring equipped, it permanently heals you faster than enemies can damage you (reward from Mission 2-5-5 and 7-6-2 or bought from shop Mythril Mine Traders). This farming method is also a great way to max out any Materia to 5 Stars because the DMW rolls level up your equipped Materia. Should you not have any luck with your last DMW images, you can continue with missions for now and farm your missing ones overnight again later.
Step 3: 100% Missions Progress, All Genji Equipment, Minerva Superboss [20-30 Hours]
All you will have left now is to obtain 100% Mission completion. You may also still need to unlock some shops, which come from Mission Rewards. Minerva is part of Mission 9-6-6: The Reigning Deity so you fight her automatically on your way to 100%. She is the hardest boss in the game.
Now is a good time to give the Minerva Boss Guide a read to know what equipment you should strive for. A big part of preparing for Minerva is unlocking all Genji Equipment which is mostly tied to high-difficulty Missions. The main thing to keep in mind is to not waste any Gil (money) and SP (fusion points). You need 1 Million Gil to buy Genji Helm. You will also need around 1 Million SP to fuse some of the better Materia in preparation for your Minerva loadout.
As you work towards Mission Completion, follow the 100% Missions Guide. It shows the unlock requirements and rewards (also optional chest rewards) for each mission.
Missions can be completed from the Save Point before the Endboss. Open whatever optional chests you come across, they contain powerful Materia and Accessories. You may also find the All Materia List and All Accessories List helpful here.
Best Loadout for Missions until you can get Minerva Loadout:
Basically you just need one strategy: Enter Buster Sword Stance (  +
+  , Story Unlock from Chapter 6) and spam the Materia “Darkness” and “Costly Punch”. Do this until you reach 25% Buster Sword Stance proficiency. You do double damage with these moves in Buster Sword Stance. At 25% proficiency, it will lift the damage limit from 9,999 to 99,999 per hit. You can then one-hit most enemies and rush through the missions super fast. Both Darkness and Costly Punch deal special damage that is non-physical/non-elemental. Darkness deals damage in a wide area and is great against multiple enemies. Costly Punch deals much more damage and is better against single targets like bosses. Both attacks reduce your own HP but you can heal back with Cure/Cura/Curaga. Remember you can make multiple Loadouts in the Equipment Menu. For bosses using magic attacks use loadout with high SPR and MBarrier (blocks magic), for bosses using physical damage use loadout with high VIT and Barrier (blocks physical). When encountering enemies that cause status ailments (such as Death) equip accessories that prevent those ailments, and for enemies using a particular element (fire/ice/thunder), equip accessories that half/null/absorb this element. You can even run away from encounters to save time. If you have a lot of trouble with a boss you can use Phoenix Down (select from item wheel and press
  ) to self-revive, but use these with care because they cannot be bought from shops.
- Materia 1: Costly Punch – use in Buster Sword Stance to deal 99,999 damage per hit. To get it fuse “Goblin Punch” (reward from chapter 9 Waterfall Chaser) with any purple Materia from Shop “Research Dpt. QMC+”.
- Materia 2: Darkness – use in Buster Sword Stance against groups of enemies. Obtained from Mission 8-4-6: Suspicious Mail 6, as early as the end of Chapter 3.
- Materia 3: Cure/Cura/Curaga – use to heal, Curaga is the strongest and should be used when you have over 9999 health.
- Materia 4: HP Up++
- Materia 5: (Anything you like)
- Materia 6: (Anything you like)
- Accessories 1-4: Anything that increases Health, prevents status ailments, casts constant Barrier/MBarrier. For difficult bosses using strong magic attacks equip anything with SPR, for bosses using strong physical attacks equip anything with VIT.
Useful Tips, Tricks and Guides:
- Crisis Core Final Fantasy VII Reunion – Wiki & Strategy Guide
- Crisis Core Final Fantasy VII Reunion – All Collectible Locations (100% Trophies & Missables)
- Crisis Core Final Fantasy VII Reunion – All Mail Locations
- Crisis Core Final Fantasy VII Reunion – All Flower Wagon Part Locations
- Crisis Core Final Fantasy VII Reunion – All Shop Locations
- Crisis Core Final Fantasy VII Reunion – All Fan Club Locations
- Crisis Core Final Fantasy VII Reunion – All Nibelheim Seven Wonders Locations
- Crisis Core Final Fantasy VII Reunion – All Missions (Unlock Requirements & Rewards)
- Crisis Core Final Fantasy VII Reunion – DMW 100% Guide
- Crisis Core Final Fantasy VII Reunion – All Genji Equipment Guide
- Crisis Core Final Fantasy VII Reunion – All Materia Locations
- Crisis Core Final Fantasy VII Reunion – All Accessories Locations
- Crisis Core Final Fantasy VII Reunion – Minerva Boss Guide
Crisis Core -Final Fantasy VII- Reunion Trophy Guide
 |
My Living Legacy Acquired all trophies. |
 |
| Earn all other Trophies in Crisis Core -Final Fantasy VII- Reunion to unlock Platinum (no DLC required). | ||
 |
Embrace Your Dreams Cleared the Prologue. |
 |
| Automatic story-related trophy, cannot be missed. | ||
 |
He Wouldn’t Betray Us Cleared Chapter 1. |
|
| Automatic story-related trophy, cannot be missed. | ||
 |
We’re Not Monsters Cleared Chapter 2. |
|
| Automatic story-related trophy, cannot be missed. | ||
 |
Angels Dream of One Thing Cleared Chapter 3. |
|
| Automatic story-related trophy, cannot be missed. | ||
 |
Where Did Everyone Go? Cleared Chapter 4. |
|
| Automatic story-related trophy, cannot be missed. | ||
 |
Protect Your SOLDIER Honor Cleared Chapter 5. |
|
| Automatic story-related trophy, cannot be missed. | ||
 |
Did Genesis Really Die? Cleared Chapter 6. |
|
| Automatic story-related trophy, cannot be missed. | ||
 |
I May Abandon Shinra Cleared Chapter 7. |
|
| Automatic story-related trophy, cannot be missed. | ||
 |
I’ll Come Visit Cleared Chapter 8. |
|
| Automatic story-related trophy, cannot be missed. | ||
 |
We’ll All Be Heroes Cleared Chapter 9. |
|
| Automatic story-related trophy, cannot be missed. | ||
 |
Thanks to You, Zack Cleared Chapter 10. |
 |
| Automatic story-related trophy, cannot be missed. For finishing the story (10 Chapters total). | ||
 |
Come and Get It Won a battle for the first time. |
|
| Automatic story-related trophy, cannot be missed. This is the first trophy you unlock in the game, after the first cutscene, defeat the first group of enemies and it will unlock. | ||
 |
Prove Your Honor to Me Performed a limit break for the first time. |
|
| Automatic story-related trophy, cannot be missed. You will automatically enter a Limit Break state within the first few fights. This happens when the DMW reels spin to 3 identical images during combat. | ||
 |
Got Materia Fusion Down Performed materia fusion for the first time. |
|
Materia Fusion is an automatic story unlock in Chapter 3, after going to the Director’s Office. You can’t miss it. Once unlocked, press  > Materia Fusion and combine any two Materia to pop the trophy. > Materia Fusion and combine any two Materia to pop the trophy. |
||
 |
Overpowered Dealt 99,999 damage to an enemy. |
|
First you must break the damage ceiling of 9999 damage. There are two ways to do this:
After you did one of the two methods above, the next thing you need is a Materia that can deal 99,999 damage in one hit. The best option is “Costly Punch”. The easiest way to get it is by fusing Materia “Goblin Punch” (reward for Trophy: The damage output of this Materia scales to your overall HP. When you have 9999 HP and hit an enemy’s weak spot or hit from behind it should often deal 99,999 damage. This is one of the best materia in the game and you should be using it against high-level bosses anyway. |
||
 |
Limit Break Collector Obtained all DMW images. |
|
| » Crisis Core Final Fantasy VII Reunion – DMW 100% Guide | ||
 |
DMW Master Achieved 100% progress for all DMW. |
|
| » Crisis Core Final Fantasy VII Reunion – DMW 100% Guide | ||
 |
Missions Completed: 25% Completed 25% of all missions. |
|
| » Crisis Core Final Fantasy VII Reunion – Missions 100% Guide (Unlock Requirements & Rewards) | ||
 |
Missions Completed: 50% Completed 50% of all missions. |
|
| » Crisis Core Final Fantasy VII Reunion – Missions 100% Guide (Unlock Requirements & Rewards) | ||
 |
Missions Completed: 75% Completed 75% of all missions. |
|
| » Crisis Core Final Fantasy VII Reunion – Missions 100% Guide (Unlock Requirements & Rewards) | ||
 |
Mission Completionist Completed 100% of all missions. |
 |
| » Crisis Core Final Fantasy VII Reunion – Missions 100% Guide (Unlock Requirements & Rewards) | ||
 |
Shop Completionist Unlocked all shops. |
|
| You will get this by following » Crisis Core Final Fantasy VII Reunion – All Collectible Locations (100% Trophies & Missables). For specifically just all Shops see » Crisis Core Final Fantasy VII Reunion – All Shop Locations |
||
 |
Mail Completionist Received mail from all senders. |
|
| You will get this by following » Crisis Core Final Fantasy VII Reunion – All Collectible Locations (100% Trophies & Missables). For specifically just all Mail see » Crisis Core Final Fantasy VII Reunion – All Mail Locations |
||
 |
Genji Equipment Collected all Genji equipment. |
|
| » Crisis Core Final Fantasy VII Reunion – How to Get All Genji Equipment | ||
 |
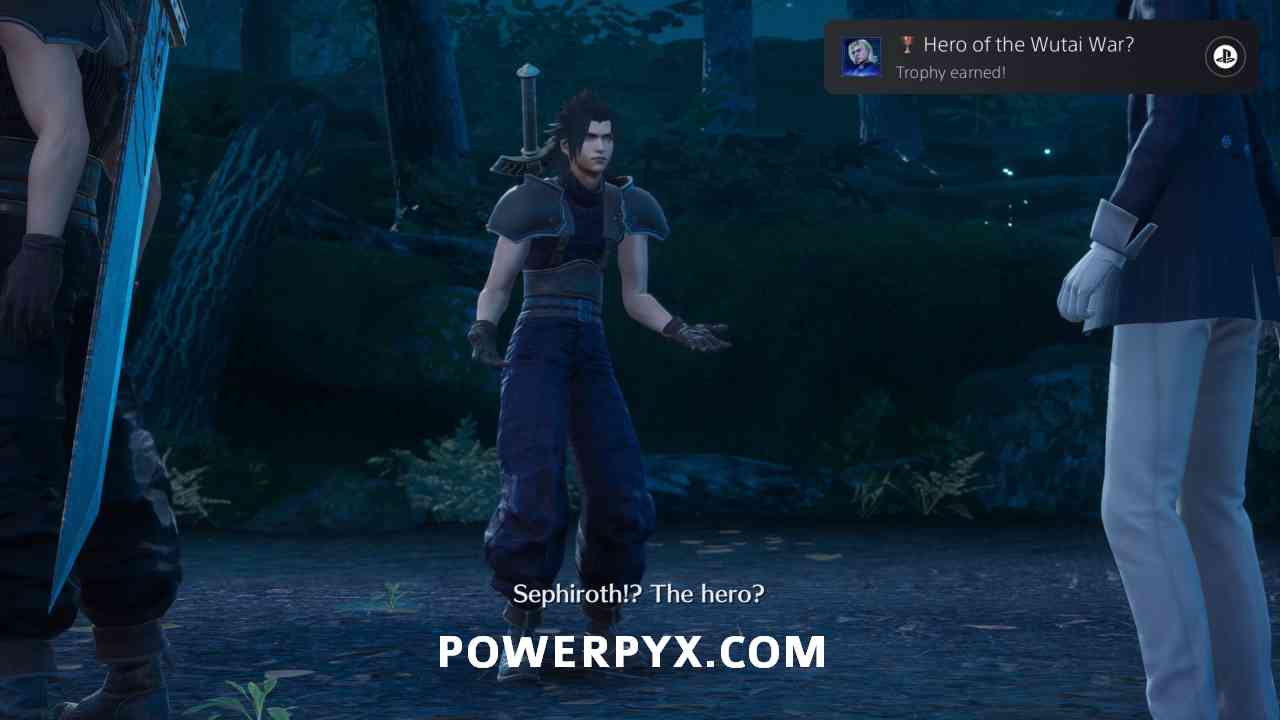
Hero of the Wutai War? Received highest evaluation from Lazard for Assault on Fort Tamblin. |
|
| Chapter 1 This takes place in Chapter 1. After the Save Point “Mt Tamblin – Mountain Path”, you will launch an assault on Fort Tamblin. The section for the trophy starts after entering the Fort, when you see a tracker in the top left corner that says “Fortress: Remaining Forces”. You must defeat all enemy groups inside the fort. There are 16 groups total. They are shown by white sword icons in the top left corner. They will get a green checkmark when defeated. Initially, it only displays 11 of 16 sword icons. The remaining 5 are hidden: 3 behind rotating doors and 2 in towers. If you reach the end of the fort section and haven’t defeated all enemies, you will get the dialogue option “I’ll take out all the enemies here first!”. By picking this you can stay here and finish the remaining enemies until all 16 show a green checkmark. Pay special attention to the 2 wooden towers and the 3 optional rotating walls, press
After you have all 16 green checkmarks exit this area. The enemies in the remaining fort area don’t matter (the only area after this is with save point “Fort Tamblin – Courtyard” and the double-boss in the temple). Only the 16 with checkmarks matter. The trophy unlocks after completely exiting Fort Tamblin, when you return to the woods and have a cutscene with Lazard, before 3 Ninjas attack you. Lazard will give you the Fire Armlet as a reward for doing a perfect job. The trophy pops during the cutscene immediately after he gives the Fire Armlet.
|
||
 |
Fan Club Aficionado Joined every fan club. |
|
| You will get this by following » Crisis Core Final Fantasy VII Reunion – All Collectible Locations (100% Trophies & Missables). For specifically just all Fan Clubs see » Crisis Core Final Fantasy VII Reunion – All Fan Club Locations |
||
 |
Master Mako Stone Miner Prevented the Materia Room from being shut down. |
|

Chapter 2 (still doable until Point of No Return at end of Chapter 7) At the very start of Chapter 2, before departing on your mission, you will be back in the main hub area. Don’t talk to Tseng yet (don’t start the mission yet). Instead, leave through the Briefing Room door to reach the Fountain area. Immediately turn around and go back the way you came to enter the Shinra Building again. Interact with the doors/elevator and choose to go to “SOLDIER Floor”. When you arrive talk to the NPC, afterward don’t enter the Briefing Room, instead walk along the SOLDIER Floor and check the doors on the side, enter the one that says “MATERIA ROOM” (it’s left of a save point). Talk to the Researcher inside on the left to unlock Mission 8-2-1, then complete through 8-2-6 to get 6 Mako Stones (you can play missions at the Save Point). Give the 6 Mako Stones to the Researcher to earn the trophy. The missions go up to 4 stars difficulty. Use Cure a lot to heal. The 4 star enemies are weak to Fire, when you run out of MP refresh with Ether (press If you find this too tricky in Chapter 2 or missed it, you can still do it any time until the Point of No Return in Chapter 7. The missions are playable from any save point and you revisit the hub area between main chapters to talk to the Researcher. |
||
 |
Banora Treasures Collected all items and arrived at Angeal’s house before the Banora airstrike. |
|
|
Chapter 2 In Chapter 2, after talking to Angeal’s mother in Banora Village, you can find 5 golden sparkling items but can’t collect them yet: 3 in the village, and 2 leading up the cliffside to Tseng. Make sure to interact with each of them once, this is mandatory to pick them up later! When done, talk to Tseng to enter the Factory. After leaving the Factory and slicing the 10 rockets for |
||
 |
Everyone’s Hero Saved everyone calling for help during the assault on the Shinra Building in Chapter 3. |
|
|
Chapter 3 After learning Materia Fusion and going to the Director’s Office, the assault on Shinra Building will begin. During the elevator ride choose “Get off and look around”. Then save the 3 people on the SOLDIER floor (2 in the hallway, 1 in Training Room). Go back to the elevator and choose “Head to the entrance right away”, then finish the 2 mandatory fights. When outside in Sector 8, save the two people in LOVELESS Avenue to pop the trophy. So in total there are 5 optional encounters to save people (3 on SOLDIER floor, 2 in LOVELESS avenue). |
||
 |
First-Rate SOLDIER Defeated all virtual data in the Training Room. |
|
|
Chapter 3 At the start of Chapter 3 you will unlock the fights in the “Training Room” of Shinra Building (SOLDIER Floor, outside Briefing Room). From where you start the chapter, turn to your immediate left and enter the Training Room. Finish all 4 Virtual Data Fights to get the trophy. The 4th is against miniboss called “Experiment No. 88”. An easy tactic is to always attack it from the side or from behind, because it can’t attack to its side. It will only be aggressively attacking when you stand in front of it, so avoid that. When you’re behind, it can use a tail whip, but landing a full |
||
 |
Precise Restoration Achieved 100% recovery with the Mako Recovery Unit. |
|
|
Chapter 4 After leaving the Slums, in the Fusion Chamber room with Hojo, interact with the machine on his left. It will count down from 5 seconds, stopping at 3 seconds. Continue counting to 0 seconds and stop it correctly to get 100%. You must press |
||
 |
Of Significant Worth Judged by Hojo to be a “SOLDIER member of significant worth” in the Fusion Chamber. |
|
|
Chapter 4 After leaving the Slums, in the Fusion Chamber room with Hojo, follow the bridge in the middle and interact with the fusion chamber. Answer the questions correctly:
|
||
 |
Cell Raider Checked all cells on the 67th floor of the Shinra Building. |
|
|
Chapter 4 After leaving the Slums, in the Fusion Chamber room with Hojo, press the switch next to him while having Steal materia equipped. You get the Steal Materia automatically from Bruno in Chapter 4 when leaving the Slums, which is just before you reach the Fusion Chamber with Hojo. You will need to use Steal Materia on all 6 Experiment Enemies to get their keys, then open the cells and open the 3 chests in each cell, and return to Hojo before the time runs out. |
||
 |
Wutai’s Nemesis Caught all the Wutai spies that had infiltrated Midgar. |
|
|
Chapter 5 Speak to the SOLDIER 2nd Class in Sector 8 – LOVELESS Avenue and agree to help find the Wutai Spies. Locate all 6 Spies to receive this as a reward. Must talk to each Spy 3 times, they must be found in a fixed order, nothing will happen if you try to speak to them out of order.
|
||
 |
Fan Club Savior Helped every fan club continue their activities. |
|
|
Chapter 7 Speak to the Genesis Fan in Sector 8 – Fountain, and suggest merging with a richer club. Head into LOVELESS Avenue and speak with the Genesis Fan there. Return to the first Genesis Fan at The Fountain and talk to her again. For the Angeal Fan Club, speak to the child in Sector 8 – Fountain who is looking for his mother. Then head up to Sector 1 – Train Station and speak to the mother, and select the “mother without honor” option. Then return to where the boy was and speak to the mother again. |
||
 |
Midgar Full of Flowers Constructed every flower wagon type. |
|
| You will get this by following » Crisis Core Final Fantasy VII Reunion – All Collectible Locations (100% Trophies & Missables). For specifically just all Flower Wagon Parts see » Crisis Core Final Fantasy VII Reunion – All Flower Wagon Part Locations |
||
 |
Seven Wonders Expert Learned about all of Nibelheim’s Seven Wonders. |
|
|
You will get this by following » Crisis Core Final Fantasy VII Reunion – All Collectible Locations (100% Trophies & Missables). |
||
 |
Cage Opener Opened the path to the Cage of Binding. |
|
|
Chapter 10 When you enter the Depths of Judgement, there’ll be three paths branching off, with this area being the hub. In each area there will be a large stone tablet you can interact with to read an Act of LOVELESS. Depths of Judgement will have “LOVELESS – Prologue”, Portal of Severance (west) will have Act III, Howling Fang (east) will have Act II and just outside the entrance of Lake of Oblivion (south) will be Act I. After reading all four tablets, enter Lake of Oblivion and around the area will be 5 mako springs you can interact with to spawn an enemy. Defeat all 5 of these enemies and a path will open to the Cage of Binding, to the north of the lake. This unlocks the trophy. |
||
 |
Slicin’ SOLDIER Cut down every incoming shell. |
|
|
Chapter 2 In Chapter 2, after talking to Angeal’s mother in Banora and going through the factory, you will automatically reach a section where you must slice 10 rockets flying at you. Can’t miss it, this is a mandatory story part. You have to slice all 10 rockets in a row without missing any. Press If you fail, complete the sequence and the last autosave. Luckily, it will put you back right before the rocket section so you can retry immediately. You can skip the initial call/cutscene by pressing |
||
 |
Master Blender Blended a perfume with the perfect amount of oil. |
|
|
Chapter 4 In the Chapter 4 Slums Market area, after getting your wallet back, interact with the “Shopping Paradise” store to start this minigame. You must count to the correct number of drops displayed. Drip = 1, DripDrip = 2, Splash! = 10. Press |
||
 |
Bingo! Guessed the exact number in the number-guessing game. |
|
|
Chapter 4 In the Chapter 4 Slums Market area, after getting your wallet back, talk to the boy in the corner for a number-guessing minigame. You must guess how many kids walk by, between 1-6. Ask Aerith for her guess, she will give you 2-3 numbers (she gives 2 when your affection is above 50, and 3 when below 50). If you pay 50 gil, the boy will give you three numbers. Select the number that is shared between these for the correct answer. Example: Aerith guesses 3,4,6 and Boy guesses 1,2,4 the correct answer is “4” because they both included it in their guess. |
||
 |
Godlike Rated to have “godlike speed” in collecting materia. |
|
|
Chapter 4 In the Chapter 4 Slums Market area, after getting your wallet back, interact with the “Item World” store to start this minigame. You must collect all 20 materia around the Market in under 14 seconds. Sprint and spam |
||
 |
Shinra’s Squats Champion Achieved victory against the SOLDIER 2nd Class in the physical fitness test. |
|
|
Chapter 5 At the start of the Chapter enter the Training Room and talk to the man to start the Squatting Minigame. Beat all four opponents. You must press Speed 1 = press Turning on controller vibration can also help with the rhythm. |
||
 |
Master Infiltrator Infiltrated the mako excavation facility without being discovered once. |
|
|
Chapter 5 Before infiltrating the facility in Modeo Ravine (story-related, snowy area), make a manual save. There’s a save point right before it. After infiltrating the facility, avoid the patrolling guards. Crouch in the blue zones with |
||
 |
Immovable Object Defeated all enemies in Defense of the Junon Perimeter. |
|
|
Chapter 6 During the assault on Junon, a minigame will start where you must stop enemies from reaching the purple outline at the end of a road. It will show a counter in the top left corner how many enemies you defeated. Stay near the end of the road where the enemies are heading. Run into all the enemies heading towards the gate to fight them and defeat them all. Don’t let any reach the gate. There are 30 enemies total, if you didn’t let any reach the gate the trophy will pop. |
||
 |
Zack the Sniper Did not allow a single gun bull head to escape while sniping. |
|
|
Chapter 9 After leaving Nibelheim, you will go down a hill and have to shoot robots with sniper rifles. You have to kill all robots at sniping spots without any of them escaping. If you alert them and take too long they will run away after a short time. Aim for the head as it does enough damage to instantly kill all the regular ones. After fully upgrading the rifle you can also aim for their shields as they are easier to hit and the fully upgraded damage still deals good damage plus staggers the robots on each hit. There are no checkpoints during this minigame, if a robot escapes you must reload the last autosave to respawn at the start and redo everything.
Continue to the end of the section and the trophy will pop before the next save point. |
||
 |
Waterfall Chaser Collected ten chests coming down the waterfall in the hills of Gongaga. |
|
|
Chapter 9 In the Hills area of Gongaga, after the cutscene with Genesis, run around until you complete 7 battles. Try to leave the area and you’ll be prompted with a minigame, choose the first option to participate in it. Chests and enemies will fall down the waterfall, and you will need to collect all 10 chests. They will fall in the same order: Chest in the middle, two enemies on the left and right, two chests on the left and right, repeat this for 10 chests. If you get hit by an enemy you’ll be stunned and miss the next two chests, so every time you grab the middle chest, you will want to quickly run to the left out of the water to safely dodge the enemies, then quickly run back to grab the chests. If you get hit by an enemy and miss a chest, simply leave the area and come back, then redo 7 battles to trigger the minigame again. Getting all 10 chests will also reward you with Goblin Punch, which can be combined with any of the DMW Materia (purchasable from Research Dept. QMC+) to create Costly Punch, one of the best combat materia. |
||
 |
Good Match For Aerith Told by Bruno that you and Aerith “make a good couple.” |
|
|
Chapter 4 In Chapter 4, in the Sector 5 Slums Market area, you must reach high affection with Aerith. Aerith affection will go up by +10 for interacting with each of the three shops when looking for Bruno, +1 for each time you select “Wait” when you talk to the girl (+10 total), +2 for each Potion given to the boy (+10 total), and +5 for choosing the first option when you speak to Aerith, or +10 for choosing the second option. This is +60 by the time you get your wallet back. You then get +5 every time you make perfect perfume (Master Blender trophy), +5 for getting the fastest time on the materia collection (Godlike trophy). Craft the Perfume 3 times in a row perfectly without miscounting the number of drops (Drip = 1, DripDrip = 2, Splash! = 10). This brings you to 75 Affection total. Leave the market and continue with the chapter until you reach the end of Sector 5. There you will run into Bruno, during the dialogue he must say “You and Aerith make a Good Couple”. If he says you are an “okay couple” you missed something or blended bad perfume (if you miscount the drops during perfume blending Aerith won’t like it and this can reduce your affection). |
||
 |
Divine Rule Broken Defeated Minerva. |
|
| » Crisis Core Final Fantasy VII Reunion – Minerva Boss Guide | ||
 |
SOLDIER of Legend Cleared the game in Hard Mode. |
|
| There is an easy trick for this: play through the game on Normal first. Before the endboss, switch from Normal to Hard difficulty by pressing > Options > Gameplay Settings > Difficulty = HARD. Then defeat only the endboss on hard and the trophy for beating the game in Hard Mode will unlock. No need to do a full playthrough on Hard.
Alternatively, or in case this gets patched in the future, you can play through Hard in New Game+. This only takes around 90 minutes if you skip all cutscenes and dialogue and already got 100% completion on the first playthrough to deal 99,999 damage per hit. All your equipment carries over into New Game+. |
||

 to select during combat).
 while squatting down, at the following times:
 to hide, and run past when they’re not looking. When you reach the exit without being seen the trophy will pop. If you were seen, reload the last manual save to retry.
PowerPyx says
Proud to present you with another Day-1 Guide.
The last big project for this year.
Enjoy!
ZexionPonty92 says
Thank you for this incredible work, as always!
Rich says
Literally best in the business. Love your work and you always come through.
I don’t know how you do these DAY ONE guides, but I’m sure I speak for legions when I say that I appreciate you and your work.
Adopted kid says
I love all your guides they are very helpful as always. On M6 5-4 what mataria do you use for the enemy. The big animal thing lol
ChickyNuggy97 says
This guide is amazing, great work!
joker says
Why 5.5/10 difficulty? if hard difficulty glitch work
PowerPyx says
See “Hardest Trophies” section at the top.
Mainly some minigames (Squats, Sniping, Godlike Speed) and some of the later 10-star missions can be annoying, it requires quite a bit of preparation to get a good loadout. Once you have a good loadout it’s not too bad. There are also some 10-star bosses aside from Minerva that can be annoying like double King Tonberry that can one-hit you if you have less than 50k health and you have to deal with two of them that have millions of health each. There’s also no way to buy Phoenix Down so you can’t simply cheese every boss with it as you’d run out of these pretty quick.
Hard Mode wouldn’t have affected the rating whatsoever, because after defeating Minerva on Normal you’d be very OP and could blaze through NG+ Hard in 90 minutes (it would be vastly easier than the first playthrough on Normal).
Goodoge says
This is reassuring for me since FF7R and Intergrade are both 6.5 and those were also “not too bad”.
Ramses Blair says
Looks a bit tedious, I don’t know..
Vince says
What is the FPS if you’re playing the PS4 version in a PS5 console?
GaloWar says
In a long game like this, I feel a bit disappointed that are so many missables with no chapter select.
In time, congratulations PowerPyx
Anonymous says
Thank you for the trophy guide. With a 5.5/10 Platinum trophy difficulty and no glitched trophies, I’m definitely buying and playing this game next.
Ninjackz says
Ah I remember, the costly punch was my favorite, 1 hit everything but still took several hits on Minerva, also fire cure ring absorbed every attack of Ifrit & turned into max heal points, it was funny.
I still need to check if the exploits work on this version, psp back then was quite vulnerable to exploits.
Ninjackz says
Thanks for the guide though, Lame they didn’t add chapter select, probably to keep us consistent to the story mode.
Nikki_boagreis says
Thank’s for posting this guide, was wondering if it had NG+ but i see in the description for the Soldier of Legend trophy it mentions NG+ and what carries over. Hopefully the Soldier of Legend trophy doesn’t get patched or not anytime soon.
SKeith says
I was wondering, is it possible for me to simply do this all on a New Game+ Playthrough? I kinda just want to enjoy the story and such without having to follow a guide while playing and enjoying the story for platinum?
CloudZack says
One thing I noticed, a pretty easy method to level up Materia early on is to play Mission 6-3: Zack the Treasure Hunter. And do MG-3-1: Items in the Plains. All you have to do is kill the two beetles first and then focus on the Dual Horn. Get behind him and just keep slashing. While you’re doing this, the DMW will keep spinning, and likely give you a roll that will trigger a limit attack. Repeat this enough times and you’ll level up.
PowerPyx says
Easier Method is to use the DMW Progress afk-farming technique described in Step 2. You can stay afk, just let it auto-roll DMW images in M1-1-1, and you get tons of quick materia progress with no work whatsoever. Can let the game idle and all equipped Materia will be 5 stars after an hour or so. Only downside is you’ll probably want the Frarie Ring from N2-5-5 first which requires a little bit of preparation but then you can max out any materia while afk and combine it with DMW progress.
Ben says
I can’t get DMW progress for sephiroth to go past 75% even when his rolls trigger a scene it does move the progress %
PowerPyx says
You are probably rolling images you’ve seen already, which don’t increase progress. You must see all UNIQUE ones, it’s complete luck. Just do the afk method for 8h and you’ll probably have all at 100%.
It seems when you stay in the same battle for many hours the game is more likely to roll images you didn’t already see in that battle.
Bob says
Assuming you played the PS4 version on your PS5, could you tell me how was the performance of the game? Was it in 60 or 30 fps for example?
Thanks!
PowerPyx says
PS4 version is locked at 30fps running on PS5.
Fettster777 says
Finished mission 6-2-6 and didn’t unlock the Sector 6 Accessory Shop. Completed it twice and still no unlock. I’m in Chapter 7 too. Any idea why?
Fettster777 says
I just went back to a save before and tried again from a different save point and same thing. No shop unlocked. I did accept the mission 6-2-1 from the Shinra Executive in Chapter 7 though. I wonder if it’s something to do with chapter 7.
Tarnished Hunter says
Hi Pyx!
Thank you guys for a great guide as always! Do y’all have any plans for a Marvel Midnight Suns guide?
Ben says
I really want one too for this
Vesperia says
Awesome guide, thank you very much for your work! What a pleasure to go back to this title.
I was wondering if you would know: does the update change some of the trophies/methods?
Daniel angulo says
Has anyone been able to verify if with the new update file we can still get the hard mode trophy by switching to normal mode???
Calints says
It works, just earned it.
… says
Hoping the new patch doesn’t void the hard difficulty cheese… love the game but don’t really feel like having to run through it twice…
Rathicofin says
Can confirm it still wotks in patch 1.0.2, just did it
K says
Anyone else having trouble unlocking Sec.6 Accessory Shop? I’ve tried completing mission 6-2-6 several times and even going back to an old save to re-do the mission fresh. Still won’t unlock. :/
Pokedude97 says
I can’t get Sec.6 Accessory Shop either, WTF. I’m at 100% missions and it’s the last thing I need for the plat.
Matt says
Just completed the game in just shy of 30 hours using this guide. Got really lucky with DMZ spins. No grinding needed.
Jeremy says
I’ve had to reload my save 3 times now for the DMW trophy. Cloud is my last and every time I get 100% the trophy just won’t pop. I even deleted the game and tried again.
Jeremy says
Just did it a 4th time all 100% still no trophy. I am at a loss for what to do to get it to pop.
PowerPyx says
Try reinstalling the game and triggering the 100% again, it might fix the issue.
Jeremy says
I’ve reinstalled the game twice now and still nothing. I’ve gotten 100% 4 times. Going to try for a 5th time today. I’ve gotten the 100% in the mission section and even out in the field. Still nothing. Last trophy for platinum.
Kazz says
I found it easier to do the squat mini-game by watching Zack’s butt rather than the arms. I got 68 squats by just hitting the button when his butt is at the lowest point.
4ipuxa says
Double platinumed today.
Took around 43 hours.
As always thanks for the guide.
As for auto popping trophies 3 trophies didnt unlock for me
* Hero of the Wutai War?
* Thanks to You, Zack
* SOLDIER of Legend
The 300 missions was exhausting because the missions were almost all the same – i mean not location wise but like run to a marked place – defeat the enemy repeat.
The Minerva wasnt tough if you have maxed stats, still Ultima in second part pretty much Oneshot for me even with block.
The DMWs are bulls**t, it takes a sadistic mind to come up with such RNG stuff. but the afk + specific materia works, somehow the Cloud DMW was the last for me, because you like need 10 memories or something.
The guide was good enough, but i would add if possible the places to farm materials and SP, and maybe gil to make an easier experience.
I will a couple
* Fat Chocobo Feather (HP%) farm Jabberwock – M2-4-4 with specific items and materia can get 4pcs per run.
Adamantite (Vitality) Farm – Crazy Sword (rare drop) M3-5-6 -> run around and defeat 2pcs per battle, i guess this is a little easier because you dont reload the mission.
SP – 9-5-3 run around and defeat balls, one killed ball is 20k minimum or 40 if you do it without damage, can easily farm the required 3-6 millions SP, depending how much you want,
to get the materia to max VIT or SPR you need 1 million.
the rest can be looked up on Youtube or GOOGLE.
Bryan says
DMW Master is glitched. All characters are at 100% and green check marks and no pop
Lewon says
Hard mode glitch still working ?
Neuttronix says
I am about to start and also wondering if this is still working. I think the current patch is 1.04?
Kazawa says
Just did it today, PS5, patch 1.04, hard mode glitch still works.
Kaimaerah says
Buster Sword damage limit increases at 55% proficiency now.
khalid says
Thank you
I got the platinum and hard mode glitch still works.