Sea Spider is a main boss in Armored Core VI during Main Mission 14: Ocean Crossing. This is the Chapter 2 Endboss and one of the hardest in the game.
Luckily, there is an easy brute-force method that requires no skill to defeat the boss. It’s all a matter of having the right build and strategy.
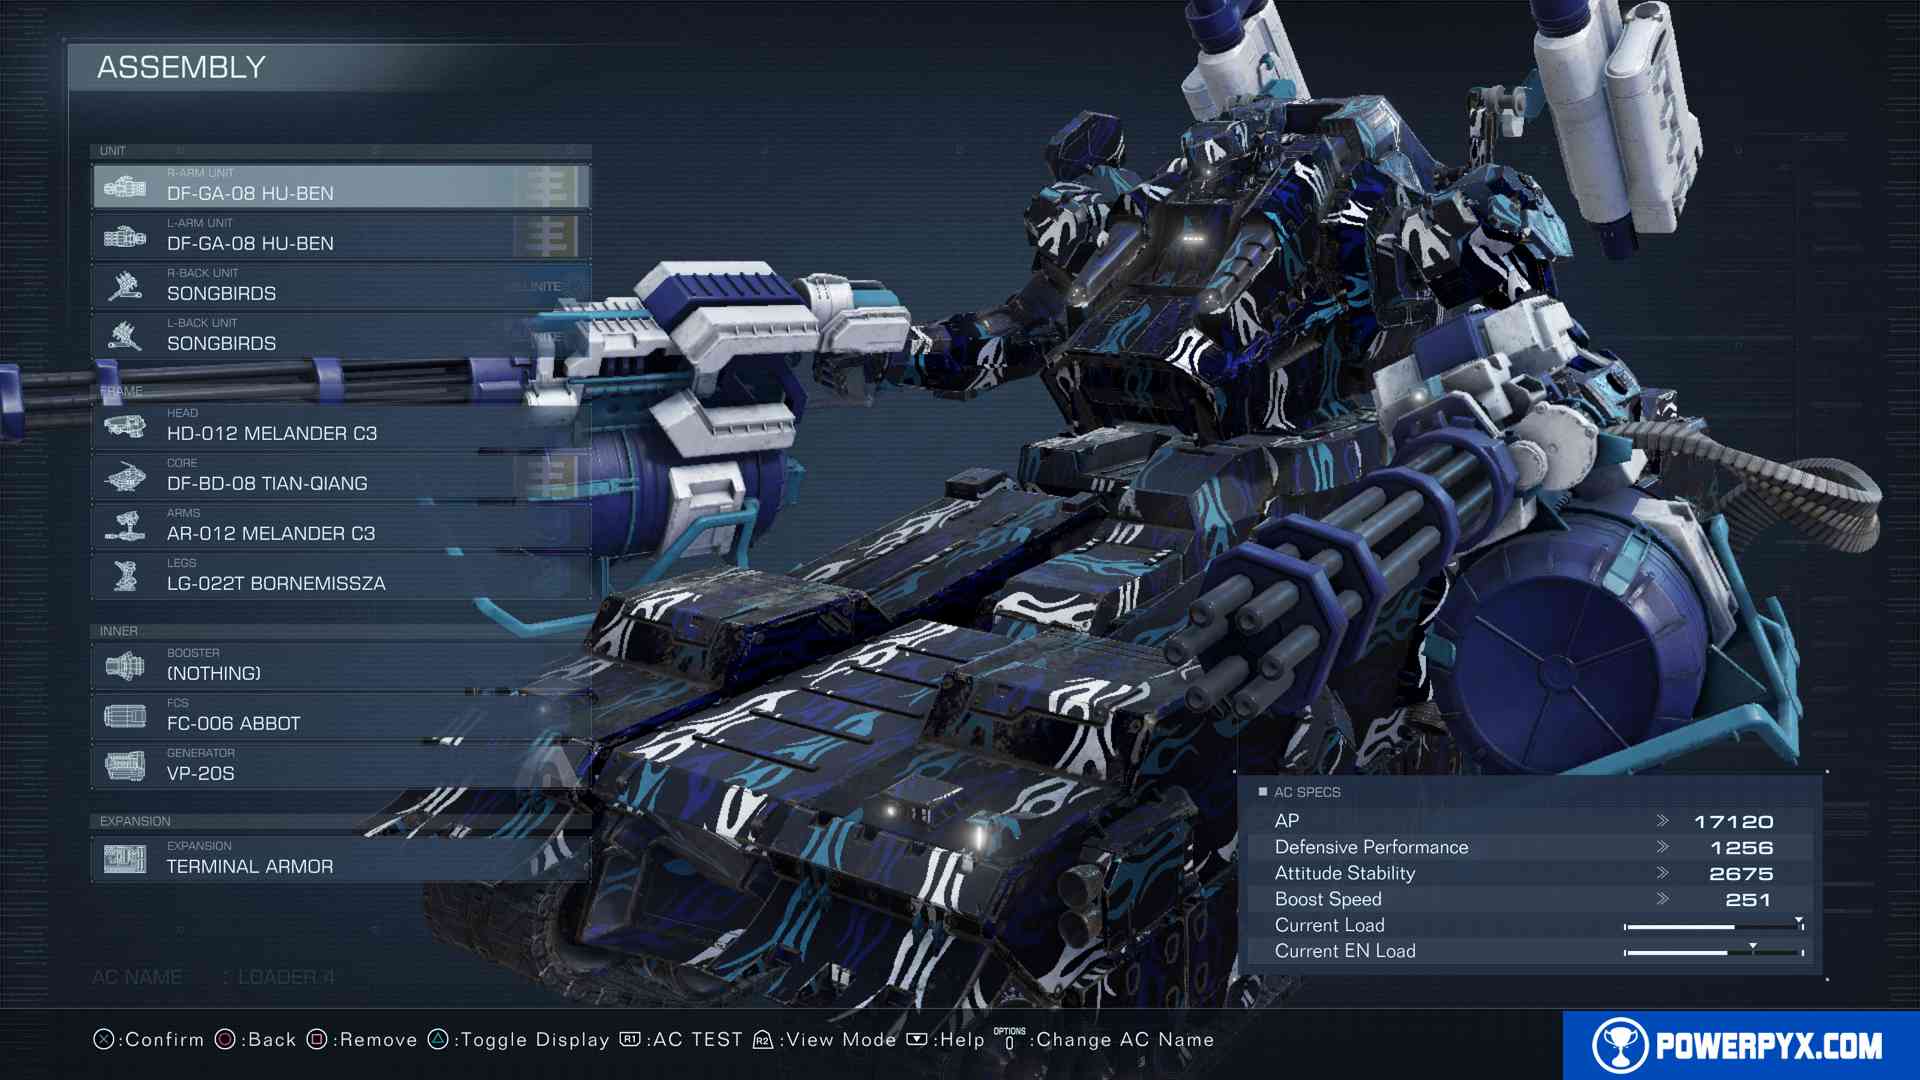
Sea Spider Boss Build
All of the required parts are available by the time you reach this boss. If you don’t have these parts unlocked, quit out and farm “Mission 6: Attack the Dam” for money. This mission gives around 170,000 COAM and only takes 90 seconds. You can also sell existing parts at the same price you bought them. Recreate this exact build:
- R-Arm: DF-GA-08 HU-BEN – Shop: 170,000 COAM – Purchaseable after completing Mission 11: Attack the Watchpoint
- L.Arm: DF-GA-08 HU-BEN – Shop: 170,000 COAM – Purchaseable after completing Mission 11: Attack the Watchpoint
- R-Back: SONGBIRDS – Shop: 182,000 COAM – Purchaseable after completing Mission 11: Attack the Watchpoint
- L-Back: SONGBIRDS – Shop: 182,000 COAM – Purchaseable after completing Mission 11: Attack the Watchpoint
- Head: Whatever has the highest AP rating
- Core: DF-BD-08 TIAN-QIANG – Shop: 390,000 COAM – Purchaseable when shop is first available after Mission 2: Destroy Artillery Installations
- Arms: Whatever has the highest AP rating and sufficient carry capacity
- Legs: LG-022T BORNEMISSZA – Shop: 280,000 COAM – Purchaseable after completing Mission 8: Operation Wallclimber.
- Booster: Nothing (auto-equipped with Tank Legs)
- FCS: FC-006 ABBOT – Obtained after completing training mission Intermediate Support 1: Assembling an AC
- Generator: VP-20S – Obtained after completing training mission Intermediate Support 1: Assembling an AC
- Expansion: Terminal Armor – bought from AC Tuning Menu
Sea Spider Boss Easy Strategy
With this build you can simply overpower the boss. You have a lot of health from using the parts with the highest available AP (Health) and Defense Stats, and having insane damage output from dual-wielding gatling guns and shoulder cannons.
It’s simple:
- Lock onto the boss immediately when fight starts (
 / Right Stick). This makes it much easier to land hits.
 - Always stay close to the boss by flying towards him with
 /
/  . The tank build is hard to drive on the ground, and while evading with
  /
/  you can’t shoot weapons. Flying has easier maneuverability and you can keep shooting.
 - Fire all 4 guns continuously at all times. Hold
 +
+  /
/  +
+  to fire the main guns & constantly tap
  +
+  /
/  +
+  to fire both shoulder weapons. Make sure you stay as close to the boss as possible for more damage output and to break his shields faster.
The shoulder weapons deal a lot of Impact Damage to keep the boss staggered most of the fight, and the Dual-Wielded Gatling Guns deal insane damage at close range during the stagger phase. But don’t overthink the timing of it too much, just keep firing at all times and you’ll finish the boss easily. The same build works brilliantly for the rest of the game too. Once the enemy is staggered, unload everything on him for fast damage. He takes significantly more damage while staggered. You don’t need to worry about evading, just stay close and deal damage and the fight will be over before you even use your second repair kit. With this build you have enough health to withstand the damage and can win by sheer brute force without any skill.
Staying at close range is the key here. At long range the gatling gun bullets get deflected. At close range they won’t deflect and deal vastly more damage, especially during stagger phases. Gatling Guns will overheat after a while but just let them cool down and hold down the trigger until they overheat again, repeat this cycle while continuously firing the shoulder weapons when they are ready.
Next Bosses: Mission 01: Illegal Entry > Mission 08: Operation Wallclimber > Mission 11: Attack the Watchpoint > Mission 12: Infiltrate Grid 086 > Mission 14: Ocean Crossing > Mission 27: Destroy the Ice Worm > Mission 34: Reach the Coral Convergence > Mission 40: Shut Down the Closure Satellites
For everything else needed to obtain 100% completion refer to Armored Core VI Strategy Guide.


Leave a Reply