
Alan Wake 2 has 113 Collectible Locations spread across the two stories of Alan and Saga. All of the following are required for trophies & achievements:
- 22 Cult Stashes – Secret Stashes
 , Hidden by the Trees
 - 21 Lunch Boxes – Secret Stashes , Hidden by the Trees
- 13 Nursery Rhyme Dolls – I’ll Find You
- 17 Nursery Rhyme Puzzles – Strange Reality , Shift in Reality
- 18 Charms – Rustic Charm
- 6 Koskela Brother Commercials – The Koskela Brothers – 1 MISSABLE
- 8 Writer’s Journey Videos – The Trail of the Writer – 4 MISSABLE
- 8 Weapons – individual trophies for each weapon, All Accounted For for all weapons
The only truly missable collectibles are 1 Koskela Brother Commerical (in Return 1: Invitation) and 4 Writer’s Journey Videos (in Initiation 4: We Sing, Initiation 5: Room 665, Initiation 7: Masks, Initiation 8: Zane’s Film). All other collectibles are still available before the Point of No Return. There is a Point of no Return for Saga at the end of Return 6: Scratch, which prompts you to continue and forces you to save before you can pass it. At this point you are able to go back and collect anything you may have missed, with the exception of the missable commercial. Despite this it is recommended that you collect everything as you play, as everything is beneficial for supplies or upgrades. Alan’s Point of No Return is at the end of Initiation 8: Zane’s Film, but this gives no warning, so make sure to be done with Alan before finishing this.
All collectible types have trophy tracking so can be tracked via the PS5 trophy list. Cult Stashes and Lunch Boxes are stashes you can open as Saga, with Cult Stashes often rewarding supplies and sometimes upgrades. Lunch Boxes reward Manuscript Fragments for upgrading weapons. Nursery Rhyme Dolls and Nursery Rhyme Puzzles are found as Saga and are often close together. Dolls are small wooden characters that are used to solve Puzzles. All four of these items can be tracked on your Case Board in their respective case files. Completing Puzzles will reward you with a Charm, which are equippable upgrades for Saga. Most of the charms are rewards from Nursery Rhyme Puzzles.
Koskela Brother Commercials are videos found as Saga, which will trigger when getting close enough to certain TVs. Writer’s Journey Videos are similar but they are found as Alan instead. Both of these can be tracked in the Television section of their respective Mind Places. These are the only collectibles that are missable, so make sure to get these as you play. There are 7 weapons to find, 4 for Saga and 3 for Alan.
The following items are not needed for trophies & achievements and can be skipped: Setter for Mayor, Deer Heads, Words of Power.
For DLC Collectibles refer to Alan Wake 2 The Lake House DLC Collectible Guide.
How Chapters Work
The chapters in this work a little different than how you would expect them to. Both characters have their own set of chapters, Saga has chapters labeled “Return” and Alan has chapters labeled “Initiation”. Both have 9 chapters, and after completing the first 5 chapters (Return 1-2, Initiation 1-3), you will unlock the ability to swap between characters at will to progress their stories in any order.
The chapters are also longer than their trophies imply and they have different names in-game than in the trophy list. The trophy for completing a chapter will generally unlock after doing a certain story segment, but the next chapter won’t actually start until you reach the location for the next chapter. For example you can defeat a boss in Return 2 and the trophy for completing the chapter will unlock, but you will still be on Return 2 until you actually leave the area. This guide is structured by the in-game chapters as per the naming on the save game.
The Cult
No collectibles in this chapter!
Return 1: Invitation

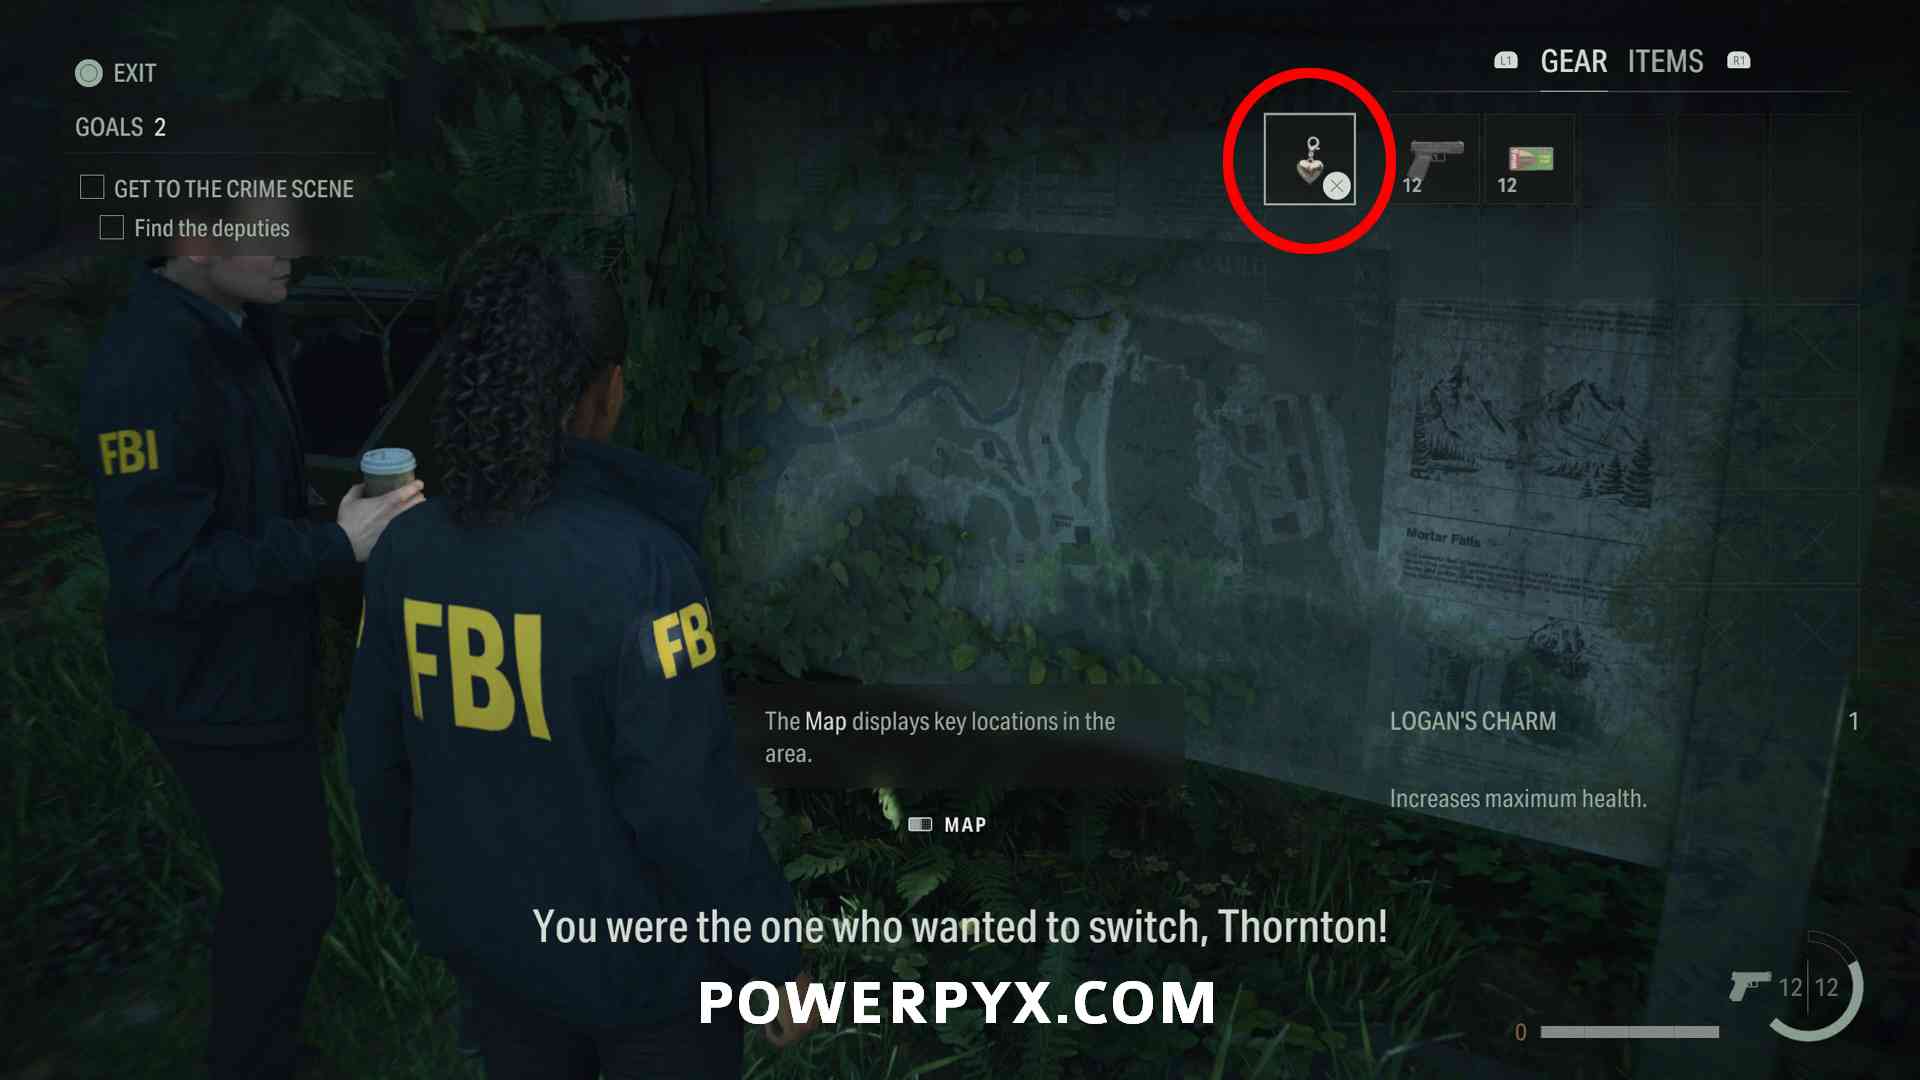
Map – Cauldron Lake
Immediately in front of you at the beginning of the chapter when you play as Saga for the first time.

Charm 1 – Logan’s Charm
In your inventory at the start of the chapter.
Lunch Box 1 – 2 Manuscript Fragments
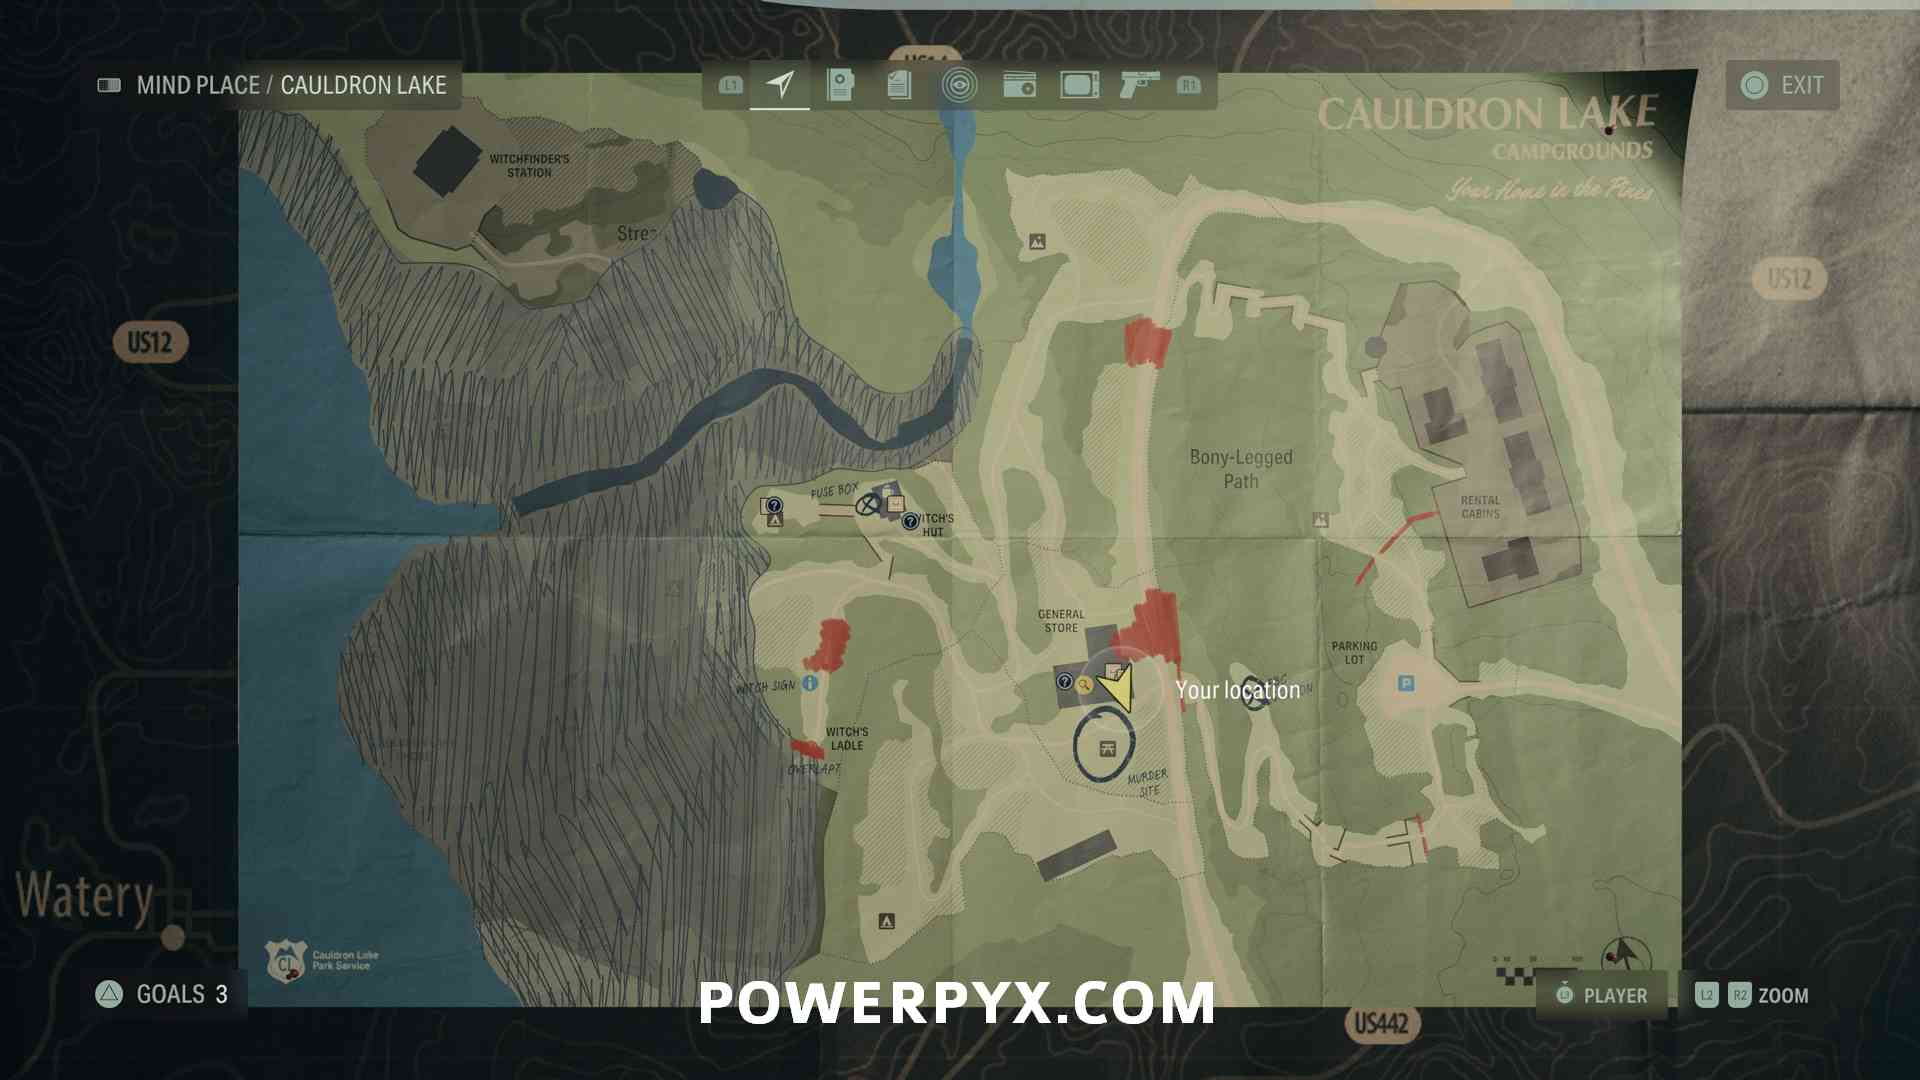
After talking to Deputy Mulligan at the start, crawl through the hole in the fence and follow the path. After going downhill, instead of following Casey on the left path, take the optional right path to reach a viewing platform. The Lunch Box is in the bushes, on the ground.


Lunch Box 2 – 1 Manuscript Fragment
Northeast from the General Store, at the end of the blocked path.


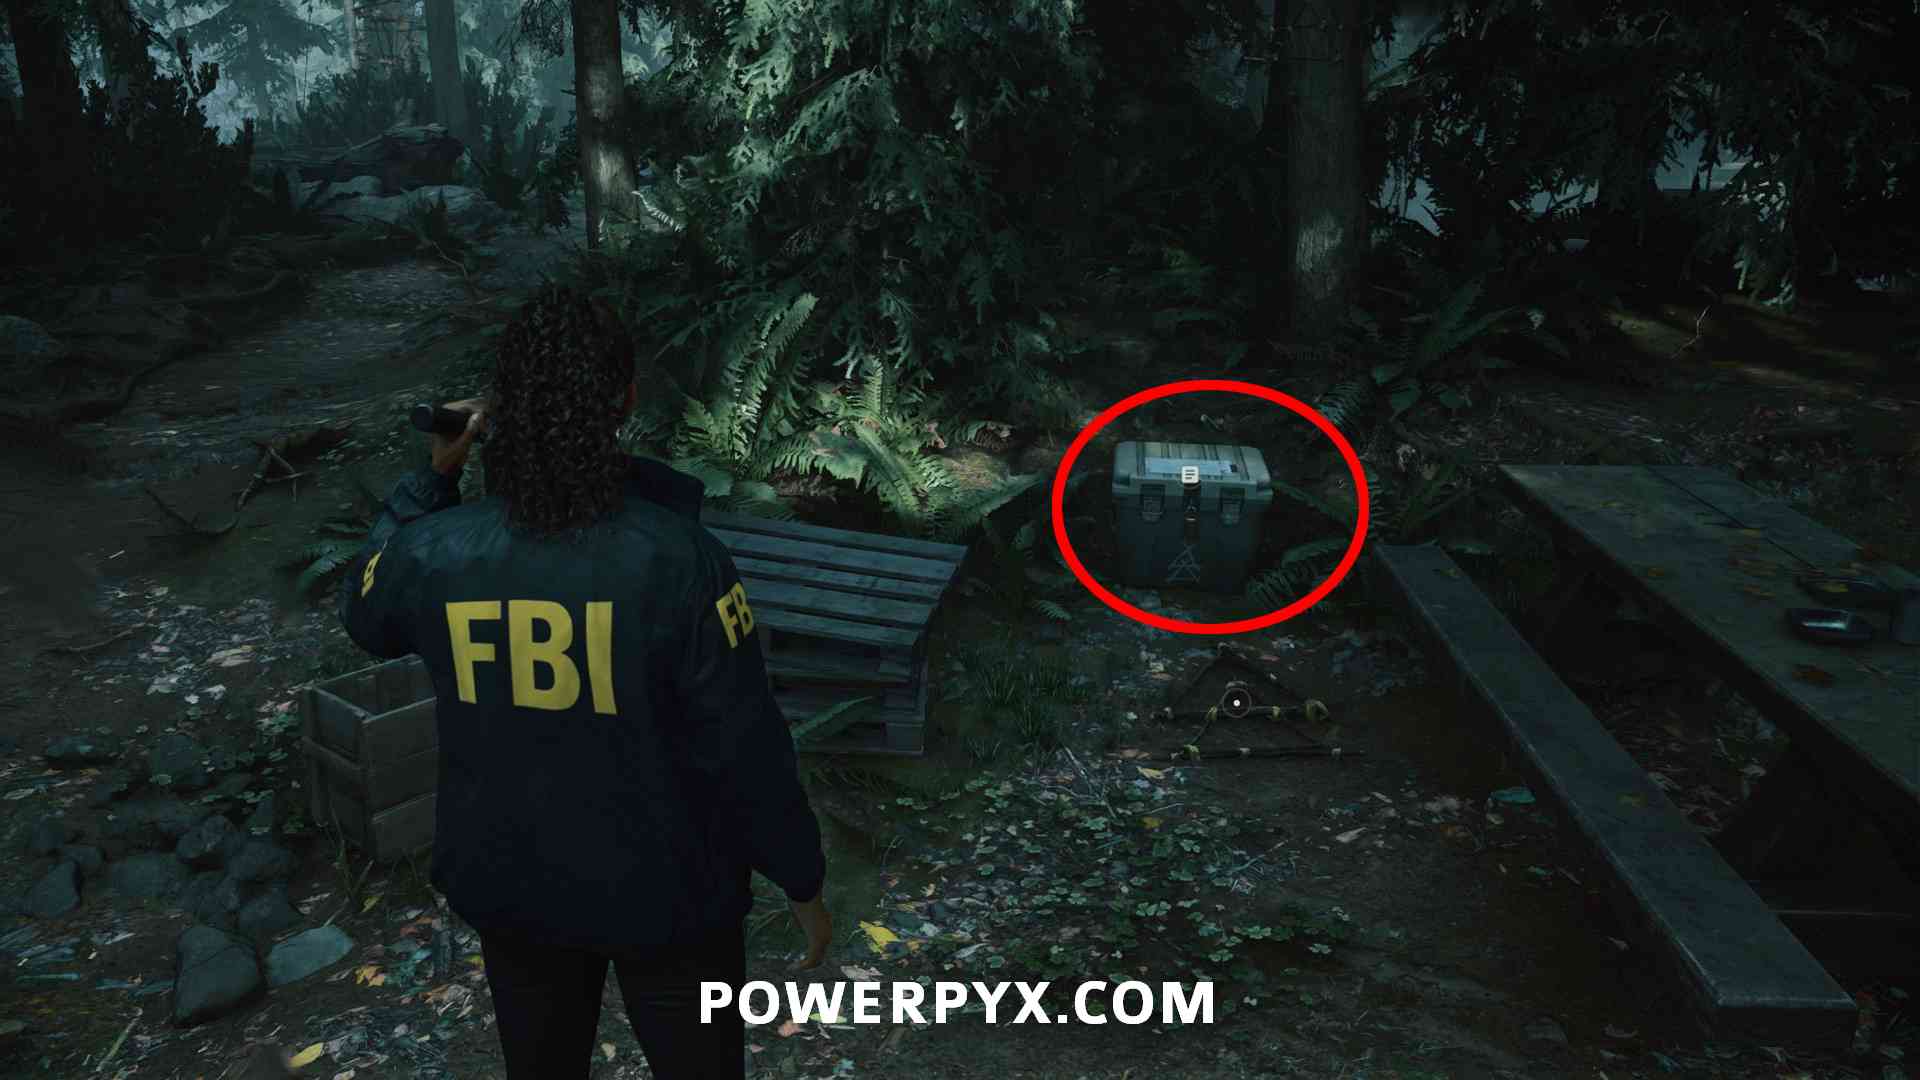
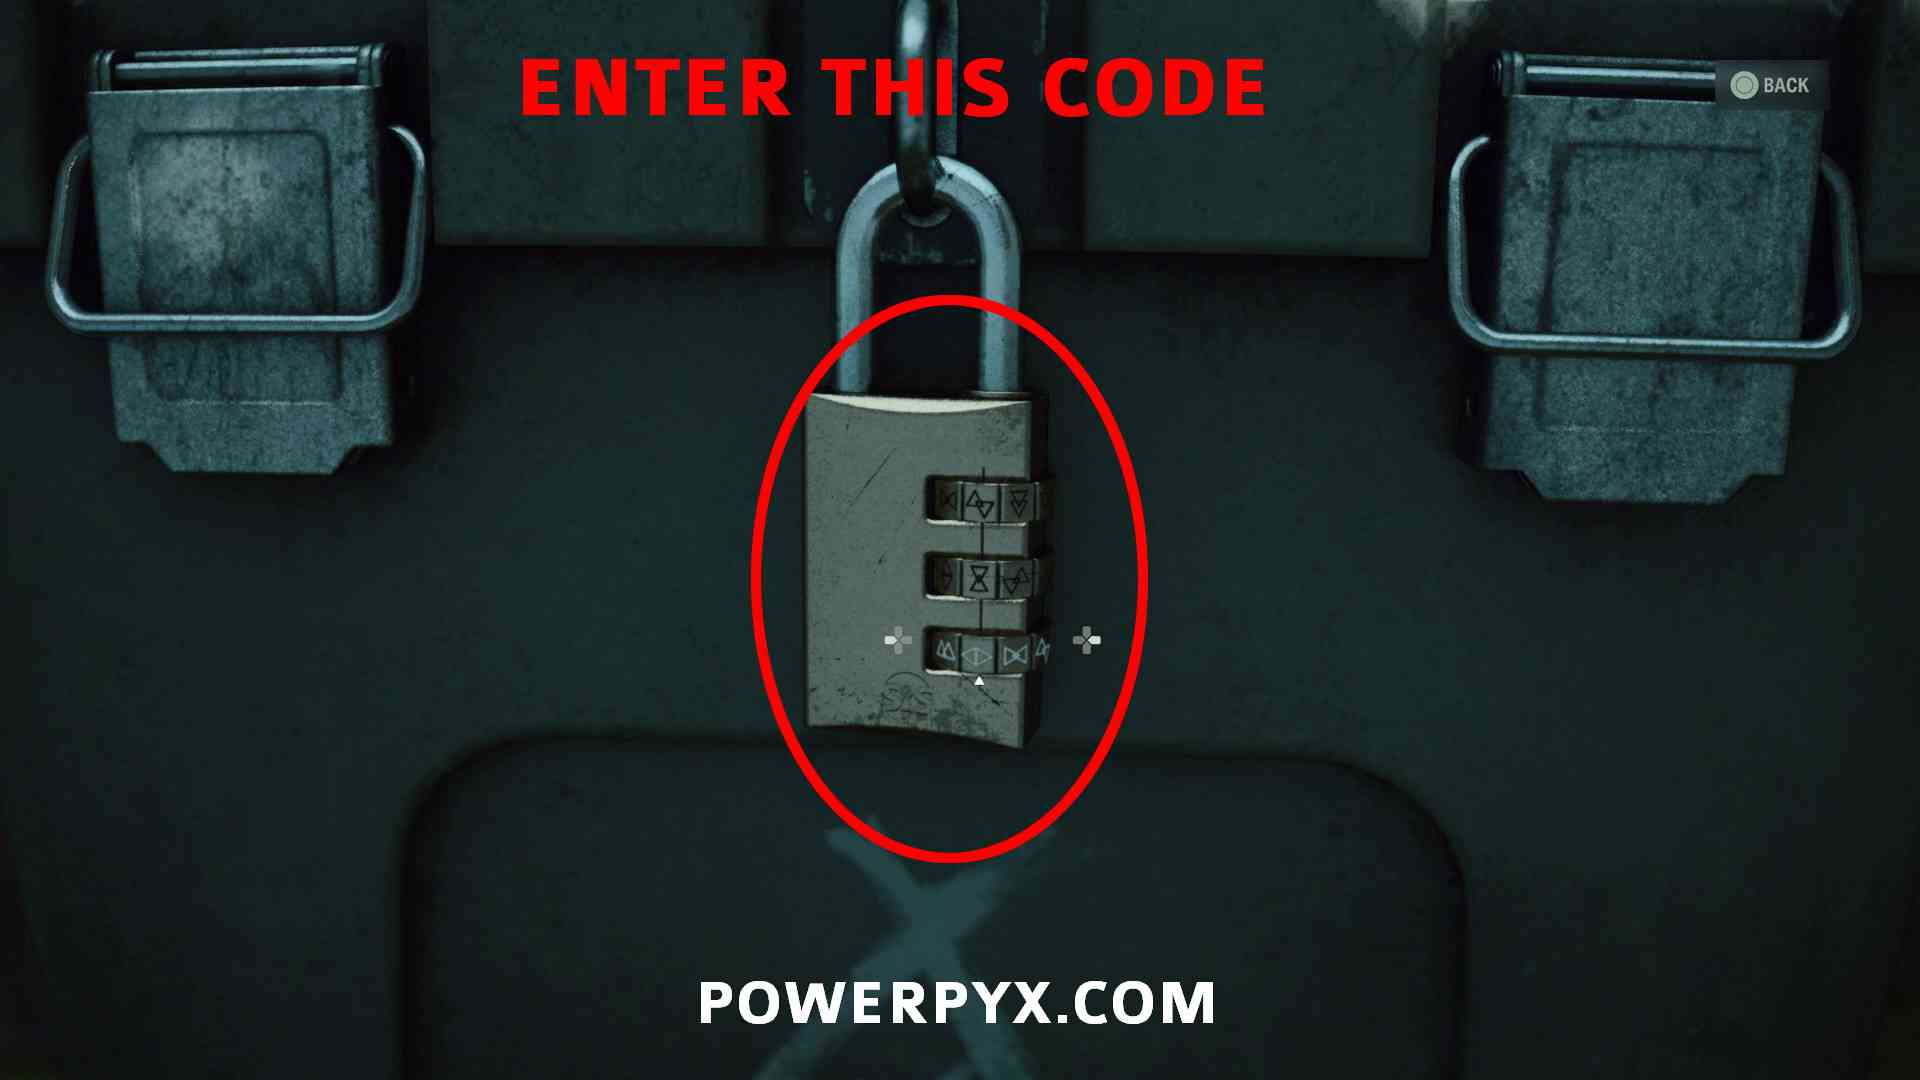
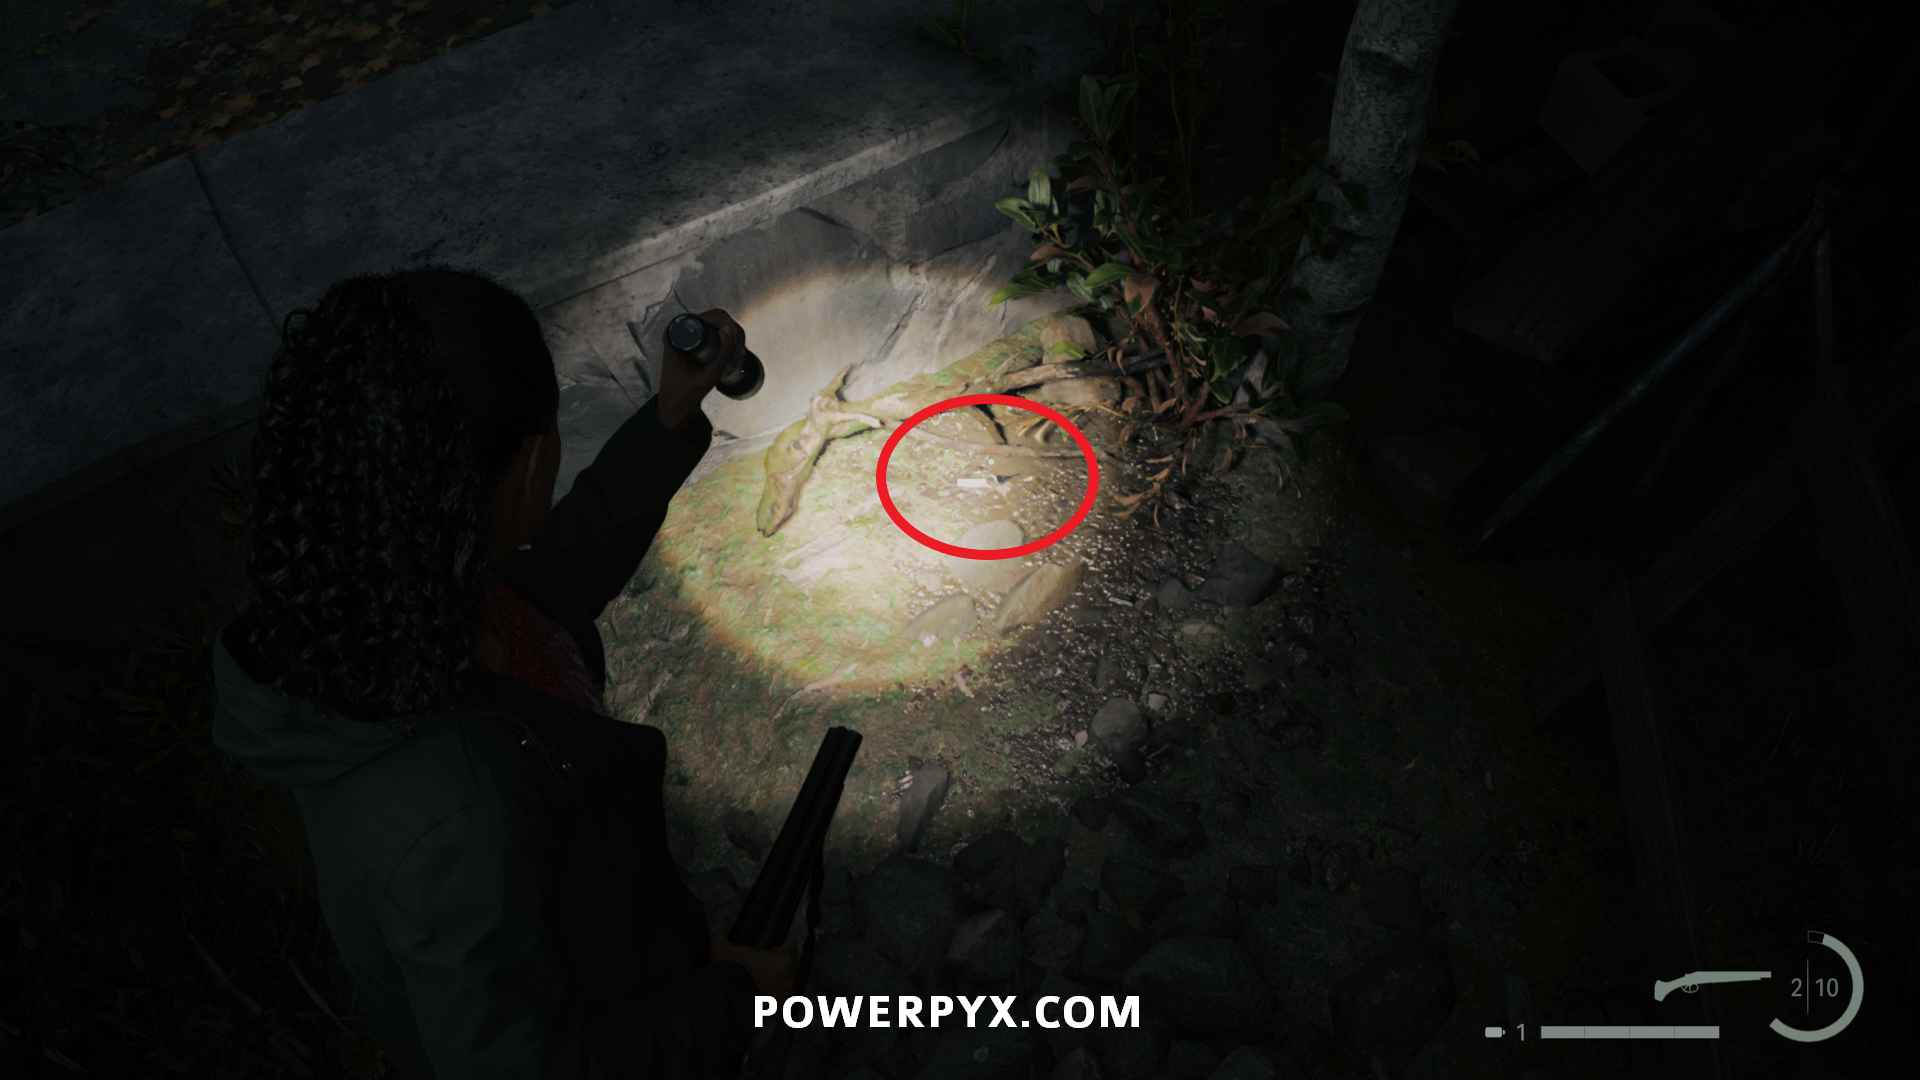
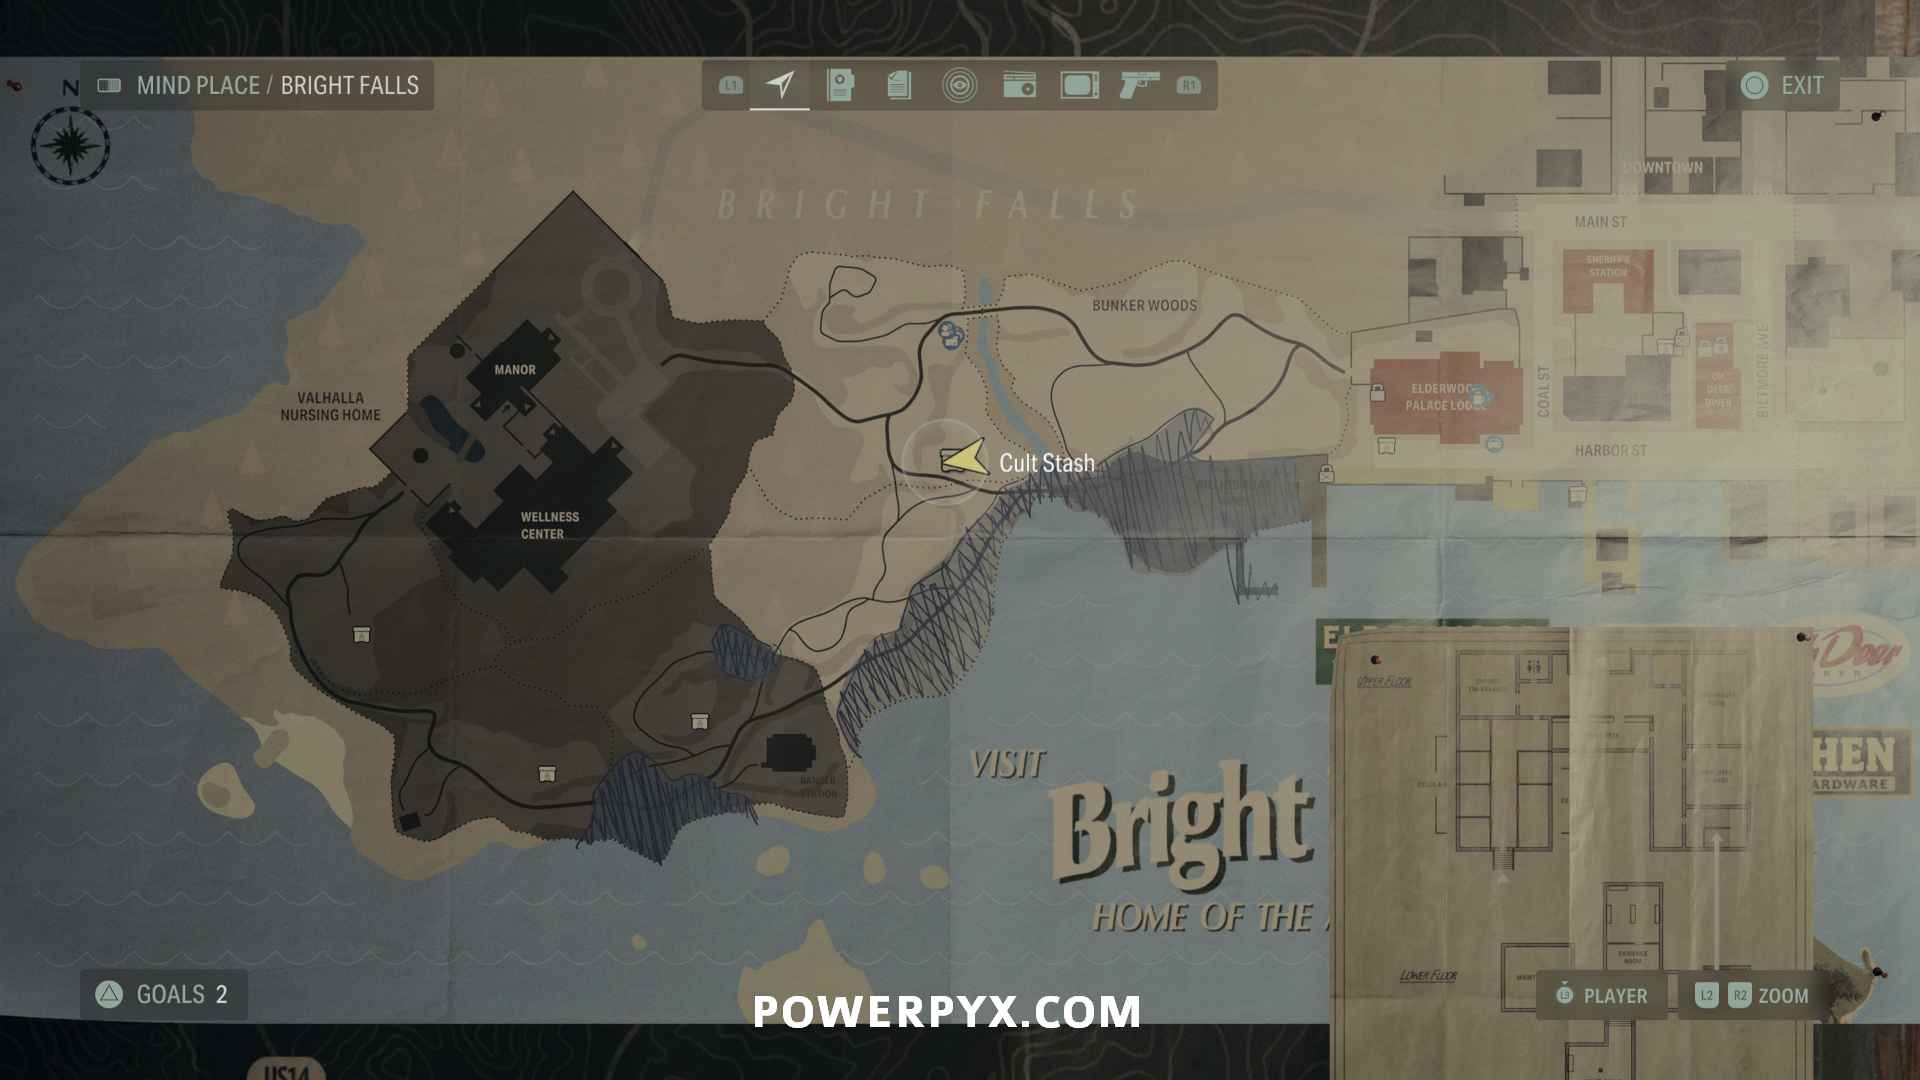
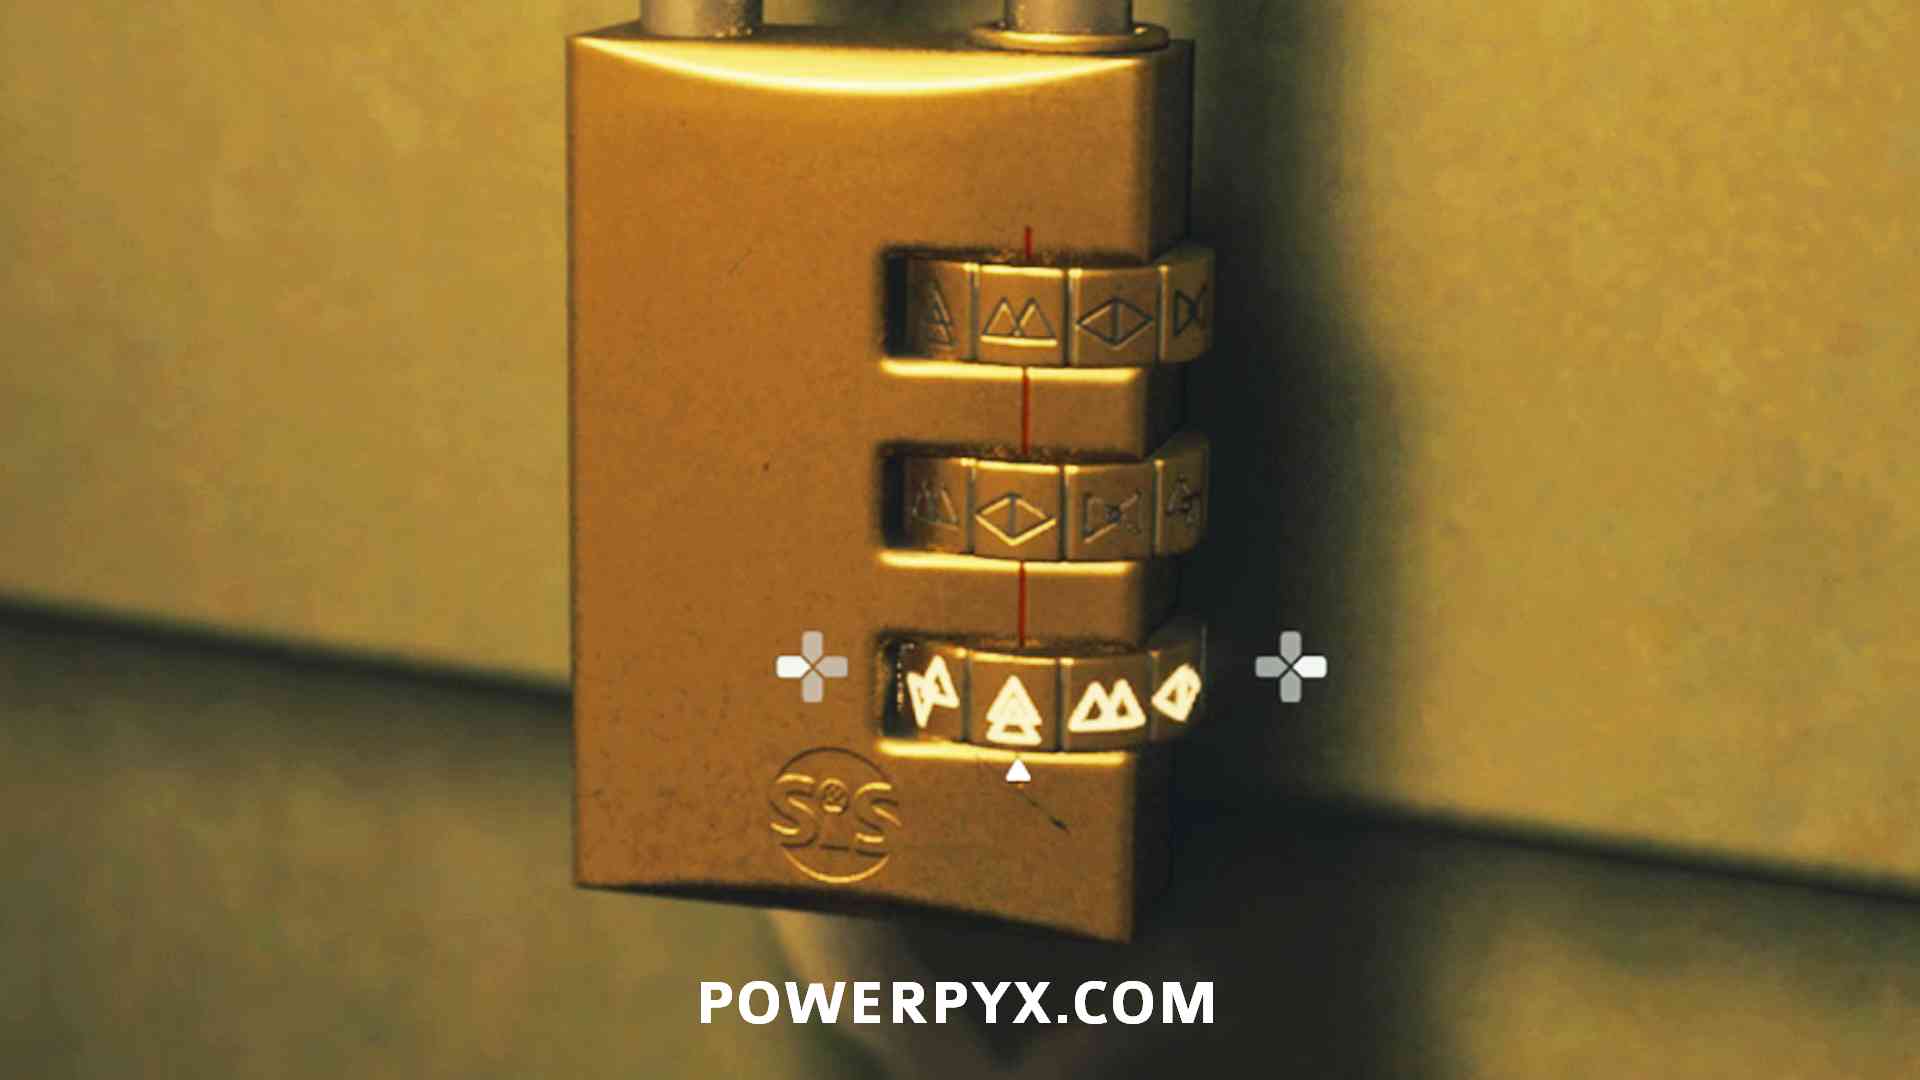
Cult Stash 1
Directly south of the Murder Site is a trailer. Straight across from the trailer door is a lockbox (outside the trailer). Interact with it and then put the cursor over the lock on the box, it wants you to input 3 symbols on the lock. See the image below for the correct combination (the note on the lockbox corresponds to the order of icons you must enter on the lock, these symbols are found inside the trailer on the walls but you can skip this and enter the code right away).

Lunch Box 3 – 3 Manuscript Fragments
Southwest of the Murder Site, at the campsite in the opening.


Lunch Box 4 – 1 Manuscript Fragment
Go to Witch’s Hut, then left across the bridge to find a camping chair. Go around the cliffside to find this Lunch Box.


Lunch Box 5 – 2 Manuscript Fragments
After the Deputy gives you the Shortcut Key (story related), you will need to follow Casey back uphill to the car where the chapter started. Halfway up the shortcut path, there is a little building (FBC station), behind it climb up the ledge to find the Lunch Box.


Map – Bright Falls
Go back outside and head up the road to see Oh Deer Diner (story objective, must go here, can’t miss it). On the outside wall of the diner is the map, on the left wall.


Lunch Box 6 – 5 Manuscript Fragments
In the park to the right of the diner (east on the map), at the base of a tree in the back right of the park, next to the gazebo.


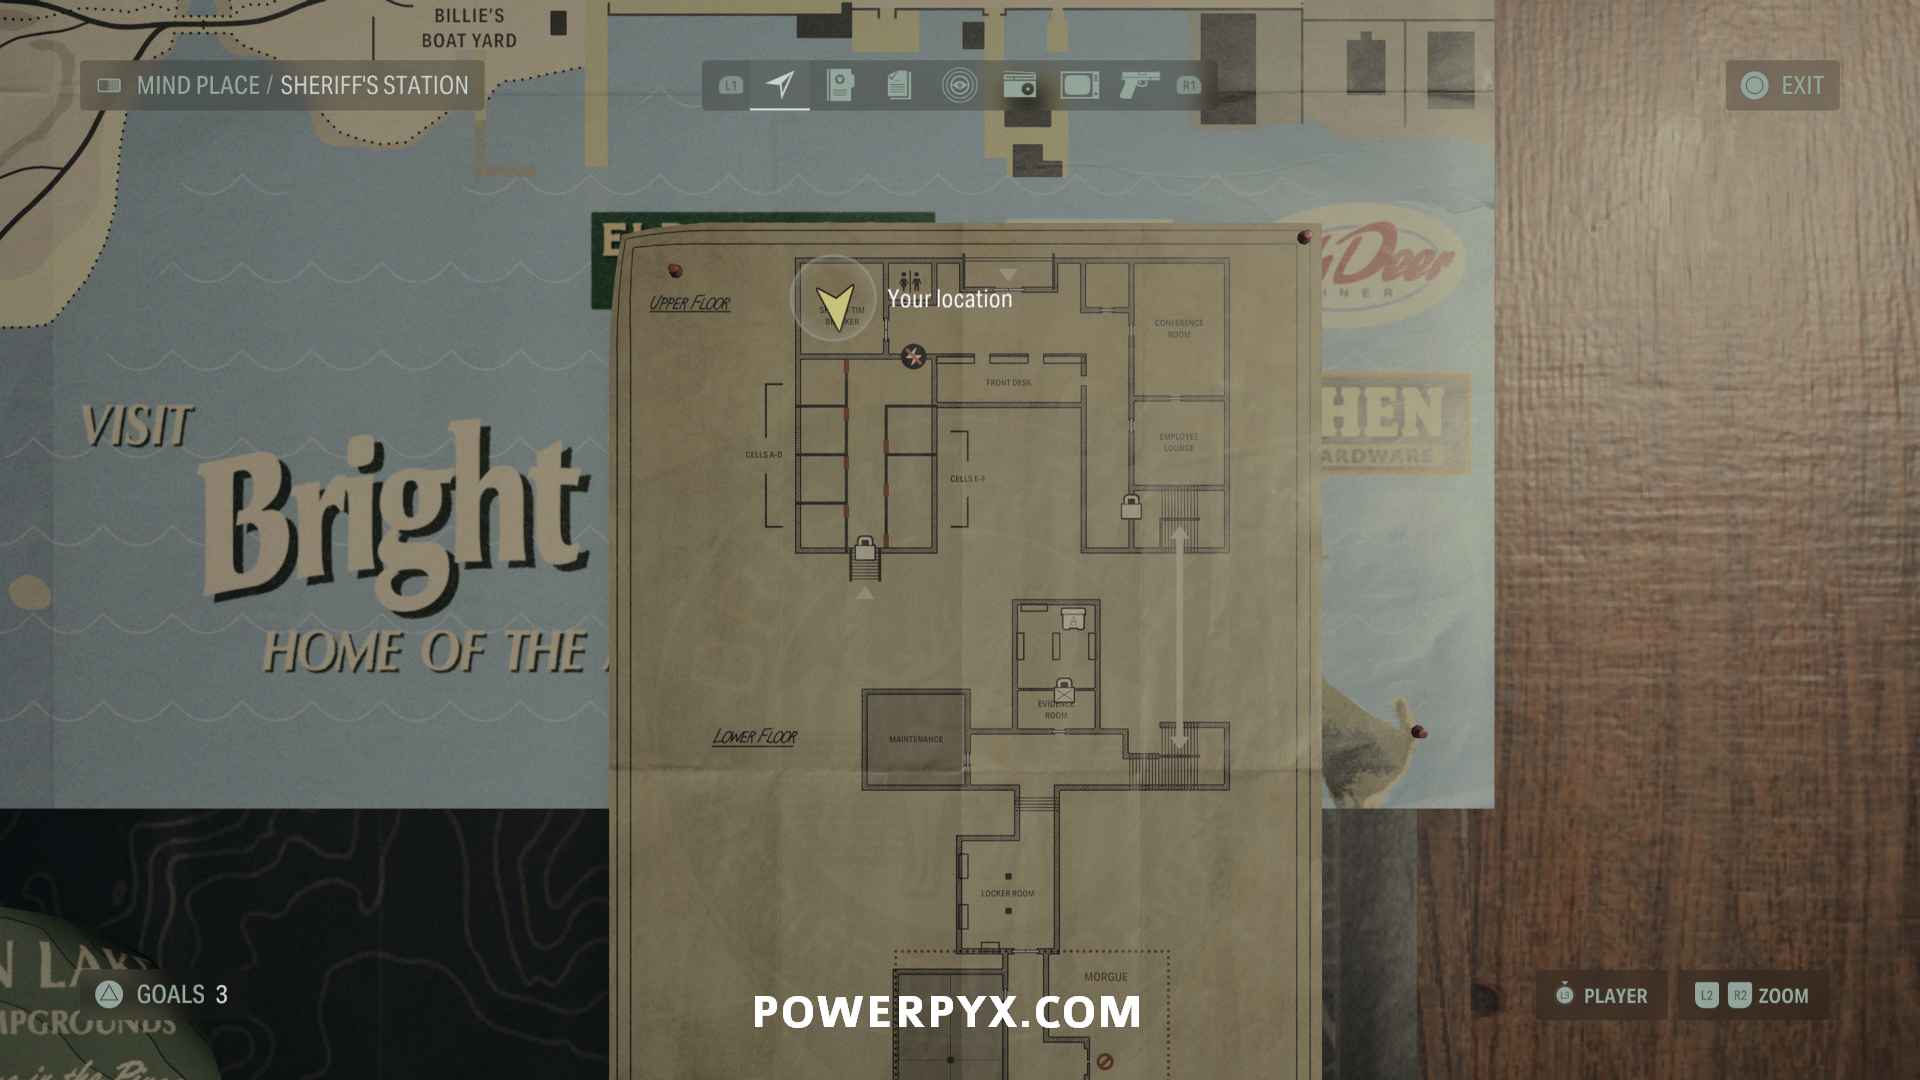
Map – Sheriff’s Station
After talking to the people in the diner follow Casey and the Sheriff to the police station. After entering the station (story-related), it’s immediately behind the counter.


[MISSABLE] Koskela Brother Commercial 1 – Adventure Tours
Inside the police station, in the employee’s lounge. Simply walk into the room to trigger it. You can get this now or until the end of Return 3: Local Girl, but after that point you will not be able to trigger this commercial!


Return 2: The Heart
Inventory Upgrade 1
Proceed the chapter until you finished the objectives at the Witch’s Hut and must return to the General Store. Inside the General Store you will fight the first Taken enemy. Afterwards, go through the broken wooden wall inside General Store, where the enemy came from. In this room on the right is the Inventory Upgrade (looks like a pouch). It’s the same room where you have to collect the heart for a story objective.


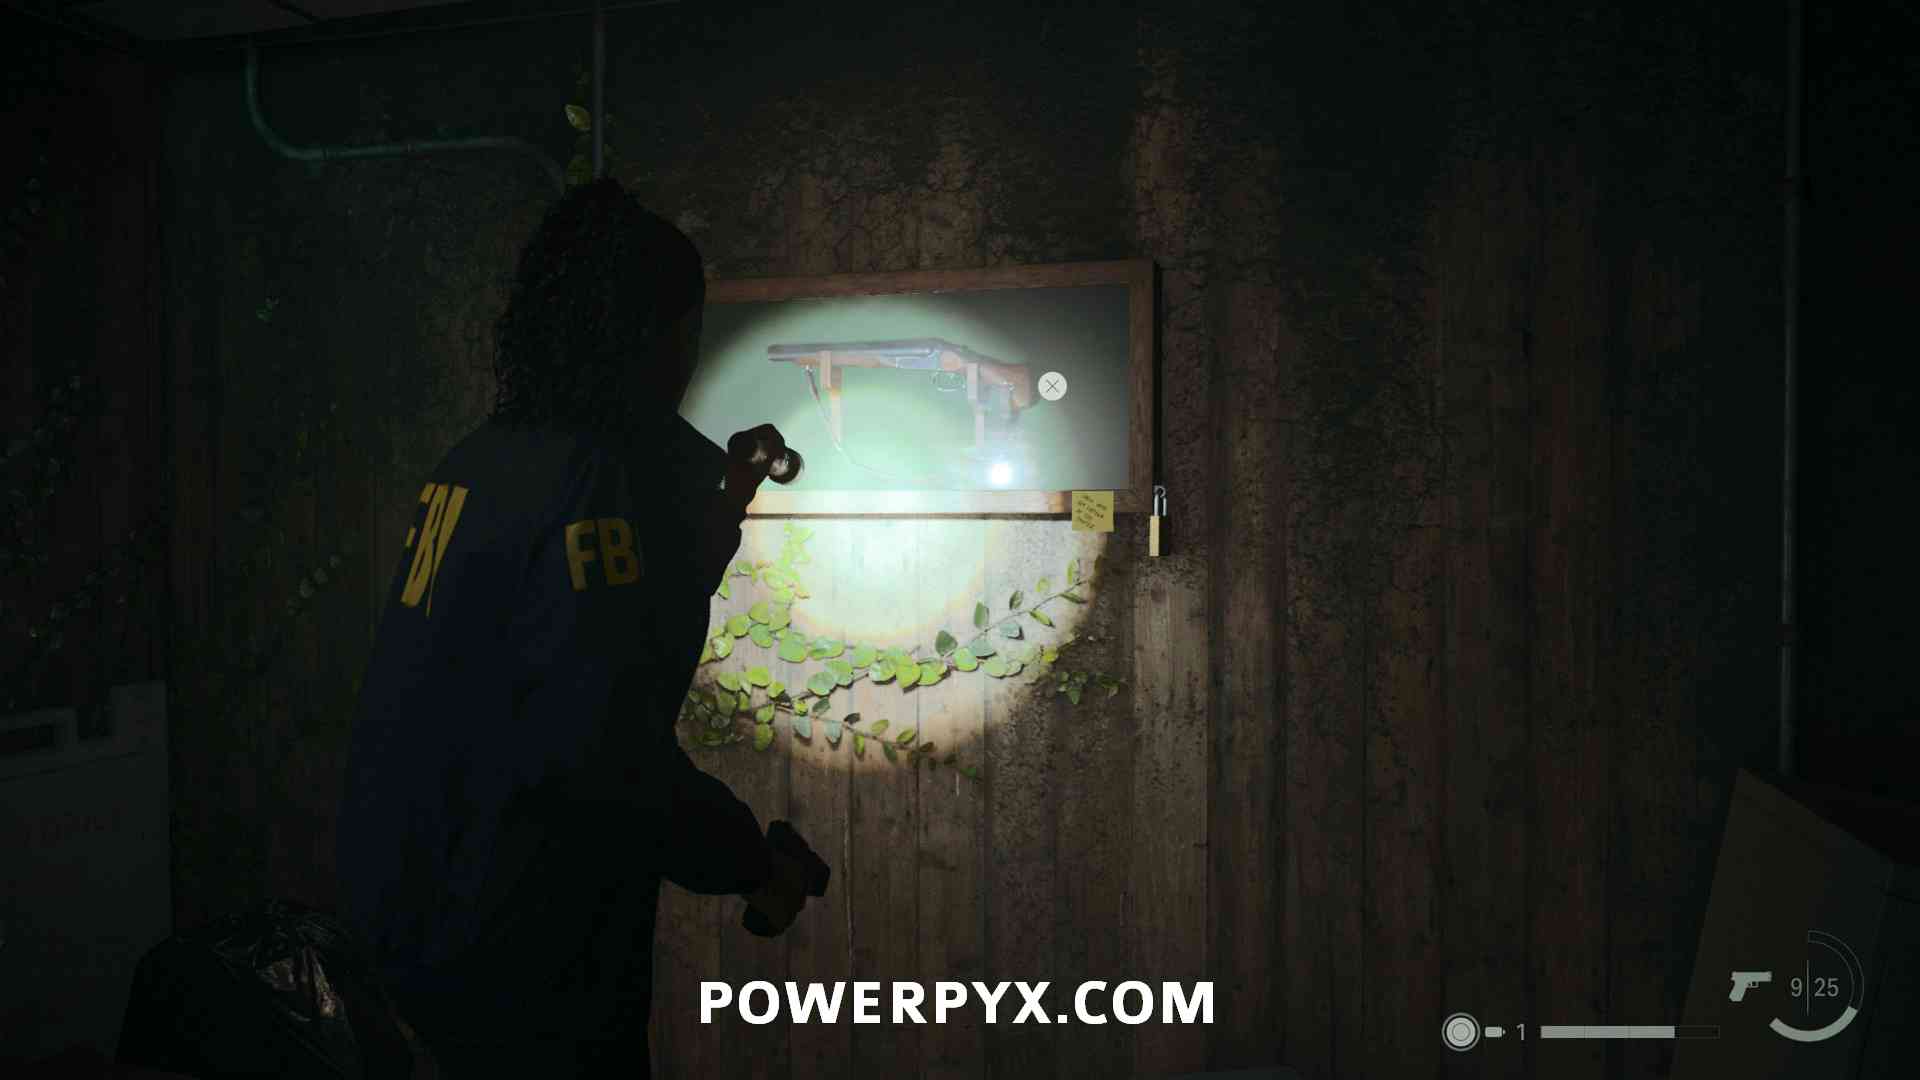
Weapon 1: Sawed-Off Shotgun
In a locker cabinet in the same room, Code 739. Just left of the Inventory Upgrade.

Trophy: Lawman (Defeat Nightingale Boss)
From the room with the last 2 collectibles you must grab the heart from the freezer, then use new clues in Mind Place. Afterwards, follow the footprints down to the Witch’s Sign. You must interact with the Witch’s Sign and insert the heart to perform the ritual. You can now enter the Overlap, follow the red lights all the way to the end to reach the Nightingale Boss. Aim the flashlight at him with  to reveal his weak spot in his chest, shoot it. Then run away from the red lights. The boss will keep spawning throughout the area, you have to defeat him by shooting him. Doing headshots with the shotgun deals a lot of damage.
After this fight and the ensuing cutscenes, you will unlock the trophy for finishing the chapter, but the chapter doesn’t properly end until you leave Cauldron Lake. The flooded areas will now be accessible (they always disappear after defeating a boss), so take this time to explore the new areas before finishing the chapter.
Cult Stash 2 + Inventory Upgrade 2
Once in control again at the shore, head south. After crouching under the wood at the beach, keep following the linear path until the path splits. Crouch under the wood on the right (instead of going up path on left). This leads to the lockbox. Interact with the lock, it will show a randomized order of 3 buttons to press. They will light up green to show you the order, then press the buttons in that same order to open the box. This box contains an Inventory Upgrade.


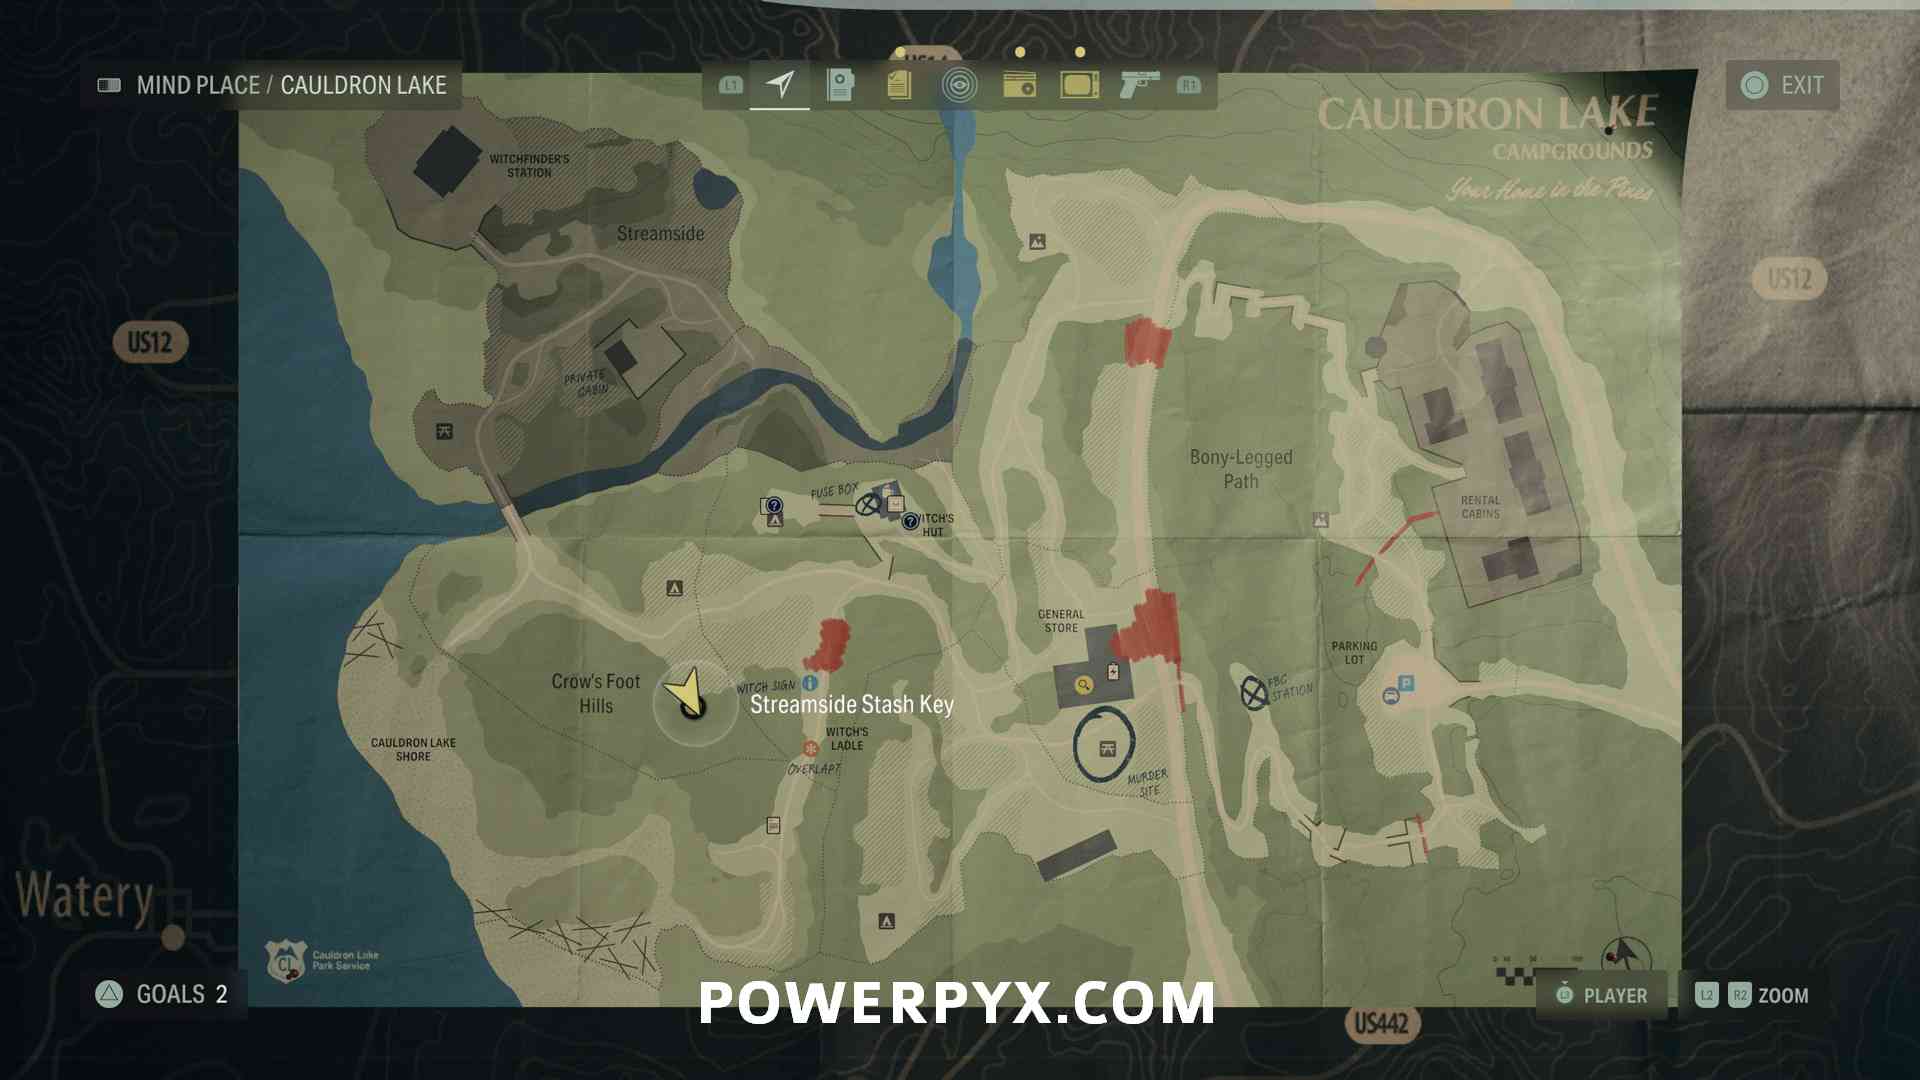
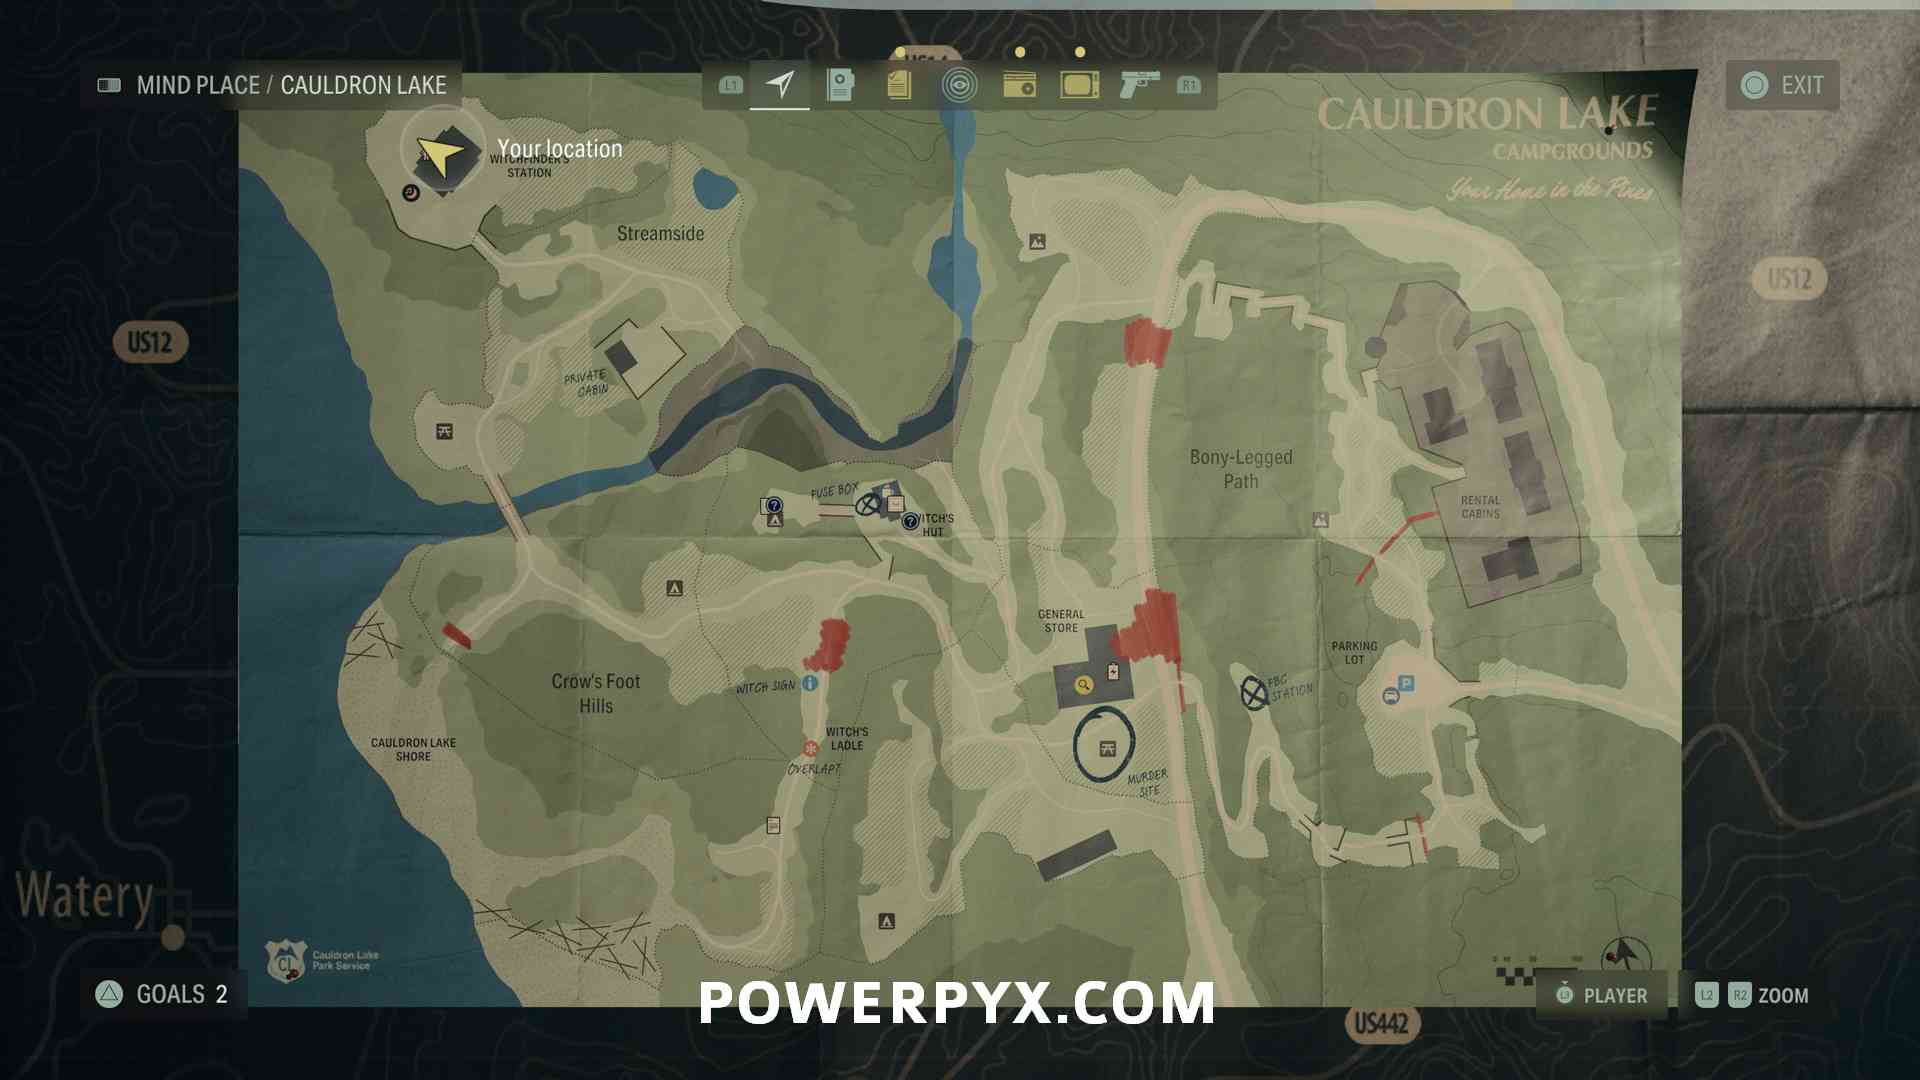
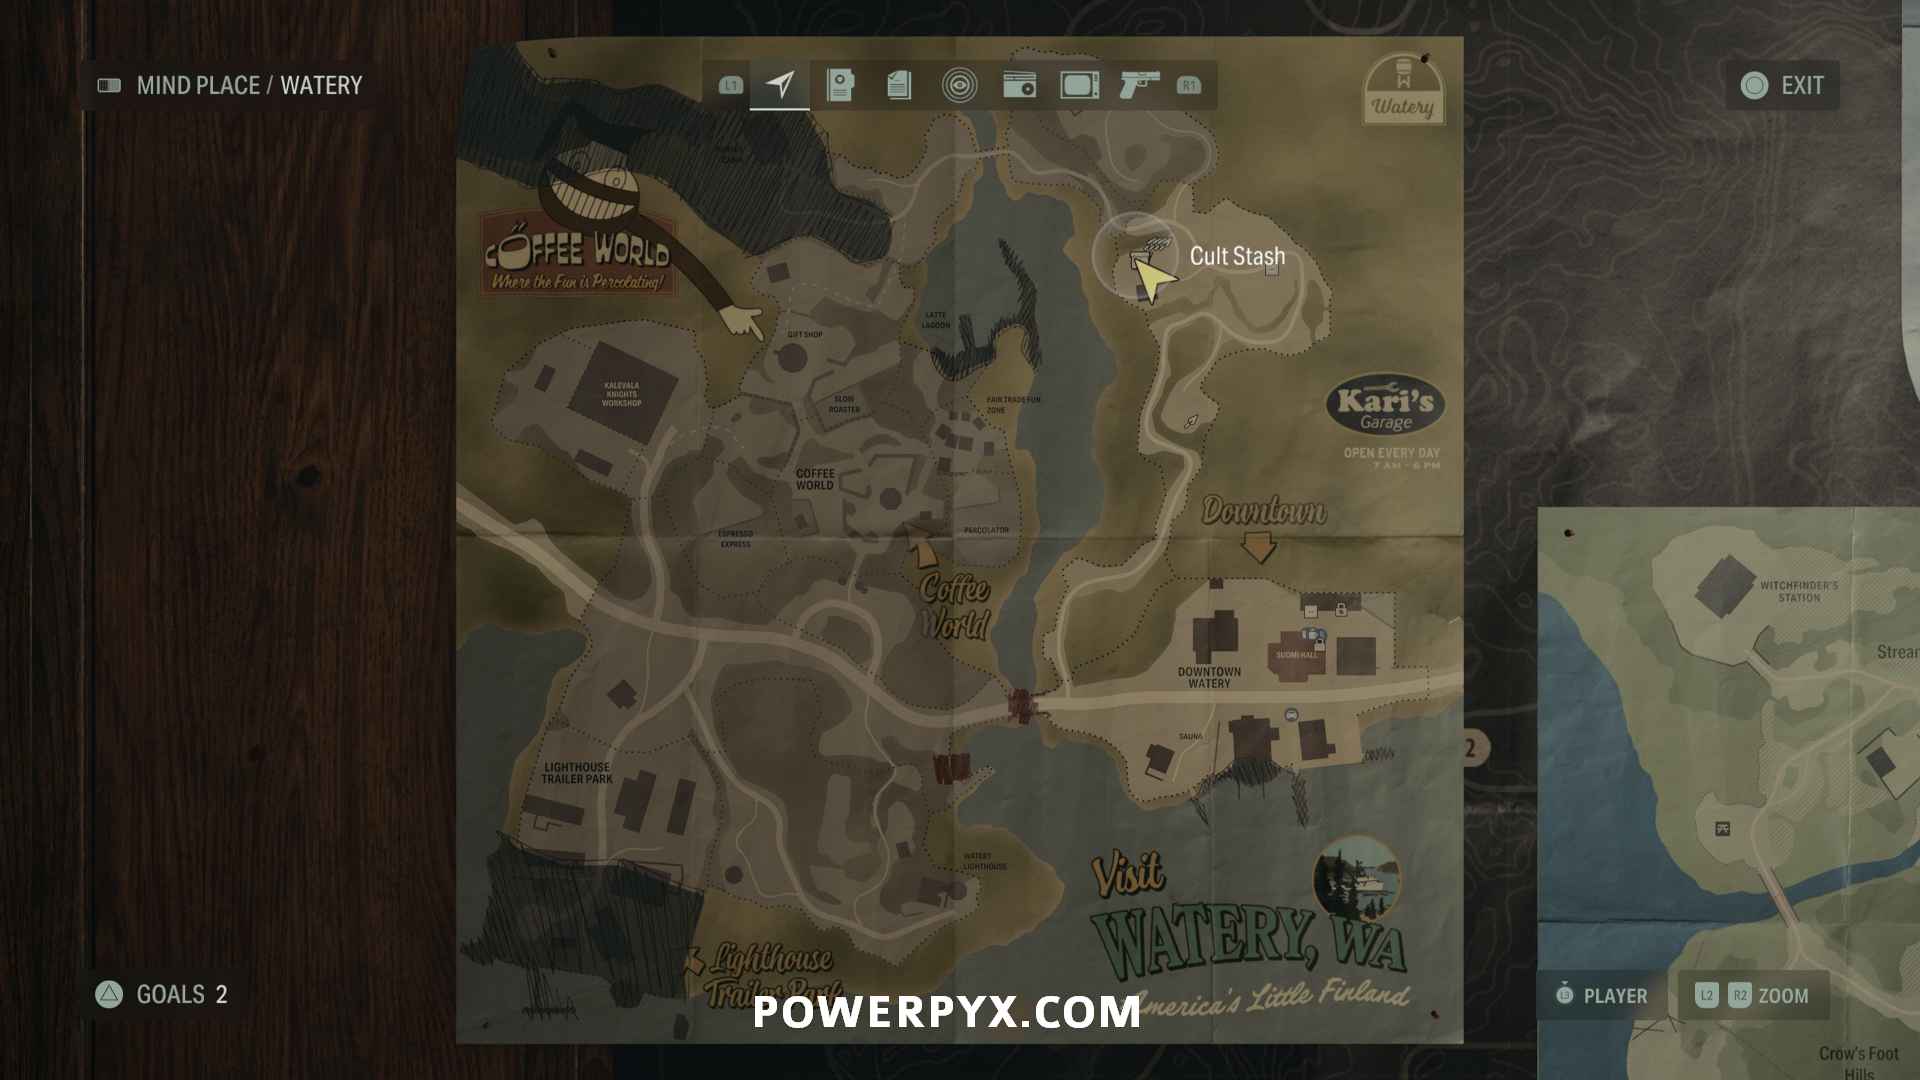
Cult Stash 3 (Streamside Stash Key)
Return to the Witch Sign (in Witch’s Ladle) where you inserted the heart earlier. With the flooding cleared, the path to the left (west) is now accessible. Defeat the wolf, then take the new path to the left. There will be yellow arrows on the rocks. Follow the direction the arrows are pointing at, this leads to the Stash Key on a rock underneath the last arrow pointing directly at it. Pick up the key, it is needed to open the Cult Stash. The Cult Stash is found in the same area, in the campsite just a few meters north (left of the campsite icon on map). Use the key to open it.


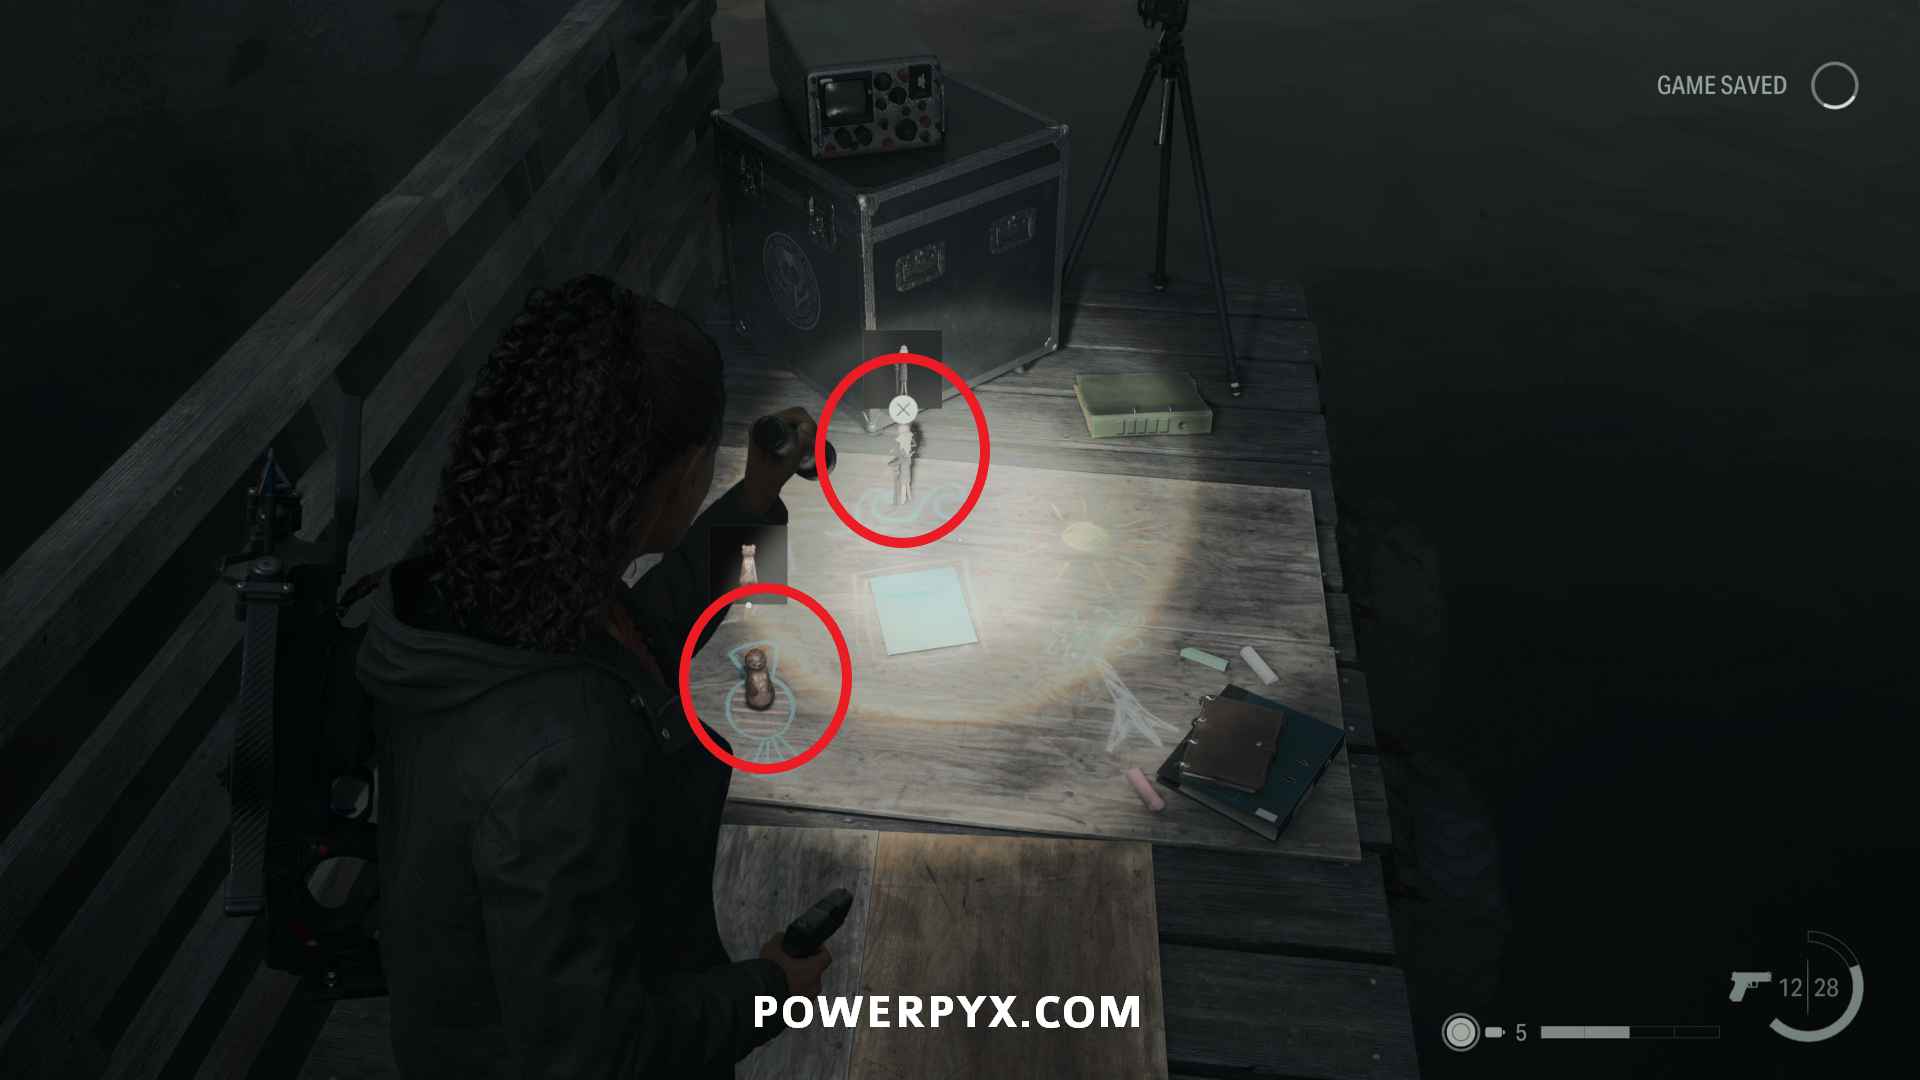
Nursery Rhyme Doll 1 – Crow Doll
From the last location cross the bridge to the north to find another campsite on the left. The doll sits on the left picnic table facing the lake, next to a burger on the table (camp icon on map, west of Private Cabin).


Nursery Rhyme Puzzle 1 + Charm 2 – Hammer Charm
Same location as last collectible, in the campsite look at the floor where a piece of paper is, inspect the paper. Around the paper are chalk drawings of objects. You must place the Crow Doll on the Sun icon. This solves the Nursery Rhyme Puzzle. Now a bird will come flying and puts the Hammer Charm on the picnic table where the doll was, pick it up. Also pick up the Crow Doll again before advancing!


Nursery Rhyme Doll 2+3 – Hero Doll + Wolf Doll
In Witchfinder’s Station, head upstairs and to the right to find these two dolls.


Nursery Rhyme Puzzle 2
Head back outside to find the puzzle on the floor. Place the Hero Doll on the Boat and the Wolf Doll on the Tree. Pick up the dolls afterwards.


Charm 3 – Coffee Mug Charm
Track the newly-appeared pawprints back upstairs to find the charm inside the enclosure.

Lunch Box 7 – 9 Manuscript Fragments
Found in the bushes north-east of Witchfinder Station, left of a small path leading downhill to Streamside.


Nursery Rhyme Puzzle 3
Head down to the Private Cabin to find another puzzle. Place the Crow Doll on the Hatchling, the Hero Doll on the Heart and the Wolf Doll on the House. Pick up the dolls afterwards.


Charm 4 – Kalevala Knights Charm
Go north to Streamside to find this Charm on the birdhouse that fell down, near the small pool of water.


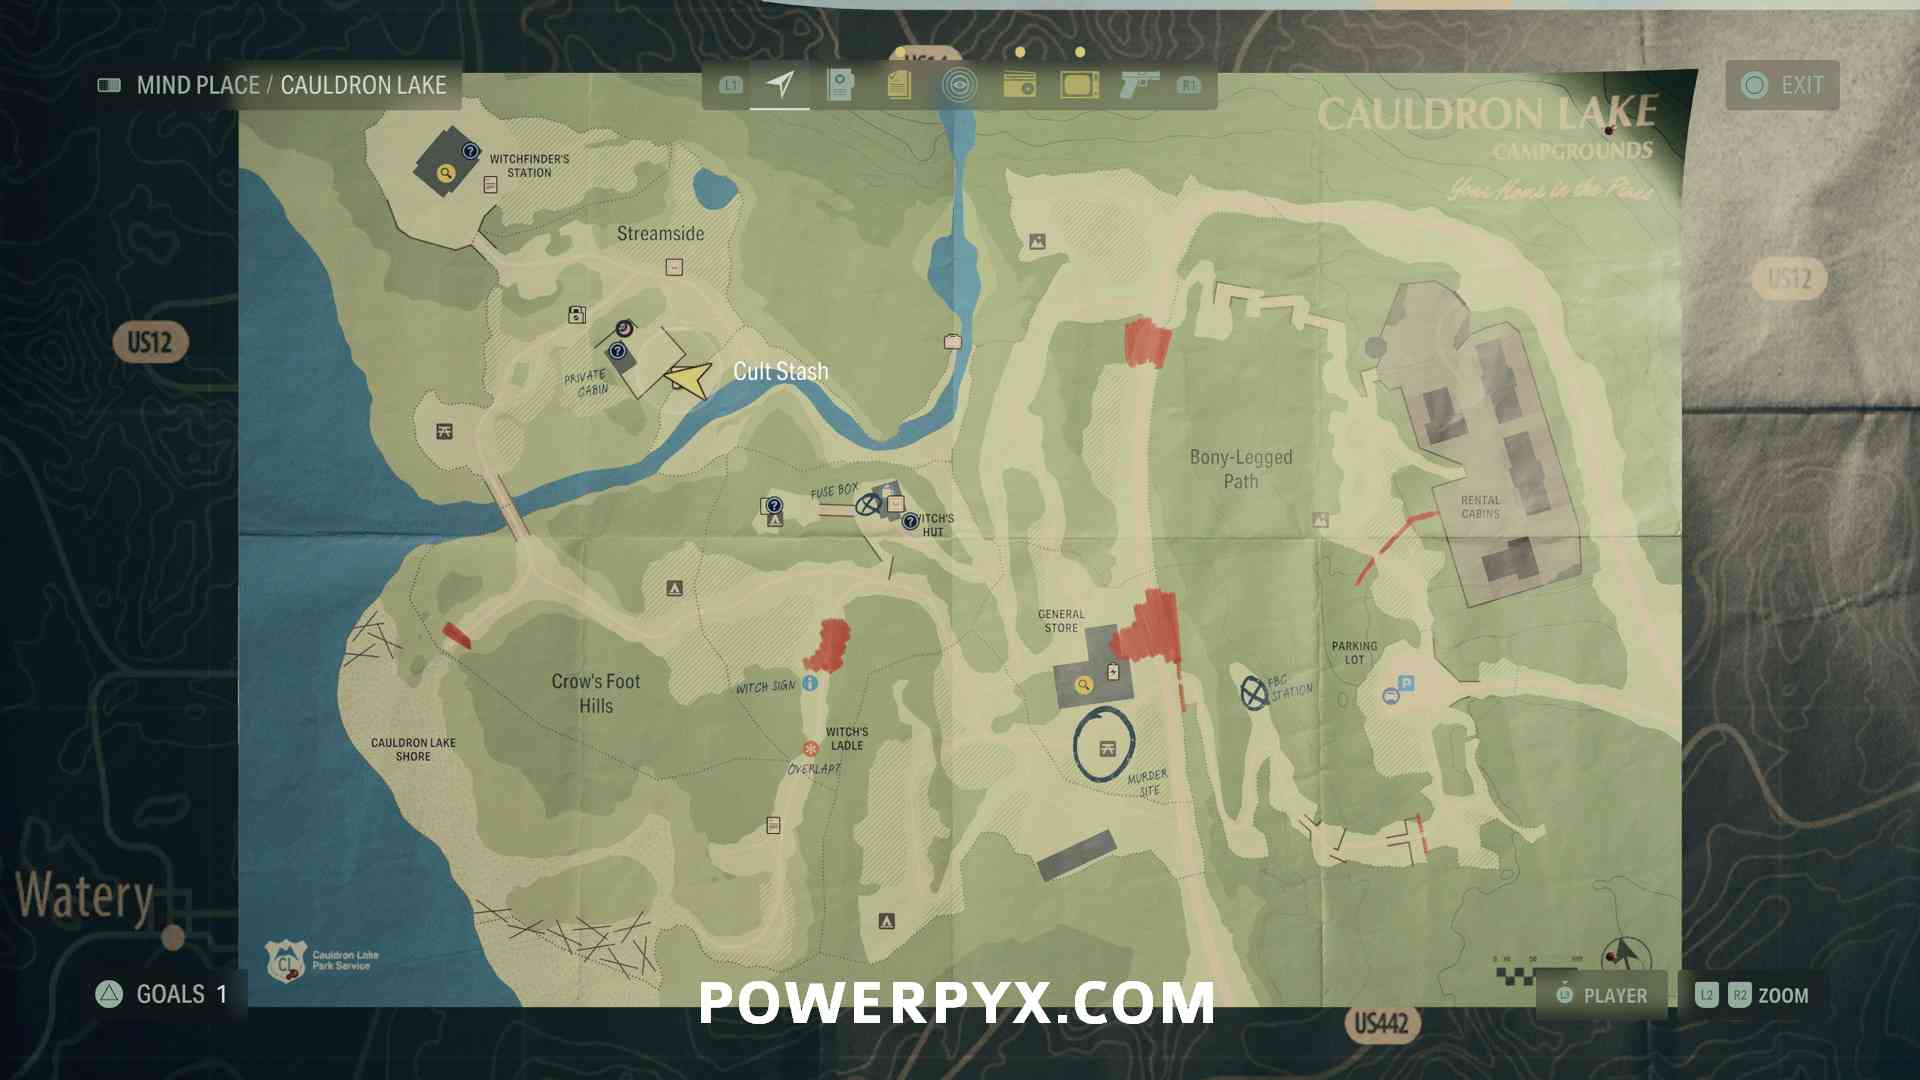
Cult Stash 4
From Streamside follow the downhill path to the south-east, then turn right before reaching the river to find this Stash. There are yellow glowing numbers on the trees near it (on map it’s directly south of Private Cabin). Code is 658.

Lunch Box 8 – 9 Manuscript Fragments
Follow the river up and all the way to the end to find this Lunch Box.


Initiation 1: Late Night
After returning to the car with Saga, you will start Alan’s first chapter. The codes to escape the studio are 665 & 565.
Map – Talk Show Studio
Inside the Cafeteria on the wall, you have to go through the Cafeteria for story purposes. You come here after escaping the studio the 2nd time, after you have to enter code 565 on the keypad (not the 1st time when you enter code 665).

Writer’s Journey Video 1 – The Dark Place
Automatic story-related item, unlocks automatically at the end of the chapter during the final cutscene.


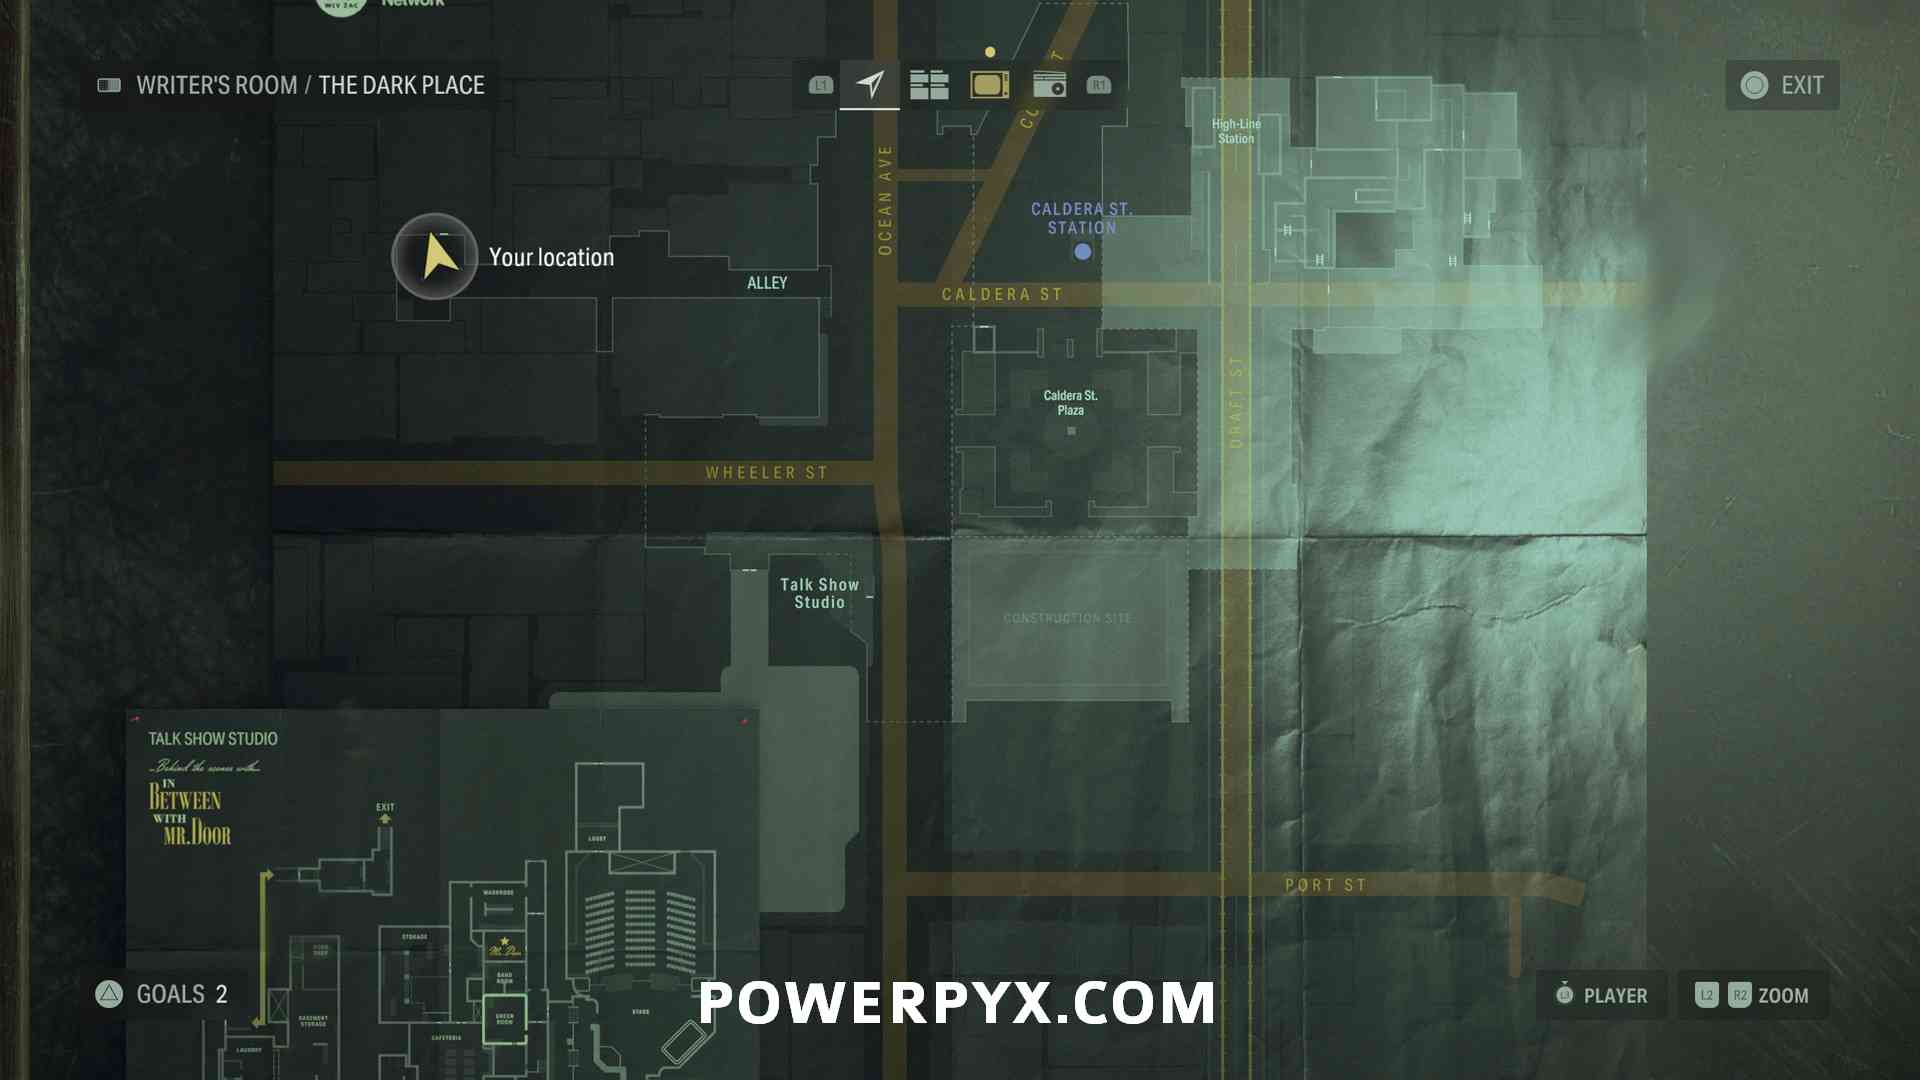
Map – The Dark Place
Next to the ringing payphone once you get outside.


Writer’s Journey Video 2 – Writing
North of the ringing payphone, walk up to the TVs at Vision TV Shop to trigger it. This will also appear as an unmissable video at the end of Initiation 2: Casey, so if you miss it here you will get it later.


Initiation 2: Casey
This chapter begins after answering the ringing payphone.
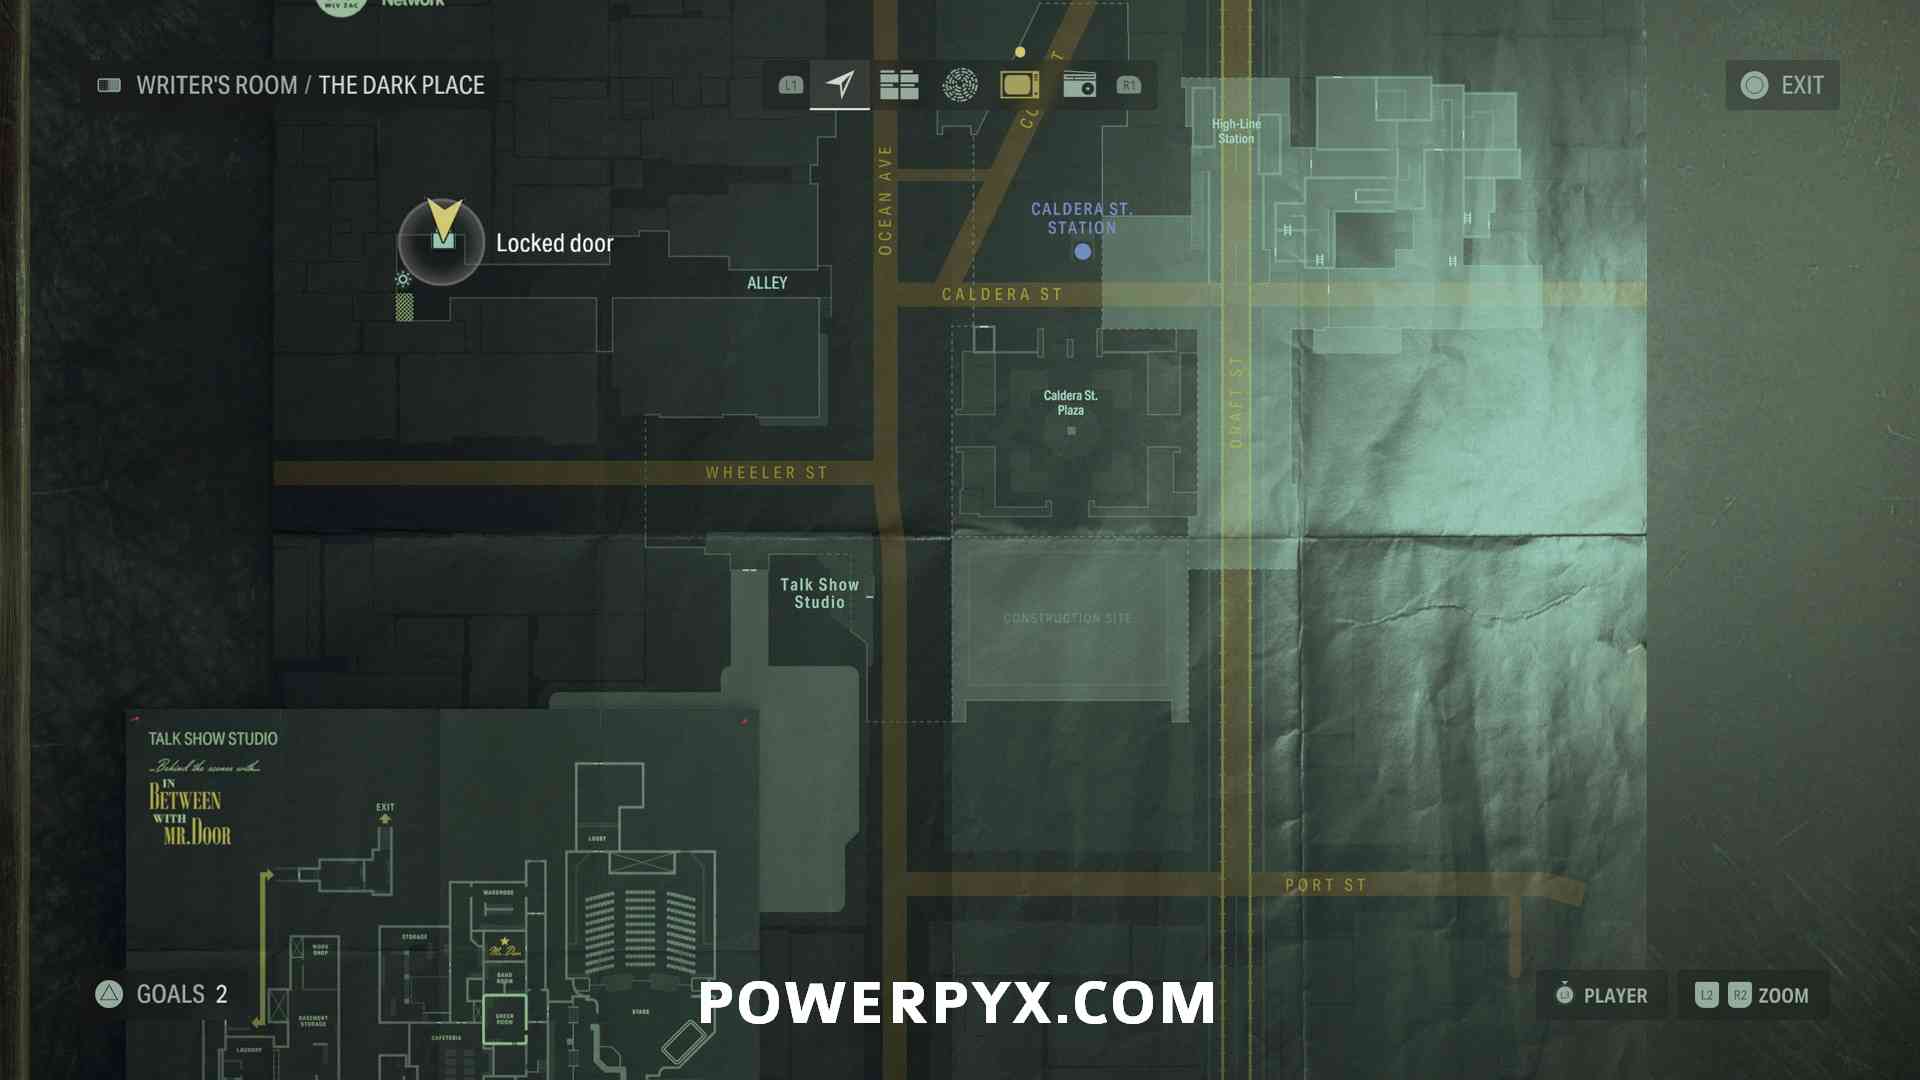
Weapon: Flashlight and Revolver
In the north-west edge of the map, at the end of the alley. You need to pick these up to continue, so they are unmissable.
Trophy: Carry his Words (Discover a Word of Power)
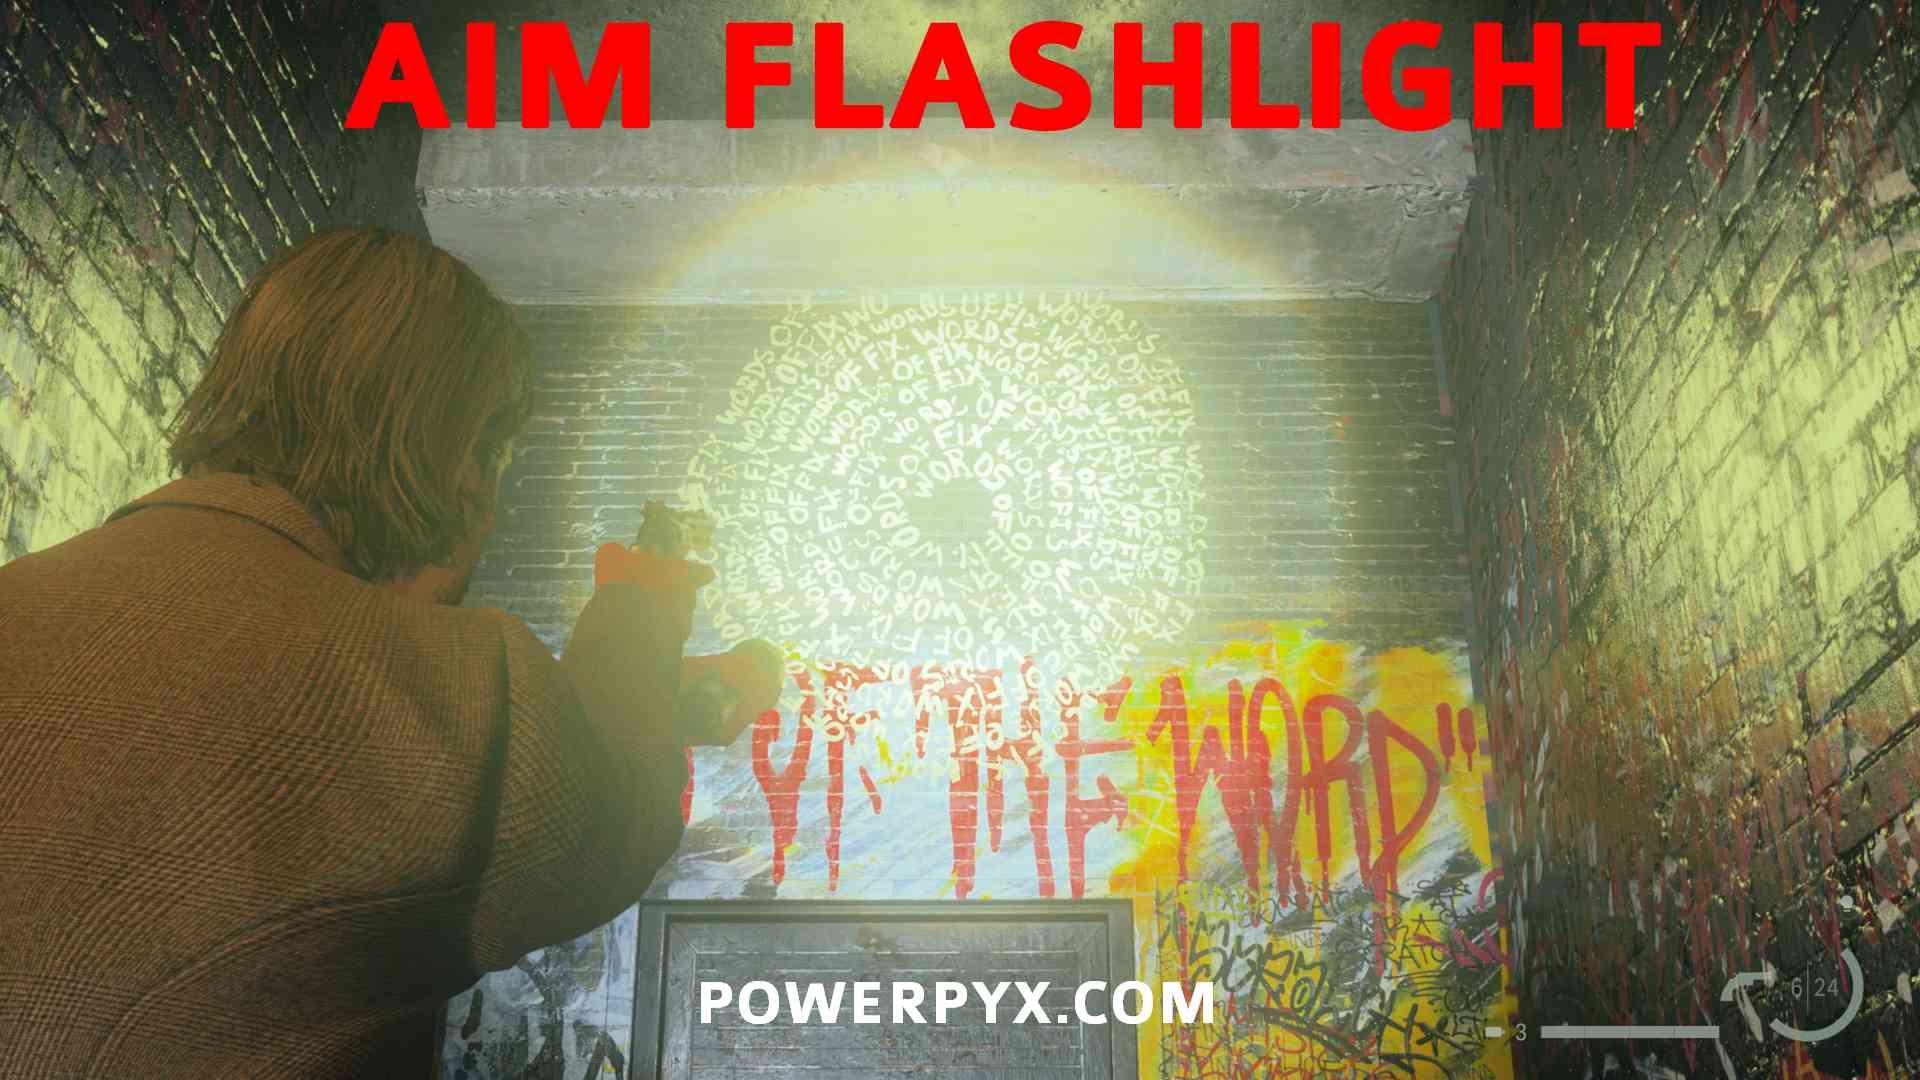
After obtaining the flashlight/revolver, interact with the lamp in the same area by holding  to steal the light. This opens a new path on the left under the lamp, follow this until you see a yellow “word circle” above a door, aim the flashlight at it to collect it. There are more of these throughout the game but they aren’t needed for trophies & achievements (only 1 is needed for Platinum / 1000 Gamerscore).
Steps to advance story: After the last collectible you’ll need to solve a bunch of steps first to advance. From where you found the flashlight/revolver be sure to take the light with you from the lamp. Then backtrack through the alley and go to the map location named Caldera St. Station (north of the area). Here use the light on the lamp on the right, above the staircase leading up (not the subway leading down). This clears the rubble, now go upstairs follow the path across a roof, on a rooftop is a door you can go through, follow the rooftop section until you reach a police car in an alley from which you can steal a second light. Now place one light on the west corner of Caldera St. Station to open up the subway station entrance. Grab the first light again that you placed at the staircase and use it downstairs in the subway station. This opens the path in the subway. You must interact with an illusion here by looking at it from the right angle, then follow the path forward (through a door on the left and downstairs). Then you reach a break room. There you’ll find the next Map collectible.
Map – Subway
Outside the subway break room hangs this map on a wall.


Steps to advance story: Throughout the subway you must now go to ‘scene’ locations (which are named on the map, starting in the Collapsed Tunnel). Then press touchpad right to place a scenario on Alan’s storyboard which will change the plot to a different setting. Contrary to Saga’s investigate board, Alan’s quest board requires changing plots with different scenarios which will change the game world. Do this throughout the subway to advance until you unlock the Ritual option, then backtrack to the Collapsed Tunnel and use the Ritual plot. Run away from the dark fog into the break room. Then the fog goes away and you can return to the Collapsed Tunnel once again which will now be open and you can advance through it to leave the subway.
Writer’s Journey Video 3 – Murder Sites
Automatic story-related collectible, cannot be missed. It unlocks while playing through the subway section, there will come a point where you must walk through a break room to advance (can’t be missed), at this point you are given the Video automatically.


Initiation 3: Haunting
There are no collectibles in this chapter.
Return 3: Local Girl
After Saga finishes interrogating Alan you can progress Saga’s Story (Return) or Alan’s Story (Initiation) by interacting with the puddle in Break Rooms with both characters. In this guide we’re alternating every couple chapters, but these can be played in any order (could do all chapters for one character then all for the other). For now continue playing as Saga.
Koskela Brother Commercial 2 – Coffee World
In the lobby of the Elderwood Palace Lodge. This will trigger automatically as you leave so you cannot miss it.


Koskela Brother Commercial 3 – Ahma Beer
Inside Oh Deer Diner. If you don’t get it here, it will also play on the TV at Suomi Hall at the end of this chapter, or in the Elderwood Palace Lodge in future chapters.


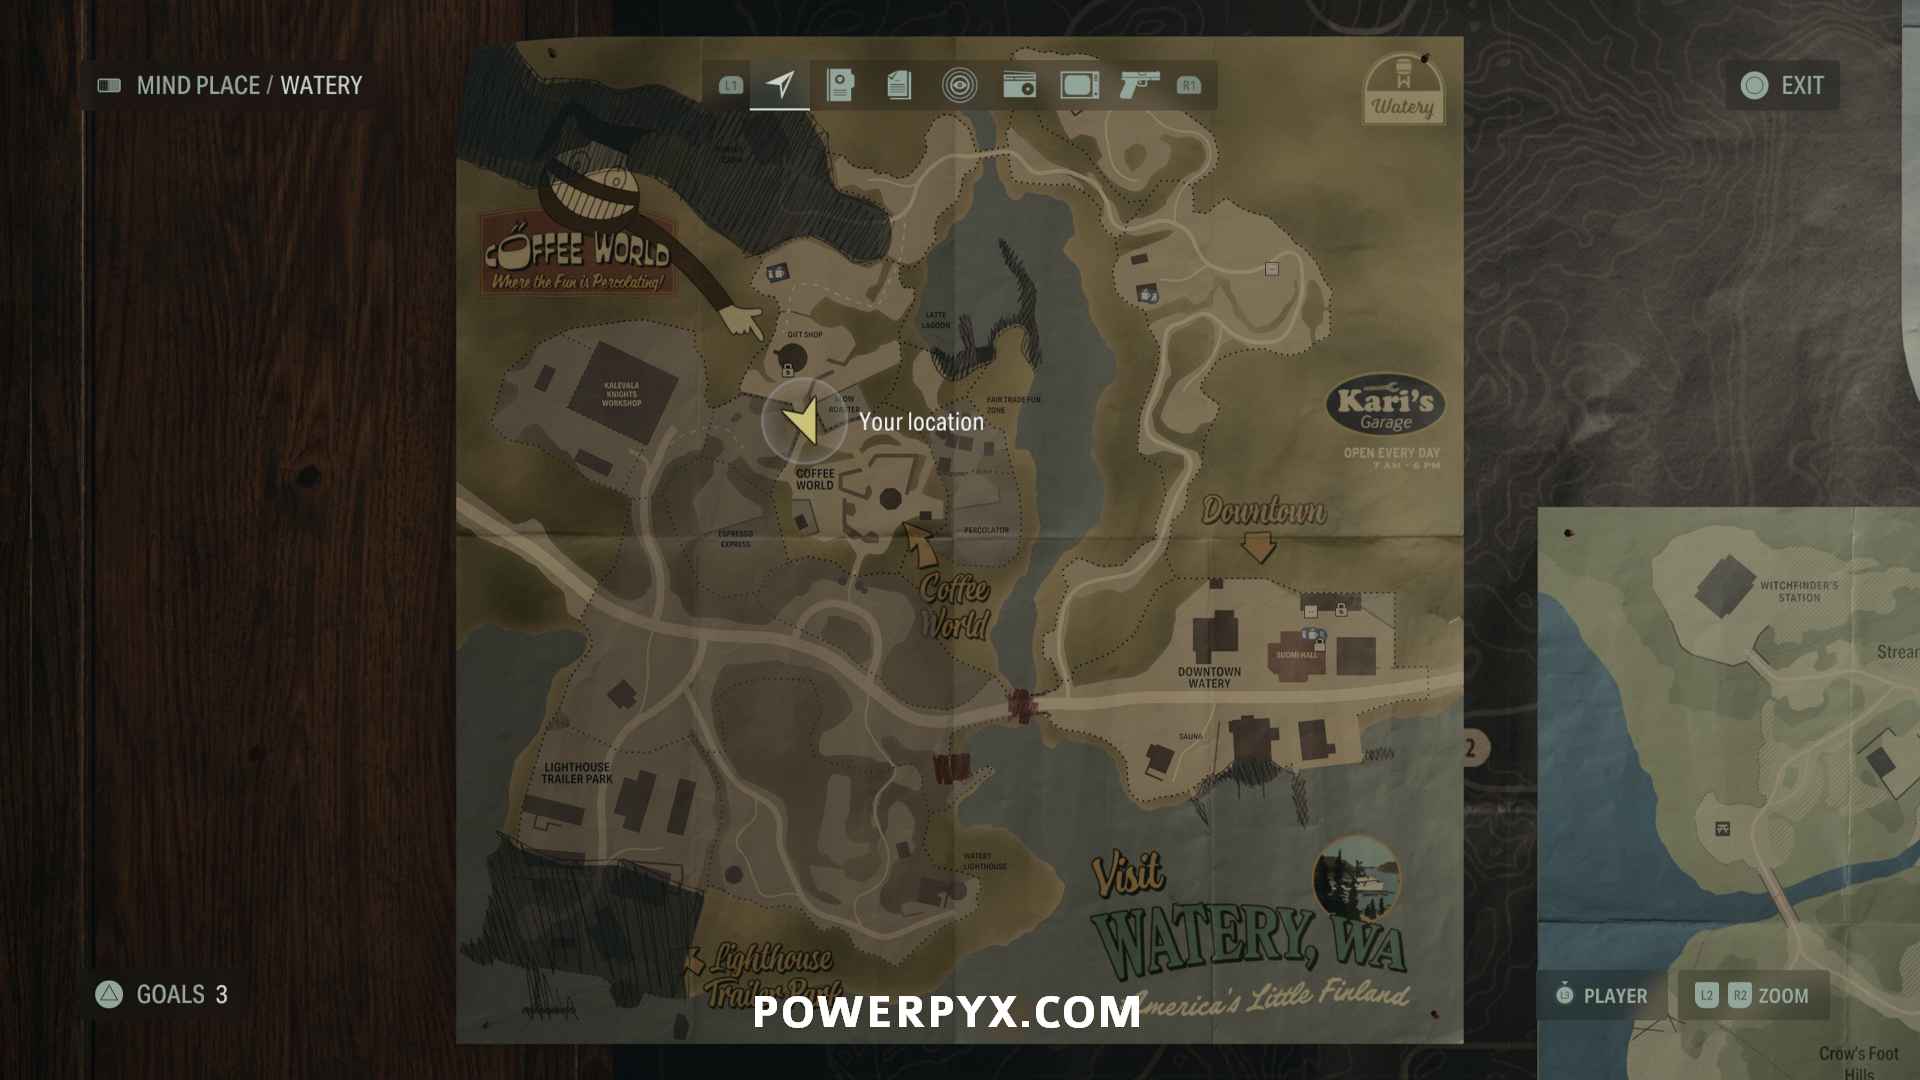
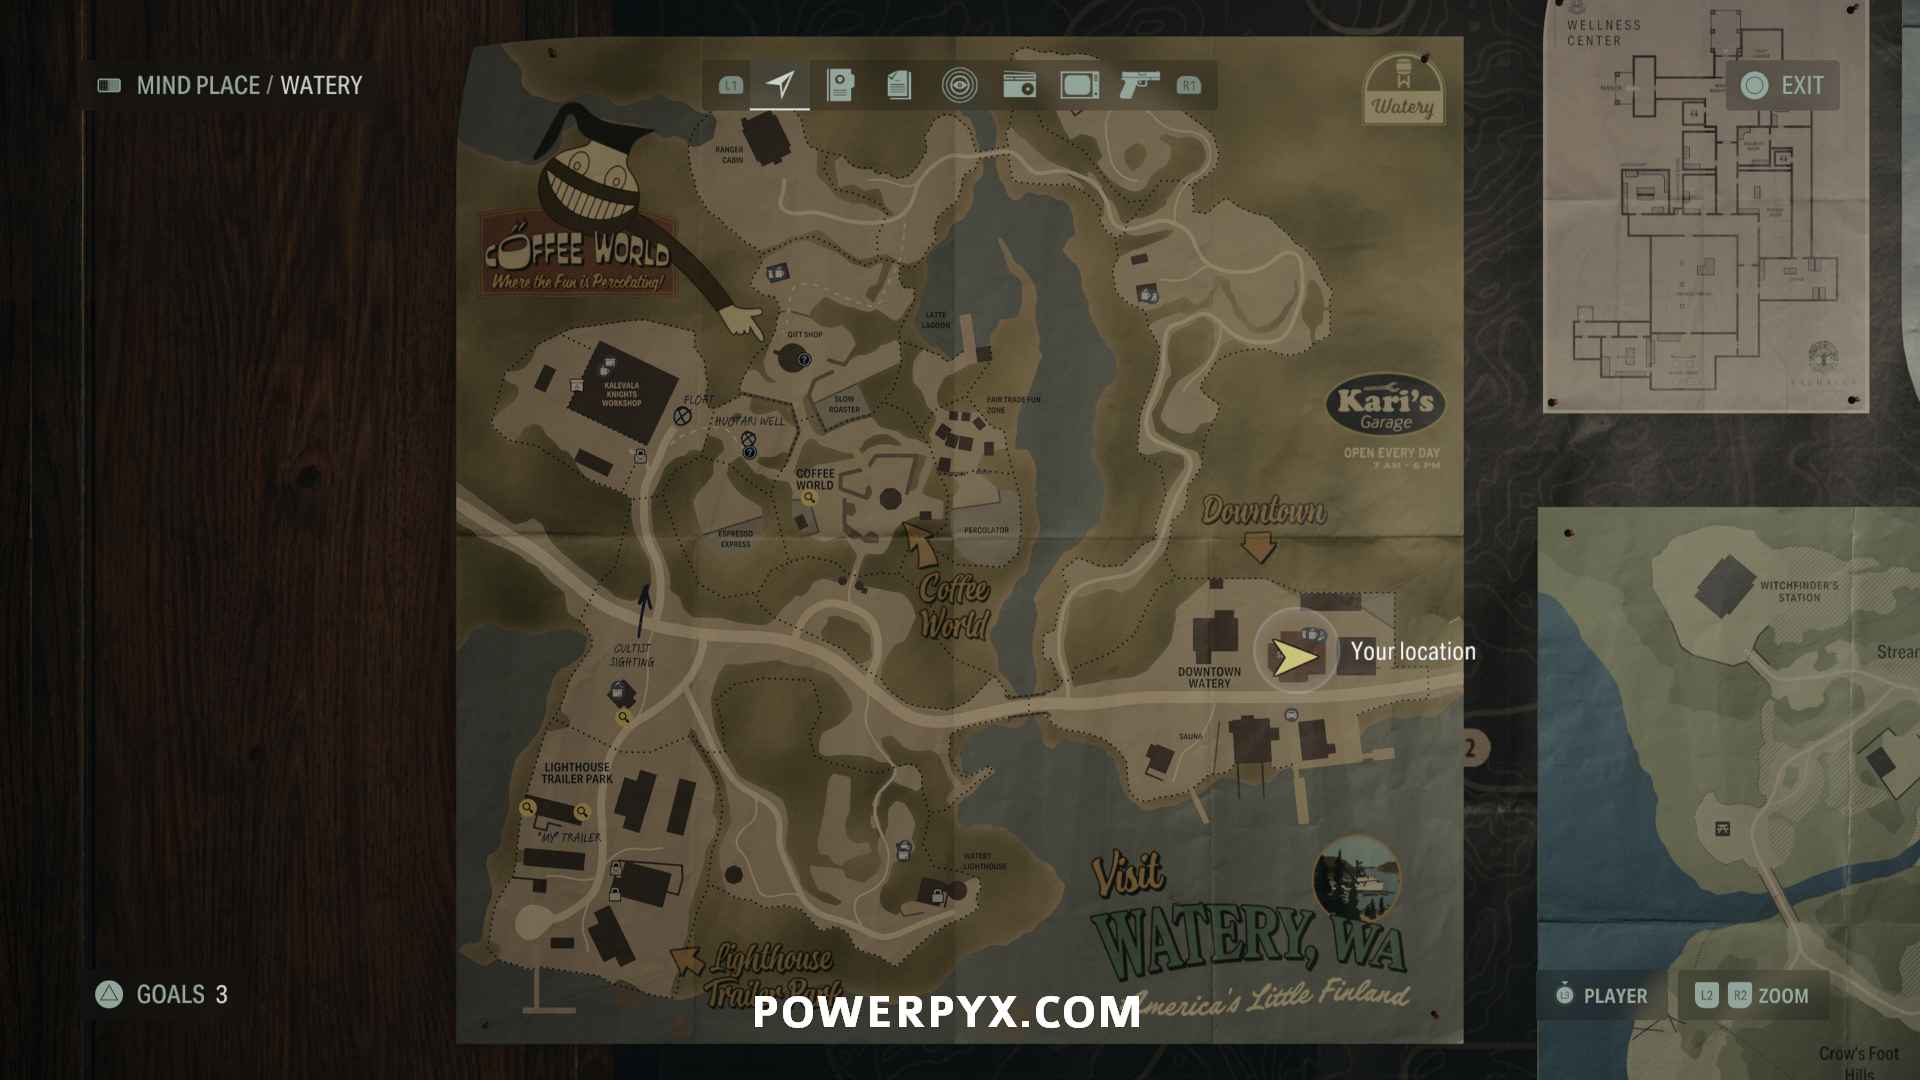
Map – Watery
Once you travel to Watery, this will be inside Suomi Hall by the entrance.


Nursery Rhyme Doll 4+5 – Deer Doll and Moose Doll
After your first encounter with Thrower Taken, head around the corner and onto the ridge to find these two dolls next to a puzzle.


Nursery Rhyme Puzzle 4
Right next to the dolls on the floor. Place the Moose Doll on the Tree (bottom right icon). Remember to pick up the doll again afterward.

Charm 5 – Coffee Mug Charm
Return back up the path to find this at the base of a moose statue. This is a duplicate charm, there are multiple Coffee Mug Charms to obtain (they are consumable), and these duplicates won’t count towards the trophy.


Cult Stash 5
Continue up the hill and there’ll be a stash on another ridge to the east. This is another memory puzzle, click the buttons as they flash.


Cult Stash 6 + Weapon: Crossbow
Outside the Hunting Shack that acts as a break room, the code is 527. Inside the stash is the Crossbow.

Nursery Rhyme Puzzle 5
Up the hill near the Radio Tower on the southern ledge, place the Deer Doll on the House (bottom left). Pick up the doll again afterward.


Charm 6 – Deer Charm
After the Nursery Puzzle this spawns next to a deer corpse by the Radio Tower, guarded by two Taken Wolves.


Lunch Box 9 – 7 Manuscript Fragments
Behind the Radio Tower on the northern ledge.


Lunch Box 10 – 5 Manuscript Fragments
Across the bridge to the west, in the small campsite before entering Coffee World.


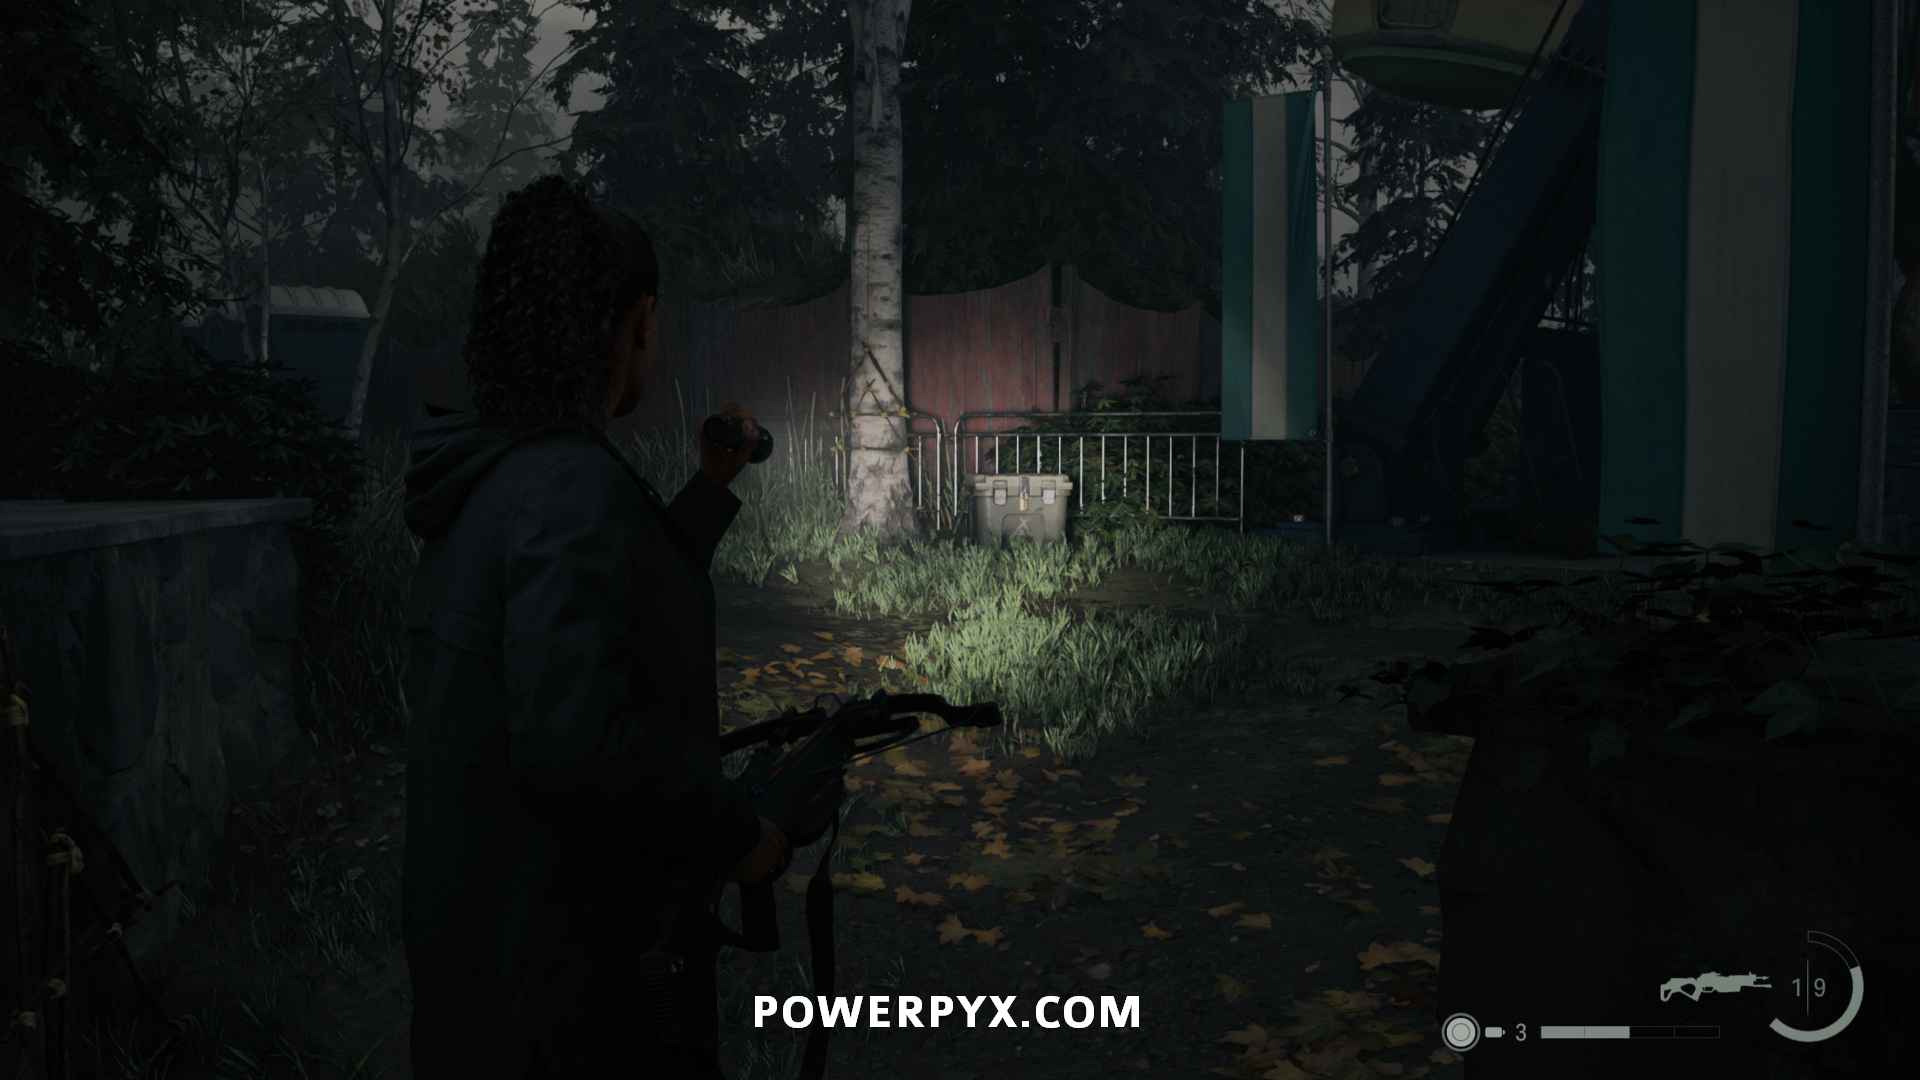
Cult Stash 7
At the base of the Slow Roaster ride, the code is 147.

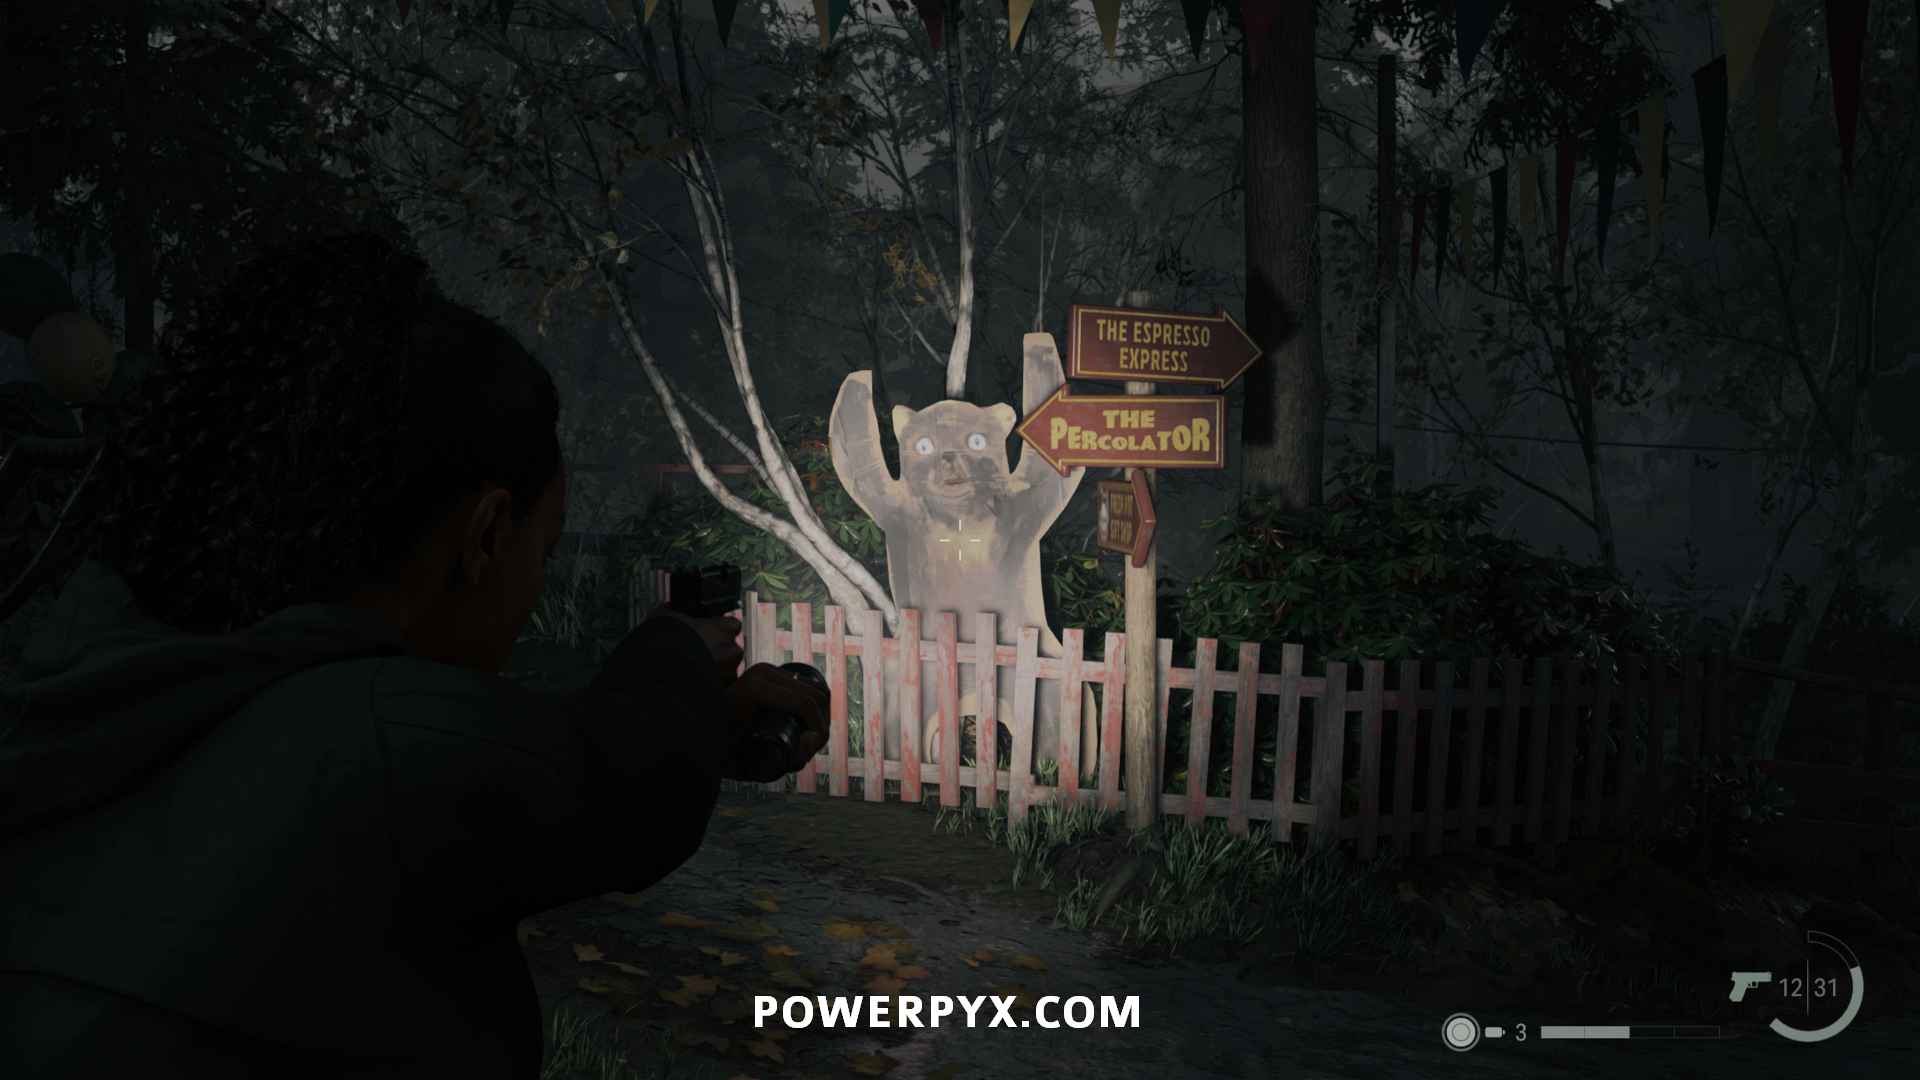
Trophy: Coffee-Themed Fun
Shoot any of the cardboard cutouts within Coffee World, the first being the bear next to the sign pointing towards The Percolator.
Screwdriver
At the Percolator, you will be attacked by Taken and find this by the back. This is required to progress the story and can be used to unlock simple locks.


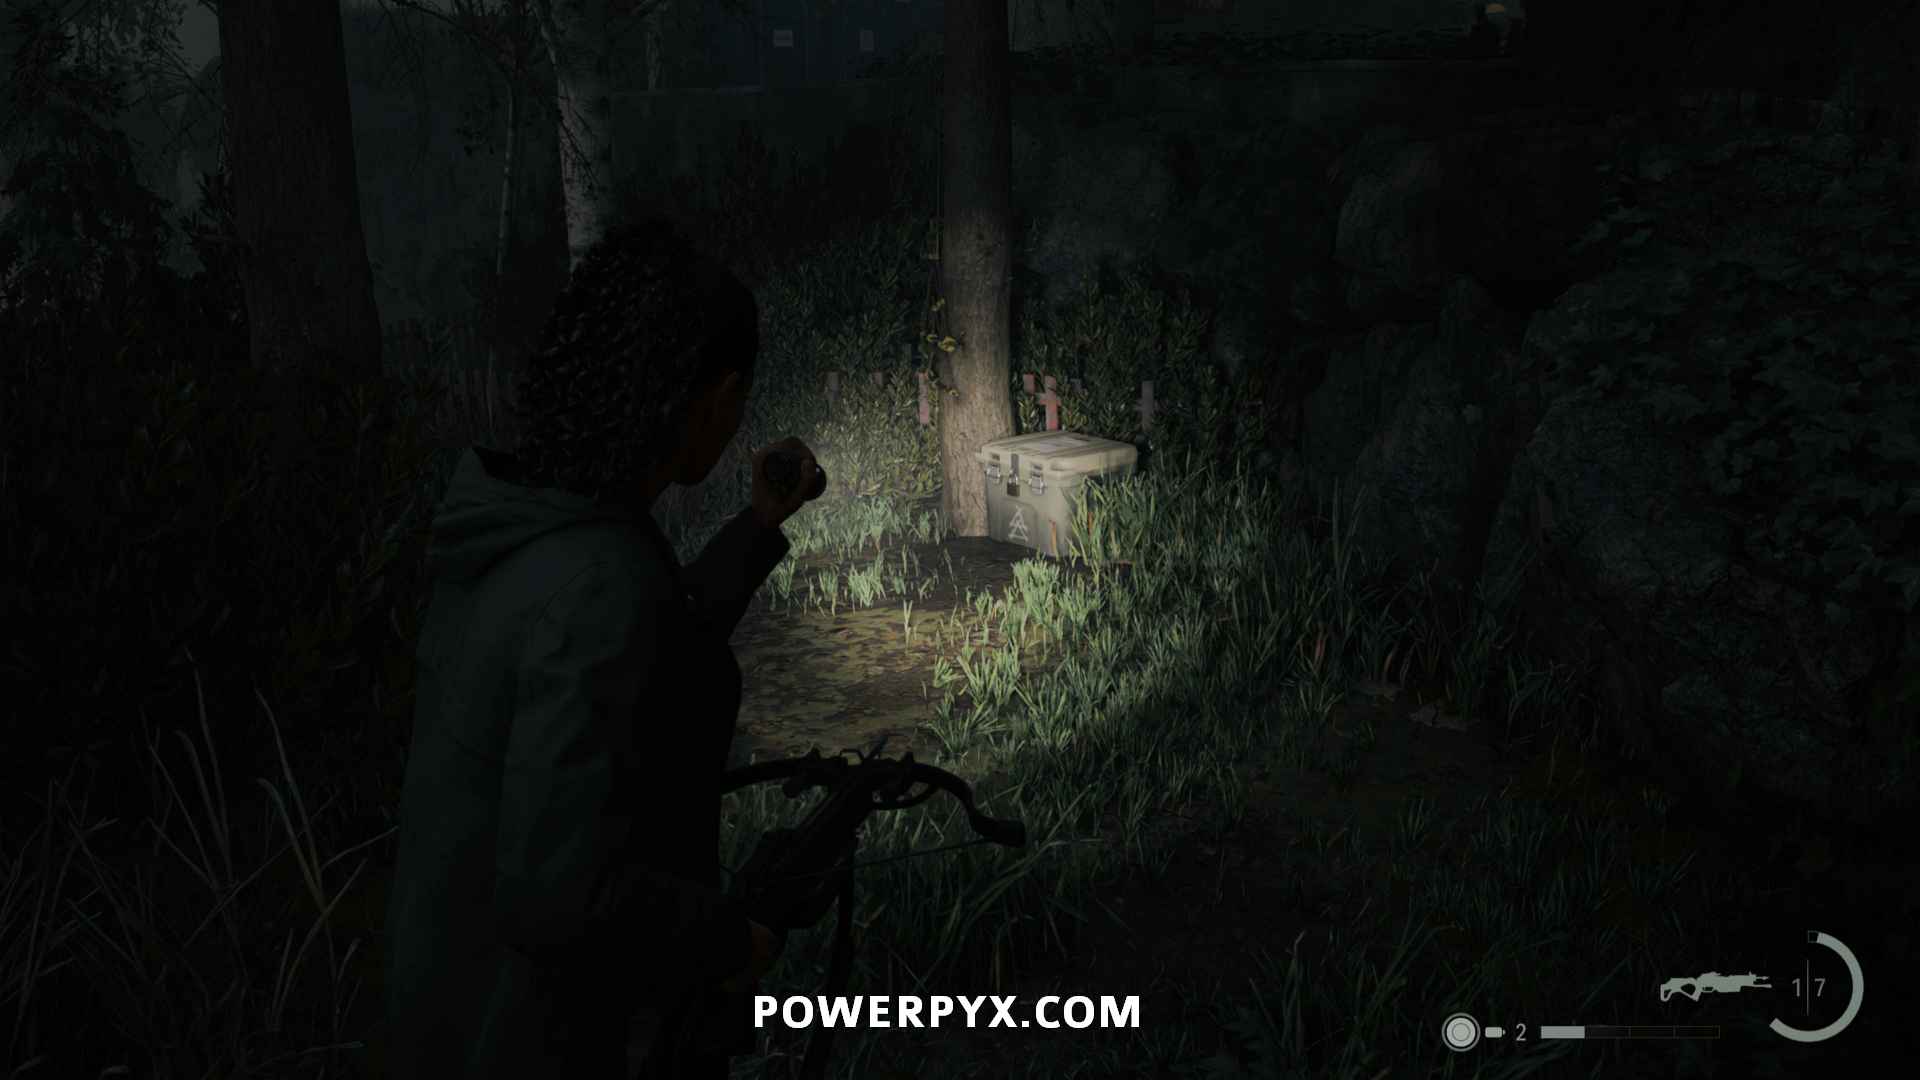
Cult Stash 8 (Coffee World Stash Key)
Behind Houtari Well, next to a tree. In order to open it, you will need the Coffee World Stash Key. To find this, go east to the statue of Mr. Drippy and head behind it to find the key on the ground.


Trailer Park Key
Found inside Gift Shop, in the safe. Code = 146. This is needed for story purposes but also for the trailer park collectibles where we will head next.


Lunch Box 11 – 9 Manuscript Fragments
Leave Coffee World through the southern exit and turn around. Enter the right coffee jug and this will be on the ground.


Lunch Box 12 – 7 Manuscript Fragments
Head south to the Lighthouse Trailer Park and use the Trailer Park Key to enter (see 2 collectibles above). Turn right and go behind the swing set to find this lunch box.


Koskela Brother Commercial 4 – Parade Floats
Return to the entrance and enter the first trailer on the left. This commercial will trigger once inside.


Lunch Box 13 – 6 Manuscript Fragments
After investigating the trailer in the right corner, head up to the Kalevala Knights Workshop, go behind it to find this between two boats.


Story Progression: Open the door lock in Kalevala Knights Workshop, see combination below. Then climb down ladder and follow the path to the ritual room.
Afterward head back outside, in front of the workshop is a little stage with cardboard cutouts and a mini-well on it, inspect all of these objects. Then read the paper next to the stage to get the clues for the 4 missing items, you must place them in the Mind Palace case board and it will say where each part is. You must now grab all 4 parts from the amusement park (they can only be interacted with after putting up all clues in the Mind Place Case Board).
Object 1: Circuit Board – take fuse from the break room in Kalevala Knights Workshop, insert it at Espresso Express, then activate the button to make the carousel spin. Stop it when the broken part of the ride is over the broken floor part directly in front of the button. It will do one more rotation and stop exactly at the point where you hit the button. Now that there’s no rocket blocking your path you can climb down to find this underneath the carousel.

Object 2: Cassette Tape – in Fair Trade Fun Zone, there’s a talking cupboard cutout of Mr. Drippy, on the back of the cutout you can find this.

Object 3: Toy Puukkoo Knife – inside Gift Shop where you opened the safe earlier.

Object 4: Mask – place all 3 parts on the stage in front of the workshop. Then go to Saga’s Mind Place and put up all new clues and do the profiling. Afterward the mask will spawn on Huotari Well.

Place it the mask and all objects on the stage and a portal will open up in the well, climb down into it.
Trophy: Bright Falls’ Finest (Defeat Mulligan and Thornton Boss)
After climbing down into the well you will access the Overlap. You will loop through a few times until you encounter Mulligan and Thornton at the well. One will snipe at you from the ridges while the other will attack you in close quarters. Around the area are darkness orbs that you must destroy with your flashlight  . If you do not destroy these, both bosses will constantly respawn. Destroy them all and then kill them both.
After defeating the bosses, you will unlock the trophy for completing the chapter, but the chapter doesn’t properly end until you return to Bright Falls. The flooding will clear in Watery, so you can access new collectibles before you leave.
Cult Stash 9 (Trailer Park Stash Key)
Head back to the Trailer Park to find this stash next to one of the trailers that are no longer flooded. You will need the Trailer Park Stash Key to open it, which can be found on top of the light pole behind it. Walk up the plank to grab it.


Nursery Rhyme Doll 6+7 – Wise Elder Doll and Bear Doll
Sitting on the sink at the Fish Cleaning station to the south.


Nursery Rhyme Doll 8+9 – Mother Doll and Child Doll
On one of the benches leading to the wharf.


Nursery Rhyme Puzzle 6
At the end of the wharf, place the Wise Elder Doll on the Waves and the Bear Doll on the Sweet/Candy. Pick up the dolls afterwards.

Charm 7 – Coffee World Token Charm
Follow the trail of fish back to the Fish Cleaning station where you find some Taken, the Charm will be on the bench.


Nursery Rhyme Doll 10 – Trickster Doll
Head up to the Lighthouse and this doll will be sitting outside the entrance.


Nursery Rhyme Puzzle 7
On the cliff by the lighthouse, place the Trickster Doll on Waves and the Wise Elder Doll on the Eye. Pick them up afterwards.


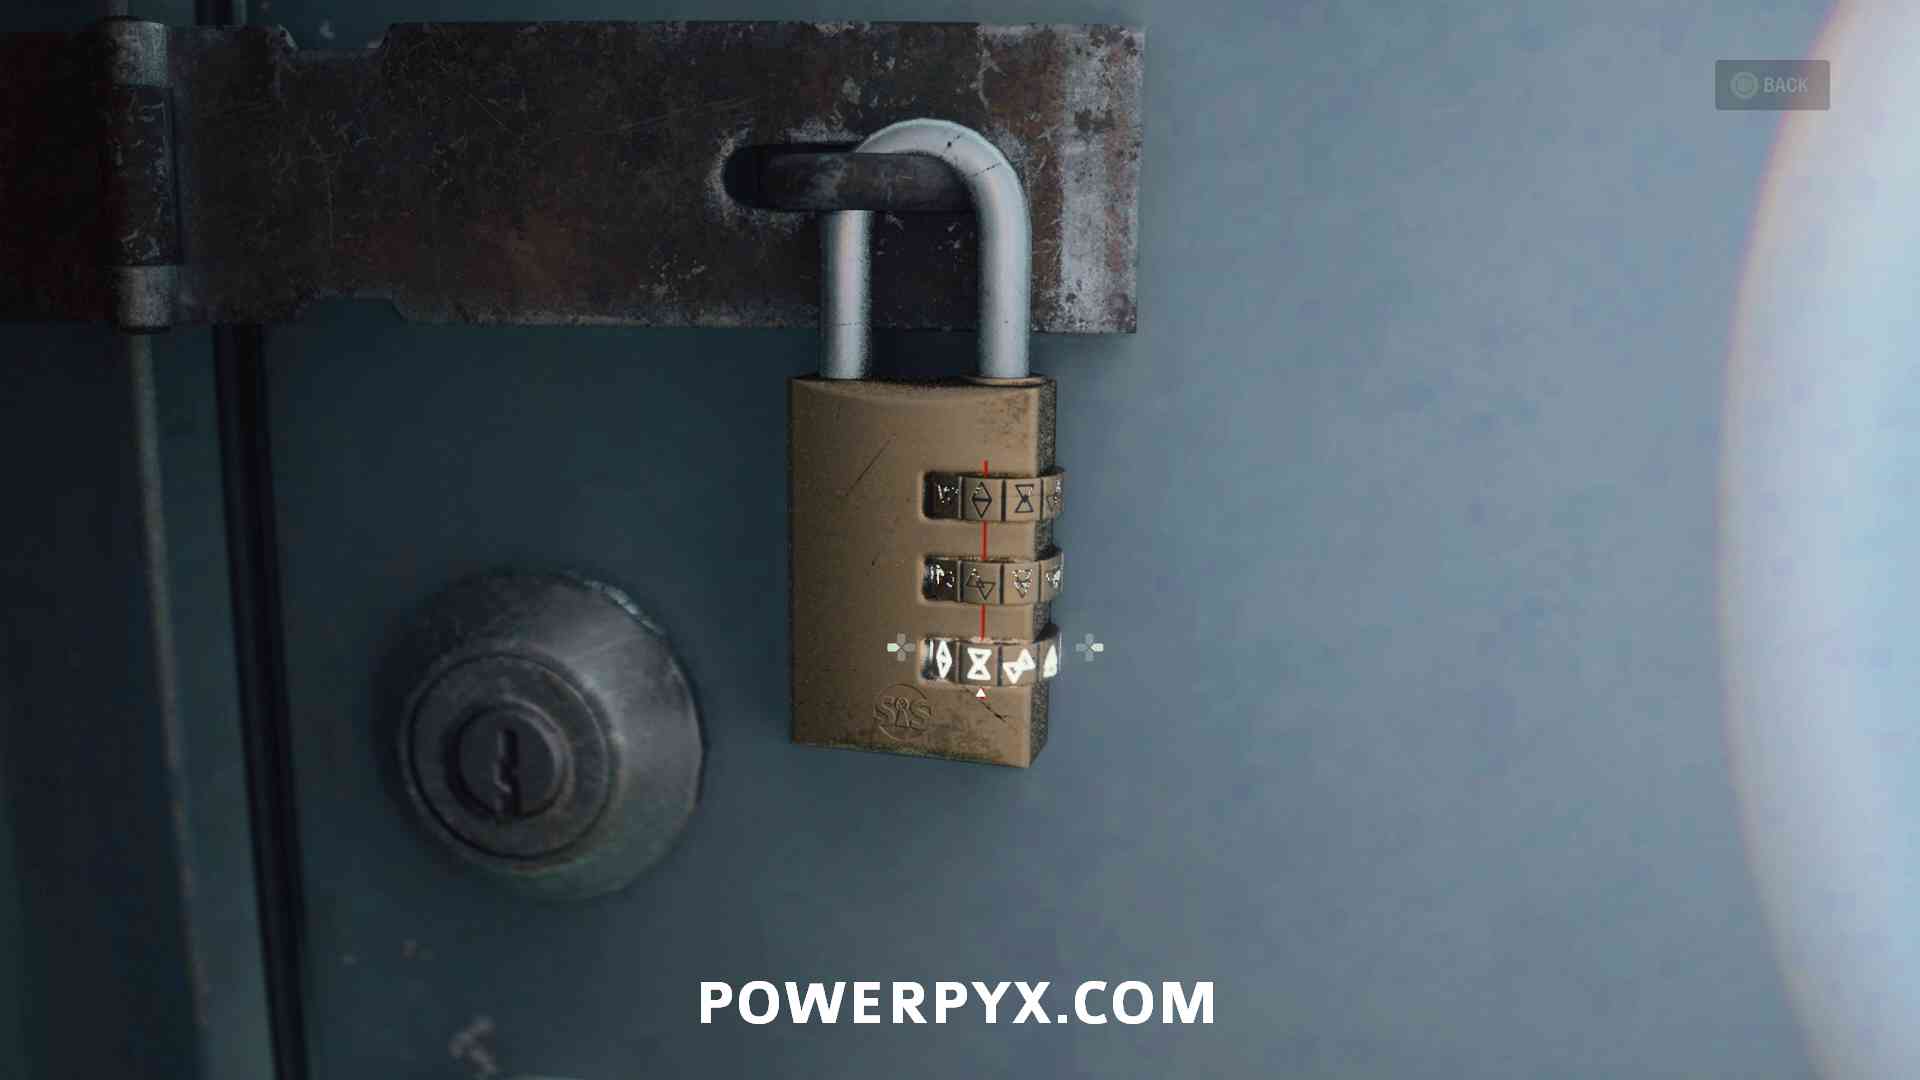
Cult Stash 10
On the ledge northwest of the lighthouse. See the lock combination in image below (can be found by looking at the symbols painted II & III for the 2nd and 3rd symbol, then can rotate the first number until it opens the lock, but can enter the solution right away).


Lunch Box 14 – 9 Manuscript Fragments
Outside the Break Room, on the ledge next to the stairs heading down.


Charm 8 – Lighthouse Charm
Head to the bridge and go south onto the beach area to find this on a rock.


Nursery Rhyme Puzzle 8
On the wharf of Latte Lagoon in Coffee World, place the Moose Doll on the Wave, the Trickster Doll on the Jewelry and the Deer Doll on the Boat. Pick them up afterwards.


Charm 9 – Mr. Drippy Charm
A red and blue boat will now float towards the wharf. The charm is sitting on the boat.


Nursery Rhyme Doll 11+12 – Maiden Doll and Monster Doll
Upstairs on the dresser in the bedroom.


Nursery Rhyme Puzzle 9
Behind the Ranger Cabin, place the Maiden Doll on the Tree and the Bear Doll on the Heart. Pick them up afterwards.


Charm 10 – FBC Charm
Head back upstairs to find the charm on the bed.


Nursery Rhyme Puzzle 10
Back in Watery, unlock the building behind Suomi Hall with your Screwdriver. Place the Maiden Doll on the House and the Trickster Doll on the Jewelry. Pick them up afterwards.


Charm 11 – Coffee Mug Charm
Go outside and the charm will be in the letterbox.


Cult Stash 11
On the southeastern wharf, the code is 496.


Return 4: No Chance
Weapon: Double-Barrelled Shotgun
Immediately in front of you as you leave the lodge. This is unmissable as you pick it up to progress.
Return 5: Old Gods
Cult Stash 12
Northwest of Bunker Woods, up the hill from the break room.


Nursery Rhyme Puzzle 11
Next to the cult stash, place the Mother Doll on the House and the Child Doll on the Tree. Pick them up afterwards.


Charm 12 – Lantern Charm
Follow the black marks to find this on the path back to the break room.


Cult Stash 13
On the back of a truck to the south of the break room, the code is 177.

Lunch Box 15 – 7 Manuscript Fragments
On the hill directly west of the cult stash, south of where you follow the path to the manor.


Map – Valhalla Nursing Home
In the first room on the right once you enter the manor (ring the bell on the front door and wait for the nurse to open it).

Lunch Box 16 – 5 Manuscript Fragments
Right next to the map.


Koskela Brother Commercial 5 – Bright Falls Blend
In the Rec Room next door. In order to trigger it, you will need to walk into the Lounge and then back out.


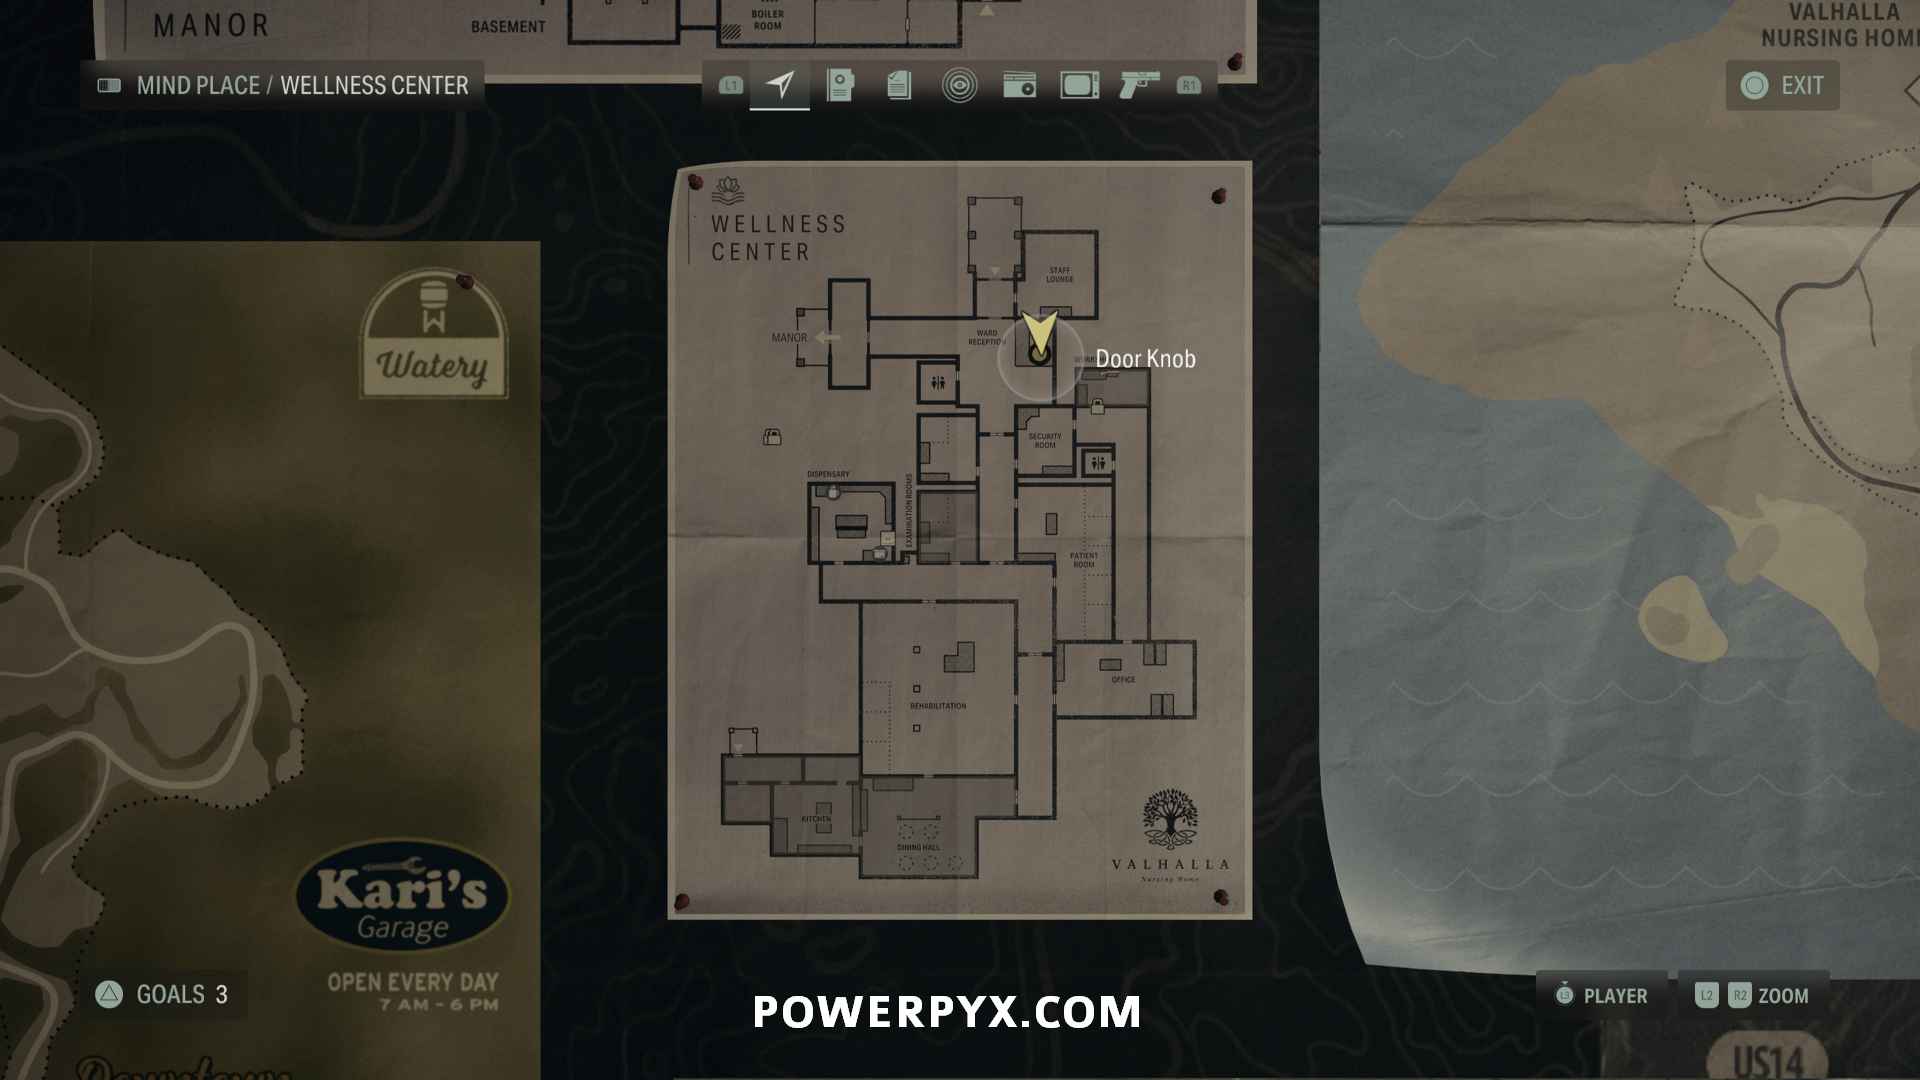
Map – Wellness Center
Right inside the entrance of the Wellness Center.

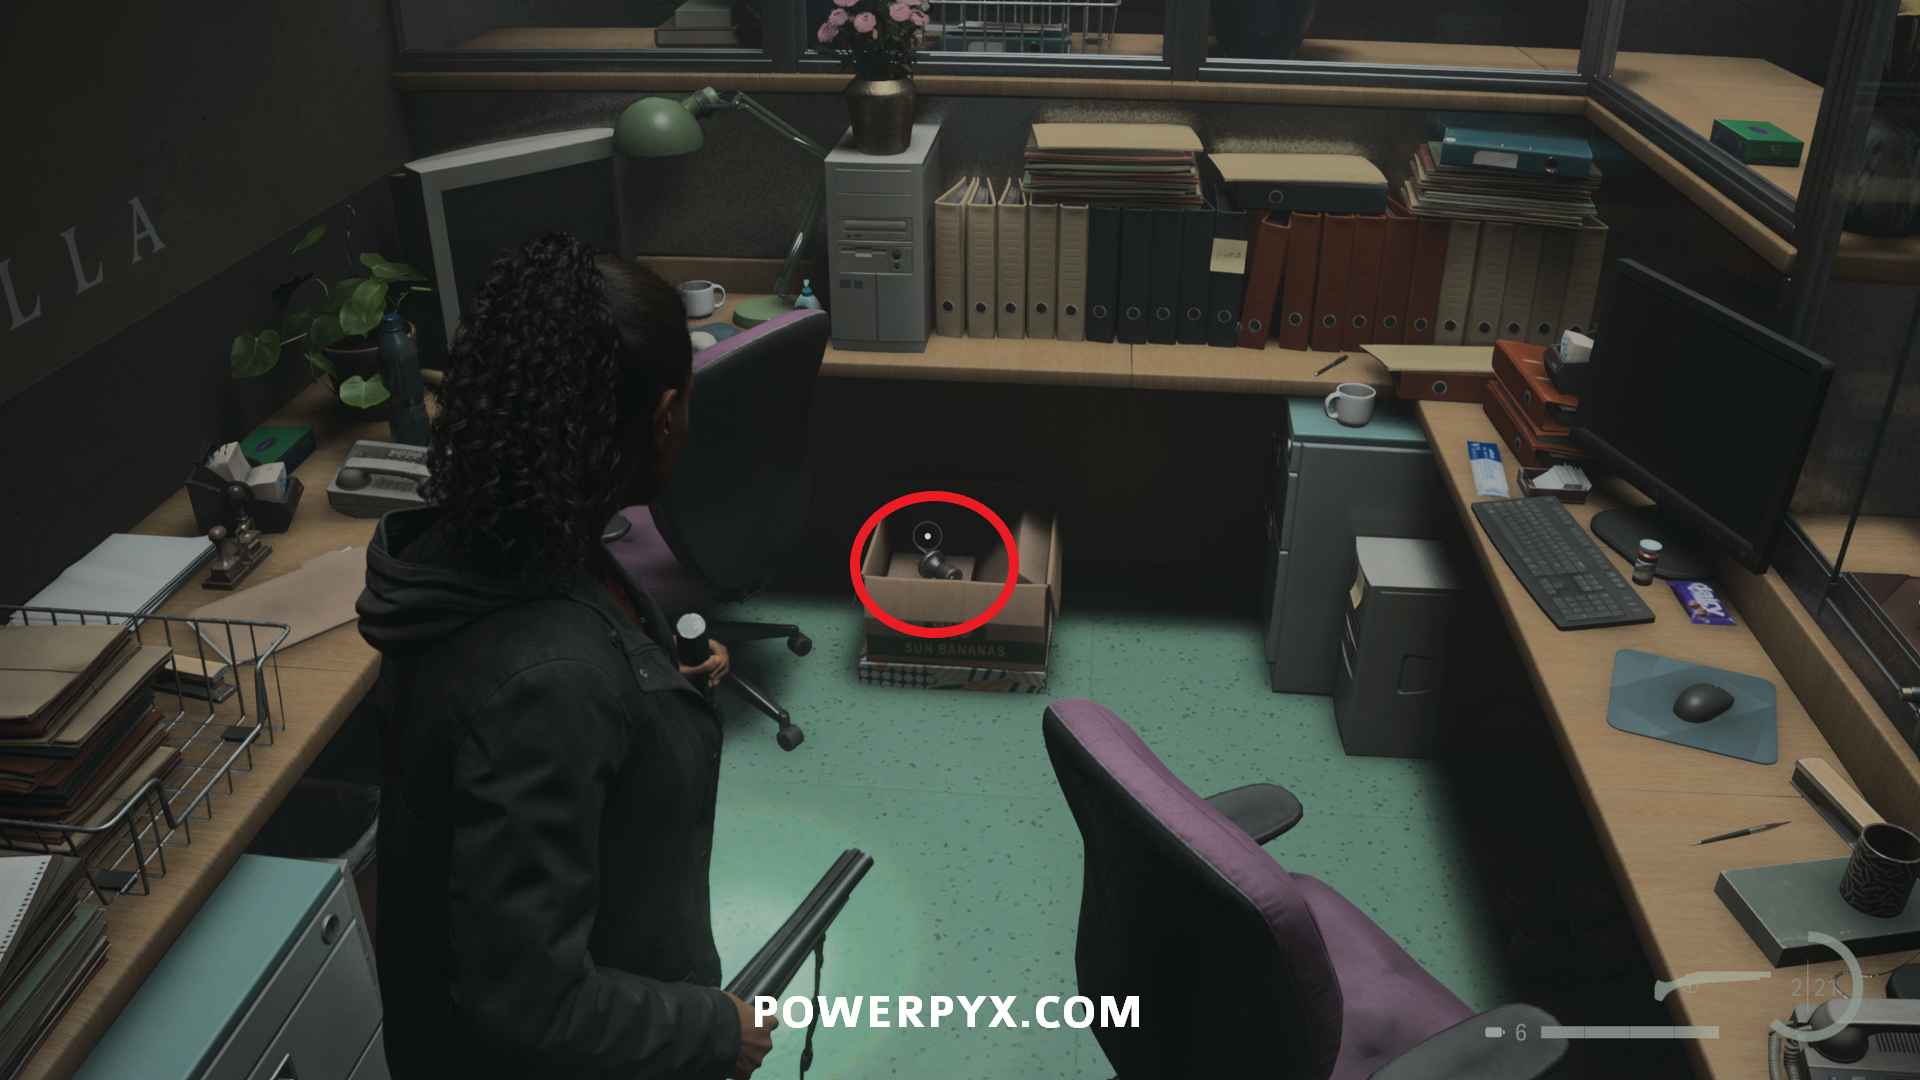
Weapon: Hunting Rifle
Advance through the Wellness Center by going through the Rehabilitation Hall, then through the corridor leading to the backdoor of Security Room (the backdoor is unlocked). Once you enter the Security Room, you can access the computer with code 170823 and unlock the doors. Go north into the Staff Lounge and behind Reception to find this in a box. Now take this to the door to the right of the security room and you’ll find the rifle inside.


How to advance Story: investigate all clues in the Security Office and put them on the case board. Go back to the Rehabilitation Hall, defeat the enemy, burn away the blockade with your flashlight and go through the door, follow the path to the exit. Then talk to the nurse and profile her in Mind Place. Talk to her again to get her key to open the locked rooms in the Manor/Nursing Home. You must now find a record, it’s in the Manor, 2nd floor, the room labeled ‘Old Gods of Asgard Museum’ (next to Trophy Room), open it with Rose’s Keyfob that the nurse gave you. Pick up the record on the floor. Then complete all clues on the case board. Then the objectives update, you must investigate Cynthia’s Room which is on the 3rd floor at the end of the hallway. Upon approaching, the power will get shut off, you must go to the basement. The basement entrance is outside, in the south-east corner of the Manor, close to where you talked to the nurse by the water. You must restart the generator which requires a fuse. The fuse is also in the basement, in the Storage Room (must crouch through a small shaft at end of basement to get there). It’s inside a red box, code is 273. Insert the fuse in the break room generator, then go back to Cynthia’s room on 3rd floor, use Rose’s Keyfob to enter. Burn the orb in the bathtub with your flashlight then pick up the record from it. Use the record on the jukebox downstairs (1st floor) in ‘Stage’ room. Then the world turns red and you can enter the water outside to get sucked into the Overlap. Continue through the tunnels until you reach a locked cabinet with the bolt cutters and a light switch next to it. Use the first switch and the second switch, then you can find the cabinet keys in the room with 2nd switch. Switch the first light off again and open the cabinet with the keys. Inside the cabinet you find the Boltcutters which will let you access previously locked areas for new collectibles (we will backtrack for those later).
Trophy: Girl in Love (Defeat Cynthia Boss)
Once you reach Cynthia in the Overlap, you will first need to press the button in the middle to open a path, then go through the water to reach the opening. Run from platform to platform, as staying in the water means getting attacked by Cynthia. Follow the tunnel around to the left and there’ll be a platform you can climb onto on your right with a generator. Once powered up, return to the first button you pressed and go downstairs. Cynthia will fly at you and throw waves, simply dodge and shoot, you will need to break her Darkness Shield when she falls on the ground.
After defeating the boss, you will unlock the trophy for completing the chapter, but the chapter doesn’t properly end until you return to the Sheriff Station. The flooding will clear in Bright Falls, so you can access new collectibles in Bright Falls. Combined with having the Boltcutters, you are now able to collect everything in each location, so it is recommended to collect everything in all 3 map locations before finishing the chapter.
Lunch Box 17 – 9 Manuscript Fragments
In amongst the trees between the two paths leading west from the Nursing Home. You must use the boltcutters on the gate west of the Nursing Home.


Cult Stash 14 (Bunker Woods Stash Key)
Down the short track to the east, behind a rock with a yellow arrow on it. In order to open it, you will need the Bunker Woods Stash key, which is found by following the gray signs with white arrows to a tree to the south.


Cult Stash 15
Slightly north of the main path past the break room, just before the path splits into two. The code is found on the rocks, follow the direction of the arrows for the order.


Nursery Rhyme Puzzle 12
Inside Ranger Station, place the Child Doll on the House and the Monster Doll on the Sweet/Candy. Pick them up afterwards.


Charm 13 – Coffee Mug
After the Nursery Rhyme Puzzle, open the backdoor of Ranger Station (the door facing east). Then turn around and look at the floor inside the house, black footprints will have appeared. Follow these footprints upstairs to the bathtub. Turn around and follow the footprints to the bed. Then the charm spawns on the bed.


Cult Stash 16 (Ranger Station Stash Key)
Head outside the Ranger Station to the chimney and you will find the Ranger Station Stash Key on the ground next to it. Take this to the cult stash on a hill west of the Ranger Station.


Lunch Box 18 – 8 Manuscript Fragments
Northeast of the cult stash, on the lower of the two tracks.


Nursery Rhyme Puzzle 13
On the beach east of the lunch box, place the Monster Doll on the Wave, the Child Doll on the Jewelry and the Mother Doll on the Boat. Pick them up afterwards.


Charm 14 – Valhalla Nursing Home Charm
Near the two Taken Divers in front of you, by the upturned boat.


Lunch Box 19 – 6 Manuscript Fragments
Amongst the trees right next to the beach.


Lunch Box 20 – 9 Manuscript Fragments
Head across the bridge to find this just south of the entrance to the boat yard, by a tree.


Nursery Rhyme Puzzle 14
On the wharf of the boat yard, place the Mother Doll on the Wave and the Monster Doll on the Boat. Pick them up afterwards.


Charm 15 – Anchor Charm
This will appear next to the beached boat in the middle of the boat yard, as well as several Taken.


Cult Stash 17
Head towards the Lodge and this will be next to a white van.


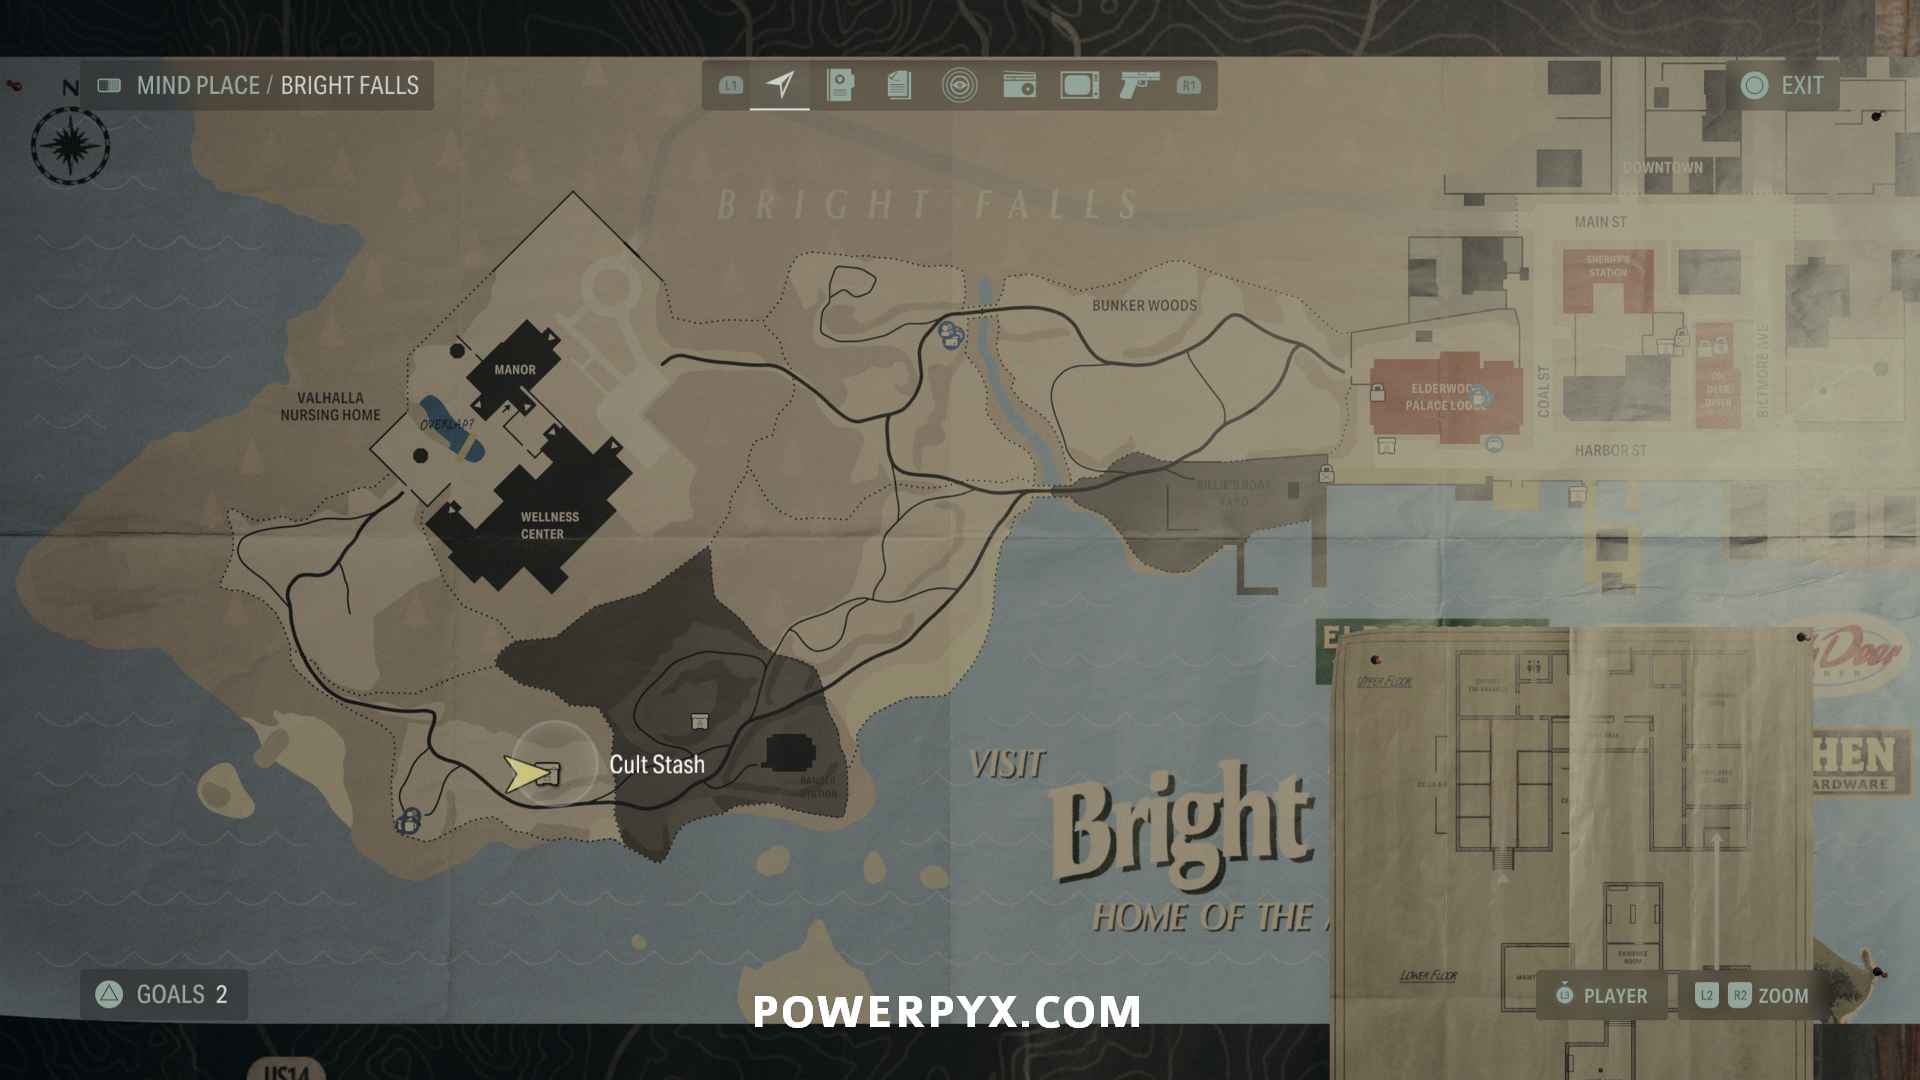
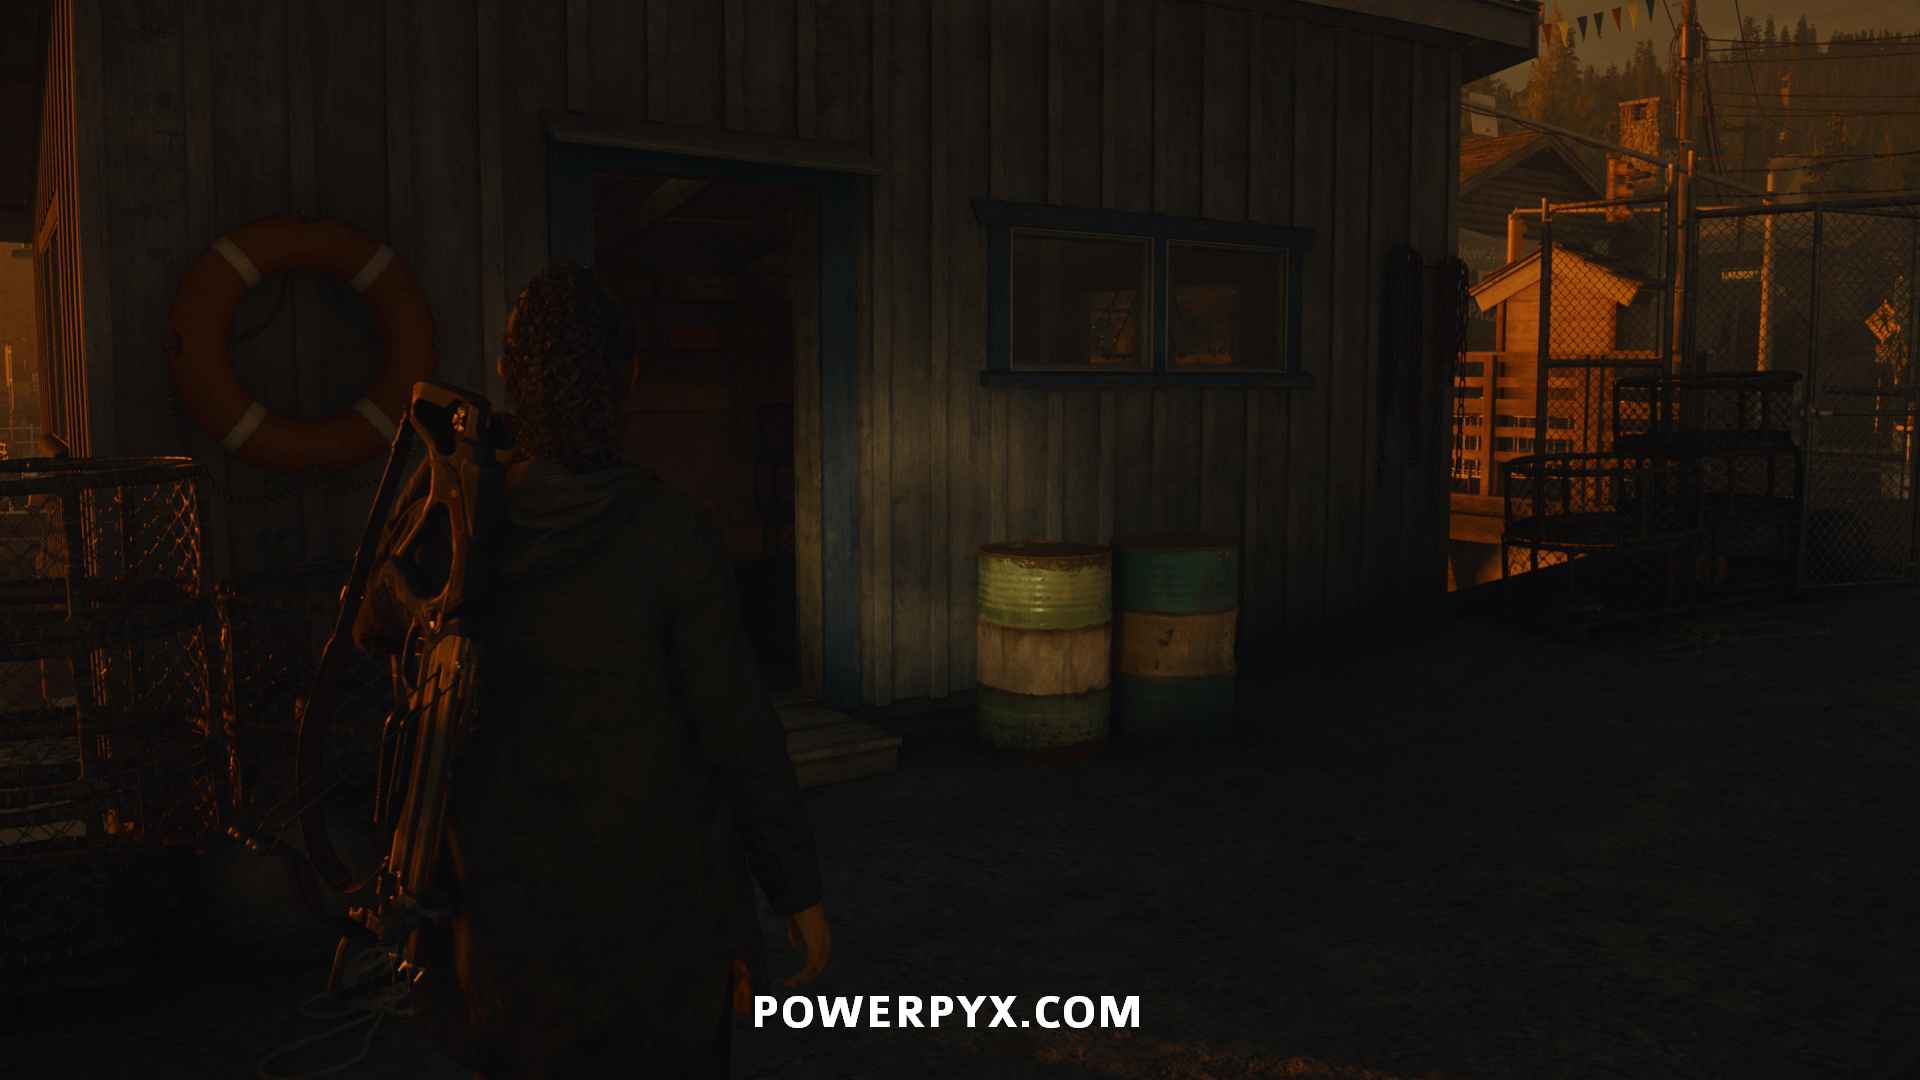
Cult Stash 18 + Inventory Upgrade 3
Go to the wharf south of the Sheriff Station and unlock the gate with the Boltcutters. Go into the shed to find the stash, the code is 697. Contains an Inventory Upgrade.


Cult Stash 19
Inside the locked fence next to the diner and behind the station, accessed with the Boltcutters. The code can be found by looking at the symbols in the park. One is on the radar dish, one is on the floor by the benches, one is in the gazebo (enter the symbols in that same order).


Now head to Watery to collect the remaining collectibles here.
Cult Stash 20
Unlock the gate next to Kalevala Knights Workshop to find this in the back, the code is 542.


Nursery Rhyme Puzzle 15
Inside the trailer park trailer that has a Boltcutter lock on it, place the Wise Elder Doll on the Eye and the Deer Doll on the Heart. Pick them up afterwards.


Charm 16 – Deerfest Charm
Sitting on a low cabinet by the exit of the trailer.

Now head to Cauldron Lake to collect the remaining collectibles here.
Lunch Box 21 – 9 Manuscript Fragments
Use the Boltcutters to access the Rental Cabins to the north. This lunch box is inside Cabin 2, you must go through Cabin 3 to reach it.


Nursery Rhyme Puzzle 16
Inside Cabin 4. To reach it crouch under the fallen tree behind Cabin 3, go through Cabin 5 and turn left. Place the Monster Doll on the Hatchling, the Crow Doll on the Eye and the Hero Doll on the Jewelry. Pick them up afterwards.


Charm 17 – Coffee Mug Charm
Head across to Cabin 6 to find this next to the TV. A big enemy will spawn inside so be ready to shoot (the door is locked until you solve the Nursery Rhyme Puzzle).


Nursery Rhyme Doll 13 – Father Doll
In an FBC crate next to the Charm. This crate will only appear after completing all 16 Nursery Rhyme Puzzles up until this point (if you missed one you must do it first and return afterward). When opening the case, you might not be able to pick up the doll right away (the /  prompt won’t work). You must close the briefcase to get a clue, go to Mind Place, interact with Case Board, select “Nursery Rhymes” Case (press
  /
/  to switch Case Files), put up the new clue called “Witchfinder’s Station”. Then try to pick up the doll. If it still doesn’t work, be sure to put up more clues on the clue board (especially the Nursery Rhymes board), quit out after putting up a few clues and try interacting with the doll again, rinse and repeat until it lets you pick it up (the interaction prompt appears to be somewhat buggy here). This doll is needed to complete the final Nursery Rhyme at Witchfinder’s Station. You will also unlock I’ll Find You for finding all Dolls if you followed the guide so far (if not, check your inventory which doll you are missing).


Cult Stash 21 (Lake Cabins Stash Key)
Head north to find some trees with numbers painted on them. Go behind the tree with the number 2 to find a Lake Cabins Stash Key on the ground. Now take this back to Cabin 1 (southernmost cabin) to unlock the stash inside.


Nursery Rhyme Puzzle 17
Head to Witchfinder’s Station, where you’ll have a rhyme puzzle being told to you over a radio instead of written down. There will be drawings to place your dolls around the house on both floors. Place the Father Doll on the Eye (downstairs), the Hero Doll on the Sun (downstairs), the Mother Doll on the Heart (downstairs), the Child Doll on the Hatchling (upstairs) and the Trickster Doll on the Wave (upstairs).

Extra Charm Slot
After talking to the man on the radio, pick up the charm box from the table for an extra slot.

Return 6: Scratch
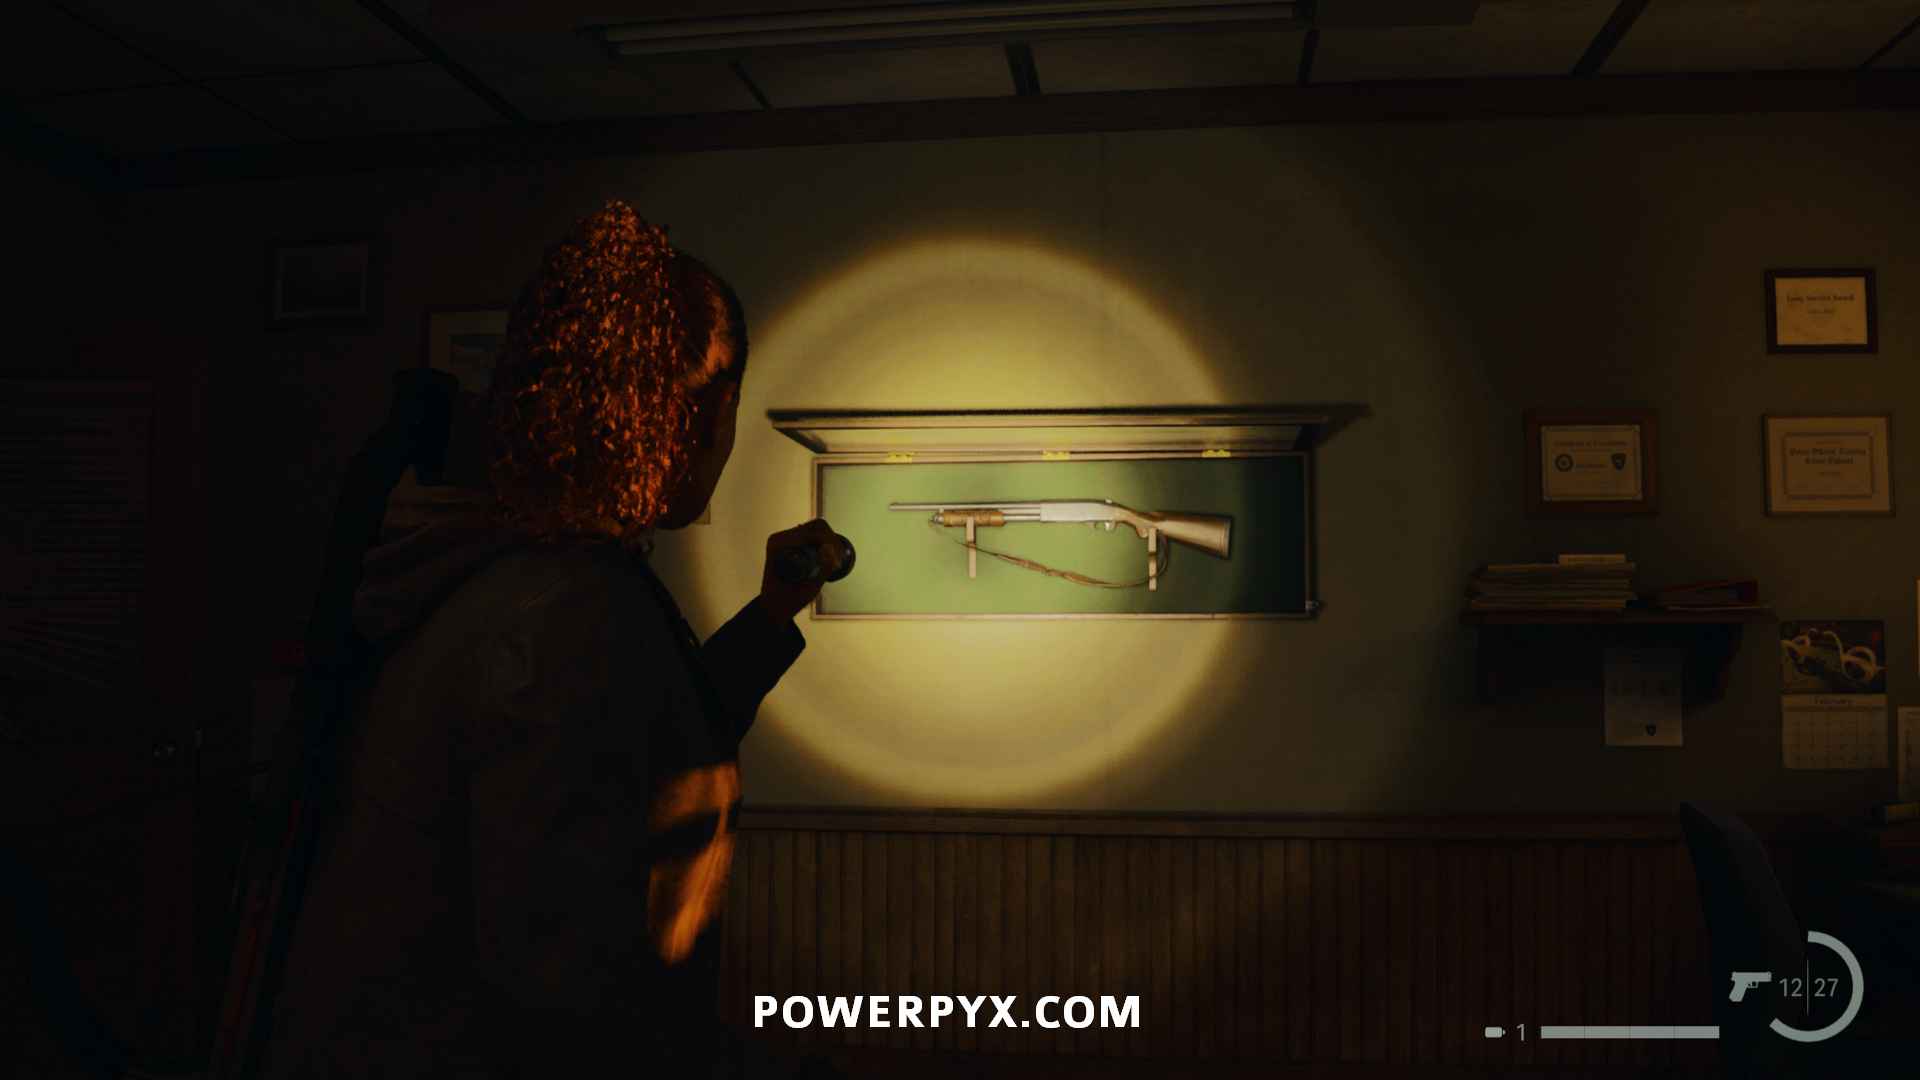
Weapon: Pump-Action Shotgun
Inside Sheriff Tim Breaker’s Office, in a display case. The code is 723. In order to access the room you will first need to kill the Taken and get the Sheriff Station Keys from the FBC Agent in the closet.
Cult Stash 22 + Lighthouse Key
In the Evidence Room in the Basement of the Sheriff Station, the code is 146. If this is your last Cult Stash, you will find a Lighthouse Key for the Lighthouse in Watery. If you go there, you will find some supplies and a couple manuscript pages.


How to advance story: Talk to your FBI friend in the basement, he will give you the fuse. Insert the fuse in Fuse Box in the same room as the FBI Agent (Autopsy Room). Leave the Morgue, defeat the enemies on the way out and burn the orbs with your flashlight. Talk to Alan in the prison cells upstairs. Then defeat the Scratch boss by turning on the 3 generators outside, you can stun him by having him walk into a light and then shoot him until he gets stunned, then you can activate the next generator. After all 3 generators are activated the fight will end. Then talk to the other people back in the Sheriff Station. After this you can free-roam again and Mayor Setter (dog) spawns in Watery.
Trophy: The Nice Things In Life + Charm 18 – Mayor Setter Charm
Once you’re done at the Sheriff Station and have the option to talk to your two colleagues, leave instead and head to Watery. Enter Suomi Hall and Mayor Setter will be sitting on the stage. This will give you the trophy as well as the final charm needed.

How to advance story: Return to Sheriff’s Station, inspect the clues in the prison cell, put them on the Case Board and do the Profiling to solve objective ‘Come up with a new Plan’. Then talk to the woman in Sheriff’s Station again. Put the clue you get from her on the case board and do the profiling of Tor. Then put the up clue from Tor profiling on Case Board. Now talk to your friends in Sheriff’s Station again.
You will now be prompted with a Point of No Return for Saga. You will be forced to save before you can continue and are free to explore before you go further, so make sure you’ve done everything with Saga before passing this point!
If you’d like to complete all Deer Heads & Setter for Mayor Signs, they can be cleaned up before the Point of No Return. We put them into an extra guide as they are redundant for trophies & achievements but if you just want them just for fun you can grab them now (not needed for Platinum / 1000 Gamerscore): Deer Head Locations + Setter for Mayor Locations. For trophies you can skip these and advance to the next chapter to save time.
Return 7: Summoning
No collectibles in this chapter. Advance the story until you finish the Summoning Ritual as Saga, then it automatically switches you back to playing Alan’s story.
Initiation 4: We Sing
Weapon: Flare Gun
Directly on your path as you progress through the chapter. This is unmissable as you pick it up to progress.

[MISSABLE] Writer’s Journey Video 4 – The Dark Presence
North of the payphone, walk up to the TVs at Vision TV Shop to trigger it, same location as the second video in Initiation 2. This will be available from now until the end of Initiation 5: Room 665 when you go to enter Parliament Tower, but after that it won’t appear in future chapters!


Initiation 5: Room 665
This chapter begins after the cutscene in the alley.
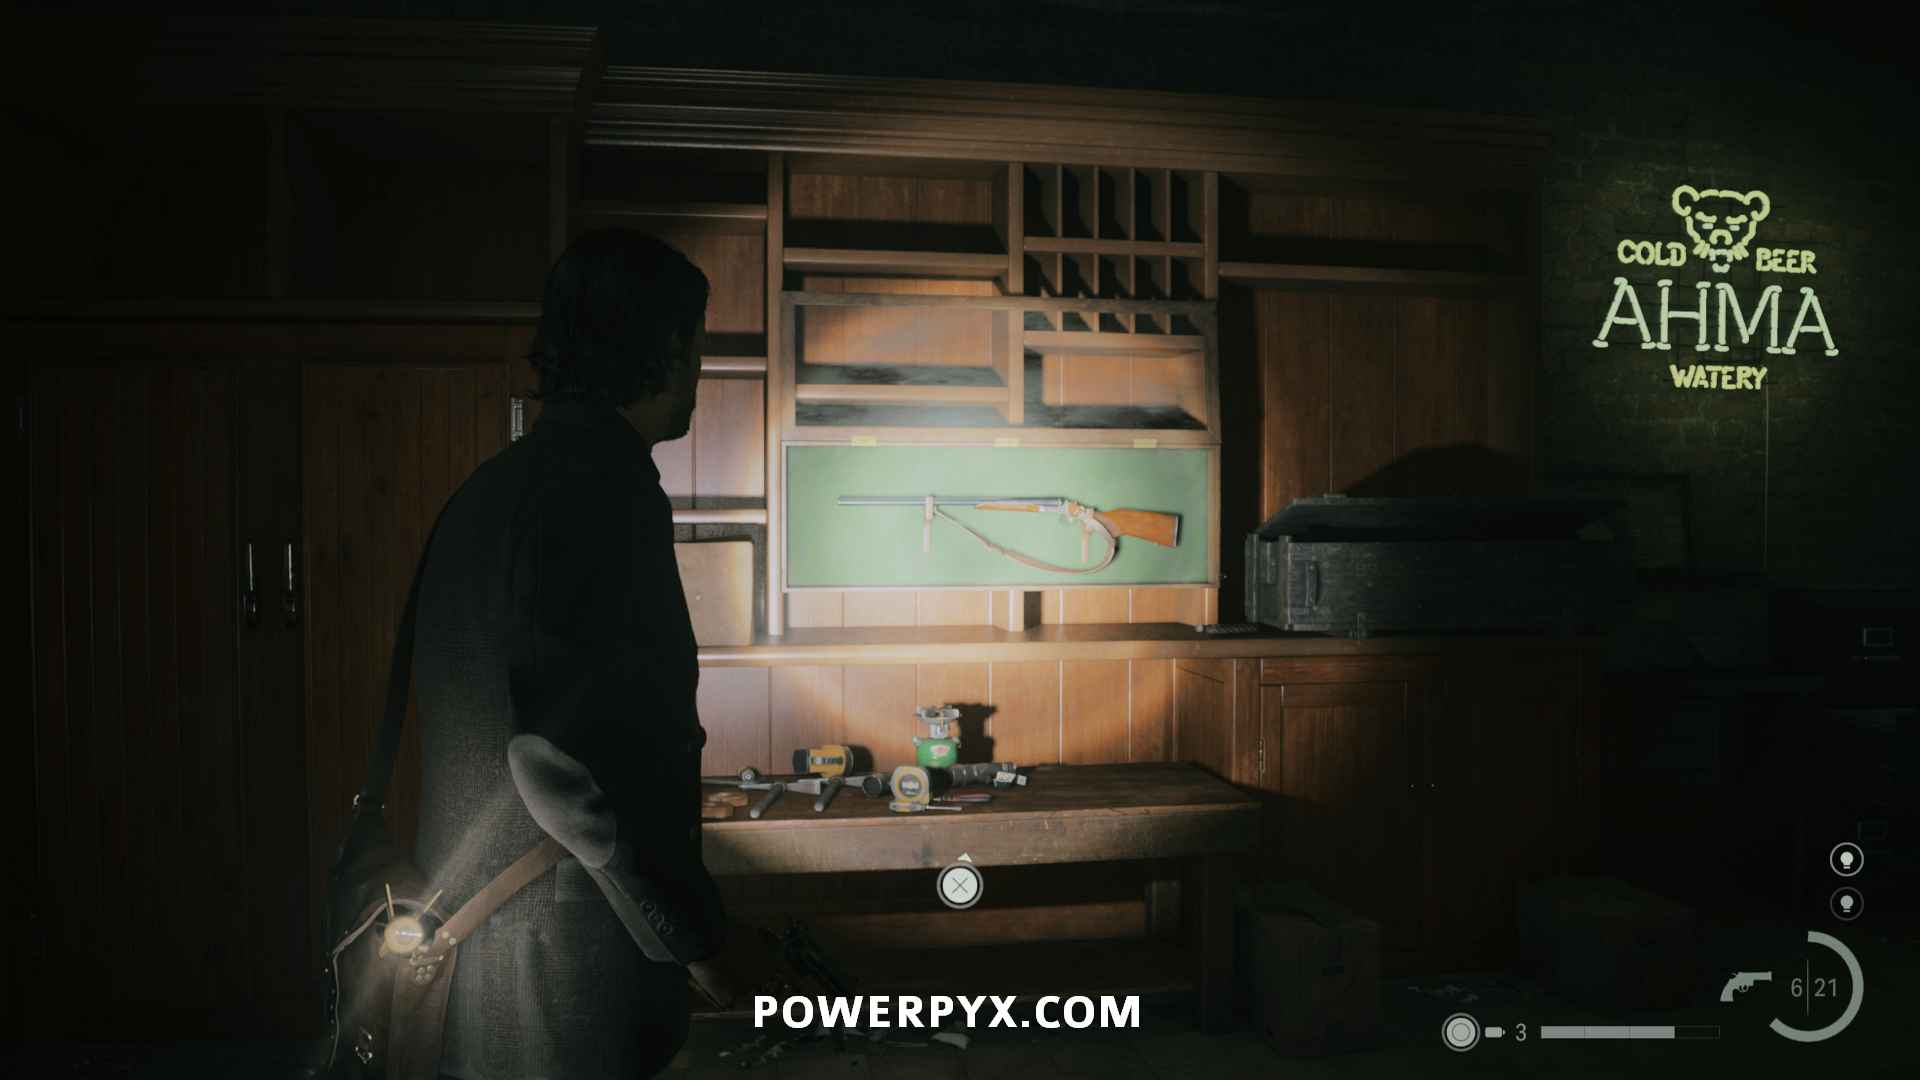
Weapon: Double-Barrelled Shotgun
Advance on the mandatory story path across the roofs until you reach the “Oceanview Hotel” rooftop Entrance with a locked door that requires entering a 4-digit code to open. Instead, go to the rooftop bar opposite the code-locked door, where the big neon sign “Mirror Peak” is. Use light shift to get inside the bar, then light shift again to make the Shotgun appear in the bar. If you found all weapons it will unlock All Accounted For, for having found all weapons in the game.
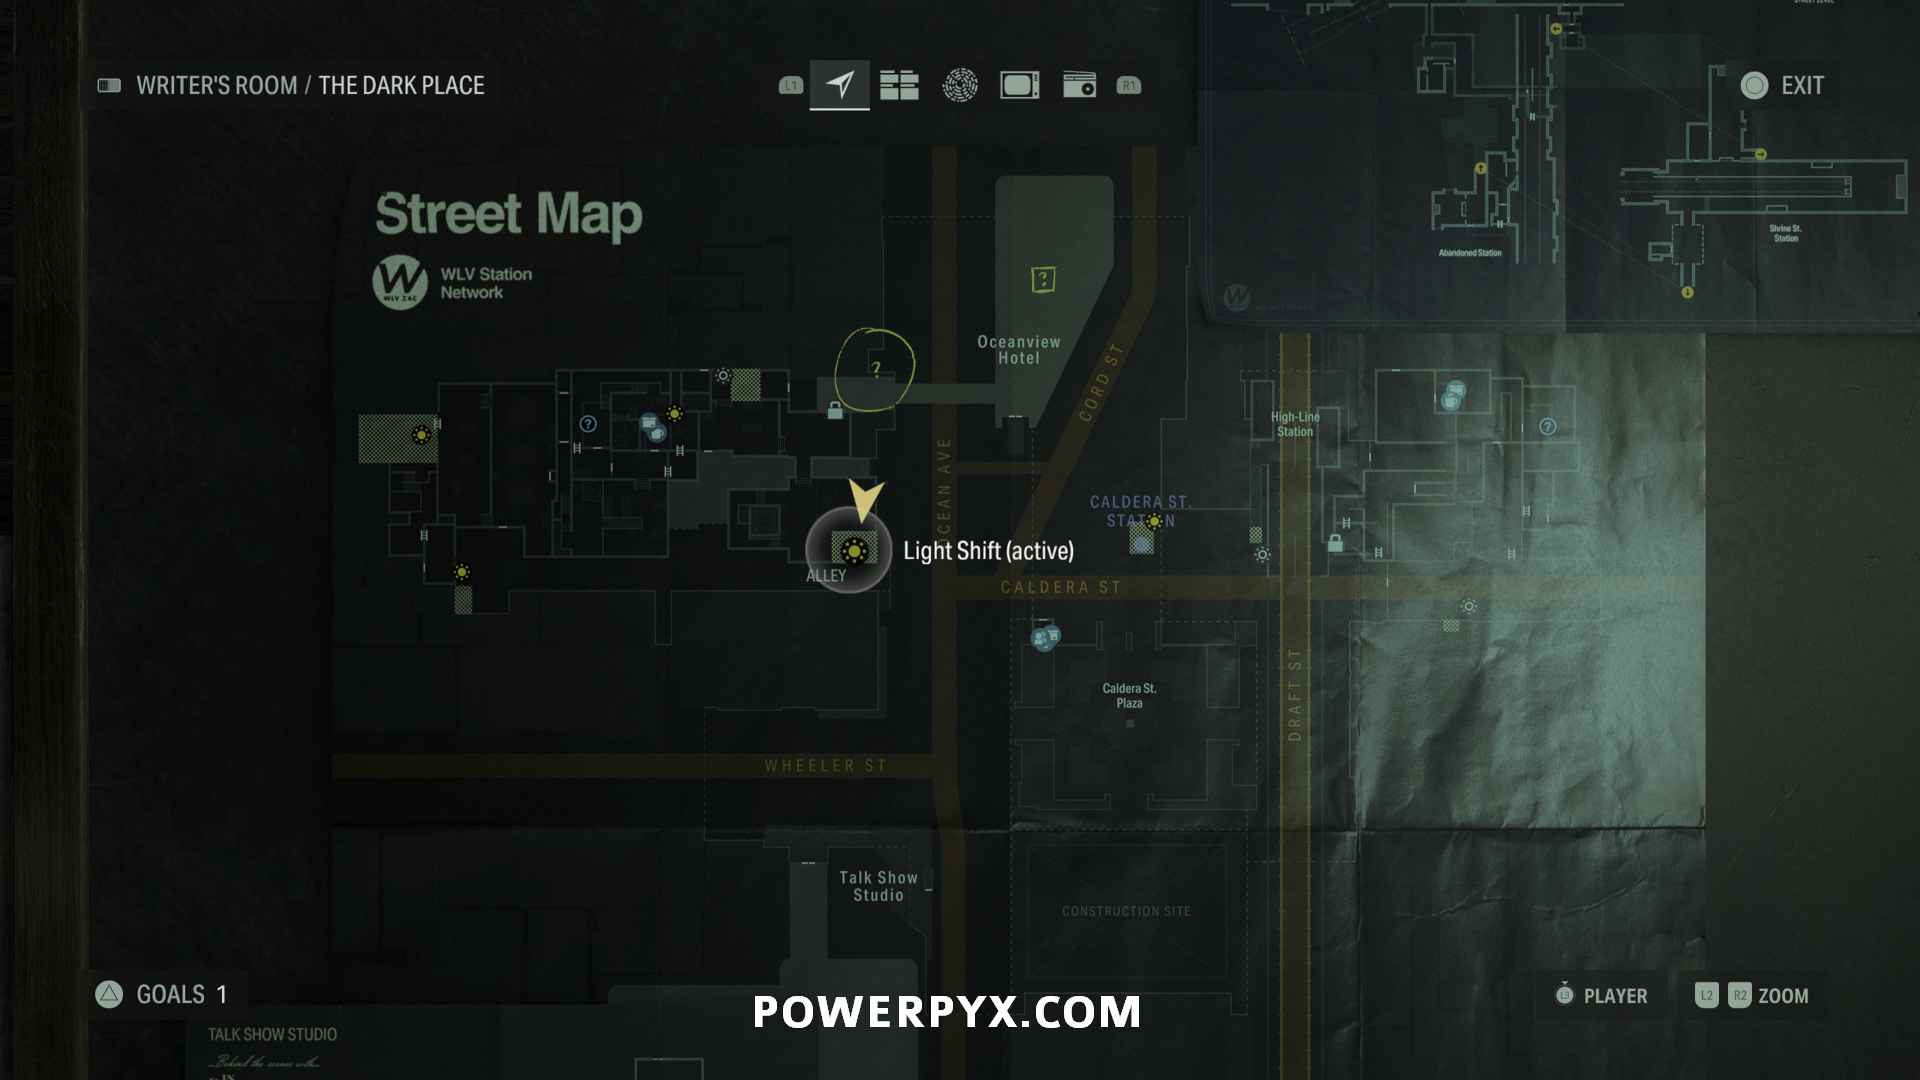

The code to the Oceanview Hotel door is 2550 (this is the locked door on the roof opposite the Double-Barrelled Shotgun).
Map – Oceanview Hotel
After going down the elevator, go behind the reception desk to find this map.


[MISSABLE] Writer’s Journey Video 5 – Visions
Inside Room 101, which is locked. The key for it is found in the Ballroom break room on 2nd floor. This is only available until you end the chapter by entering Parliament Tower, so make sure to get it before you leave the hotel!


How to advance Story: You must change the plot in the ballroom. Then look at the whiteboard on the left for a clue that the rehearsal moved from Room 219 to Room 202. The door to Room 202 is locked. You must enter Room 219, use light switch so the room turns red, while still in Room 219 go through the door next to the light switch to reach Room 202 (it basically teleports you to Room 202 when going through the door inside Room 219). Use the Plot Board to switch back and forth between plots in Room 202 while standing at different points until the room changes (it’s a bit inconsistent, just stand in different places and repeat until the room completely changes to a version with green ceiling lights). Once this happens there will be two echos in Room 202 that you must line up to unlock a new plots ‘Haunted’. Go back to Ballroom and activate the Haunted plot there, look at the typewriter on the stage. Stand behind the typewriter and look through the echos to get a new plot ‘The Devil’. Change Ballroom to the Devil plot. Follow the blood trail back to the 1st floor (by going through the break room in Room 225). Go to the location of “Final Scene” in the hallway north of Room 111. Activate ‘The Devil’ plot there. Proceed to Entrance Hall and activate ‘The Devil’ plot there too. Look through the echos from behind the reception desk. Go up the bloody staircase north of the Entrance Hall on 1st floor. Enter room 666 on the top floor, look through the echos inside. Then run away from the darkness, go to end of left corridor until it collapses, turn around, go through green-lit corridor in middle, then go forward in right corridor all the way to the end where the lit area is. Then change the ‘Final Scene’ location to ‘Climax’ plot. Now you can enter Room 108. Interact with the bathtub to finish the chapter.
Initiation 6: Return
There are no collectibles in this chapter.
Initiation 7: Masks
[HIGHLY MISSABLE] Writer’s Journey Video 6 – Drowning
After reaching the Janitor’s Room, where the Janitor awaits you, go through the door behind him, down to the basement. At the end of the stairs turn right, enter the door at the end of the right path, hold / to use the Light Shift. Step outside this room and turn to your immediate right, where there was a brick wall before you can now go downstairs. Go to the Workshop in the basement and use Light Shift there to make a Shoebox appear. You HAVE TO interact with the shoebox and pick up Alice’s Photographs from it. This is necessary to trigger the Video at the end of the chapter. Now go back up one floor and proceed to the TV at the end of the level, in the north-west room on the map. Interact with the TV, it will show the black screen “End of Part”. After this screen it will show the new Video “Drowning” in the bottom left of the screen. DO NOT INTERACT WITH THE TV UNTIL YOU COLLECTED ALICE’S PHOTOGRAPHS FROM THE SHOEBOX! If you didn’t collect Alice’s Photographs from the Shoebox you won’t get the video and it will have been missed. You can reload one of the previous Autosaves if you missed it. Check the TV in Alan’s Writer’s Room to confirm it counted correctly.


Initiation 8: Zane’s Film
Map – Poet’s Cinema
After leaving the hotel you must go through the Car Wash in the south-east of the map to reach Poet’s Cinema. Interact with the front counter and use the Movie Ticket to open the front door. After entering Poet’s Cinema, this will be in the Staff Only Room behind the Concession Stand.


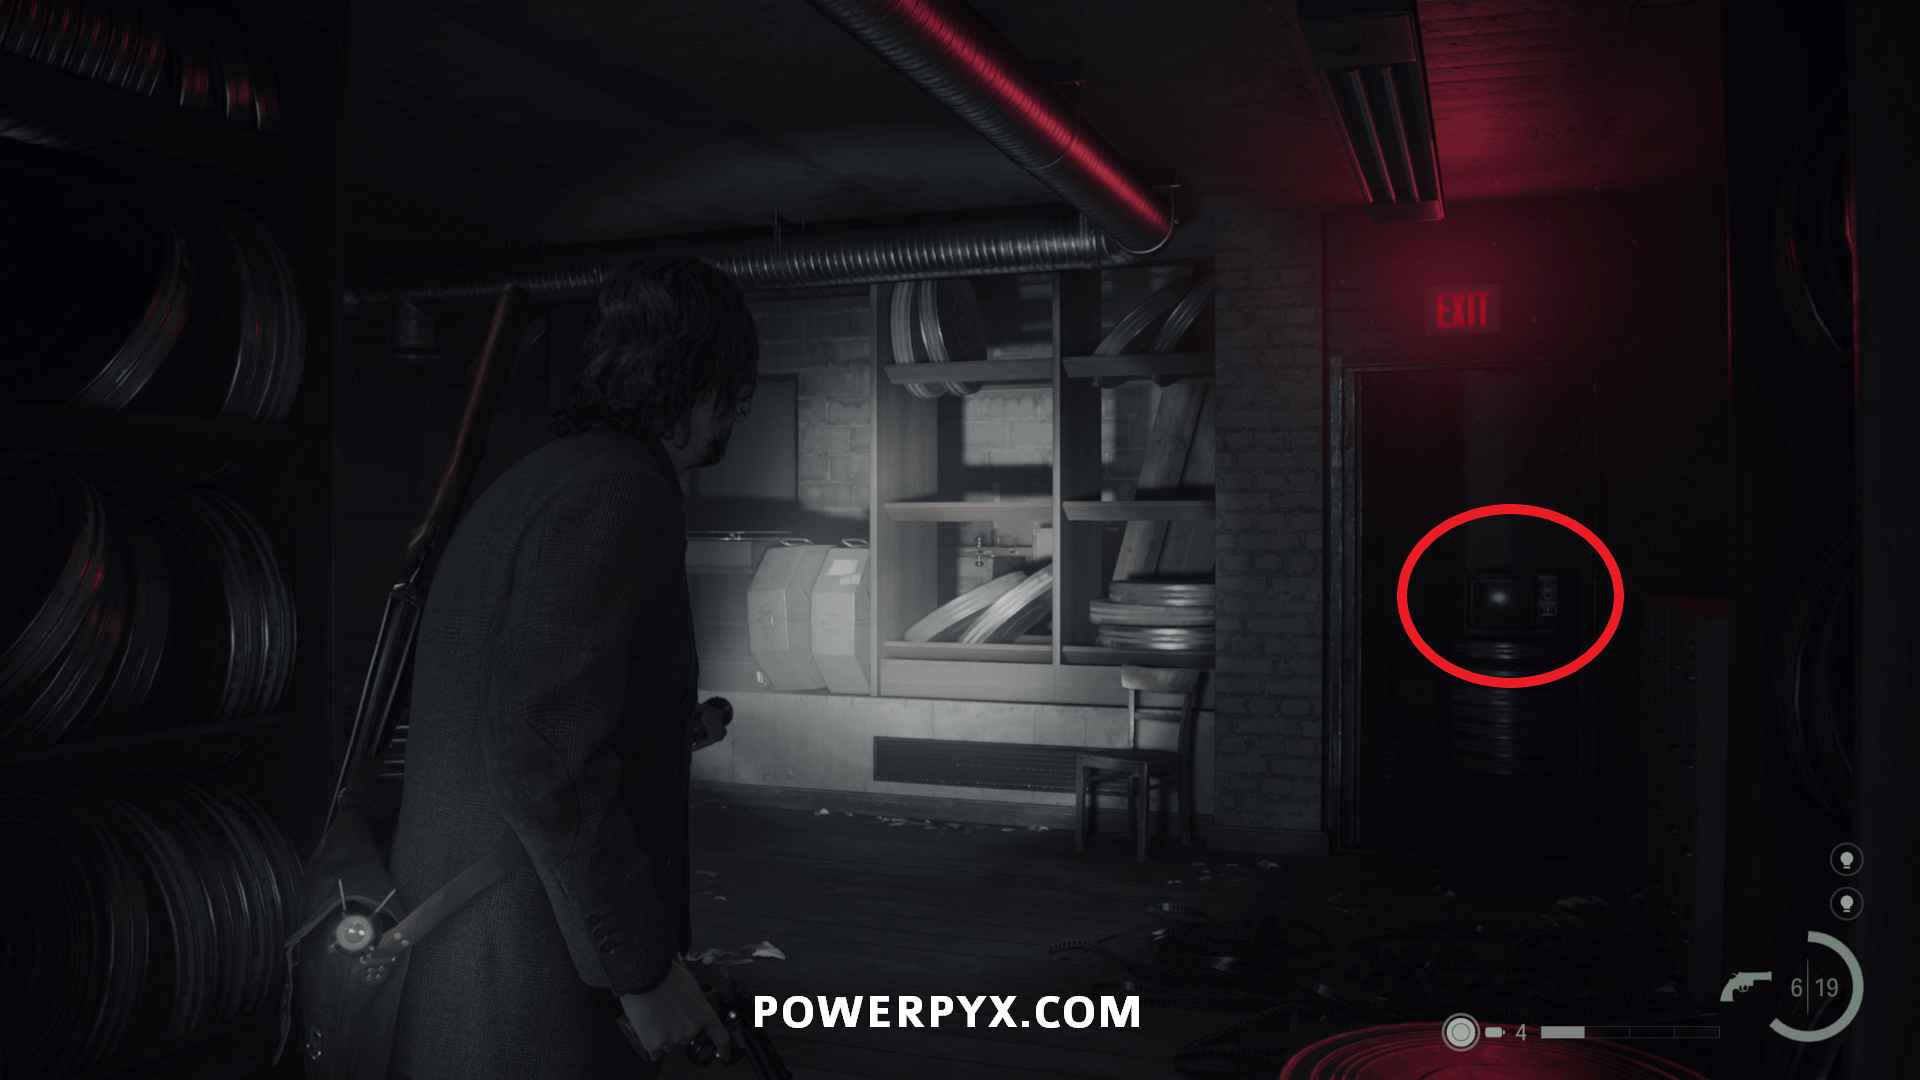
Writer’s Journey Video 7 – Stop Writing
In the break room to the right of the Concession Stand.

How to advance Story: in the lobby you must line up the two echos by looking at them from upstairs, this unlocks a new plot. Enter the Staff Only area behind the Concession Stand, then change the plot and enter the backroom, line up the echo there and let the dialogue play out to unlock a new plot. Change to ‘New York’s Finest’ plot to clear the path from Lobby to Theater Hall. Line up the echoes from the stage. Switch to ‘Cult of the Word’ plot, go upstairs, use Light Shift and line up the echo, listen to the dialogue. This unlocks a new plot. Switch plot to ‘Clip of the Lost Film’. Use Light Shift on the big theater screen, then go out the exit on the left side of the theater to reach the backlot. Switch plots in backlot to ‘Cult of the Word’ and then to ‘New York’s Finest’, Light Shift the police car and line up the echo next to the police car. After listening to the echo, Light Shift the police car back and forth to open the path in front of it, you must go through the door in front of the police car during a Light Shift to get upstairs and climb the ladder to the roof. Reach the very end of the roof, where a break room is you can climb down a ladder to see down into the backlot, change plots from there to ‘Cult of the Word’, line up the echo to unlock the ‘Grandmaster’ plot. Walk back to the Backlot (plot must be ‘New York’s Finest’ to open the path). In the Backlot change plot to ‘Grandmaster’ to open the door upstairs. Return to Theater Hall and switch plot to ‘Grandmaster’ to cast a door on the screen, you must go on the stage and interact with the door on the screen to go through it. In the section that follows will be the next collectible.
[MISSABLE] Writer’s Journey Video 8 – Initiation
After using the ‘Grandmaster’ plot in Theater Hall you must go through the blue door that spawns on the movie screen. This leads to a hidden area behind the movie screen. You will have to run in loops around the area (the area repeats itself), during the third loop of the area this will be behind a door you have to open to progress. Make sure to walk in and trigger it, as simply opening the door is enough to continue progressing but won’t trigger the video. Make sure to trigger it before leaving this room!

How to advance story: Continue until you reach a guy bound to a chair. Pick up the knife behind him, then he will run off, keep following the path until you come out in the Projection Room above the Theater, interact with the green-lit hanging body with a moose skull on it (inside Projection Room). This triggers a cutscene. Leave Poet’s Cinema (change Lobby back to ‘Clip of the Lost Film’ to open front door). Go through the Car Wash and to Parliament Tower. The front door is locked, interact with it then answer the payphone. Then put Alice’s Photographs in the shoebox in the plaza, straight in front of Parliament Tower entrance. Now the door is open and you can go inside.
Unlike with Saga, you will not get a prompt for the Point of No Return. Once you go back to Parliament Tower to place the photos in the shoebox, you will immediately be kicked out as Alan. Make sure you’ve gotten everything with Alan before doing this! It’s good to keep a Manual Save from this point.
If you’d like to complete all Words of Power, they can be cleaned up before the Point of No Return. We put them into an extra guide as they are redundant for trophies & achievements but if you just want them just for fun you can grab them now (not needed for Platinum / 1000 Gamerscore): Words of Power Locations. For trophies you can skip these and advance to the next chapter to save time.
Initiation 9: Gone
Trophy: Filled With Rage (Defeat Scratch Boss)
After the fight with the horde of Taken, you’ll need to get Scratch into the containment cage. Shoot him until your colleagues stun him with the light, then rotate the two light beams to face the containment cage. Do this until both light beams are rotated, then walk inside the cage to finish the fight.
Return 8: Deerfest
[Semi-Missable] Koskela Brother Commercial 6 – “Return” Review
Once you’re back in Bright Falls, enter the Oh Deer Diner to trigger this final commercial. If you interact with the bookstand at the end of the road before going into the diner this is technically missable (but if missed can replay from the mandatory manual save the game forces you to make at the point of no return).
Return 9: Come Home
There are no collectibles in this chapter.
That’s all of the Chapters & Collectibles! If you missed a collectible trophy, here are Collectible Guides by type to easily find what you still need:
- Weapons
- Cult Stashes
- Lunch Boxes
- Nursery Rhyme Puzzles
- Nursery Rhyme Dolls
- Charms
- Koskela Brother Commercials
- Writer’s Journey Videos
- Words of Power
- Deer Heads
- Setter for Mayor
For DLC Collectibles refer to Alan Wake 2 The Lake House DLC Collectible Guide.
Ruancarlo says
Hey, where did you found the Father doll? Is the location pointed here correct? It isn’t spawning to me. I already completed 16 of the 17 puzzles and have 12/13 dolls.
Archavia says
For me my second-to-last puzzle was the one on the Bright Falls Dockyard, and when I went to grab the charm, the FBC crate was sitting next to it and contained the Father Doll.
CptObvious says
I think it would be nice to have the Setter for Mayor, Words of Power, and Deer Heads collectibles in this guide, even if they aren’t needed for achievements/trophies. I feel most people coming to this guide are going to want to find all types of collectibles, not just all achievement/trophy collectibles, and it’s much easier to get them in order if you aren’t jumping back and forth across multiple guides. The people that do just want achievements/trophies could easily skip over the unnecessary collectibles when going through the guide.
PowerPyx says
They are already in the guide – see Return 6: Scratch & Initiation 8: Zane’s Film.
CptObvious says
All that’s there are links to separate guides for those collectibles, which as I said is a lot less convenient than just having them listed in this guide as you come across them, so you can get them the first time you come across them. There’s also other “collectibles” that aren’t mentioned at all, those being manuscript pages, case board evidence, radio shows, and echoes.
Ariost says
I too would of liked them in the main guide. I missed a bunch of words of power in the subway and as far as I can tell you can’t go back since the darkness collapsed the tunnel so there missable.
Ventus says
I agree 100% it is the only thing holding this guide back from being perfect
RagnarsDisciple says
Yeah this is a big oversight. Usually PowerPyx has everything listed and then specifies if it’s optional for the trophy. I don’t know why this guide is different.
Jerry says
I leave the studio before picking up the photo(you dont need to pick it up in order to end the chapter)…and now I head back to the studio to pick up the photo and the writer’s journey video 6 is not available anymore…
Archavia says
So you’re able to leave and pick up the photos afterwards, allowing you to continue the story but not get the video when you leave the building a second time? I suspect something must’ve changed with one of the patches as when I did it I too finished the chapter before grabbing the photos, but after going to grab them and leaving the video still played. Will double check it and confirm it as missable if so.
Irwynn says
Charm 13 seems fixed, found on the bed (2nd floor).
Irwynn says
and yes, it’s another coffee mug
Archavia says
Thanks this is updated now
Keanu says
For Charm 13 you have to open the front door and follow the footsteps to the upstairs bed… it is indeed a coffee mug charm! :D
Noxq says
Where is this Writer’s Journey Video 6 – Drowning
You say its not missible but i dobt have this
Christina says
Same for me. I think it is because you have to pick up the photos. Meaning press A or X on it more than one time. I had observed it, Alan did his dialogue, but I did not pick them up I realized later on. So you are right, it is missable. They should put that in red to make sure they are picked up. At least, that was my issue I think.
Sushidrew says
Initiation 7: Masks, the video never showed up, and I left the studio from the basement. There were no photographs in the shoebox. This is missable as I was able to finish the chapter without getting the video. I’m still trying to figure out how to get it but I can’t seem to figure it out.
Dan says
You are Missing a manuscript page. You find it in the path leading from the beach back up to Witch’s Ladle. It would be between Cult Stash 2 and 3.
Art says
Initiation 7: Masks
Writer’s Journey Video 6 – Drowning
I was able to take those photo from shoebox only in next chapter: Initiation 8: Zane’s Film
BUT the video never show up when you leaving the studio…. wtf(
Art says
Well… I reloaded my save file from chapter Initiation 7: Masks
And this time I was able to took those photos, and video showed up.
This video turn out missible (HIGHLY MISSIBLE)
If you didn’t take the photos in chapter 7 then at the end of chapter 8 you will receive this call that will lead you to those photos, but this way there is no video.
GD666 says
Same issue as a few others above, no Writer’s Journey Video 6 popped so potentially missable which is really really annoying.
Christina says
I am not sure if the Writer’s Journey 6: Drowning is unmissable. I retrieved Alice’s photos, had the video play, but it was never added to my Writer’s Journey. I even went back to do the same steps and nothing.
Christina says
I think the issue was I observed the photos and never picked them up, the video played, I finished the chapter, moved on did some stuff on Saga, etc., then was up to the part that you place the photos in the photo box. The quest steps were telling me to place them but I realized they were not in my inventory so I did not want to chance placing them in case it bugged. So I went back to where you are supposed to get them, got them, no video played. So this actually does make this missable IF you do not pick the photos up. That should probably be a disclaimer here so no one has to go through what I did. I completed the game and am only missing that video. I also followed this guide completely, and did not get the weapons achievement for getting them all. I guess that was not fixed yet either. Other than that, I have all other achievements. Great guides though – I always follow your stuff for achievements.
TheMo3x2042 says
I Comleting Nursery Rhyme Puzzle 16 of The 17 puzzle!
but last Farher Doll Box Not Spawn For Me… it’s bug?
I reload the game, drive car Different Area, And Quit Game…still Don’t Spawn…
I’m olny have doll 12 of the 13.
Resonance says
I’m playing AW2 on the PS5 and it says that I only have 13/14 charms for the Rustic Charm achievement. However, I have all 14 unique charms along with 5 more coffee mug charms for a total of 19. Yet the achievement’s not popping.
Is anyone else having this issue?
marvth3martian says
Do you have the Mayor Setter Charm? I was at 13/14 charms and thought I was done after solving all of the nursery rhyme puzzles but you earn this charm later on without doing a puzzle. It’s Trophy: The Nice Things In Life + Charm 18 on the guide.
Light says
Anyone manage to find all the echoes in initiation 2/draft 1? I’m stuck at 9/10 and have no idea where the last one could be
Jason J says
Is the Subway available to go back for Words of Power after Initiation 2 – Casey has been finished? I know they’re not all needed for trophies, but I missed a couple. Right now the entrance has changed so I can no longer enter. Does this change later in the story or have I missed them?
Zed says
You can’t go back once the tunnel has collapsed after Initiation 2: Casey. Wait for new game plus & nightmare mode I would say
rrunge says
Im confused. following this guide to a T and when I get done with Chapter 5: old Gods , the guide says to switch to Alan wake and start doing his chapters but the guide seems to be unorganized at that point and it the collection guide continues to cover Sagas chapters.. Please tell me what order I need to do these chapters.
Martin says
I am partly confused. I followed that guide strictly, but after return 5 I switched to Alan as recommended and found myself in initiation 4, while guide continued with return 6.
Now I played until into the hotel and more or less missed everything on the way ????
Lazgur says
Thanks for this guide
AJ P says
Interesting thing about Charm 12 for me (the one in Bunker Woods), the icon before i go to pick it up shows the lantern, but when i do pick it up it becomes a coffee map in my inventory!
littlejay says
I already had the lantern. I guess you can’t have more than one.
redrum says
Did you get the charm trophy just fine? Because I just had the same thing happening, googled it and there seemed to be an issue with this charm and the deluxe edition because it already came with the lantern charm.
Ed says
I noticed most dolls are randomly placed in their spawning points
Hafiedza says
I Found a way for the Fathers Doll Bug, judt move the selection cursor around the Doll, while clicking X button many times. I got the last doll doing that.
Kirby says
Omg Thank you!
Xenor says
Worth nothing that Father Doll actually spawns at the last nursery rhyme location you do (or last charm you get, to be specific), doesn’t have to be the one in the guide.
I’ve missed it cause wolves attacked me and then spent waaay too much time trying to un-bug this, whole case was somewhere else entirely.
Jamie says
Lunchbox achievement is bugged for me on Xbox. I have all 21 and the case is closed in the mind place but no achievement. Tried reloading, restarting the Xbox and using a previous save and nothing.
Jordan says
I dont have the movie ticket to enter the theatre, im not sure iv missed something or its bugged
Ben L0nd0n says
I had the same issue as I went straight from the TV studio to the theatre. Then I noticed that the objective wants you to speak to Zane at the hotel in room 665 (go up elevator).
If this is used as a walkthrough might be worth including that at the start of the map collectible rather than just writing “after leaving the hotel” ;)
David says
Hey, for Nursery Rhyme Puzzle 9 & Nursery Rhyme Doll 11+12 you don’t tell how to get the Ranger Cabin key? its not mentioned anywhere else before and now I am stuck outside of it. I don’t have the key to the ranger cabin.
Fooga says
Just wanted to add that Writer’s Journey Video 6 – Drowning IS MISSABLE. You can actually leave this area without getting Alice’s photos (which I did accidentally). Basically don’t go to the Exit/TV Room before you get the photos, or the Drowning video will not trigger when you start the next part. Thankfully I was able to reload.
Mike M says
Words of Power in 665. Its in the ballroom on ceiling of the bar. It can be used to upgrade Alans Inventory space.
LebonOldBoy says
guys have fixed the video drowning bug.
I loaded any save and it automatically unlocked the platinum trophy
TidusTheGame says
Koskela Brother Commercial 2 – Coffee World
Is MISSABLE. I’m at the end of the game with 5/6 commercials and somehow I didn’t get this. I saved at the point of no return and can go back but it also doesn’t trigger
PowerPyx says
This is just bugged in the current patch (it’s unobtainable even on first visit), the devs are aware and should be patched soon (worked fine on older patches).
Lord Maim says
Hey guys, great guide. Just wanted to add the Inventory Upgrade 4 is in the Lighthouse in Watery, to max out Saga’s inventory Space
Lenny Summers says
Will Powerpyx make an “Alan Wake 2 New Game+ All Collectible Locations” guide?
PowerPyx says
Did they add new NG+ exclusive collectibles?
TidusTheGame says
GREAT NEWS!
NEW GAME + PATCH ACTUALLY CARRIES YOUR VIDEO PROGRESS FOR:
Koskela Brother Commercial 2 – Coffee World
When looking at your actual video list it’ll only show what you’ve found on your current NG+ playthrough but the second the Coffee World video finished the trophy popped as 2/6 videos.
allan says
would have been amazing if u had wrote word of power into the collectible guide
Faray says
Thank you for this amazing guide, I got the platinum so easily. Great Effort!
Anton says
Mayor (Dog) spawns even at the end of Chapter 5
Anton says
You haven’t mentioned Inventory Upgrade 4 at the Watery Lighthouse (end of chapter 6)
NateTruth says
Just finished this game with Plat – with only cursory glance at this guide for “missable” items. (Invaluable help – ta)
Serling effort as always PowerPyx team – I doff my cap ????????????
What an awesome game BTW!!!
Remedy ????