
Curios are accessories in Black Myth: Wukong. They are pieces of equipment that grant passive buffs. Finding all Curios locations unlocks A Curious Collection trophy & achievement. There are 36 Curios in total (plus one extra from DLC).
You can fast travel between chapters at any time from Keeper’s Shrines. There’s still free-roam after the story. After the endboss you are put back in the Title Screen, here choose to Continue, it will spawn you before the final boss. You can still revisit all places from this point. Just don’t “Enter a New Cycle” in the Title Screen as this starts New Game+ and overwrites your save with no way back.
Chapter 1: Black Wind Mountain
Curio #1: Cat Eye Beads [MISSABLE]
Forest of Wolves > Front Hills: From the shrine take the path straight ahead and you’ll find the “Wandering Wight” boss, he drops this. Looks like a big stone-head boss wandering on the path. Missable: must defeat this boss before beating “Elder Jinchi” in the Chapter 1 Secret Area.
Curio #2: Agate Jar
Black Wind Cave > Cave Interior: In the arena where you fight the “Black Wind King” boss, it’s on the left in a small chest.
Curio #3: Back Scratcher
Can be bought from any of the shrines in Chapter 1 after finishing Chapter 2.
Curio #4: Boshan Censer (*requires backtracking after Chapter 2)
Forest of the Wolves > Outside the Forest: Dropped by boss “Red Loong” This requires the Loong Scales from Chapter 2. After you have the Scales, fast travel back to Chapter 1 via a shrine. From Outside the Forest Shrine, take the path to the left until you reach a waterfall in the corner of the area. With the Loong Scales in your inventory you will now be able to interact with the waterfall to enter the area with this hidden boss.
Chapter 2: Yellow Wind Ridge
Curio #5: Glazed Reliquary
Yellow Wind Formation > Windrest Hamlet: Behind “Tiger’s Acolyte” boss in the cave, in a small chest.
Curio #6: Goldflora Hairpin
Fright Cliff > Squall Hideout: After completing the Man-in-Stone questline, it can be purchased from his shop for 12,800 Will.
Curio #7: Tricadna Pendant
Fright Cliff > Rockrest Flat: Dropped by the boss “Black Loong“. This requires the Loong Scales from Chapter 2. After you got them, go to Rockrest Flat, from the shrine turn right and go up the path to reach a waterfall. With the Loong Scales in your inventory you can now interact with the waterfall to enter the area with this hidden boss.
Curio #8: Tiger Tally
Kingdom of Sahi: In the Chapter 2 Secret area, defeat the boss “Tiger Vanguard“. This is different from the identically named Tiger Vanguard found at Crouching Tiger Temple. See How to Reach Kingdom of Sahi (requires doing Drunken Boar questline).
Chapter 3: The New West
Curio #9: Mani Bead
Snowhill Path > Mirrormere: Randomly dropped by “Frozen Corpse” enemies, they can drop it throughout Chapter 3 wherever they appear. Must kill these enemies repeatedly until they drop it. For example, one is found to the right of Mirrormere shrine, about 20 meters/yards away, leaning against a tree. Can kill him and rest at shrine to respawn him and keep killing him until he drops it.

Curio #10: Auspicious Lantern [MISSABLE]
Pagoda Realm: you must kill all 9 “Lantern Wardens” in the Pagoda Realm prison. After the fight against the ice dragon “Kang-Jin Loong” you will wake up in a prison cell. Wait until your eyes start glowing red and the screen turns gray, this happens periodically while in this area. Then you can see this new enemy type wandering around the path in front of the prison cells, looks like a big skeleton with glowing lamps hanging off its spine instead of a head. They are found throughout the lower and upper levels of the prison. After killing the 9th one you get this Curio. IMPORTANT: this Curio is easily missable. You must kill all Lanterns BEFORE killing the area boss, “Captain Wise-Voice” or you’ll have to get this in NG+.

Curio #11: Fine China Tea Bowl
Pagoda Realm > Lower Pagoda: From this shrine go through the next corridors in the prison. At the very end of the path (lower level) you will find this in a small golden chest. Before going upstairs, in the corner below the stairs.
Curio #12: Frostsprout Twig
Pagoda Realm > Upper Pagoda: From this shrine turn around. Directly across from the shrine, drop down the cliff and you’ll reach the hidden boss “Captain Lotus-Vision“, he drops this.
Curio #13: Maitreya’s Orb
AFTER patch 1.0.8: Valley of Ecstasy > Mindfulness Cliff: from this shrine go forward up the stairs, then on the left side along the path open the small box. (*this is the new location after patch)
BEFORE patch 1.0.8: Valley of Ecstasy > Brook of Bliss: Go up the slope to the right of this shrine. At the top go around the right side, there you will find the “Non-Able” boss, he drops this. (*this is old original location, it was changed with patch and no longer drops from this boss)
Curio #14: Gold Spikeplate
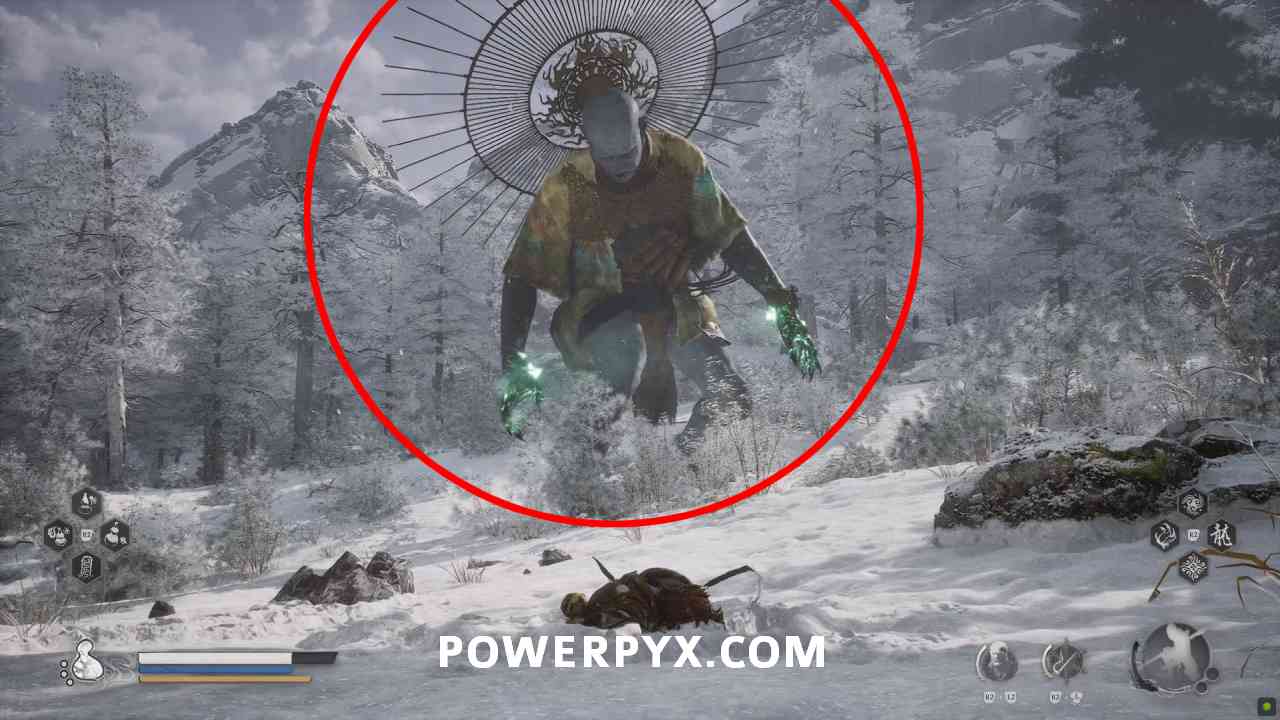
Valley of Ecstasy > Longevity Road: enter the area with the stone statues in front of you, flanking the left side. Then, go down the path on the left with other stone statues, making sure you slightly veer right as you make your way down the path. When you reach the corner of the area there will be a huge giant who drops this. It’s a guaranteed drop by this enemy.
Curio #15: Bronze Buddha Pendant
Valley of Ecstasy > Forest of Felicity: random drop from “Wolf Guardian” enemies. From this shrine, go through the Torii gate in front of you slightly to the left. Follow the path until you reach a big gate, there two wolf enemies in yellow robes jump down. Kill them until they drop this curio. You can rest at shrine to respawn them.

Curio #16: Snow Fox Brush
Reward for completing the Fox questline.
Curio #17: Beast Buddha
Valley of Ecstasy > Towers of Karma: random drop from “Dual-Blade Monk” enemies. Directly in front of the Towers of Karma shrine is an enemy facing a wall that can drop this. Keep farming him until he drops it. Completely random. Another good location is New Thunderclap Temple > Temple Entrance. There’s another one of this kind of enemy in front of the shrine down the stairs. Some have reported that he must not be killed using magic for a higher drop chance, so it’s best to use only standard quick-attacks. Rest at shrine to respawn the enemy and keep killing him until he drops the Curio.

Curio #18: Thunderflame Seal
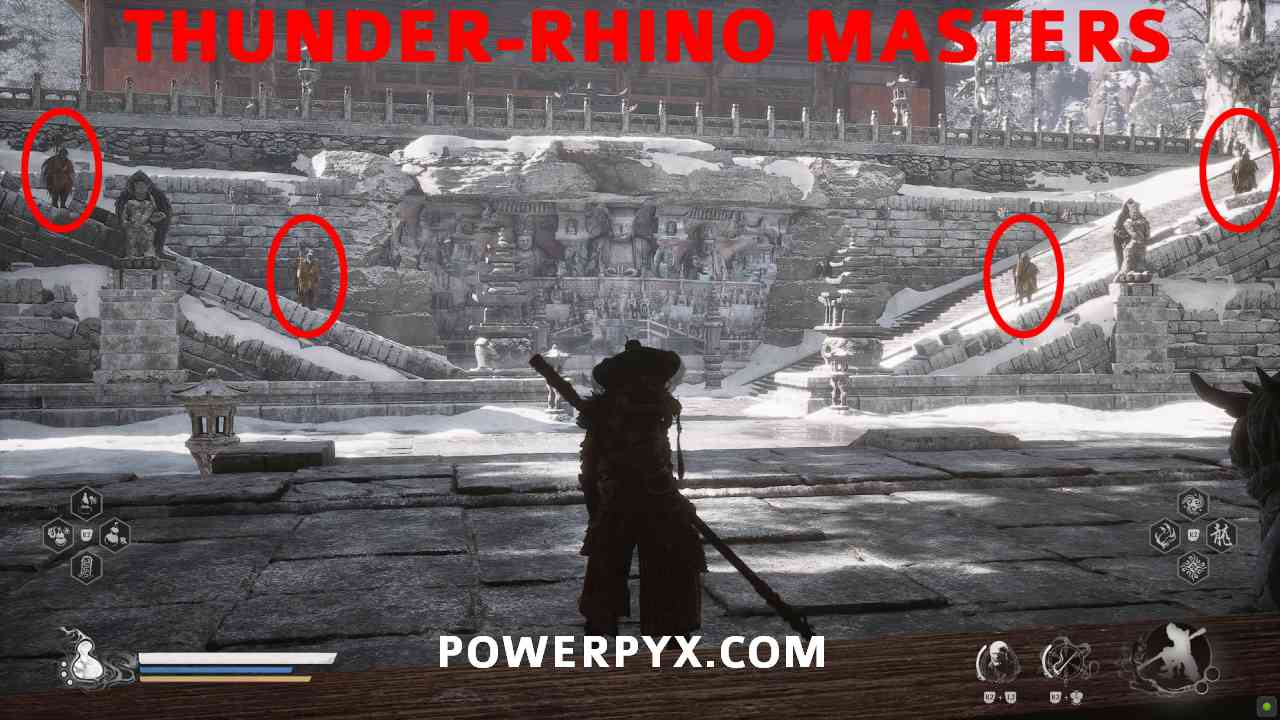
New Thunderclap Temple > Temple Entrance: randomly dropped by “Thunder-Rhino Master” enemies (mages casting lightning). From the shrine, go forward down the stairs and past the dual-blade wielding enemy at the entrance of the temple. When you leave the temple, you’ll see 4 lighting-casting mages on the stairs. You must farm these until one of them drops it. Completely random drop. Rest at shrine to respawn the enemies.
Curio #19: Thunderstone
New Thunderclap Temple > Temple Entrance: From this shrine go forward, through a temple building, then up the stairs in front of you. Then straight ahead enter the next temple building, inside is a small chest that contains this.
Chapter 4: The Webbed Hollow
Curio #20: Cuo Jin-Yin Belt Hook
Webbed Hollow > Upper Hollow: From this shrine turn around and go down the path, at the end is a big gold chest containing this.
Curio #21: Spine in the Sack
Webbed Hollow: Random drop from destructible spider cocoons throughout the Webbed Hollow. You can obtain multiple copies of this Curio. Destroy all cocoons you come across, the ones standing on the floor, not the ones with spider arms slashing out of them.
Curio #22: Golden Carp
Webbed Hollow > Relief of the Fallen Loong: Dropped by boss “Yellow Loong“. This requires the Loong Scales from Chapter 2 AND you must have defeated the other 3 Loong bosses (Chapter 1: The Red Loong, Chapter 2: Black Loong, Chapter 3: Cyan Loong). Then the Yellow Loong will spawn to the right of the “Relief of the Fallen Loong” shrine. To get here, start at Webbed Hollow > Cliff of Oblivion, go down the broken hand and follow the path until you can drop down the left side to a hanging bridge. Go over it to reach a narrow wooden beam with slashing spider cocoons around it. Use Cloudstep to get past the spider cocoons and walk over the wooden beam. At the other end you reach the hidden area “Relief of the Fallen Loong”.
Curio #23: Jade Moon Rabbit
Webbed Hollow > Hut of Immortality: Directly after this shrine you find the “Zhu Bajie” boss, he drops this. You must defeat him twice in a row, after the second encounter you get this (unmissable story-related boss).
Curio #24: Virtuous Bamboo Engraving
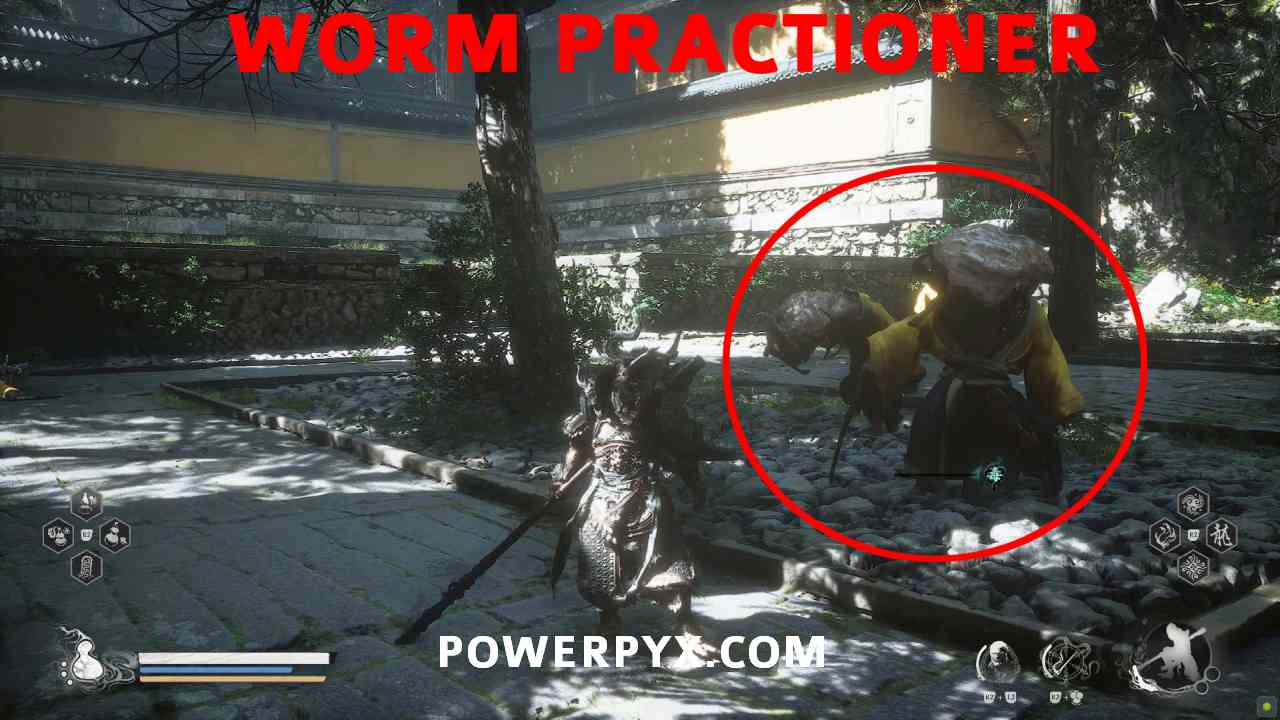
Temple of the Yellow Flower > Temple Entrance: random drop from “Worm Practioner” enemies. From the shrine, go up the stairs, then on the right side go through the gate to reach a courtyard with many worm-head enemies wearing yellow robes (a meditation spot is also here). You must farm these worm-head enemies until one of them drops it. Completely random drop, can rest at shrine to respawn the enemies.
Curio #25: Tablet of the Three Supreme
Temple of the Yellow Flower > Forest of Ferocity: From this shrine go forward and up the stairs, then turn right to find a lot of enemies practicing and behind them will be the “Commander Beetle” boss. You find this in small container behind the Commander Beetle boss.
Curio #26: Tiger Tendon Belt
Temple of the Yellow Flower > Court of Illumination: random drop from “Snake Sheriff” enemies (lions with long neck). From this shrine, turn around 180° and go down the stairs, after the stairs on the left is a Snake Sheriff in a pond. He can drop this Curio, entirely random. Keep resting at shrine to respawn the enemy.

Curio #27: Gold Sun Crow
Secret: Purple Cloud Mountain > Valley of Blooms: From this shrine go over the bridge, follow the path until you see a Tree-Enemy. To the right of this tree enemy go up the hill. Go all the way up and you’ll reach a broken tree on top. Go over the tree trunk, directly after dropping down the tree trunk is a wooden chest that contains this.
Curio #28: Celestial Registry Tablet
Secret: Purple Cloud Mountain > Petalfall Hamlet: Facing the shrine, head right to find a small gazebo with the container with this Curio.
Curio #29: Preservation Orb
Temple of the Yellow Flower > Court of Illumination: from the shrine, turn around 180°, go down the stairs and go straight ahead through the gate on the left and follow the path. Continue until you come back to where you fought the “Venom Daoist” boss that you needed to access the Purple Mountain Cloud secret area. Continue past the boss arena and into the garden. In the back of the garden, near some statues, is the container with this Curio.
Chapter 5: Flaming Mountains
Curio #30: Amber Prayer Beads
Woods of Ember > Height of Ember: After you defeated “Father of Stones” boss (story-related mandatory boss), open the gate, then enter the next cave and take the first exit on the right to find this in a small golden container.
Curio #31: White Seashell Waist Chain
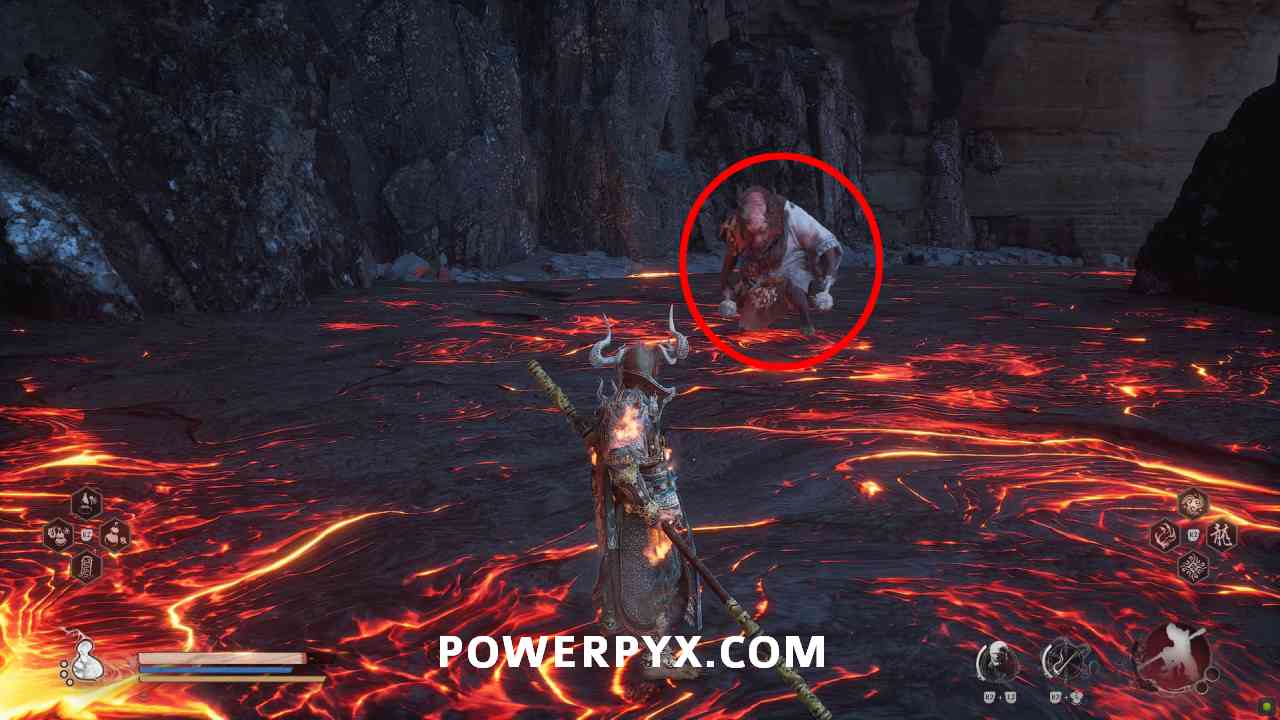
Furnace Valley > Rakshasa Palace: From this shrine go over the lava on the left to the back of the area, there’s a regular enemy dual-wielding mace weapons, defeat him to get this (random drop, if he doesn’t drop it rest at shrine and farm him repeatedly).
Curio #32: Gold Button
Furnace Valley > Rakshasa Palace: From this shrine go upstairs and there will be two huge giants with shields, defeat both of them to get this item.
Curio #33: Flame Orb
Field of Fire > Cooling Slope: finish Five Element Carts questline, then it will drop from the last cart “Rusty-Gold Cart” which is part of the quest.
Curio #34: Daoist’s Basket of Fire and Water
Bishui Cave > Corridor of Fire and Ice: First, see How to Reach Chapter 5 Secret Area. You will unlock this for beating the Chapter 5 Secret Area boss “Bishui Golden-Eyed Beast“. He’s at the end of the secret area.
Chapter 6: Mount Huaguo
Curio #35: Waterward Orb
Foothills > Verdant Path: Dropped by the boss “Jiao Loong of Waves“. After you unlock the spell to fly on a cloud, immediately fly down into the lake below the location where you spawn after the cutscene. The boss spawns in the middle of the lake.
Curio #36: Celestial Birthstone Fragment
Foothills > Verdant Path: Dropped by the boss “Lang-Baw-Baw“. After you unlock the spell to fly on a cloud, fly down to the big lake in the lower area. Then fly to the back right corner (the corner closest to the cliff where you started, not the corner at other end of lake). This frog boss will spawn there. Looks like a brown area in corner of the lake. Dismount from the cloud to see the boss.
DLC Items
Curio #37: Wind Chime
DLC Item from Digital Deluxe Edition. Not needed for the trophy.
For more guides check out the Black Myth Wukong Wiki.
Glaive says
There’s a curio called Bronze Buddha Pendant dropped by an enemy in a yellow robe near the stairs before you get to Luojia Fragrant Vine #6 in Bitter Lake > North Shore Chapter 3.
Mike says
Some do drop from enemies by the way. No idea if those are needed for a trophy
Gold Spikeplate drops from enemies (can’t remember which)
Beast Buddha: drops from the enemies with the dual blade monk I believe their name is. Also a good location to farm mind core.
Good Location: the new west -> valley of Ecstasy -> Towers of Karma. To the left of the shrine.
ThiophenSJ says
The curio tiger tendon belt was dropped by the tiger snake enemy. Good place of farming is in chapter 4, temple of the yellow flower, last altar before the final boss. Turn around, go through the door (there are 2 yellow robbed enemies), left in a pond is the tiger.
Also in chapter 4 is the (green) preservation orb. It is in a small chest behind the big tree next to the place where you fought the venom daoist the second time. It was not there initially, but it was there during my clean-up run during chapter 6.
CrayzdLion says
I am curious to know if anyone can tell me if the max amount of most curious is because going into ng++, I have found what I can, but some aren’t dropping anymore. Is the max 3 each, or is my rng just terrible now?
Tm says
I can confirm that 31: White Seashell Waist Chain also dropes from the same enemy but with one sword.
I think they can drop from any of that enemy type.
Donlino65 says
Got all 36 items but no trophy. Anyone else run into this?
Hrothgar says
Me too, you got it now?
Ant says
Yeah didn’t pop for me either and I have duplicates.
hottosossu says
Same here. Even got duplicates and the trophy didn’t pop.
PowerPyx says
Last patch seems to have changed the location of Maitreya’s Orb.
Before it was dropped by Non-Able boss (can see it in my video of this boss that he drops it at end).
It’s now found in a chest instead. Weird thing for the devs to change.
Updated it in guide with both locations for each patch. In case they change it back again in future we have both locations here.
Akira says
For the White Seashell Waist Chain, a better farm area is Flaming Mountains > Secret Bishui Cave > Cave Depths. There are many “bull-like” enemies near this shrine. ^w^
iTeADp says
Whatever you do, do not use the armor or curio that increases the change to get items from enemies, i used it for 30 min and got nothing, switched it and instantly got the drop, went to the next location, first try too… i did the other location the whole day, so either i got really lucky right after (literally both first try) switching that