
This guide shows 37 Points of Interest Locations for the Alaska region in Rainbow Six Extraction. Points of interest are basically the Collectibles in the game. They are unique environmental locations that can be interacted with that give a voice line of background info about the game lore. Interacting with them provides no gameplay benefit or reward but is required for the following 3 trophies and achievements:
- Curiouser
 – Interact with a Point of Interest
 - Fieldwork – Interact with 5 Points of Interest in Each Region
- Encyclopedia
 – Interact with 100 Points of Interest
 – Interact with a Point of Interest
 – Interact with 100 Points of Interest
YOU MUST BE PLAYING SOLO TO INTERACT WITH POINTS OF INTEREST! Currently, the game is set up so the prompt does not appear when playing with other people, only when playing solo does the interact prompt appear.
You cannot track in-game how many total Points of Interest you have interacted with, nor can you actually know what the Points of Interest are until you are standing directly beside one and can see the interact prompt for them.
They are normally unique locations in the environment, such as Archaean structures, REACT equipment, or posters on walls typically within the airlocks between areas. They will never be on destructible walls or items, so if you are looking for any on your own you can avoid looking for them in spots like those.
This guide lists them in the order the areas are in the Incursion menu. The sub-zone you start in within the areas is random, so you aren’t guaranteed to start in the same location as the order of this list, so you will need to check for where you are starting and then follow the locations from there.
Note: There may be additional Points of Interest, but this guide and the other region’s guides include over 100 total which is enough to earn all 3 trophies tied to them and there’s no benefit in getting additional ones.
Points of Interest in other Regions:
Eurydice Valley
1 – Missile Silo – Southmost hallway, cart along the south wall.
 |
 |
2 – Missile Silo – Central round room, empty space in the center (when standing on second floor looking towards the center of the room).
 |
 |
3 – Missile Silo – Northmost room, large tank in the center of the room lit up with red/orange light.
 |
 |
4 – Missle Silo – Central square room (directly underneath Extraction point), red mechanical arms in the center of the room.
 |
 |
5 – Airlock between Missile Silo and Eurydice Farm – Plants in glass cabinets on north side of the room.
 |
 |
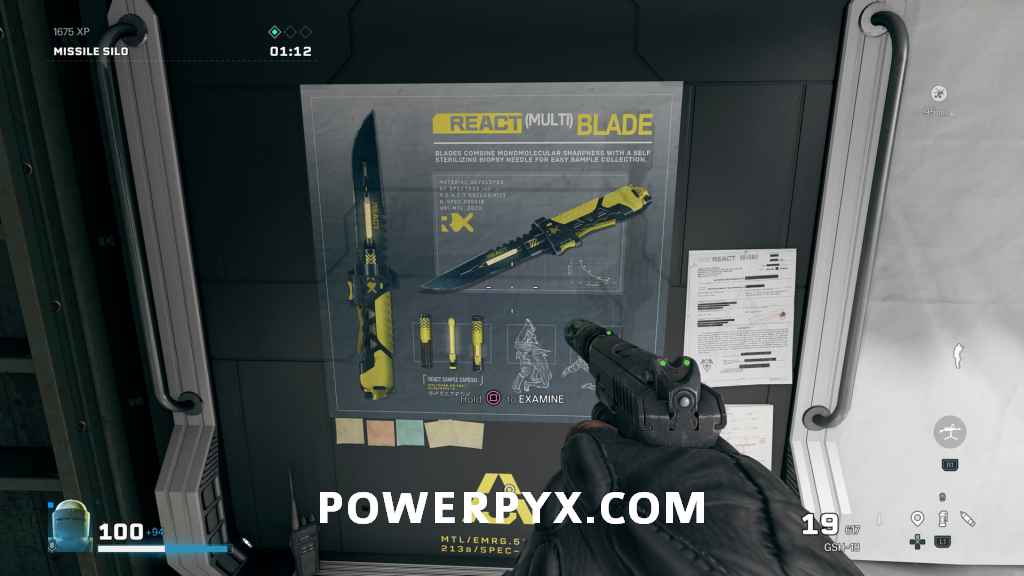
6 – Airlock between Missile Silo and Eurydice Farm – REACT Knife poster on west wall.
 |
 |
7 – Eurydice Farm – Northern farm building, schematics on desk on lower floor.
 |
 |
8 – Eurydice Farm – Eastern building, distilling equipment in center of room.
 |
 |
9 – Eurydice Farm – Central structure, up the stairs and then looking at the electronic devices on the southeast corner.
 |
 |
10 – Eurydice Farm – Eastern edge of the area, looking out the chain link fence.
 |
 |
11 – Airlock between Eurydice Farm and Eurydice Commons – White canisters on west side of room.
 |
 |
12 – Eurydice Commons – Southeastern room, shiny machinery under white machinery with REACT on it.
 |
 |
13 – Eurydice Commons – Large room on the west side, interact with the center of the raised platform.
 |
 |
14 – Eurydice Commons – Circular room on the west side, the items on the white desk.
 |
 |
Orpheus Research Center
15 – Observatory – Extraction point, looking at the fence to the south.
 |
 |
16 – Observatory – Large observation room, top floor looking towards the structure in the middle from the southwest side.
 |
 |
17 – Observatory – Easternmost hallway, looking at containers on the ground.
 |
 |
18 – Airlock between Observatory and Mission Control – Scissorlift in the southwest corner of the area.
 |
 |
19 – Mission Control – Northwest corner, look towards the window with the goo ball outside it.
 |
 |
20 – Mission Control – Central rectangular room, look up towards the large globe hanging in the center of the room.
 |
 |
21 – Mission Control – Southern room lower floor, the Archaean spike in the middle of the area.
 |
 |
22 – Airlock between Mission Control and Employee Quarters – Rooter diagram on east wall.
 |
 |
23 – Employee Quarters – Westmost room, telescope looking out the windows.
 |
 |
24 – Employee Quarters – Large central room, large structure with goo on it right in the middle of the room.
 |
 |
25 – Employee Quarters – Large central room, diagram of REACT tracker gun on west wall.
 |
 |
26 – Employee Quarters – Eastern entertainment room, the large Rabbid mosaic on the wall.
 |
 |
27 – Employee Quarters – Northeastern corner room, space underneath the vehicle on the lift.
 |
 |
Nome
28 – Gold Dredge – Southeastern area, REACT tents along south side.
 |
 |
29 – Gold Dredge – Northern building, south side of upper floor, inspect the levers near the open window.
 |
 |
30 – Airlock between Gold Dredge and City Docks – Documents on the north wall.
 |
 |
31 – Airlock between Gold Dredge and City Docks – White machine on the north wall.
 |
 |
32 – City Docks – Western room, inspect white machine with the yellow tube coming out of the top.
 |
 |
33 – City Docks – Western room (same as above), body bags in middle of the floor.
 |
 |
34 – City Docks – Central area, look out the fence at the very north side.
 |
 |
35 – Airlock between City Docks and Nome Cannery – Documents on the east wall.
 |
 |
36 – Nome Cannery – Northwestern corner, look out the barrier towards the wind turbines.
 |
 |
37 – Nome Cannery – Southeastern corner, look at the Archaean structure breaking through the wall.
 |
 |
For all other regions, check out the full Rainbow Six Extraction Points of Interest Guide.
Leave a Reply